Exploring Divi 5’s New Payment Button Module
Divi 5‘s Payment Button Module lets you accept payments through PayPal or Stripe without setting up a full online store. Add the module to your page, connect your payment resource, and style the button in the Visual Builder. Visitors then complete their payment through the provider’s checkout.
The module works independently of WooCommerce. It does not add a cart, manage inventory, or create WooCommerce order records. For donations, a single service, or a straightforward paid offer, that can be a useful alternative to building a storefront. Booking, ticket management, and digital delivery still need their own arrangements.
In this post, we’ll explore the Payment Button Module, configure both payment providers, style a button for a service offer, and test the checkout process. You’ll also find downloadable layouts for the examples shown throughout the post.
What Is The Payment Button Module In Divi 5?
The Payment Button is a native Divi 5 module that sends visitors to PayPal or Stripe to complete a payment. You choose the provider and payment resource in the module, then configure the remaining checkout details according to the provider you use.
For PayPal, settings such as the amount, currency, and return pages are configured in Divi. For Stripe, those details are managed through a Payment Link created in your Stripe dashboard.
Divi handles the button’s appearance and the handoff to checkout. The payment provider processes the transaction and manages its payment records.
The module offers a simple way to collect payments without adding a full e-commerce system to WordPress. It does not create a product catalog, track stock, calculate shipping, or manage fulfillment. If your site needs those features, a store solution such as WooCommerce is a better fit.
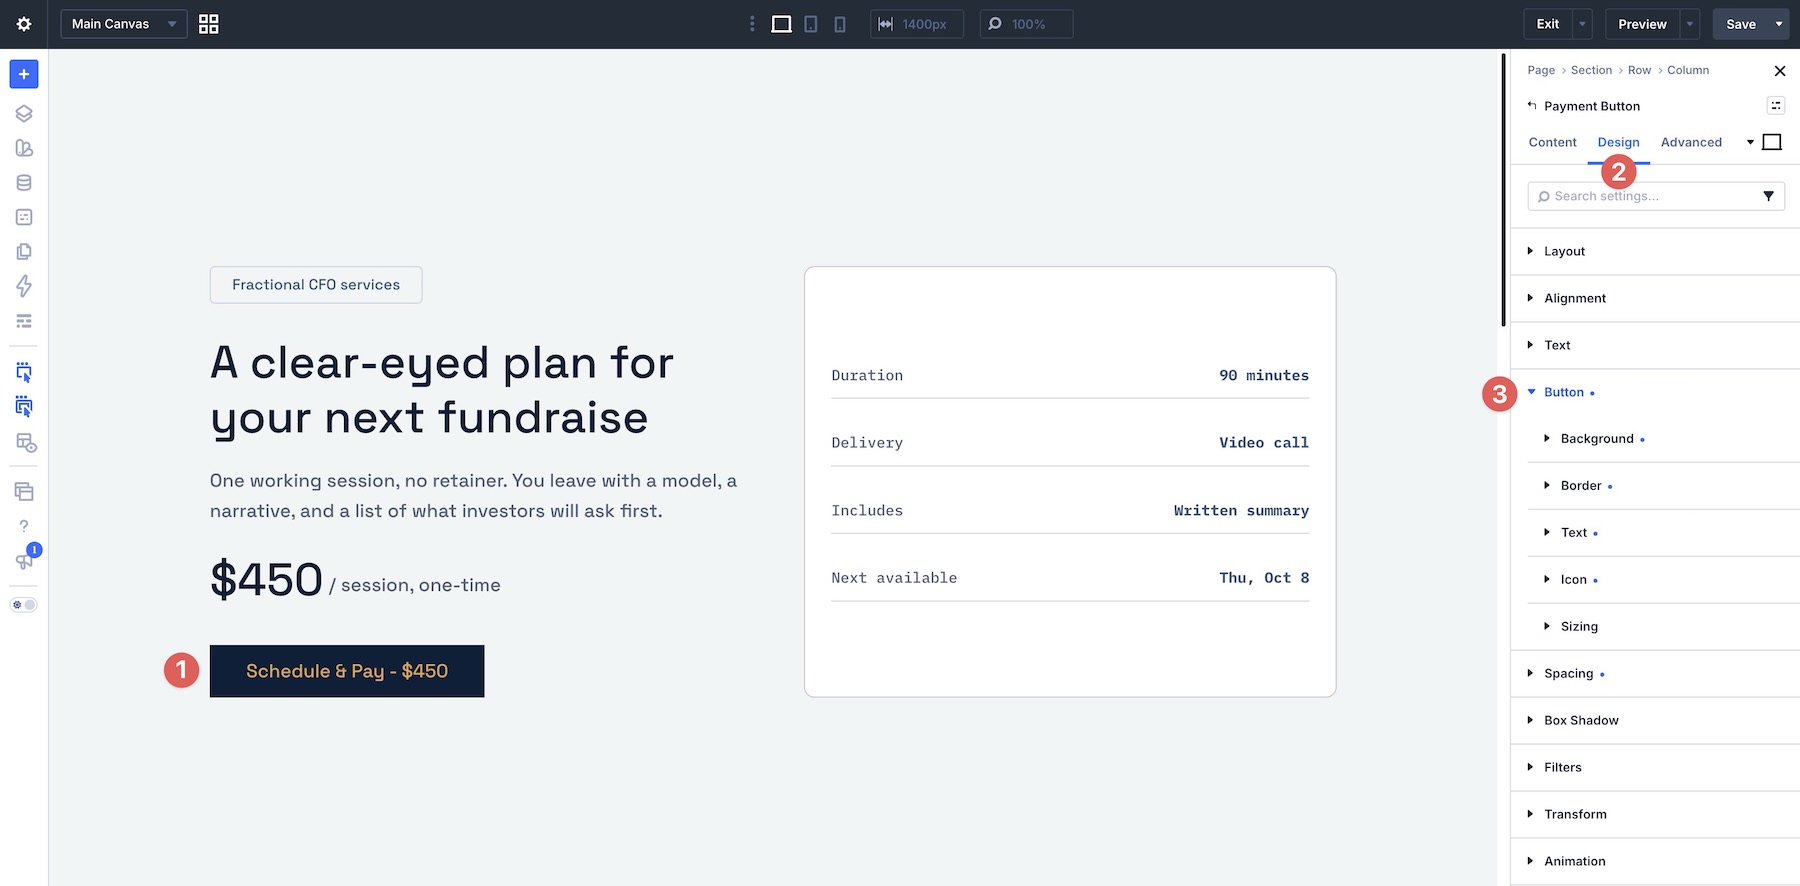
Visually, the Payment Button uses familiar button design controls. You can adjust its typography, colors, spacing, border, and icon to match the rest of your site. Compatible Button Option Group Presets can help you reuse existing styling.
What The Payment Button Module Does
The module connects a button on your page to a payment checkout. How much of the configuration happens inside Divi depends on the provider.
For PayPal, select a fixed amount or let visitors enter their own amount. Choose the currency and add a description that identifies the payment.
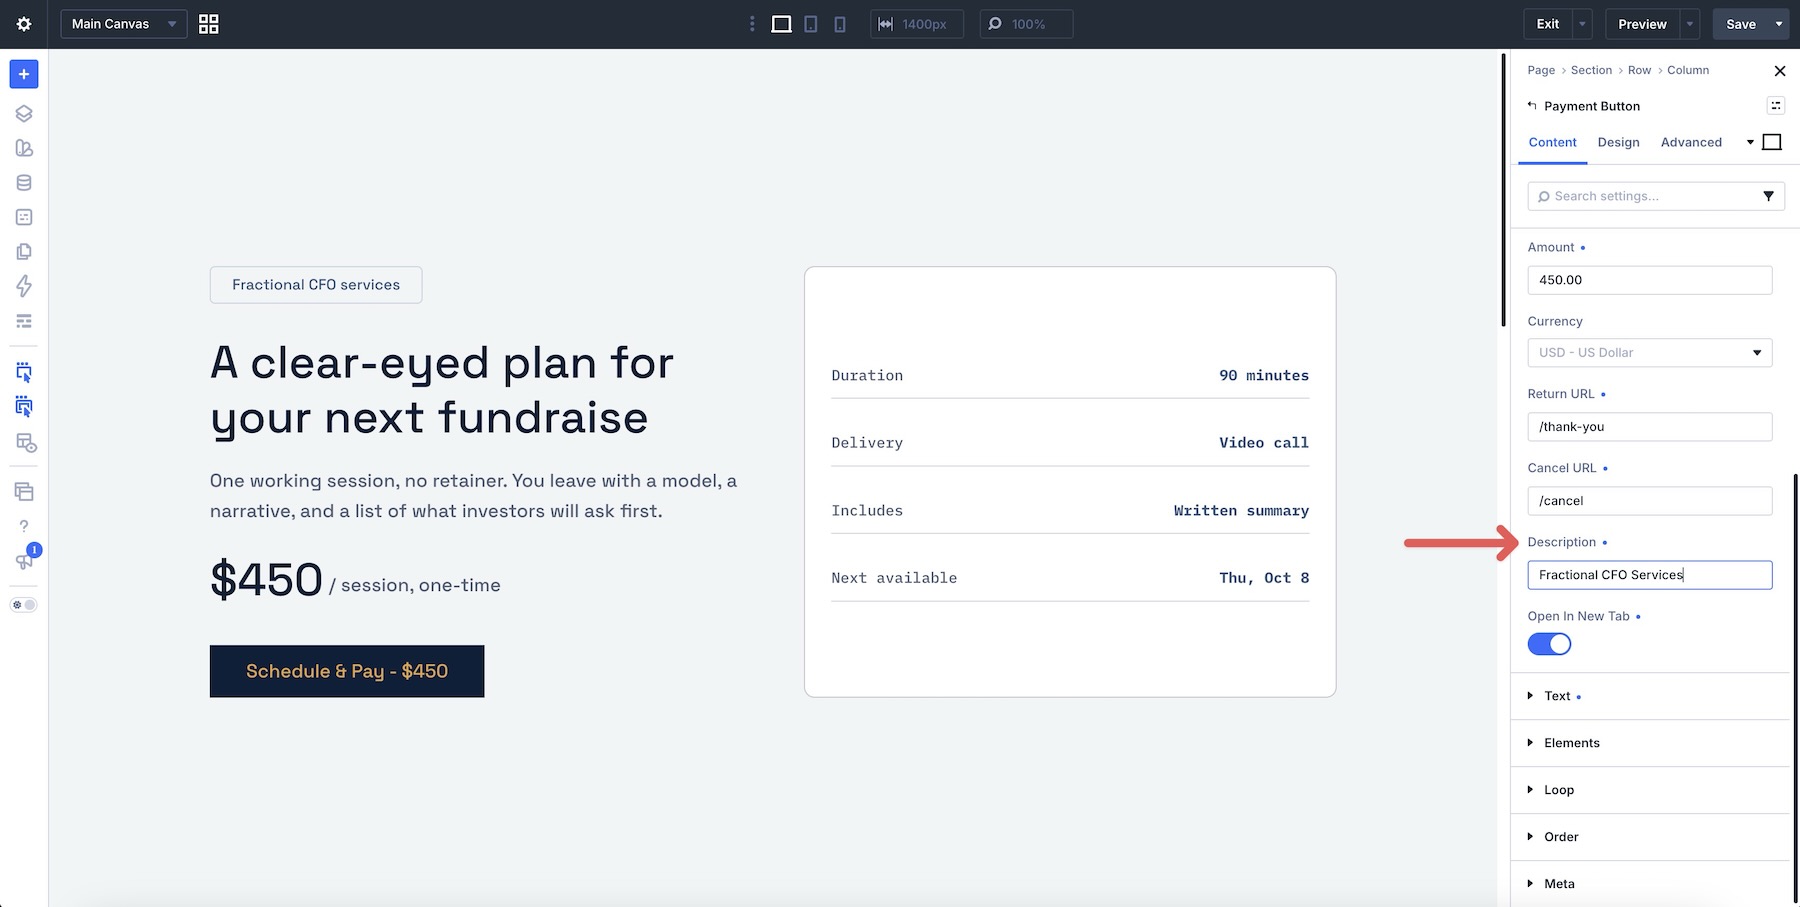
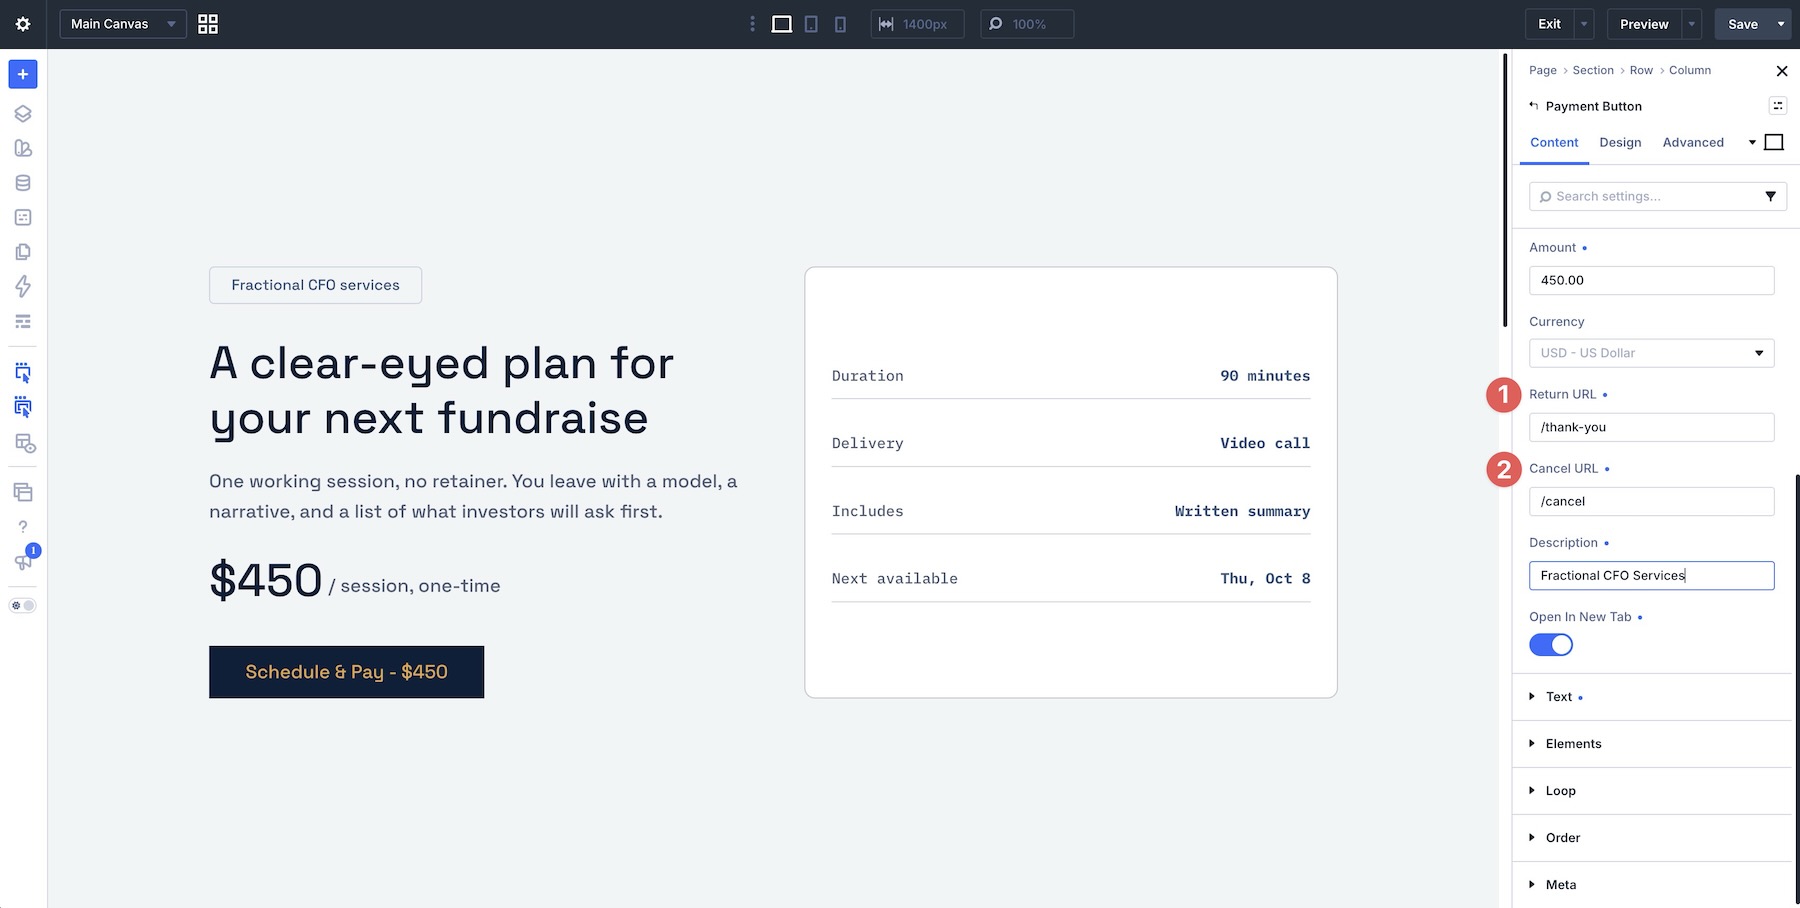
The PayPal settings also include a Return URL and a Cancel URL. These specify where visitors should go after completing or canceling checkout. You can also choose whether checkout opens in a new tab.
Use Sandbox in the Environment field while testing with PayPal sandbox accounts. When you are ready to accept payments, select your live account resource and switch the environment to Live.
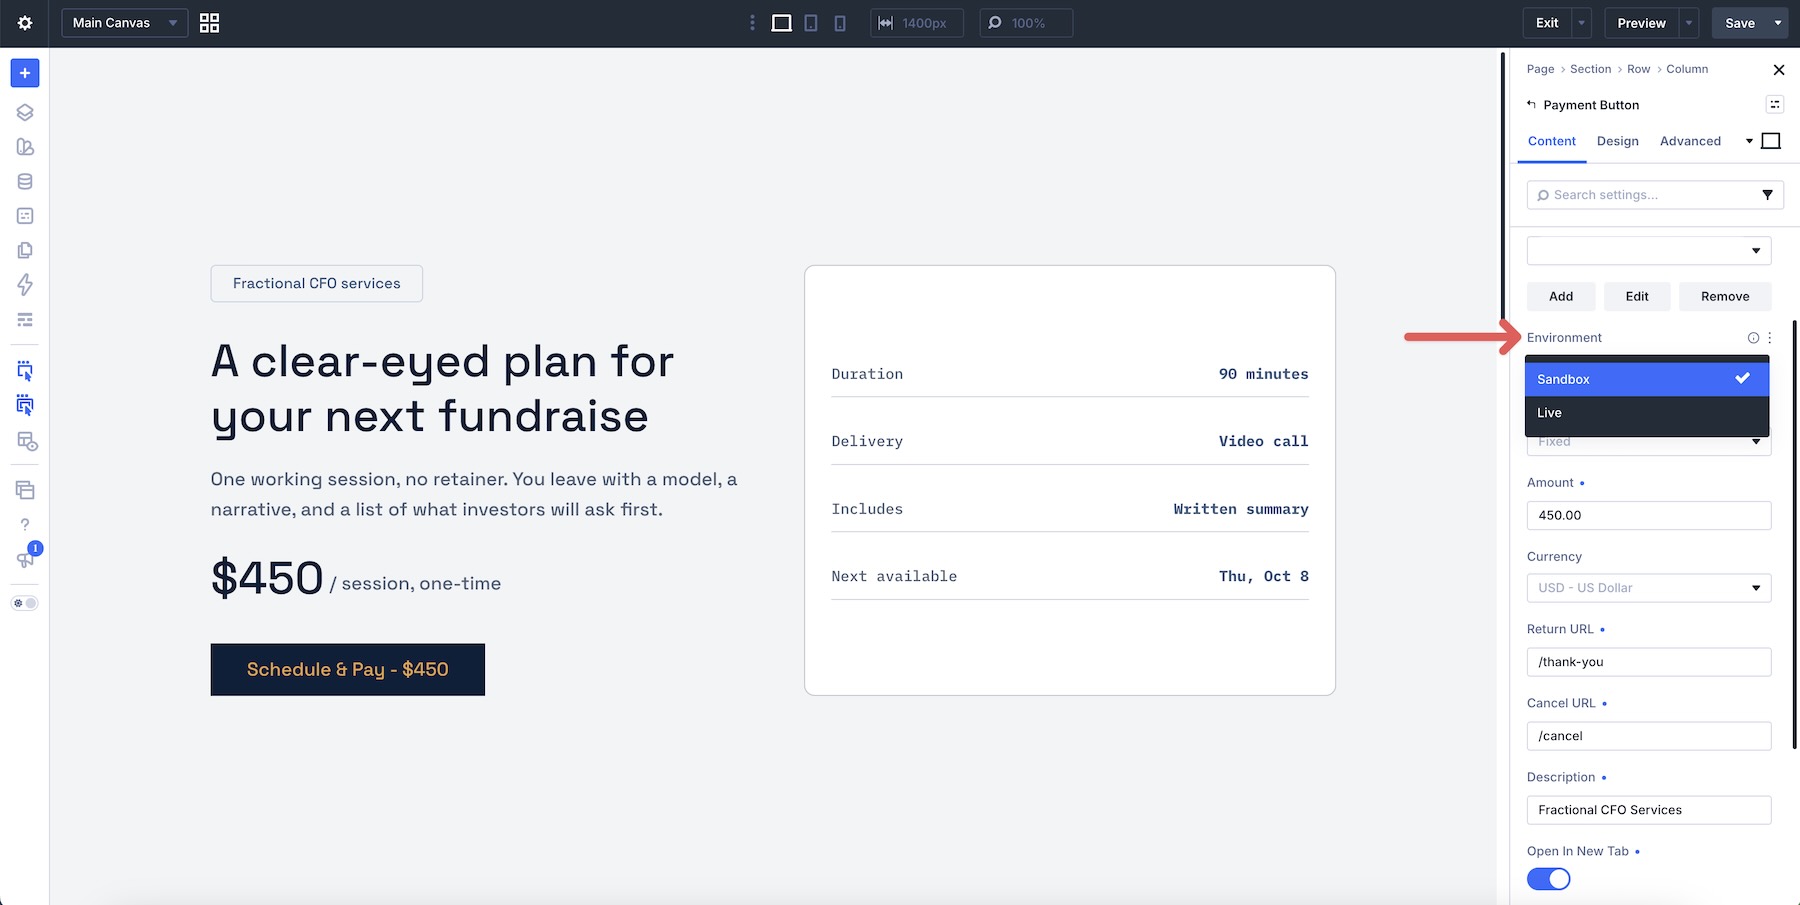
Stripe’s configuration happens primarily in its dashboard. Create a product and a Payment Link, then add that link to Divi. The Payment Link determines the price, currency, and what visitors see after checkout.
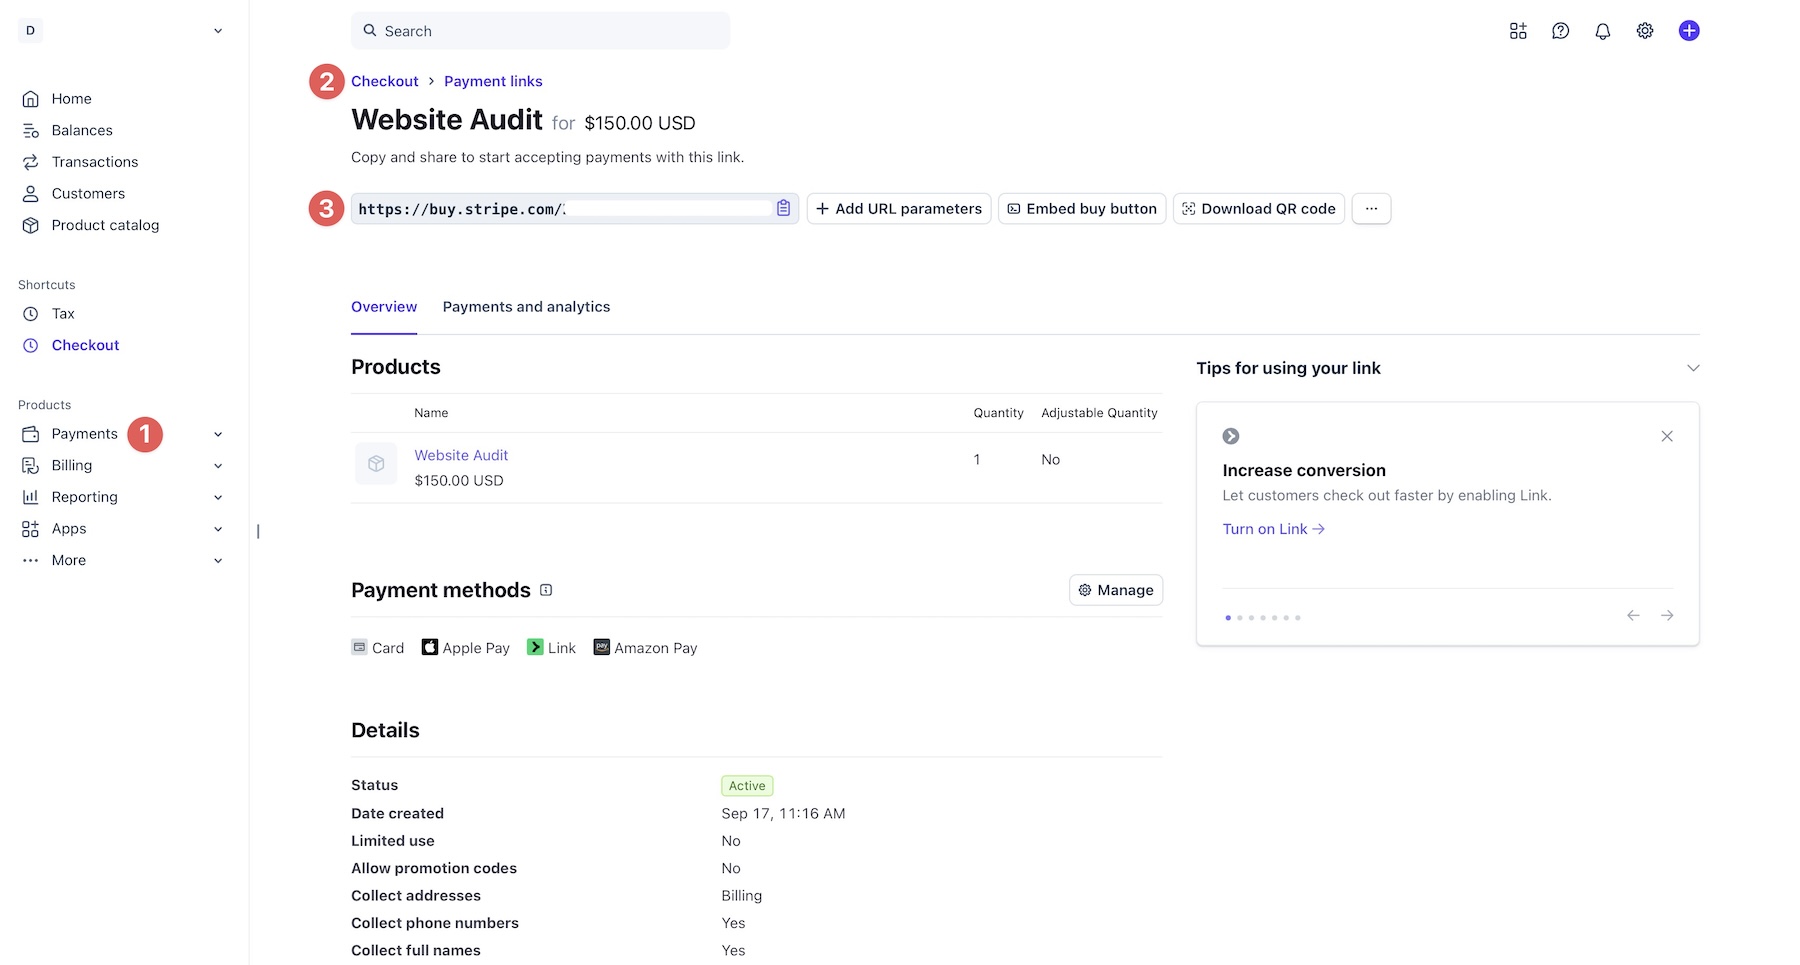
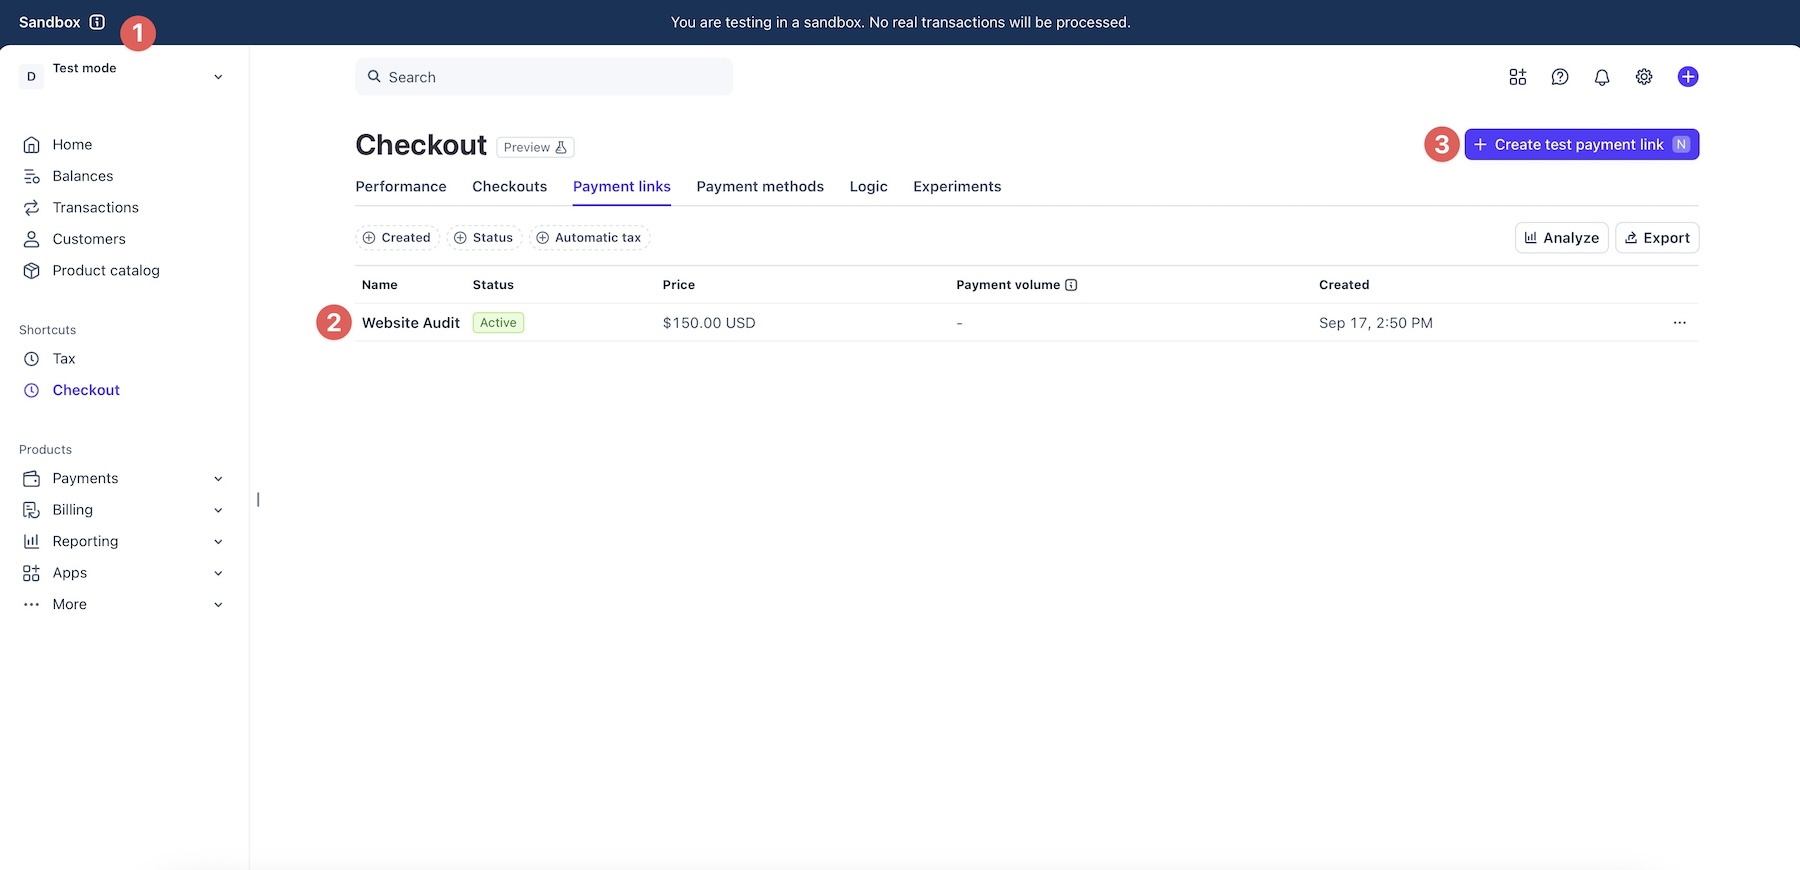
For Stripe, testing depends on using a Payment Link created in a Stripe testing environment. Changing a setting in Divi does not turn a live Stripe Payment Link into a test link.
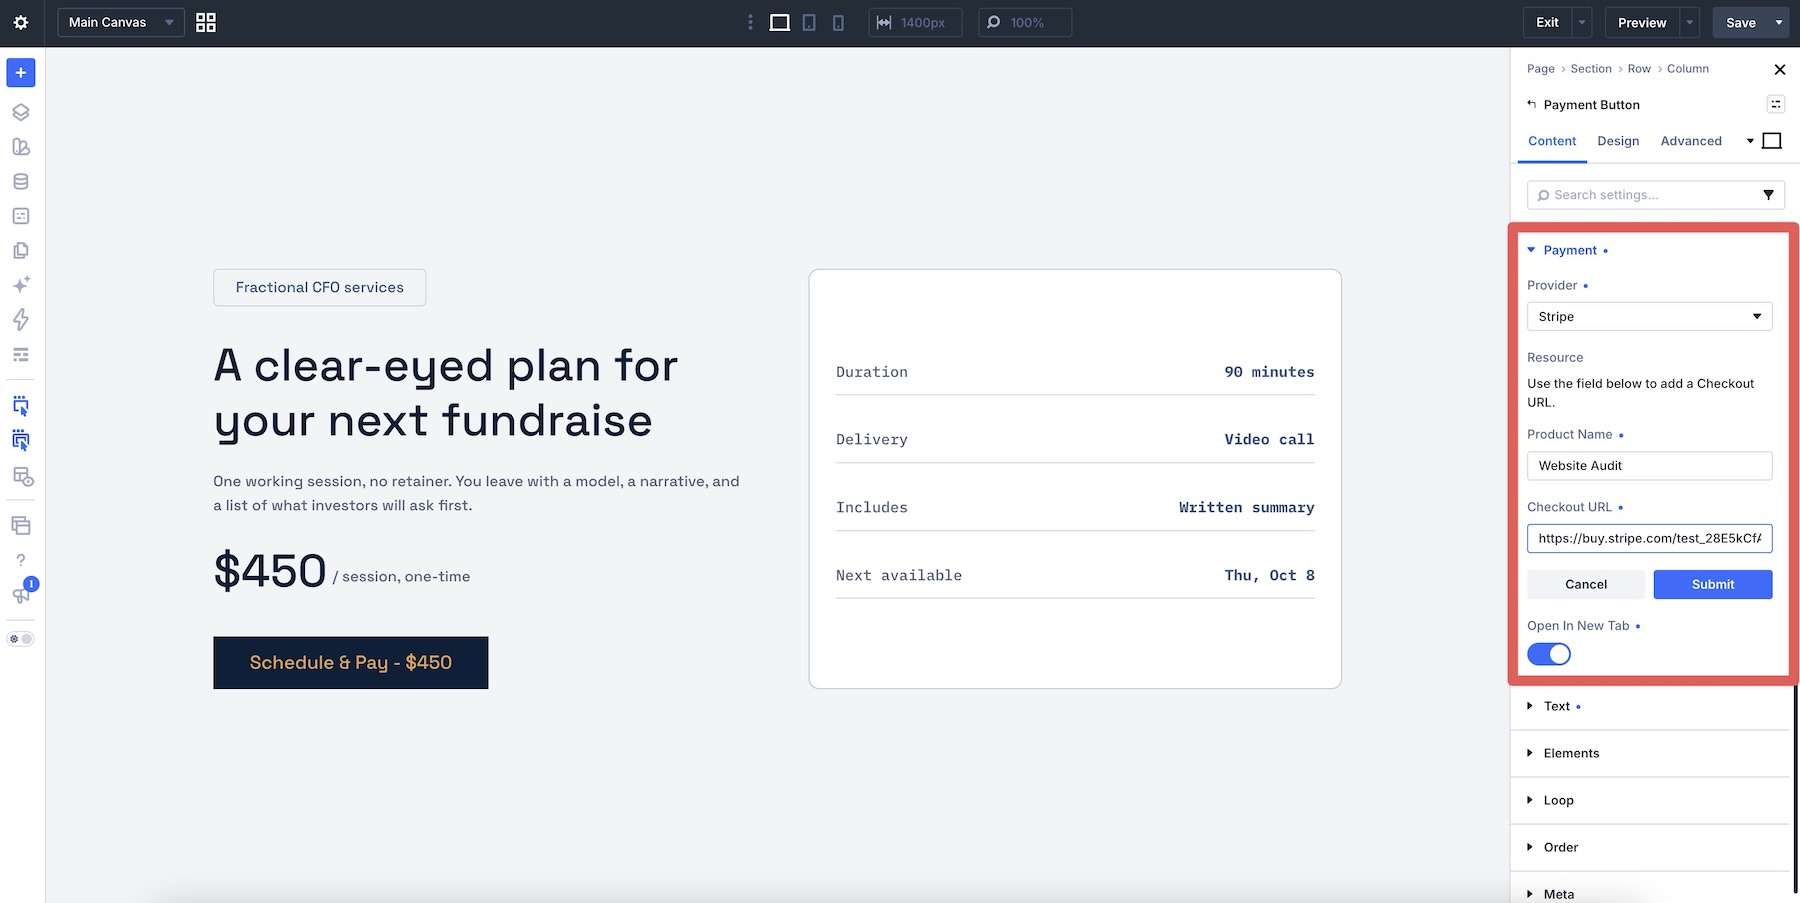
In the module, select Stripe and save the Payment Link as a resource. Divi sends visitors to that URL, and Stripe handles checkout.
With either provider, you manage the button’s design in Divi and the transaction in the provider’s dashboard. Available payment methods and receipt settings depend on your provider configuration.
What The Payment Button Module Doesn’t Do
The Payment Button Module is different from the Woo Checkout Payment Module. The latter works within WooCommerce checkout, while the Payment Button operates independently of WooCommerce.
It also does not embed a credit card form into your Divi page. Visitors complete checkout with PayPal or Stripe, and you manage transactions, refunds, disputes, and payouts through that provider.
The module does not automatically deliver files, reserve appointments, issue tickets, or restrict access to paid content. Those tasks require a separate workflow. A return to a thank-you page should not be treated as proof of payment on its own.
Typical Use Cases
The Payment Button is useful when a page presents a clear offer and needs a direct route to checkout. The following layouts show how that can work for donations, services, events, and digital products.
Donations And Fundraising Pages
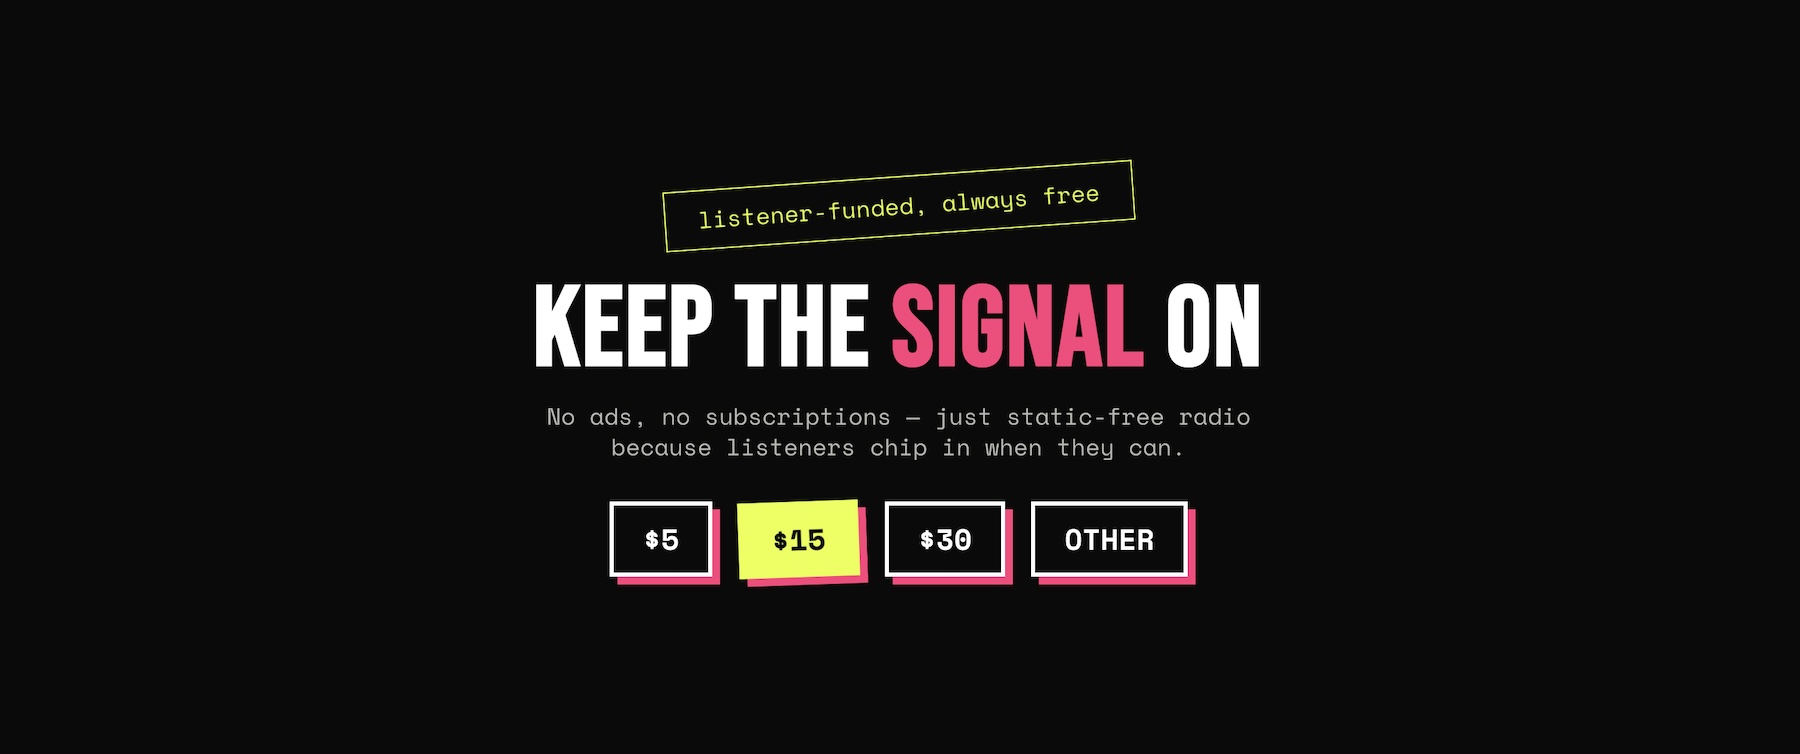
A listener-funded radio station may need a donation page rather than a store. This layout explains the campaign and presents several suggested amounts.
The first three buttons represent fixed donations. A fourth lets visitors choose their own amount. With PayPal, use the module’s User Defined amount mode. With Stripe, configure a suitable customer-chosen amount Payment Link in Stripe.
Visitors choose an amount and continue to the provider’s checkout without browsing a product catalog on your site.
Single Services Or Consultations
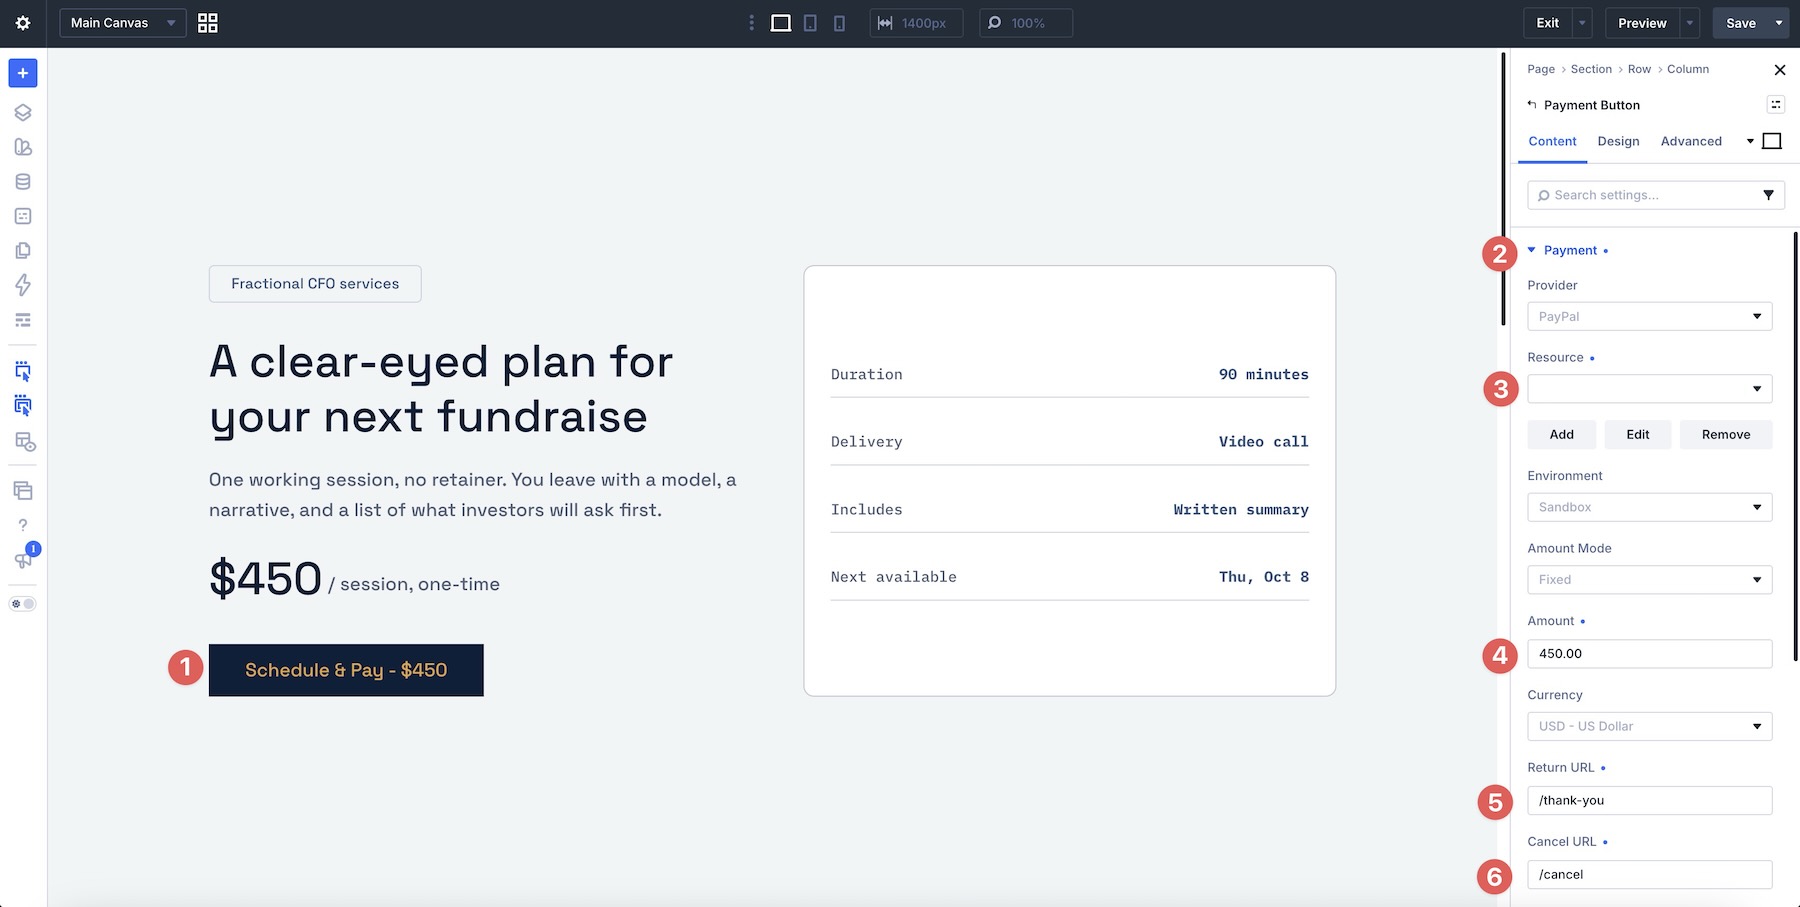
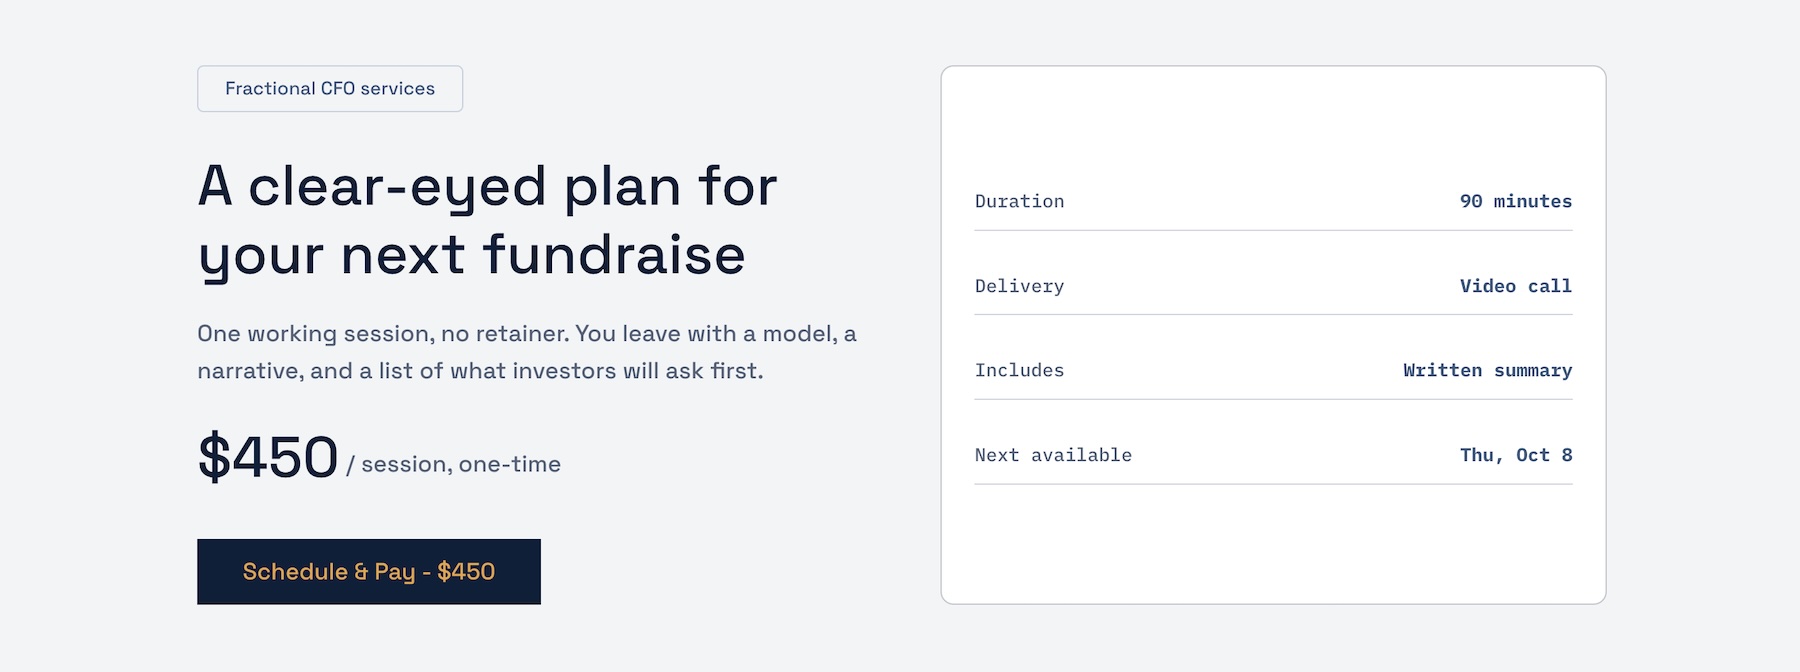
A fractional CFO offering a single working session can use a focused service page. The page explains what is included, how much it costs, and what happens after payment.
Here, the offer is $450 for a 90-minute video call and a written summary. The Payment Button sits beneath the price, with a label that matches the offer. After checkout, the thank-you page can explain how to book the session.
The button collects payment; your booking process manages availability and scheduling. This pattern also works for audits, consultations, and other clearly defined services.
Event Tickets Or Simple Single-Item Offers
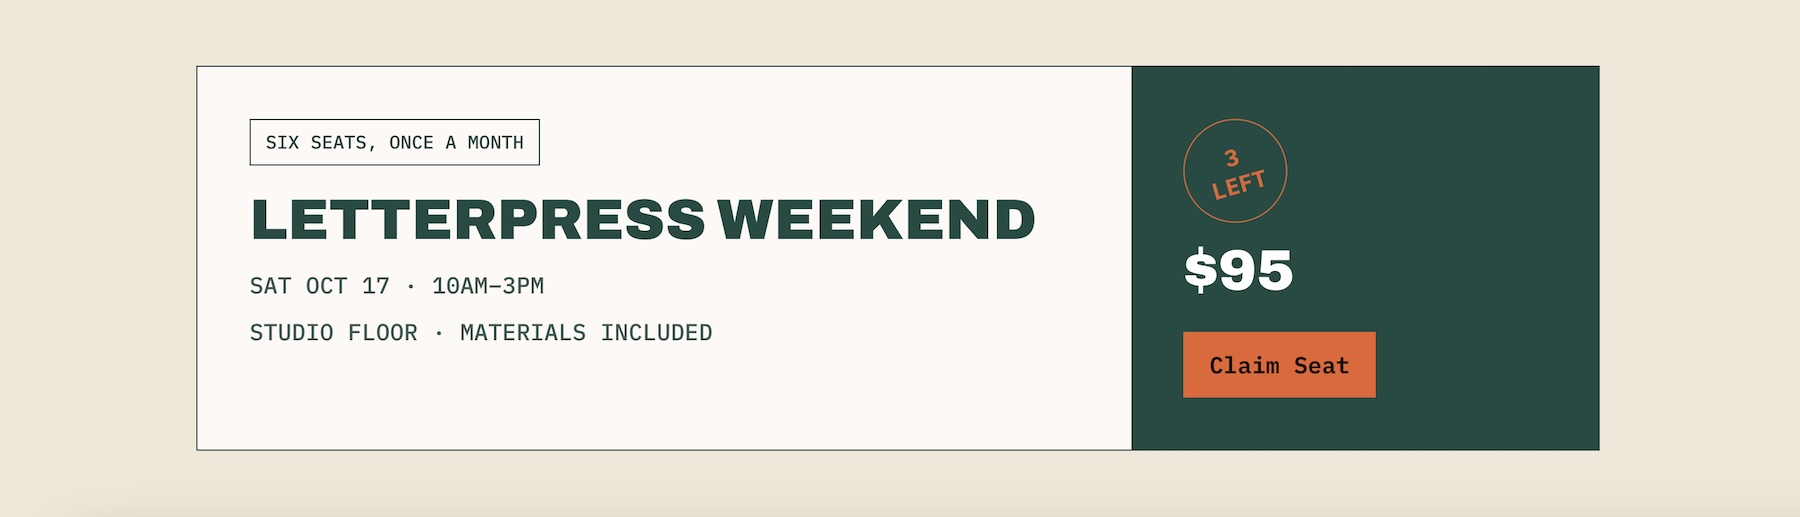
A letterpress workshop can present its date, price, and registration details in a compact banner. This example places the event information on the left and a Payment Button on the right, sending visitors to checkout for a $95 payment.
For an event with only six seats, availability needs separate handling from the start. The Payment Button does not count seats or prevent overselling. Use a booking or ticketing system, or an appropriate provider-side purchase limit, when capacity must be enforced.
The layout still works well as the public-facing offer, provided the payment and registration workflow supports the event’s requirements.
Digital Product Landing Pages
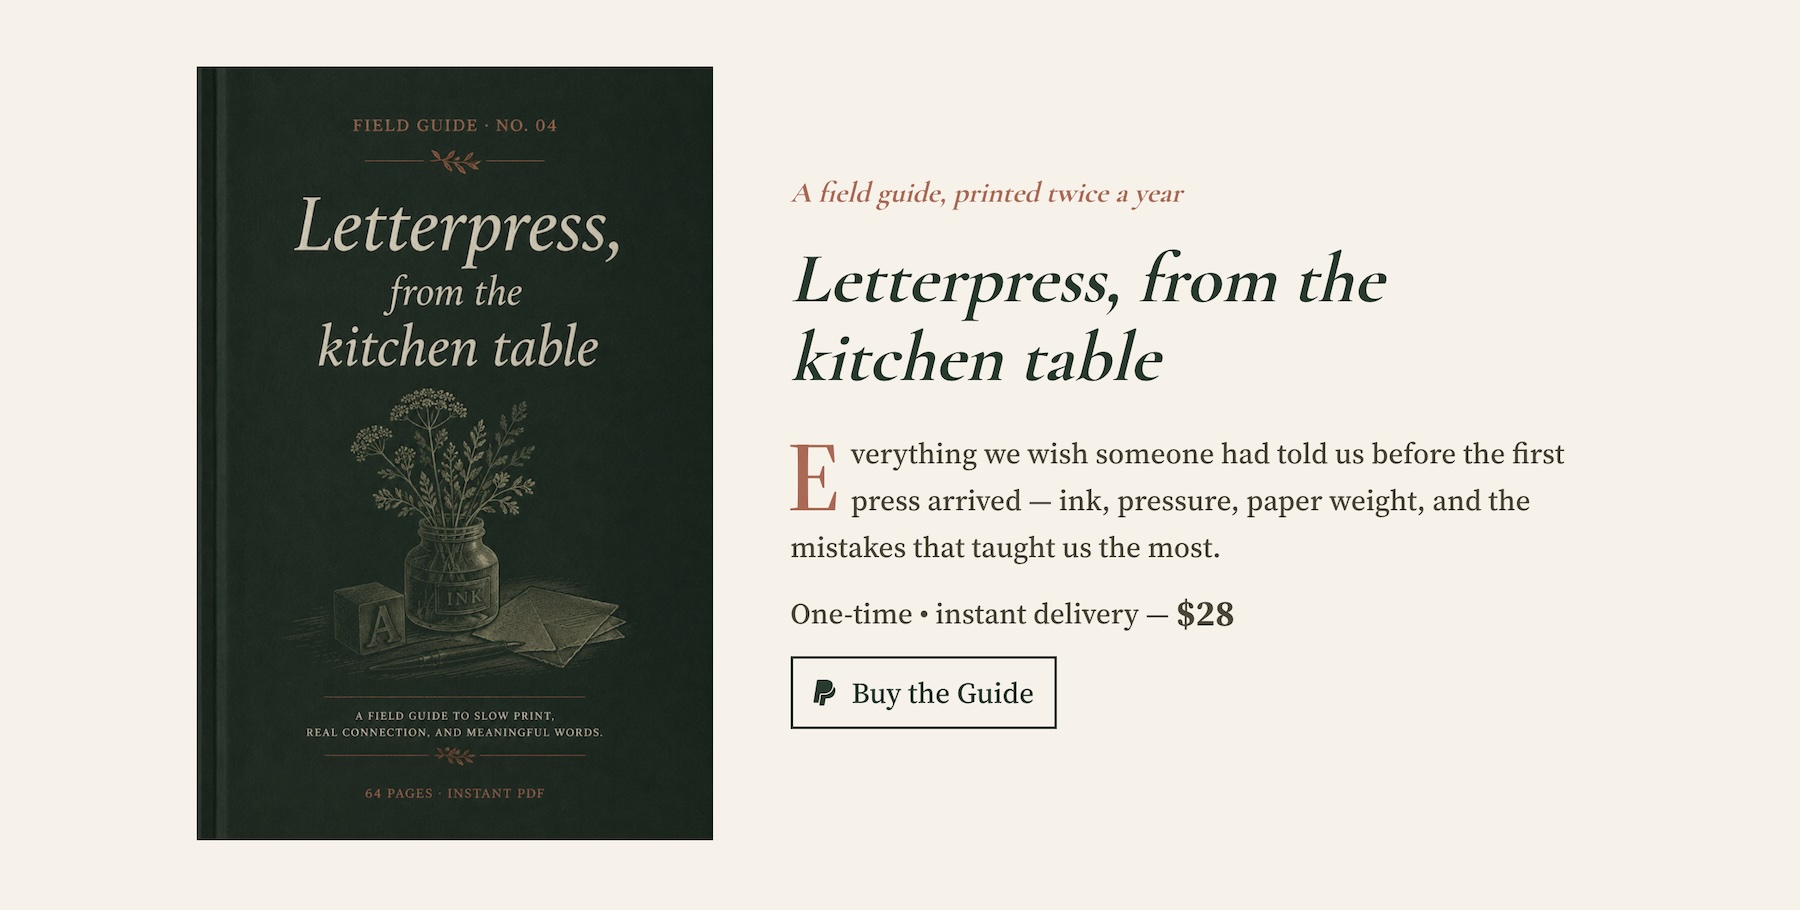
A $28 PDF field guide can have a simple landing page: show the cover, explain what is inside, list the price, and add a Payment Button.
Digital delivery needs its own setup. Your thank-you page can explain how buyers receive the file, while a separate fulfillment process sends or grants access after payment is confirmed. A publicly accessible thank-you page does not protect a download by itself.
If the offer grows into a catalog with customer accounts and managed downloads, a dedicated e-commerce solution may become more suitable.
Prerequisites Before You Build
The Payment Button Module was introduced in Divi 5.11. Update to the latest available Divi 5 release before following the tutorial.
You’ll also need the payment resource for your chosen provider: a PayPal business account email or a Stripe Payment Link. Each button uses one provider and one selected resource.
Prepare the pages your checkout process needs:
- Offer Page: The page containing your service, product, or donation information and the Payment Button.
- Thank-You Page: For PayPal, use this as the module’s Return URL. For Stripe, configure it as the Payment Link’s after-payment redirect if you want buyers returned to your site.
- Cancel Page: For PayPal, set the module’s Cancel URL to an appropriate page, such as the original offer or a short “try again” page.
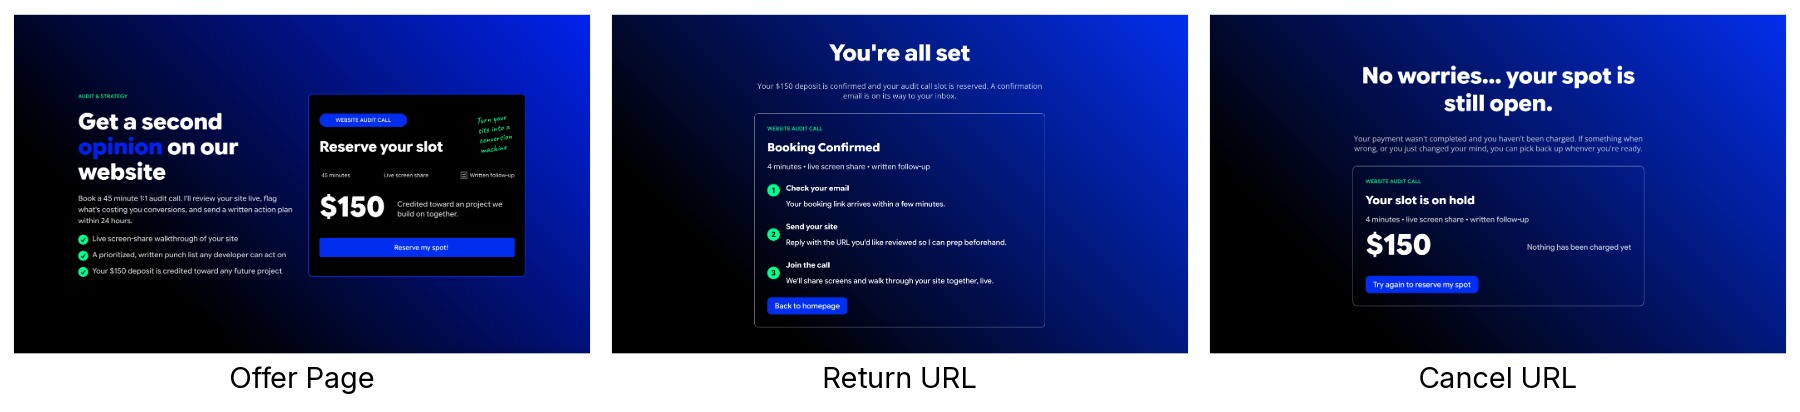
Start with test resources. PayPal testing uses a sandbox business account for the seller and a sandbox personal account for the buyer. Stripe testing uses a Payment Link created in its sandbox or test environment.
Finally, confirm that the module suits the project. It does not provide a WordPress cart, inventory system, or order-management workflow. Stripe may offer additional checkout options through its Payment Links, but those remain provider-side features rather than store functionality added by Divi.
How To Use The Payment Button Module
The layout below promotes a one-time $150 website audit, with the offer on the left and a payment card on the right.
We’ll focus on configuring the Payment Button rather than rebuilding the entire section. We’ll cover PayPal’s settings first, then connect Stripe through a Payment Link, style the button, and test the completed checkout.
For PayPal, the fixed amount is entered in Divi. For Stripe, the $150 price is set on the product and Payment Link in Stripe.
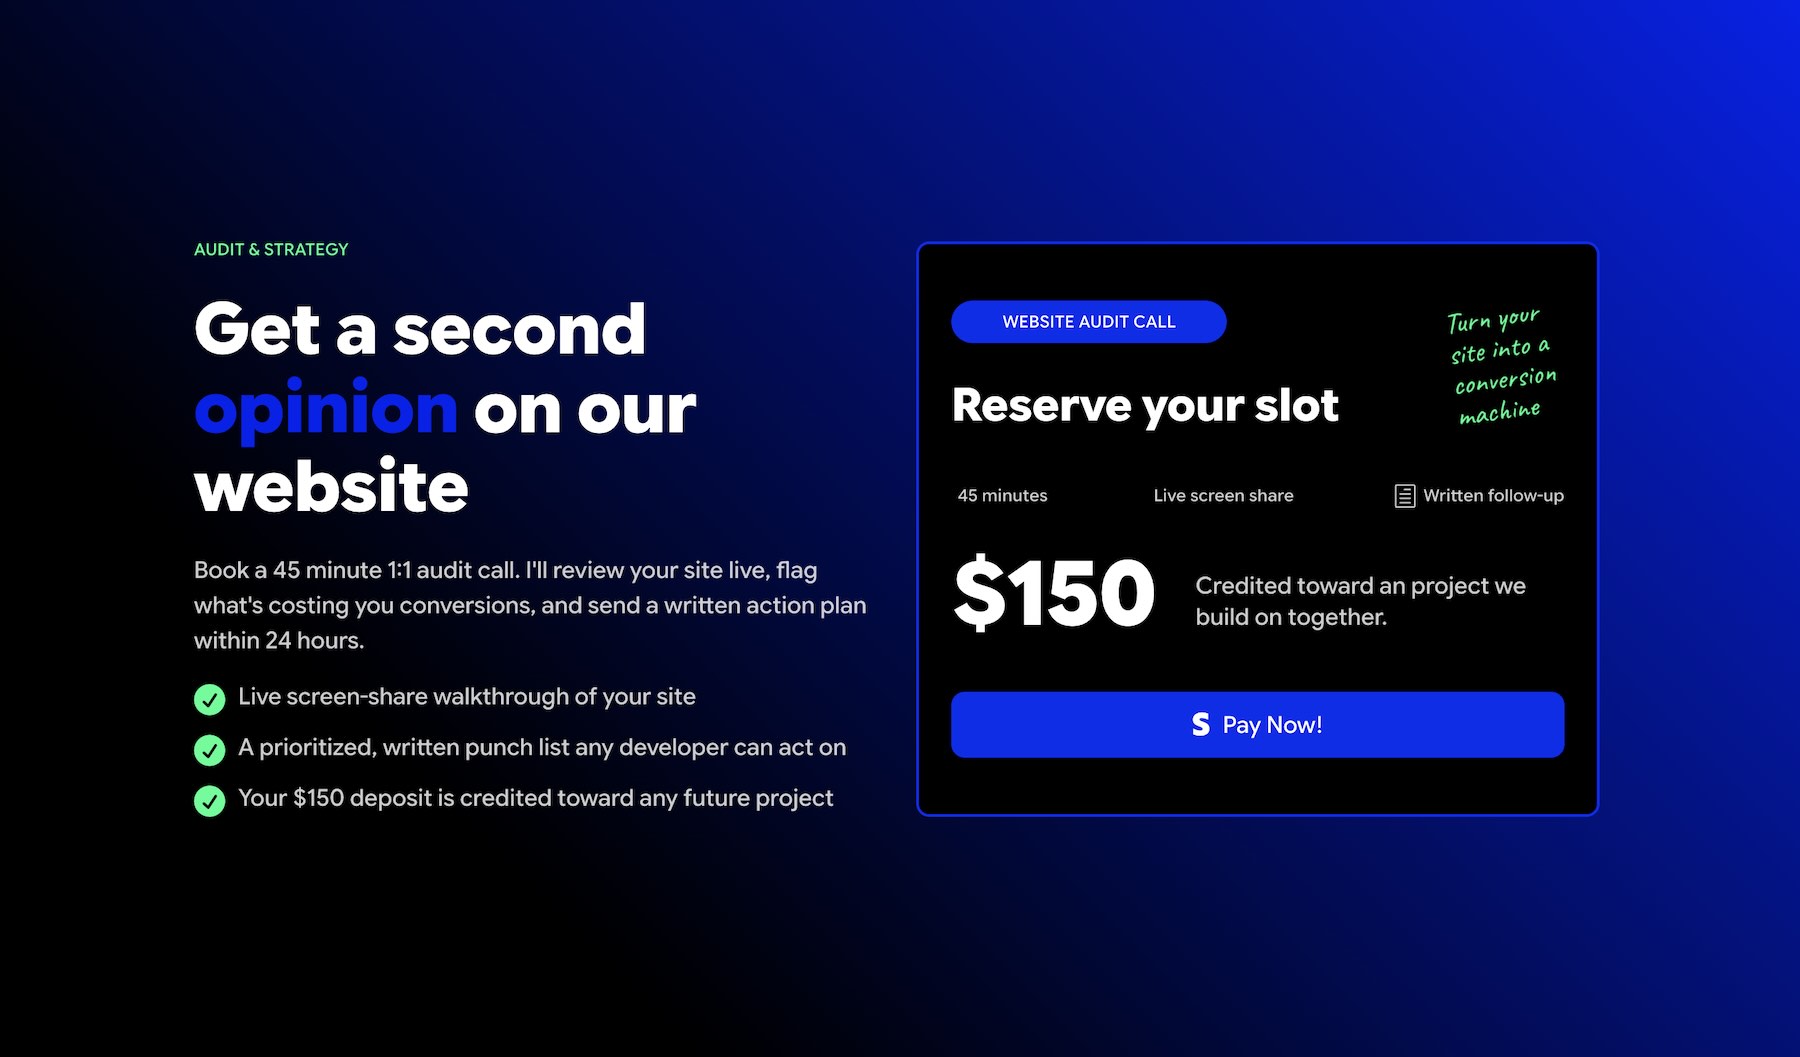
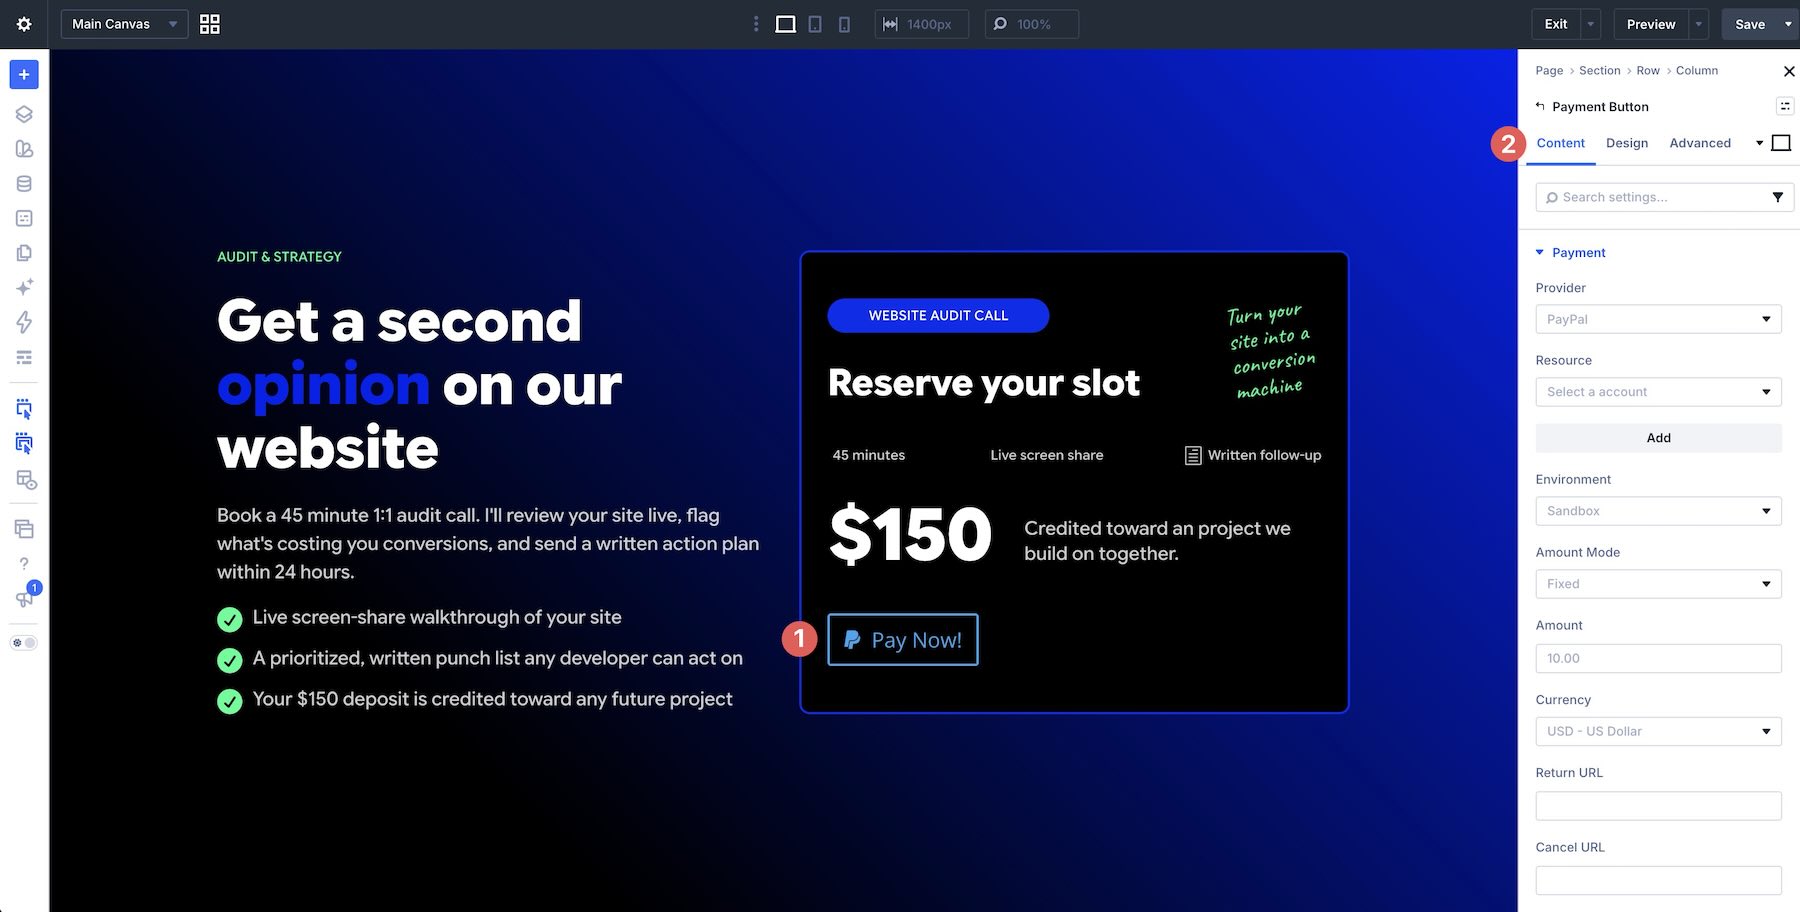
Create a new page or open an existing one in the Visual Builder. Prepare your offer section, then click to add a module. Search for Payment Button and insert it where the checkout call to action should appear.
The Content tab contains the payment connection and button text. The available payment settings depend on the provider you select.
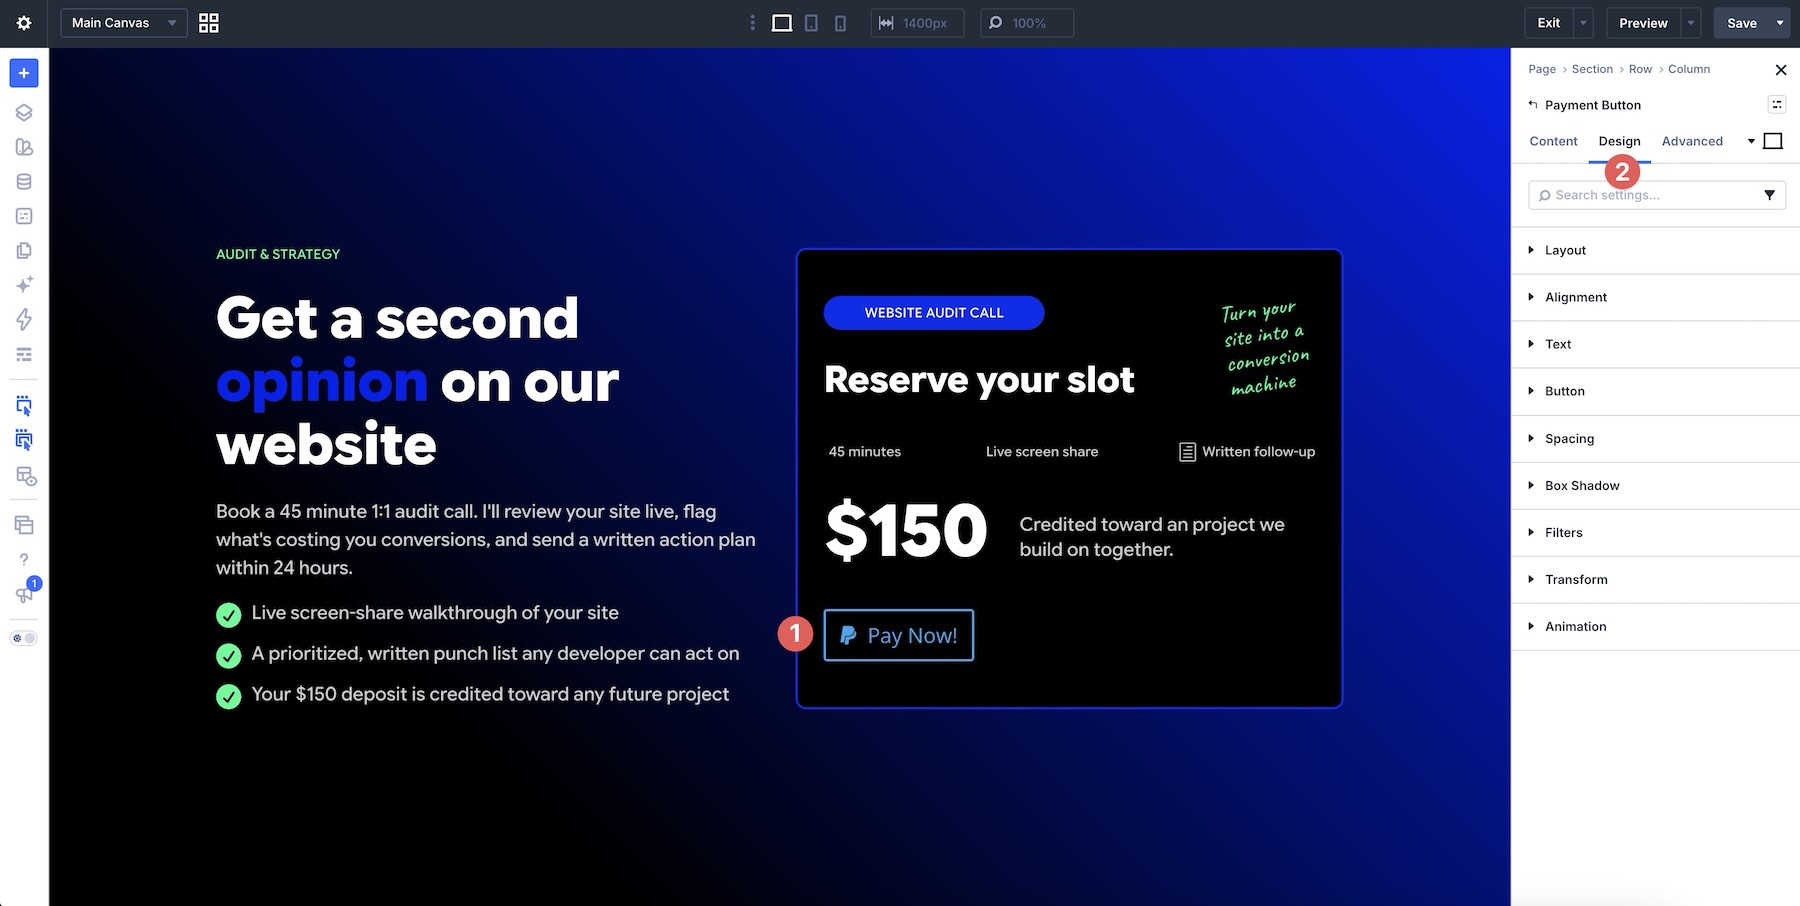
Use the Design tab to style the module.
If you already have a compatible Button Option Group Preset, apply it to reuse your site’s button styling. An Element Preset created for a regular Button Module should not be assumed to apply to a different module type.
Later in the tutorial, we’ll save a Payment Button Element Preset for reuse on other Payment Button Modules.
Configure PayPal Settings
Select PayPal as the Provider. The resource identifies the receiving account by its PayPal email address.
For the test setup, use the email associated with your PayPal sandbox business account. When you go live, replace it with your live business account resource.
Click Add under Resource.
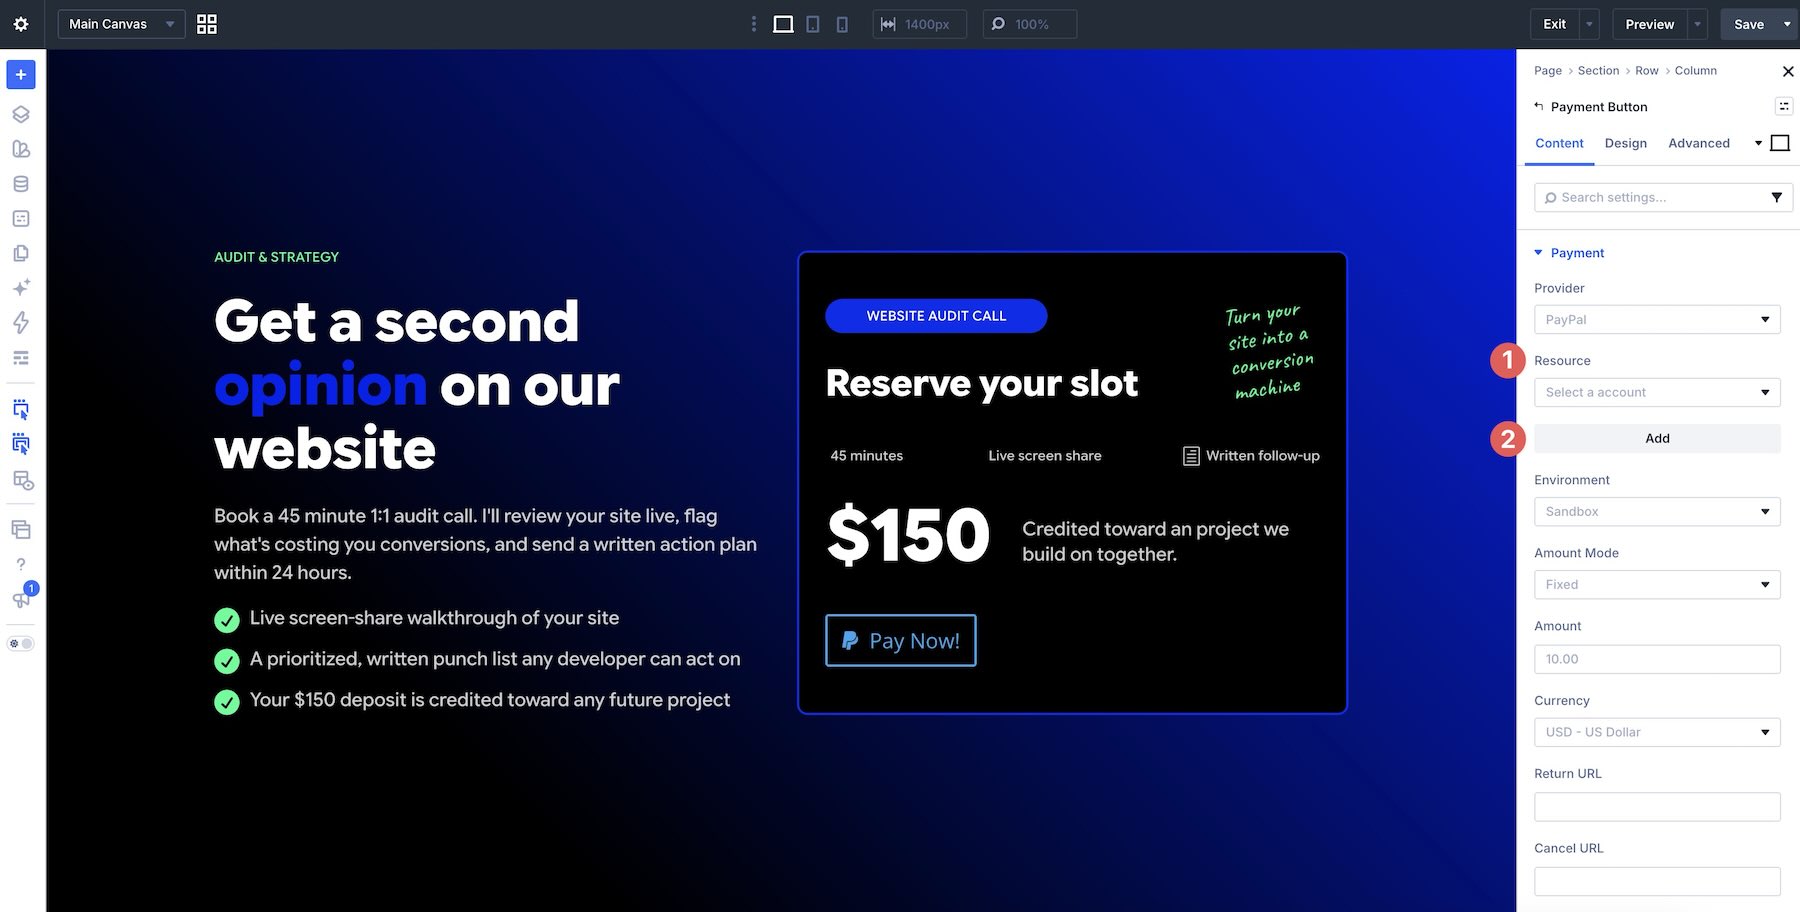
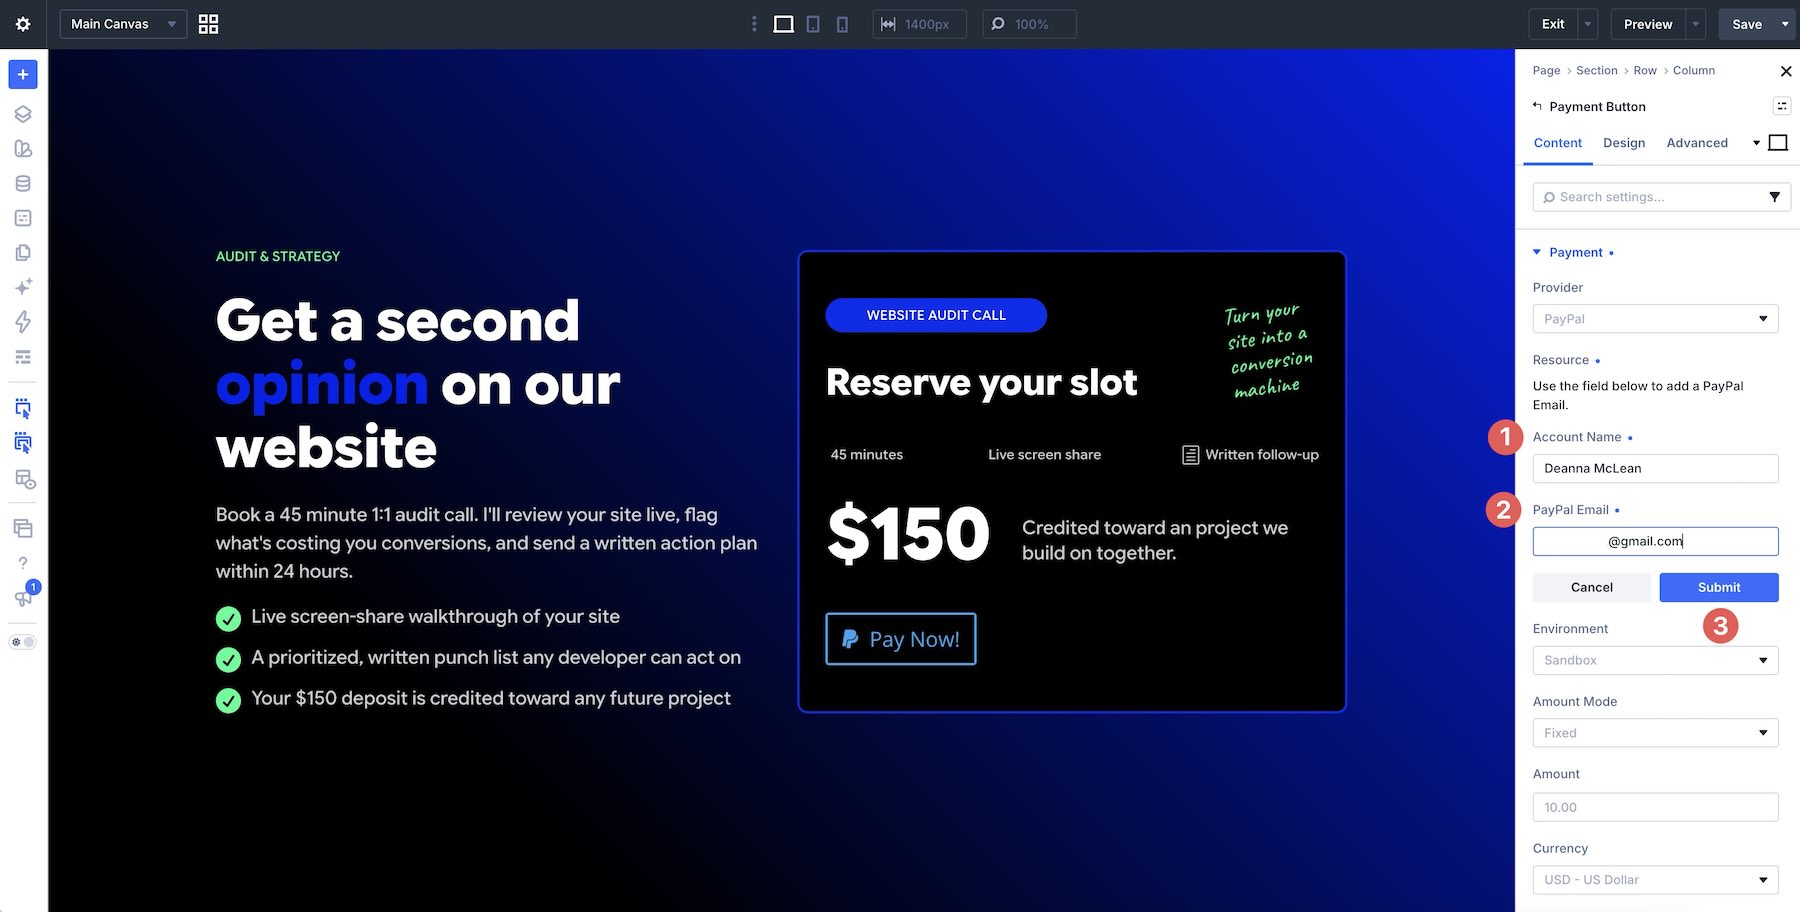
Enter a recognizable Account Name and the appropriate PayPal Email, then click Submit. A name such as “Business Sandbox” helps distinguish the test resource from the live one.
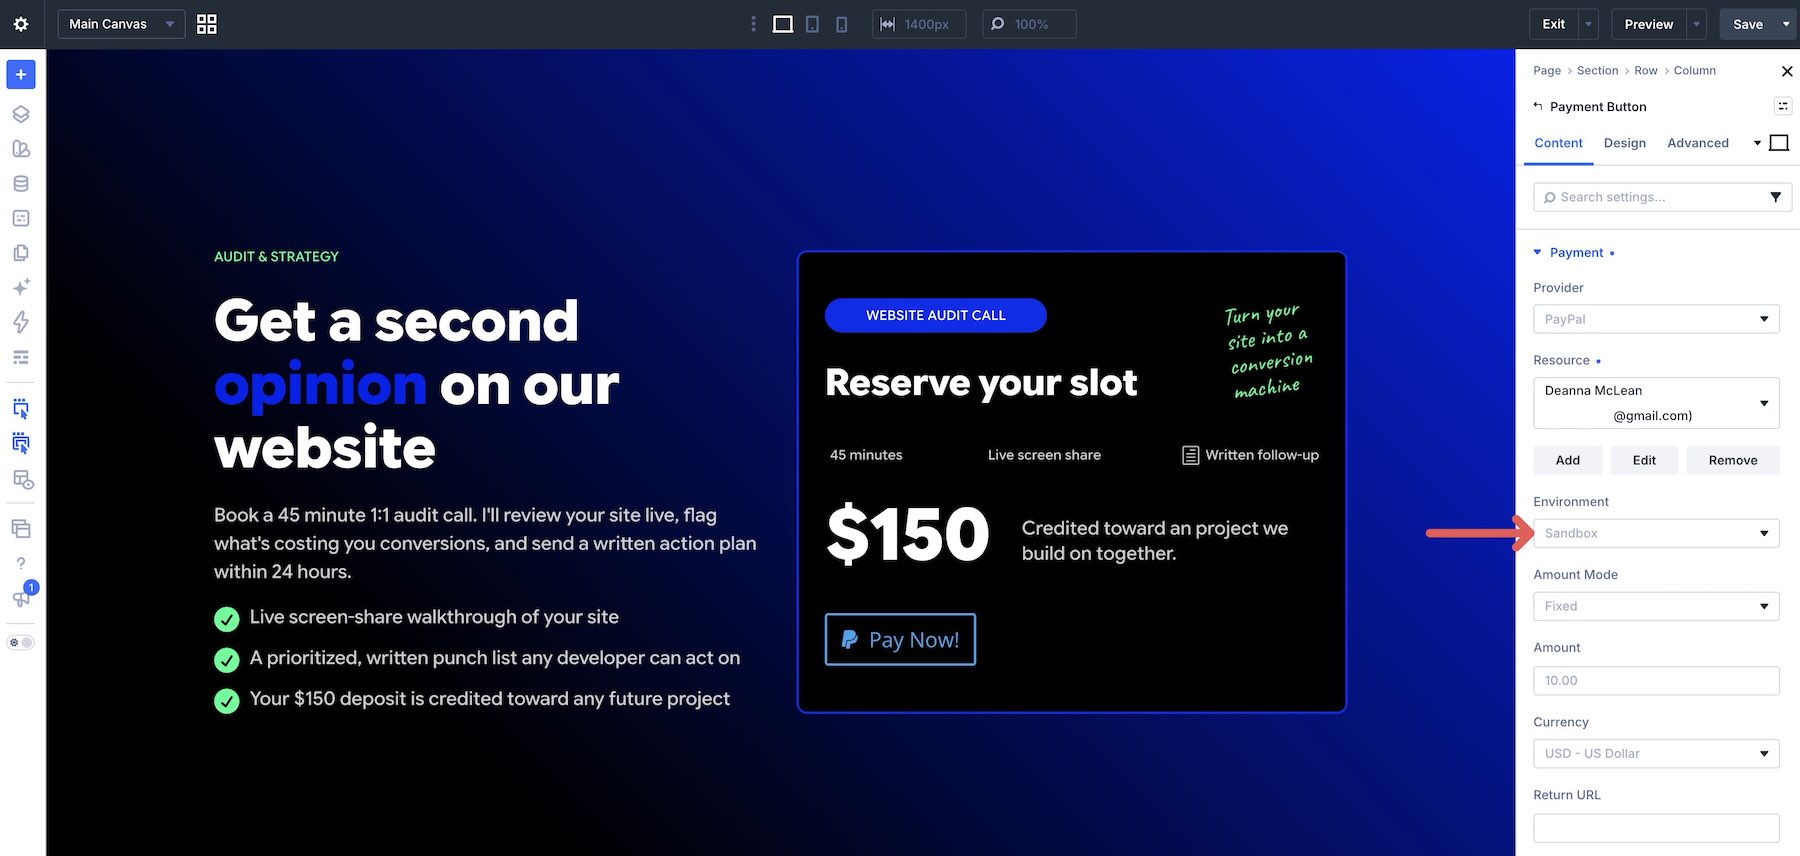
Select Sandbox under Environment. The environment and account resource need to match: use a sandbox account for testing and a live account for real payments.
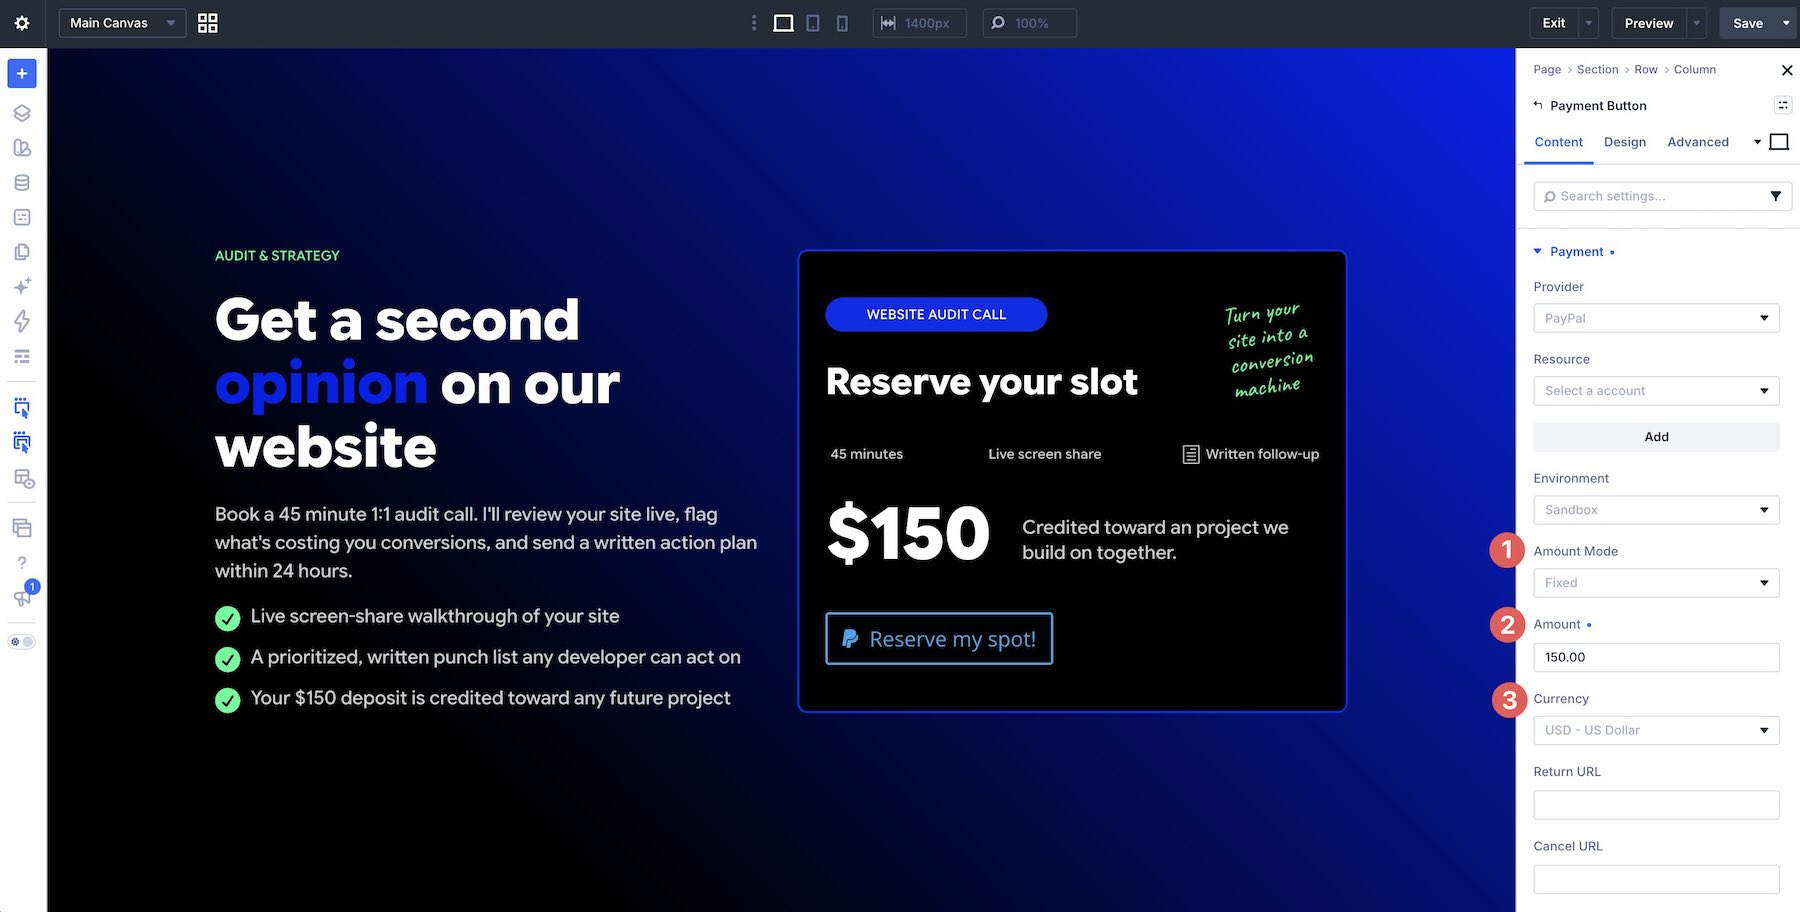
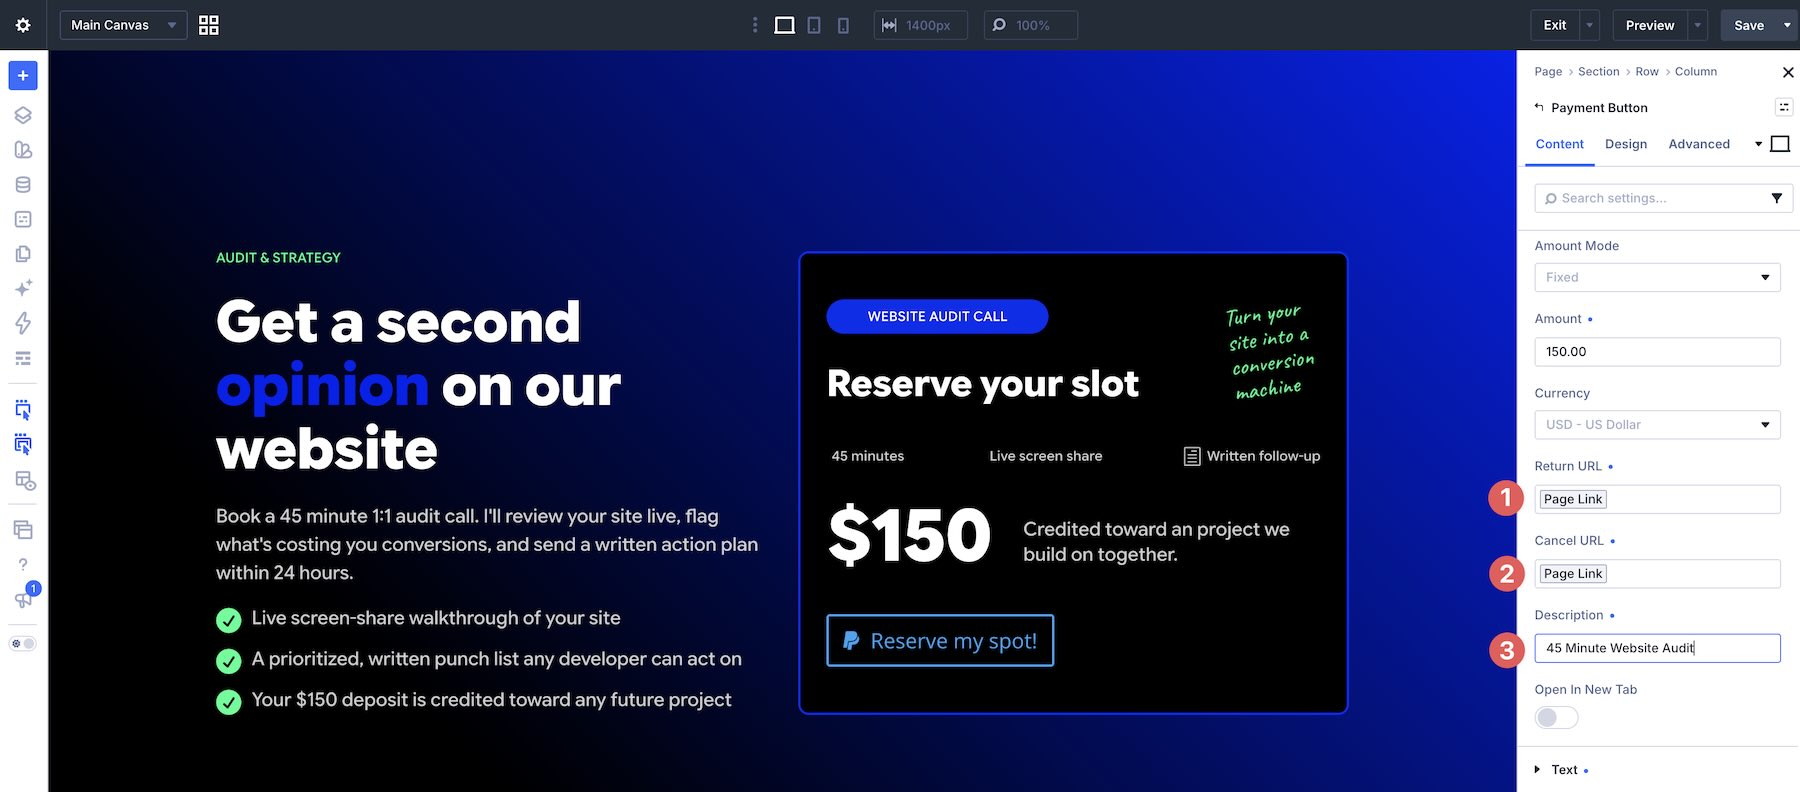
Choose between Fixed and User Defined for the amount mode. Since our offer is a $150 website audit, select Fixed, enter 150 as the amount, and choose USD as the currency.
Set the Return URL to your thank-you page and the Cancel URL to the offer page or a dedicated cancellation page. Add a description that identifies the website audit.
These return and cancellation fields apply to PayPal. Stripe’s after-payment destination is configured separately.
Configure Stripe Settings
Stripe uses the Payment Link saved as the module’s resource. Configure the product, amount, currency, and after-payment behavior in Stripe rather than relying on the PayPal settings in Divi.
Stripe can show its own confirmation message or redirect buyers to your website. For this example, we’ll configure a redirect to the thank-you page.
Create A New Stripe Product
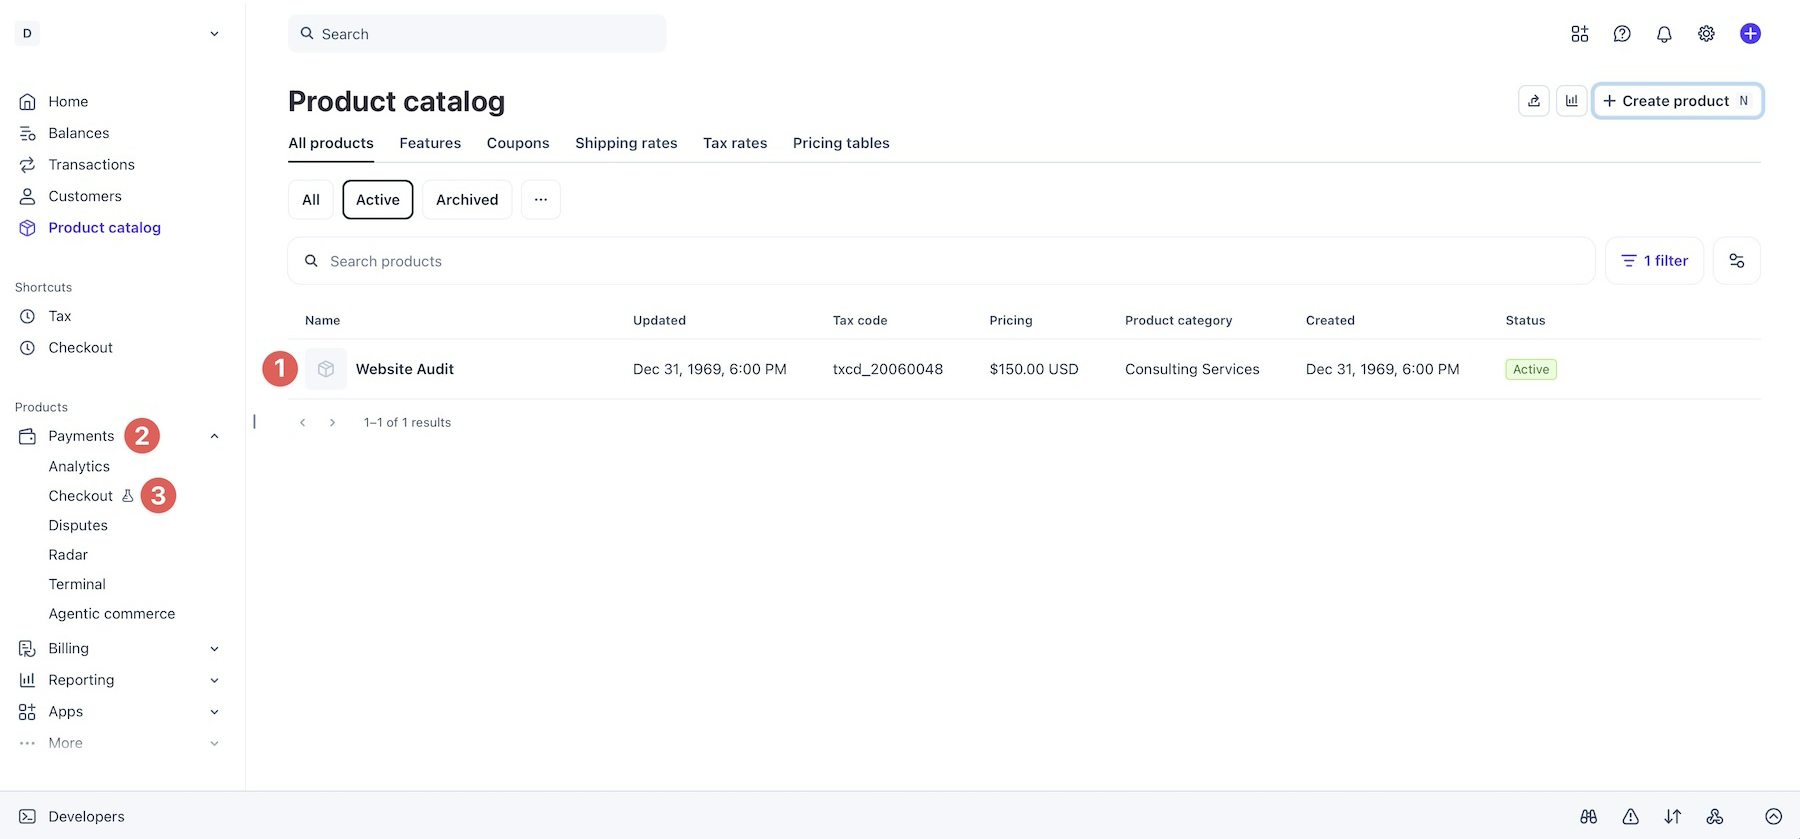
Open your Stripe Dashboard and navigate to the product catalog. Start in a sandbox or test environment if you are setting up the checkout for the first time.
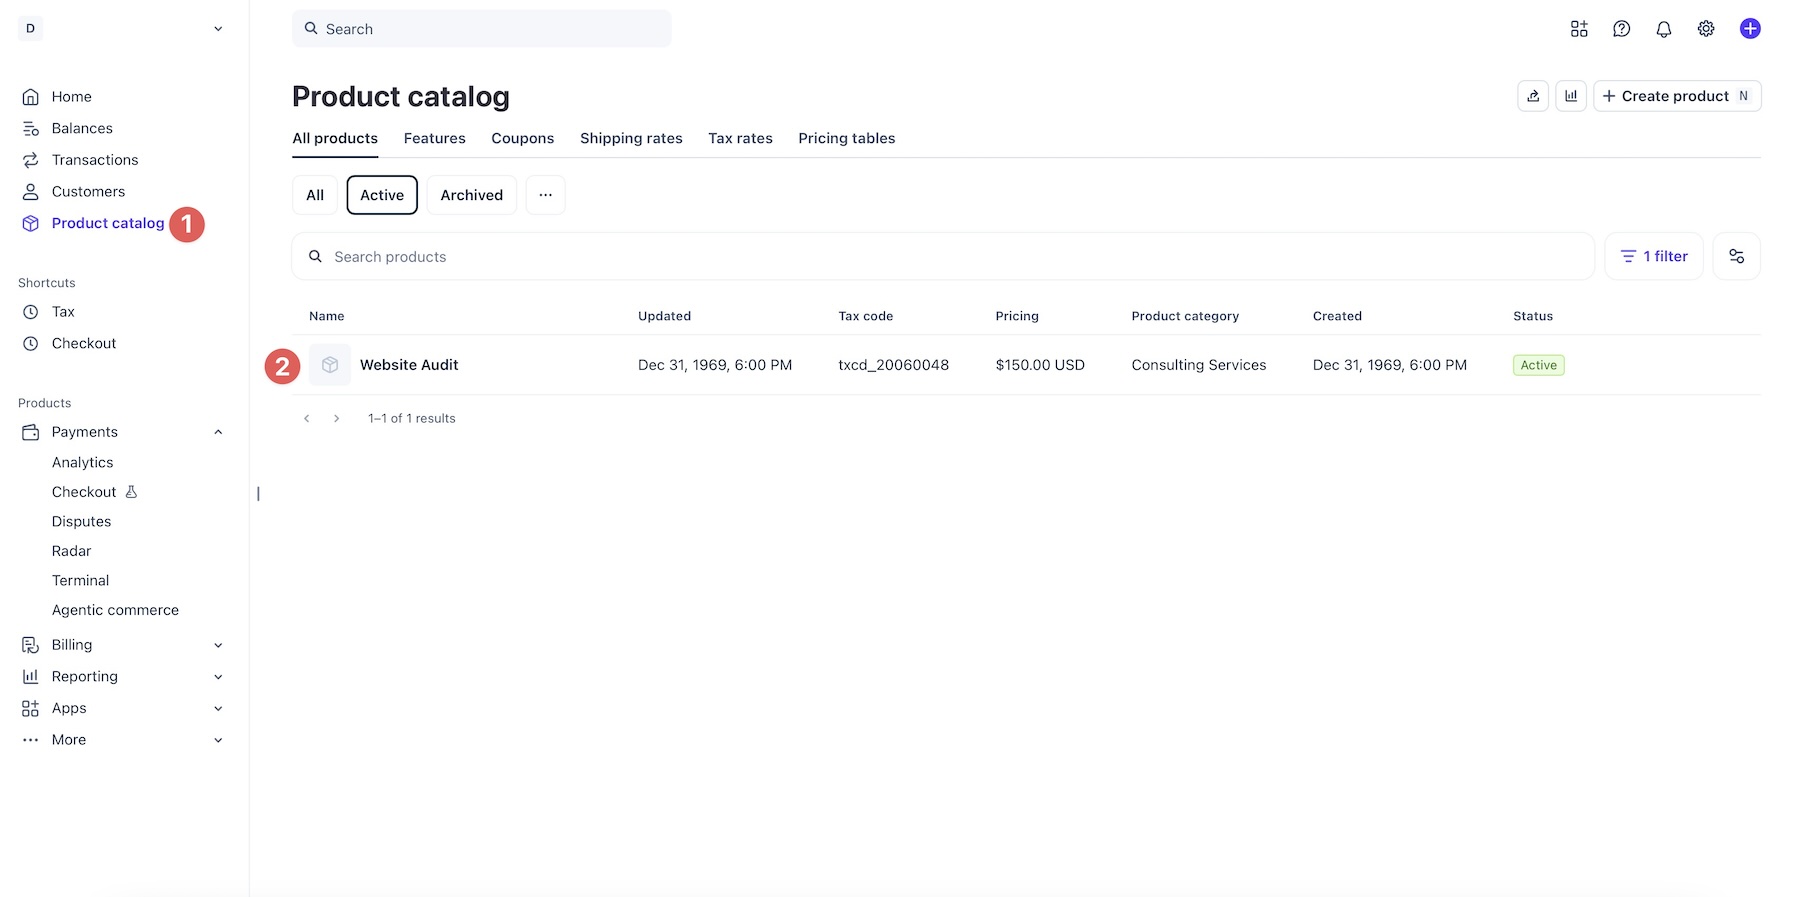
Click + Create Product.
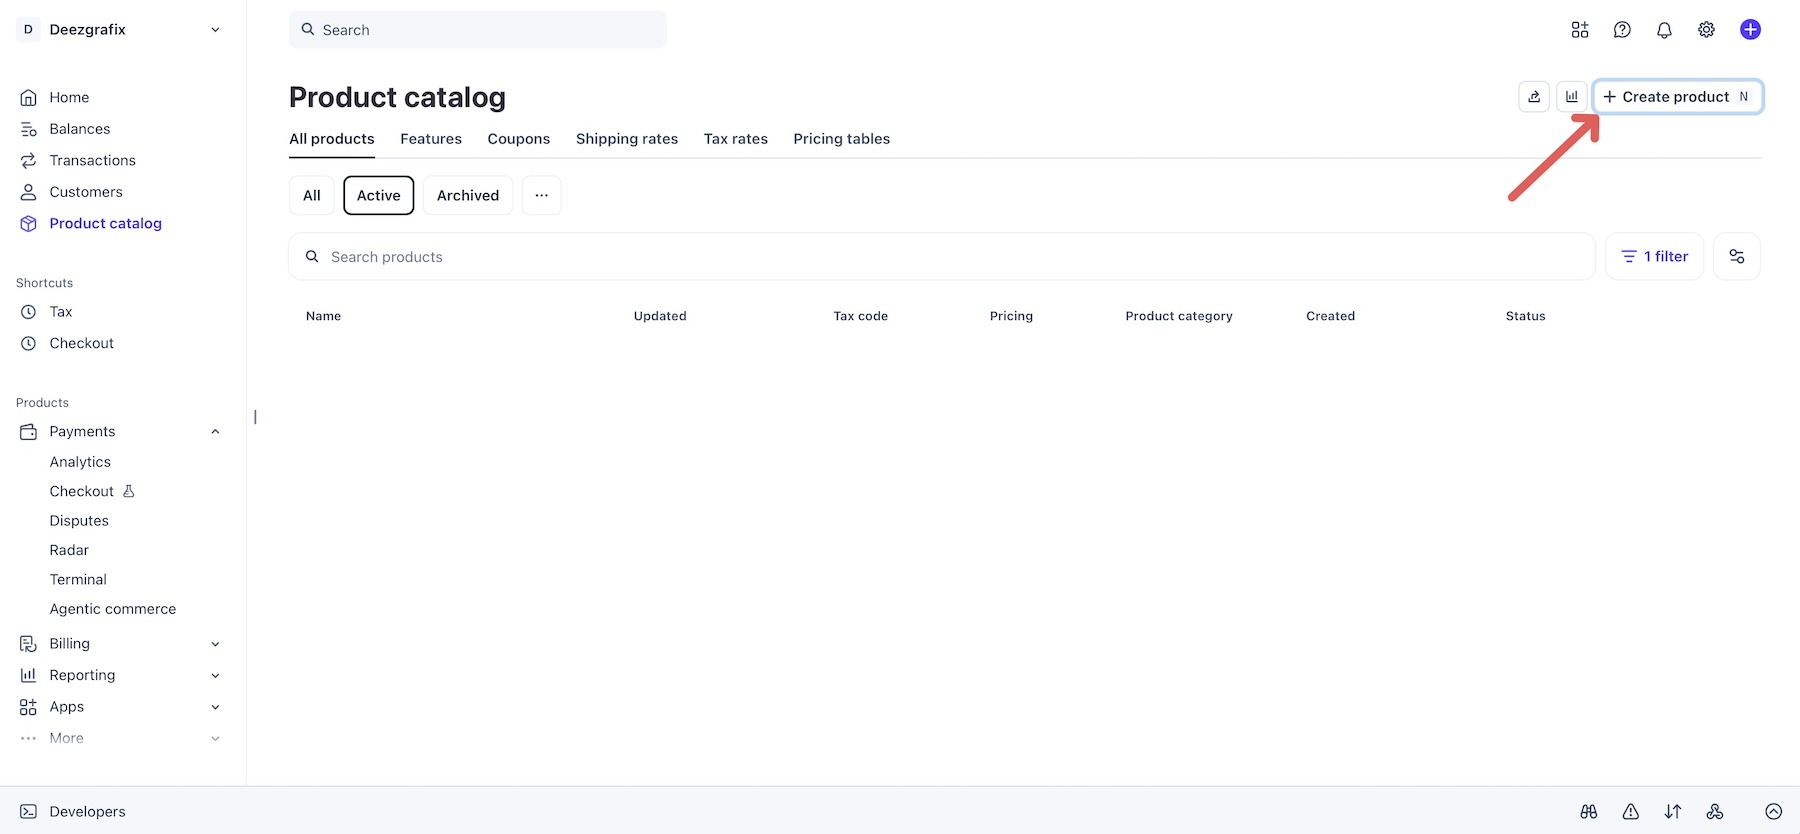
Enter the product name, description, and image. Add the relevant category information where shown, and configure a one-time price of $150 USD for the audit. Click Add Product when the details are complete.
Create A Payment Link
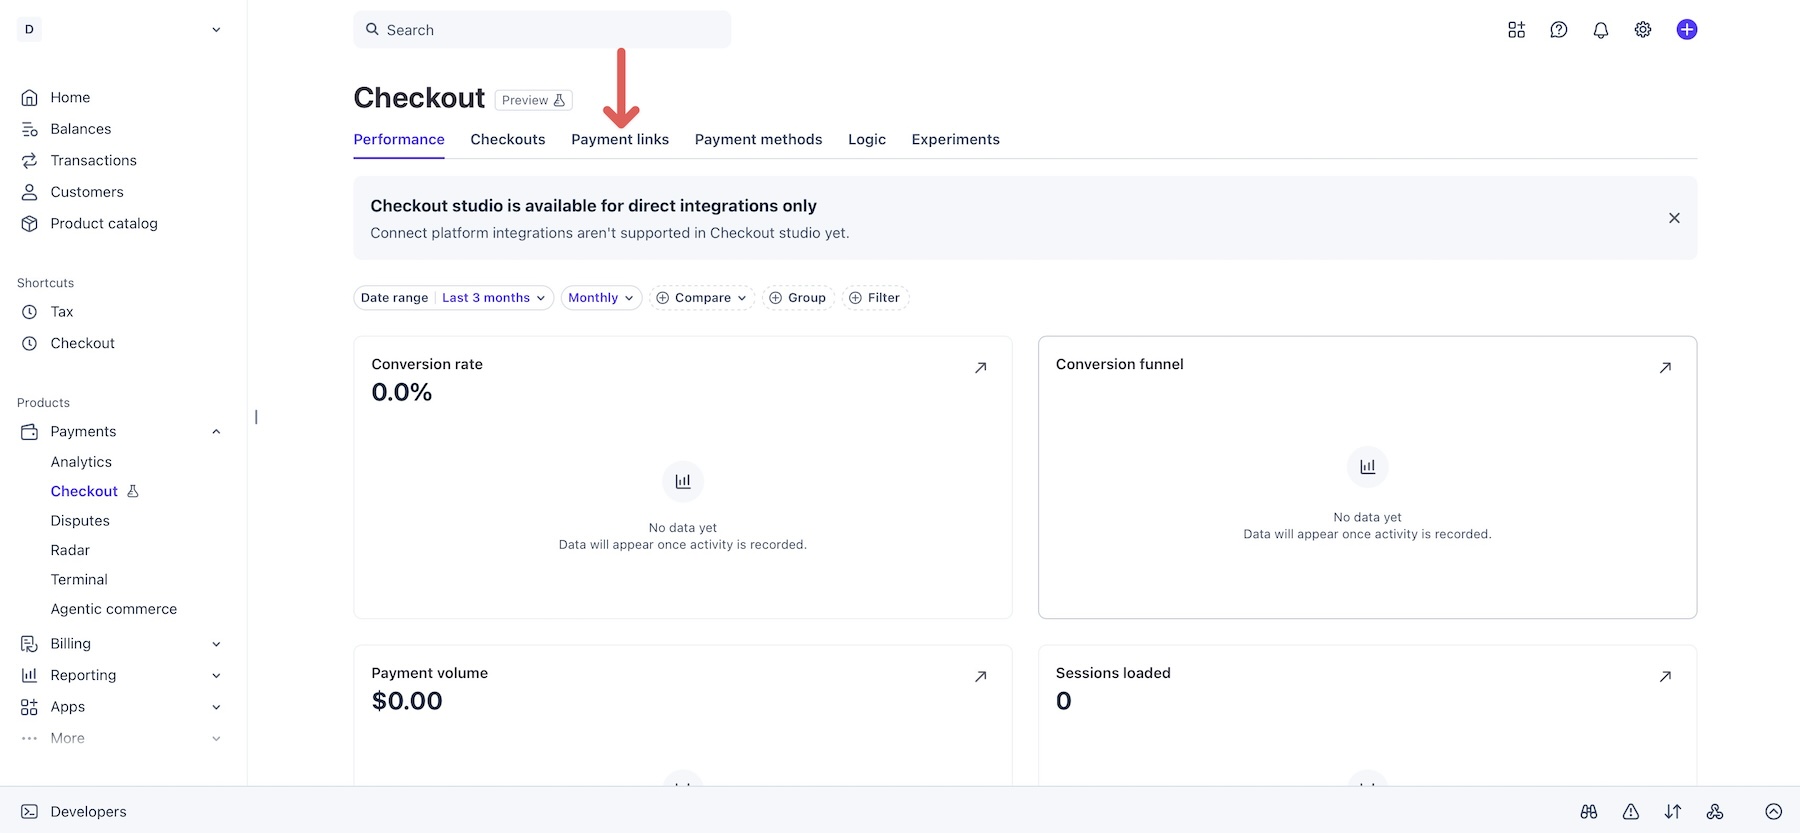
In the dashboard shown here, open Payments > Checkout. Stripe’s navigation may vary by account, so you can also use its dashboard search to find Payment Links.
Open the Payment Links tab.
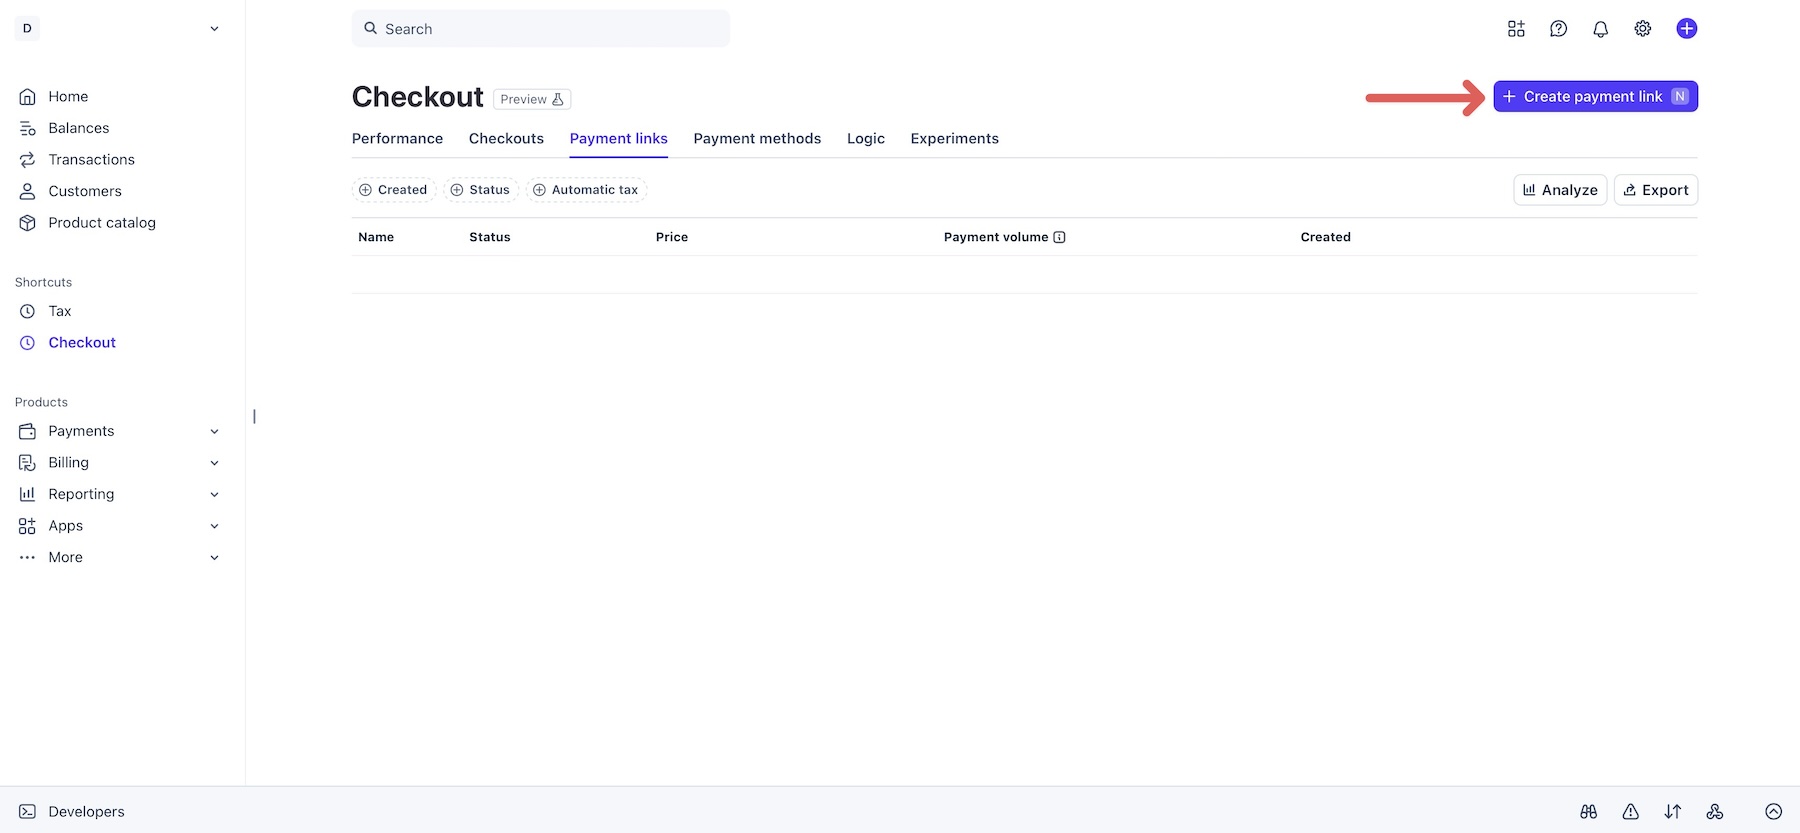
Click + Create Payment Link in the upper-right corner.
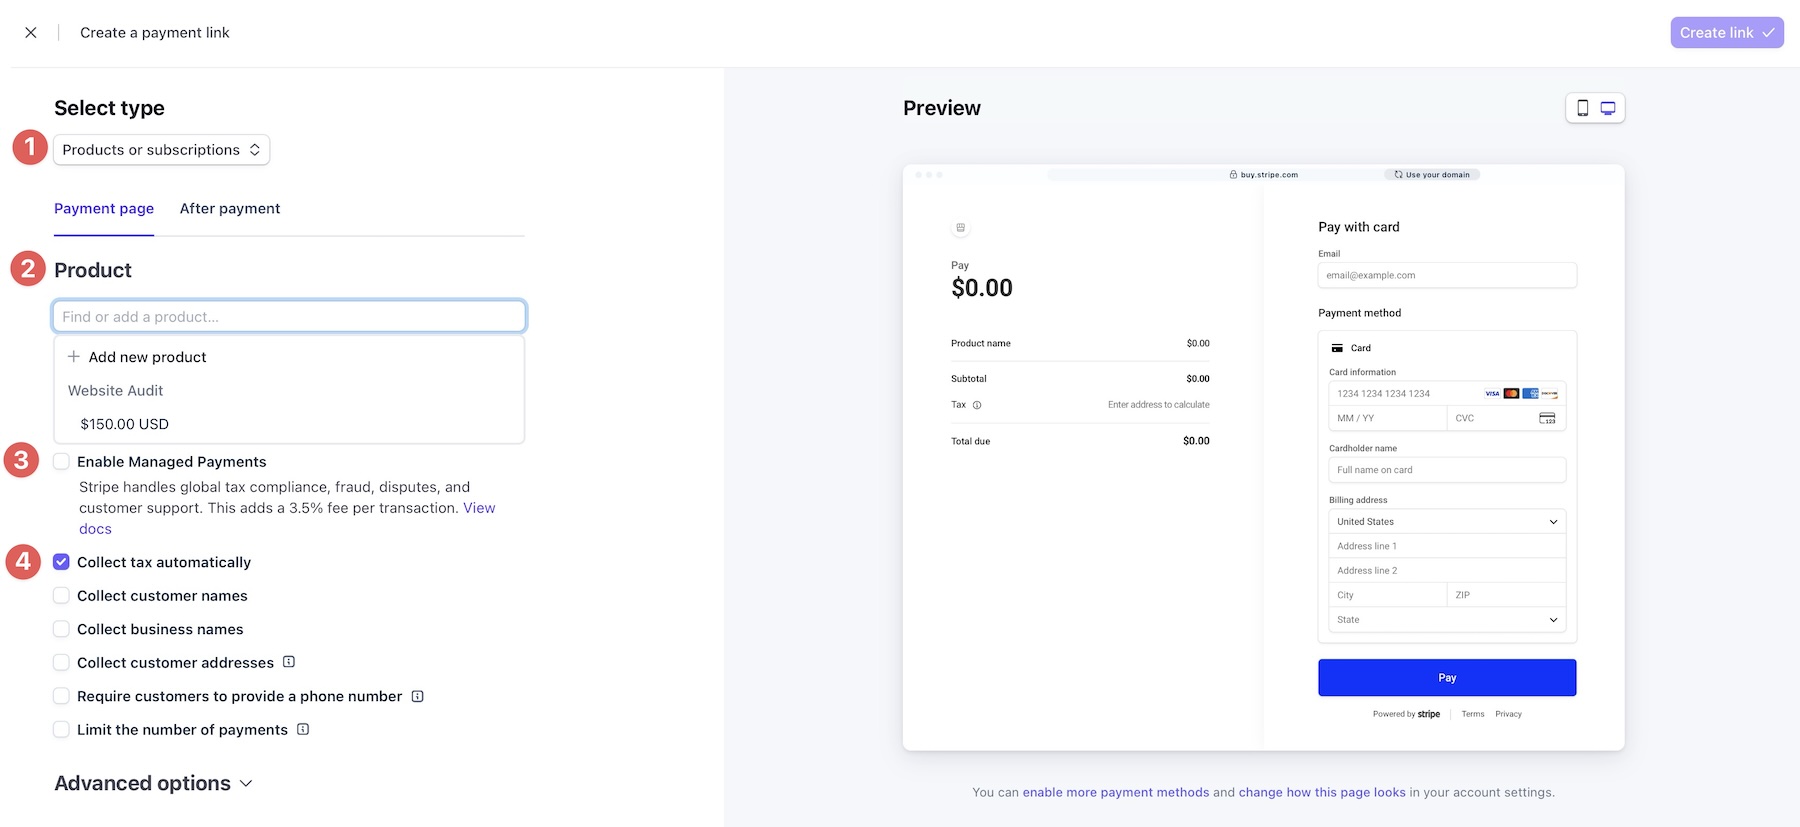
Keep the link type set to Products Or Subscriptions and select the product you created. The product’s one-time price determines the charge for this example.
Review the available checkout options, including tax collection and customer information. Collect the details needed for the service, such as a name and email address. Any Managed Payments option shown is a separate Stripe feature, not a requirement for connecting the link to Divi.
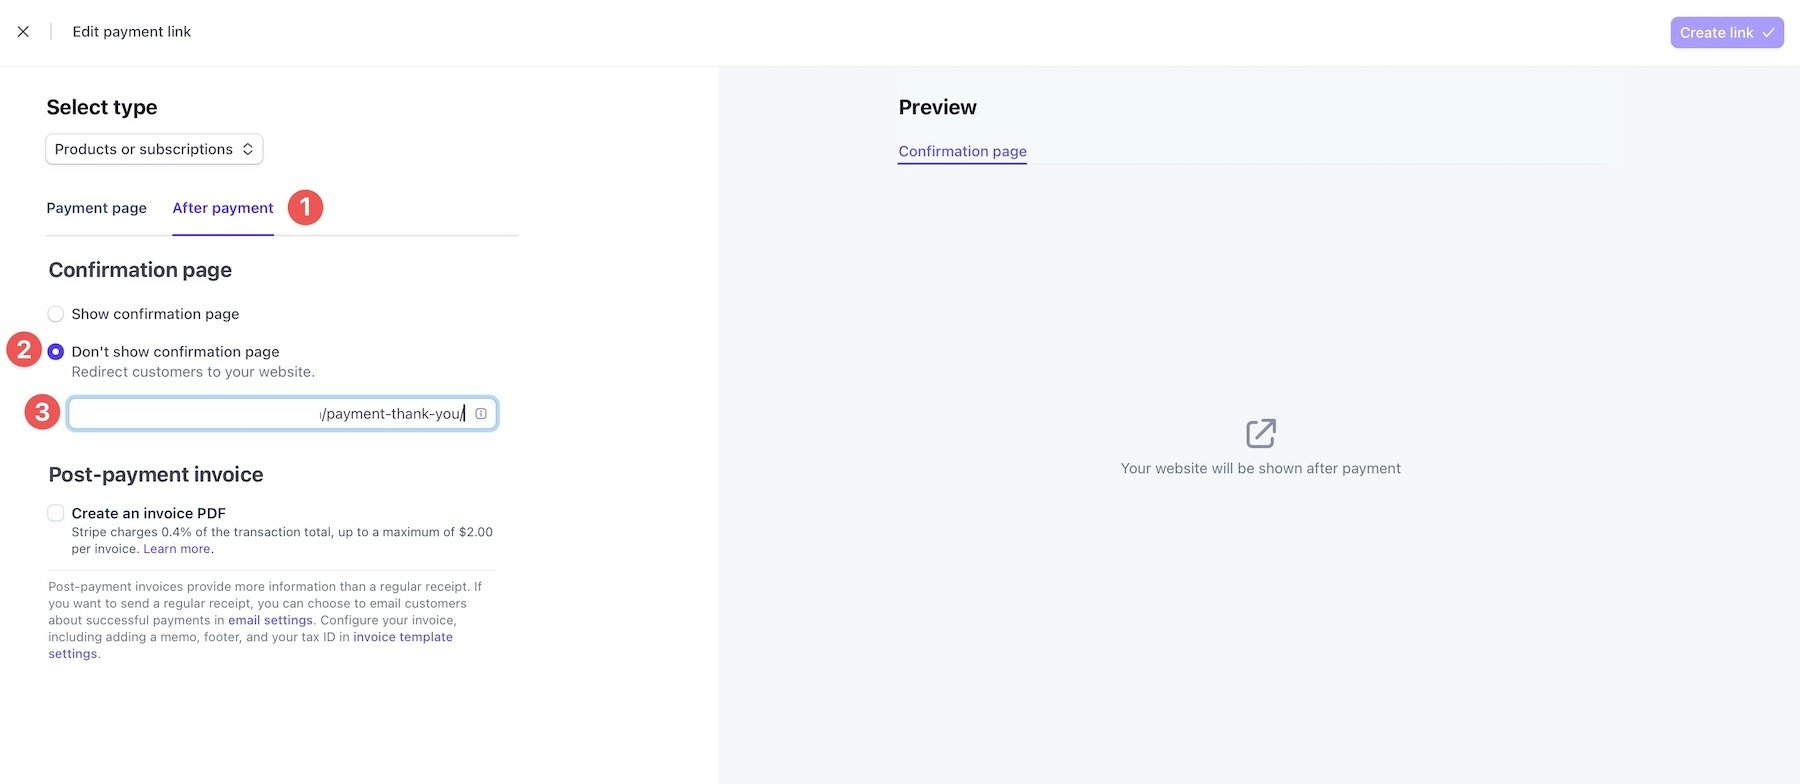
Open the After Payment tab. Under Confirmation Page, select the option to redirect to your site, shown here as Don’t Show Confirmation Page, and enter your thank-you page URL.
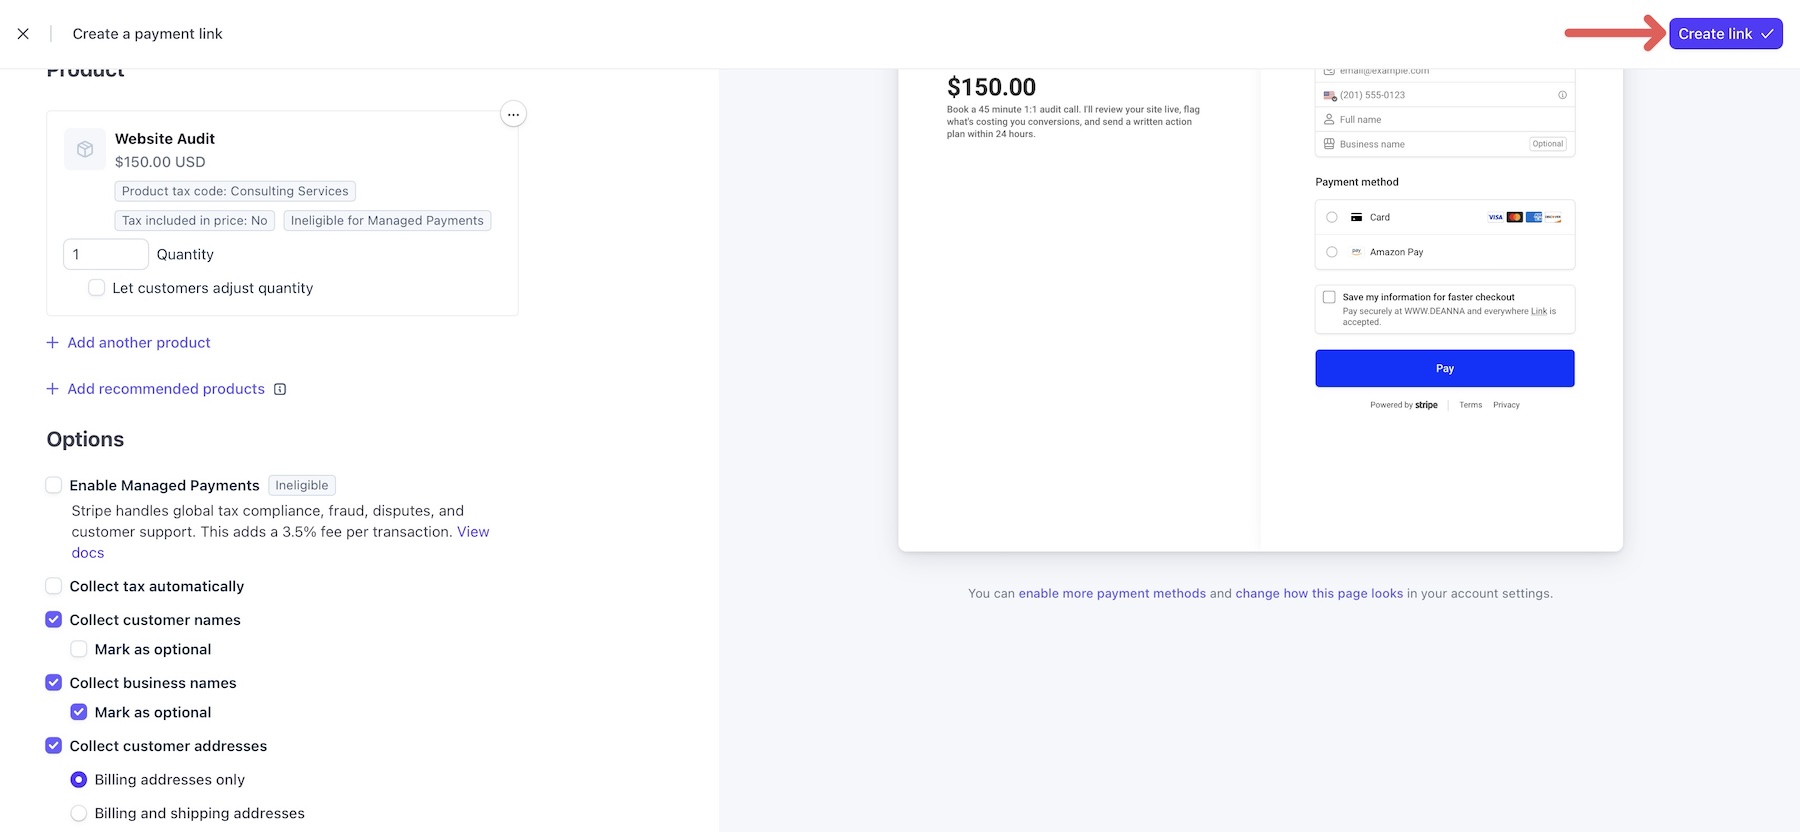
Once the settings are ready, click Create Link.
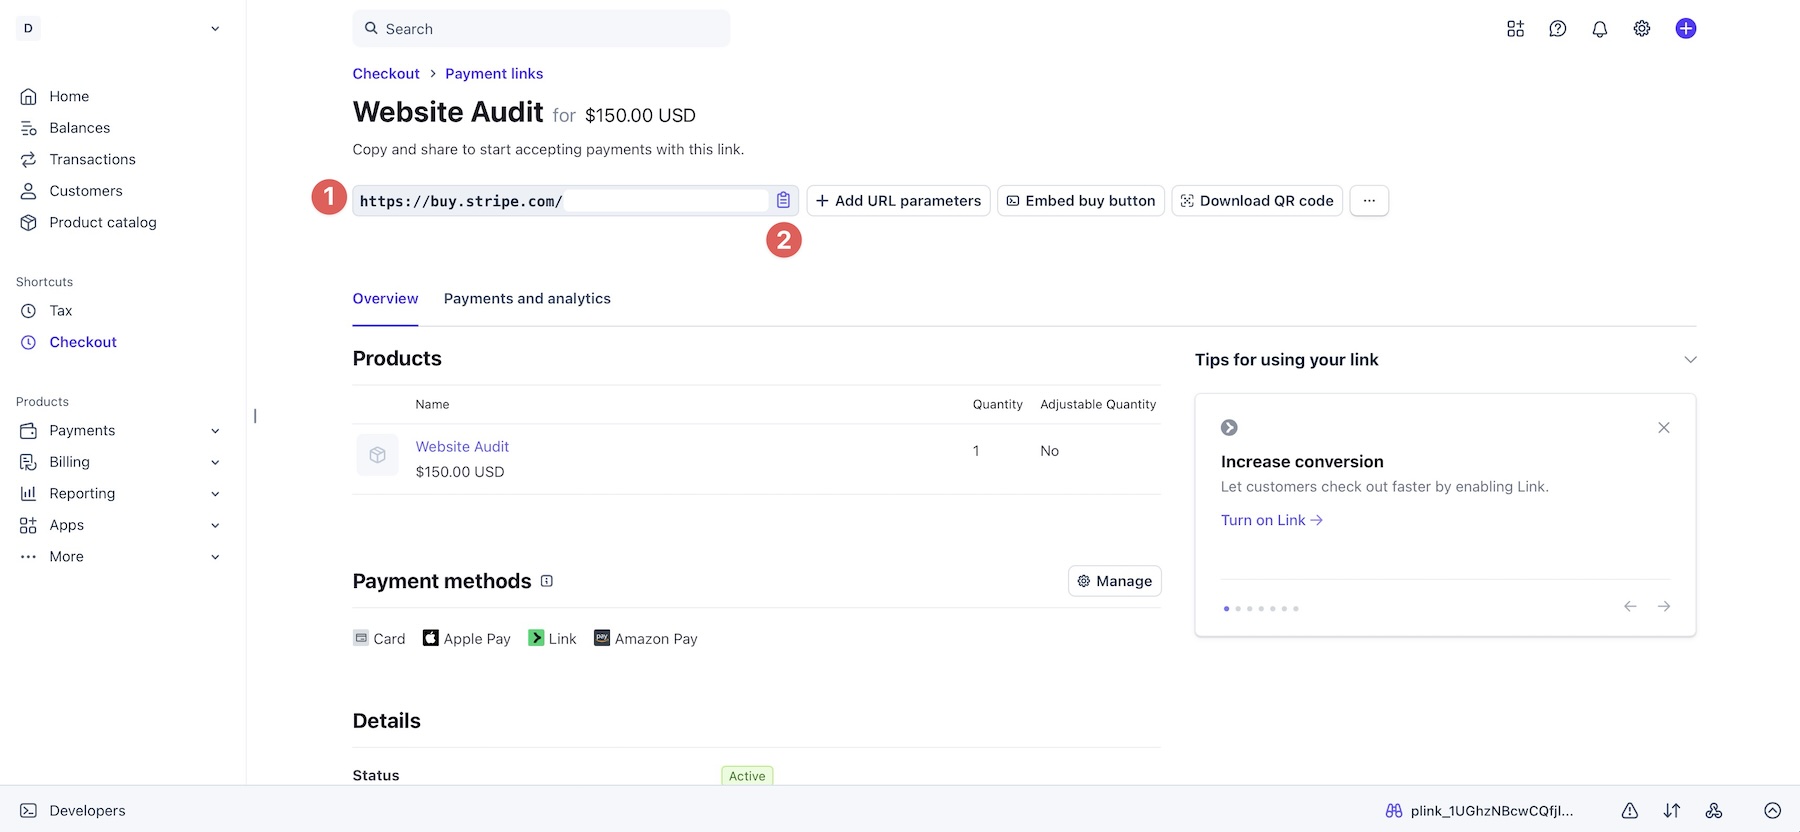
Copy the generated Checkout Link URL from the link’s details page.
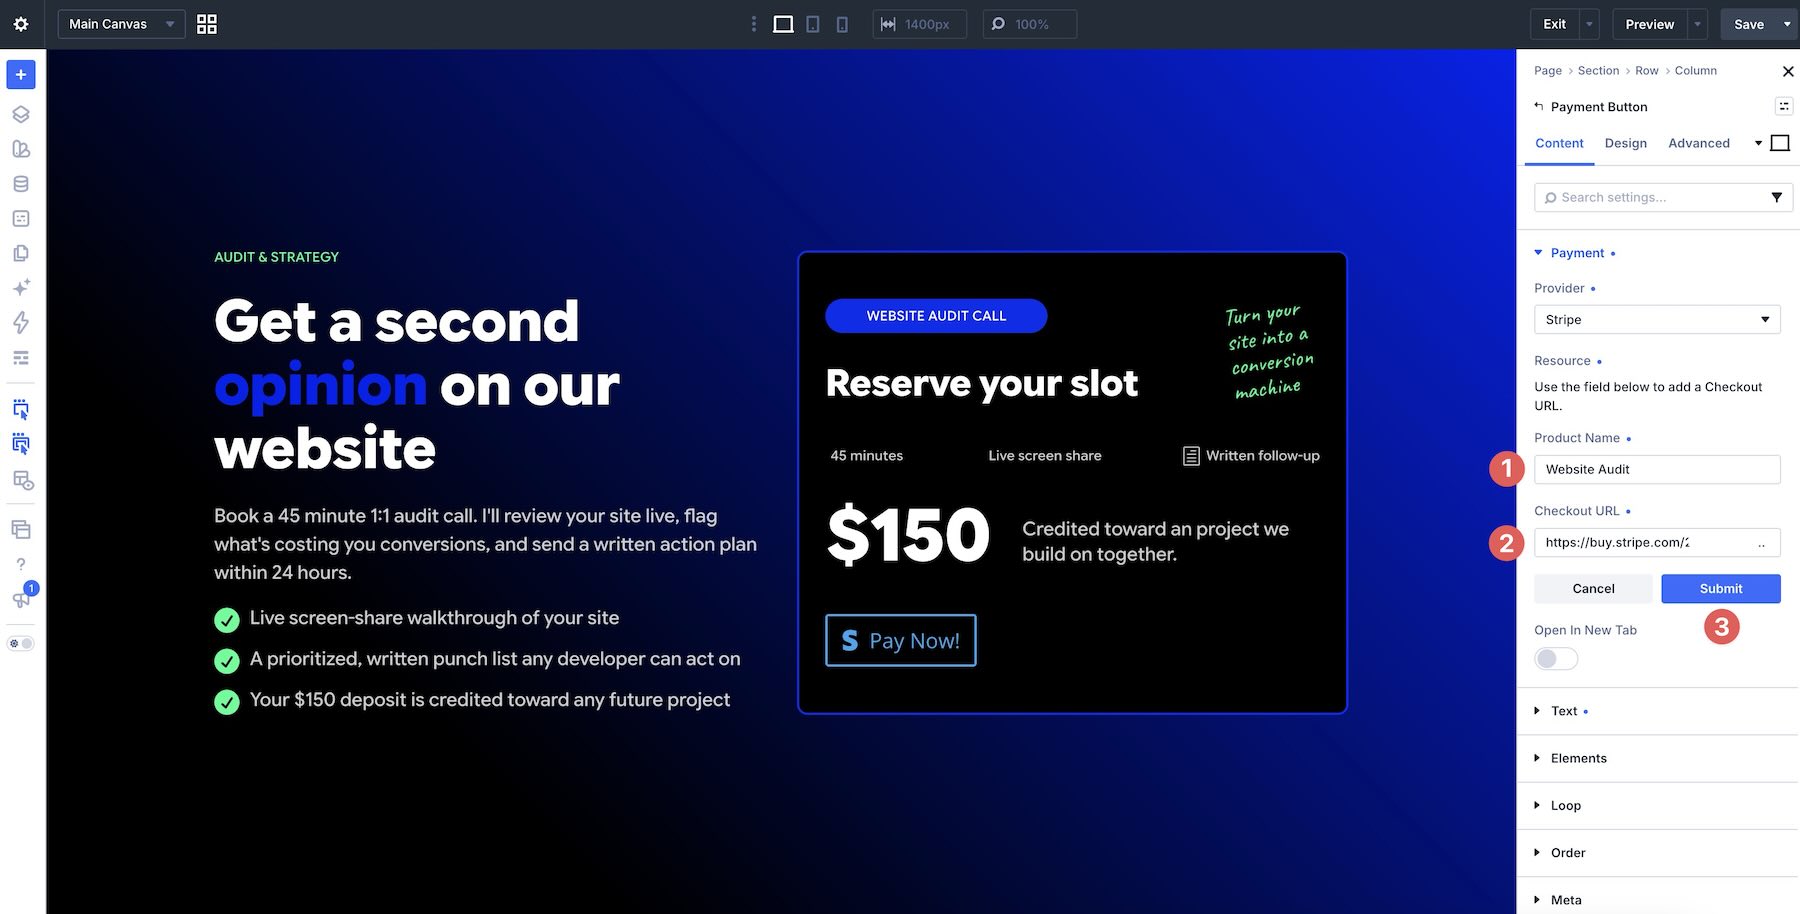
Return to the Visual Builder. Select Stripe as the Provider and click Add under Resource.
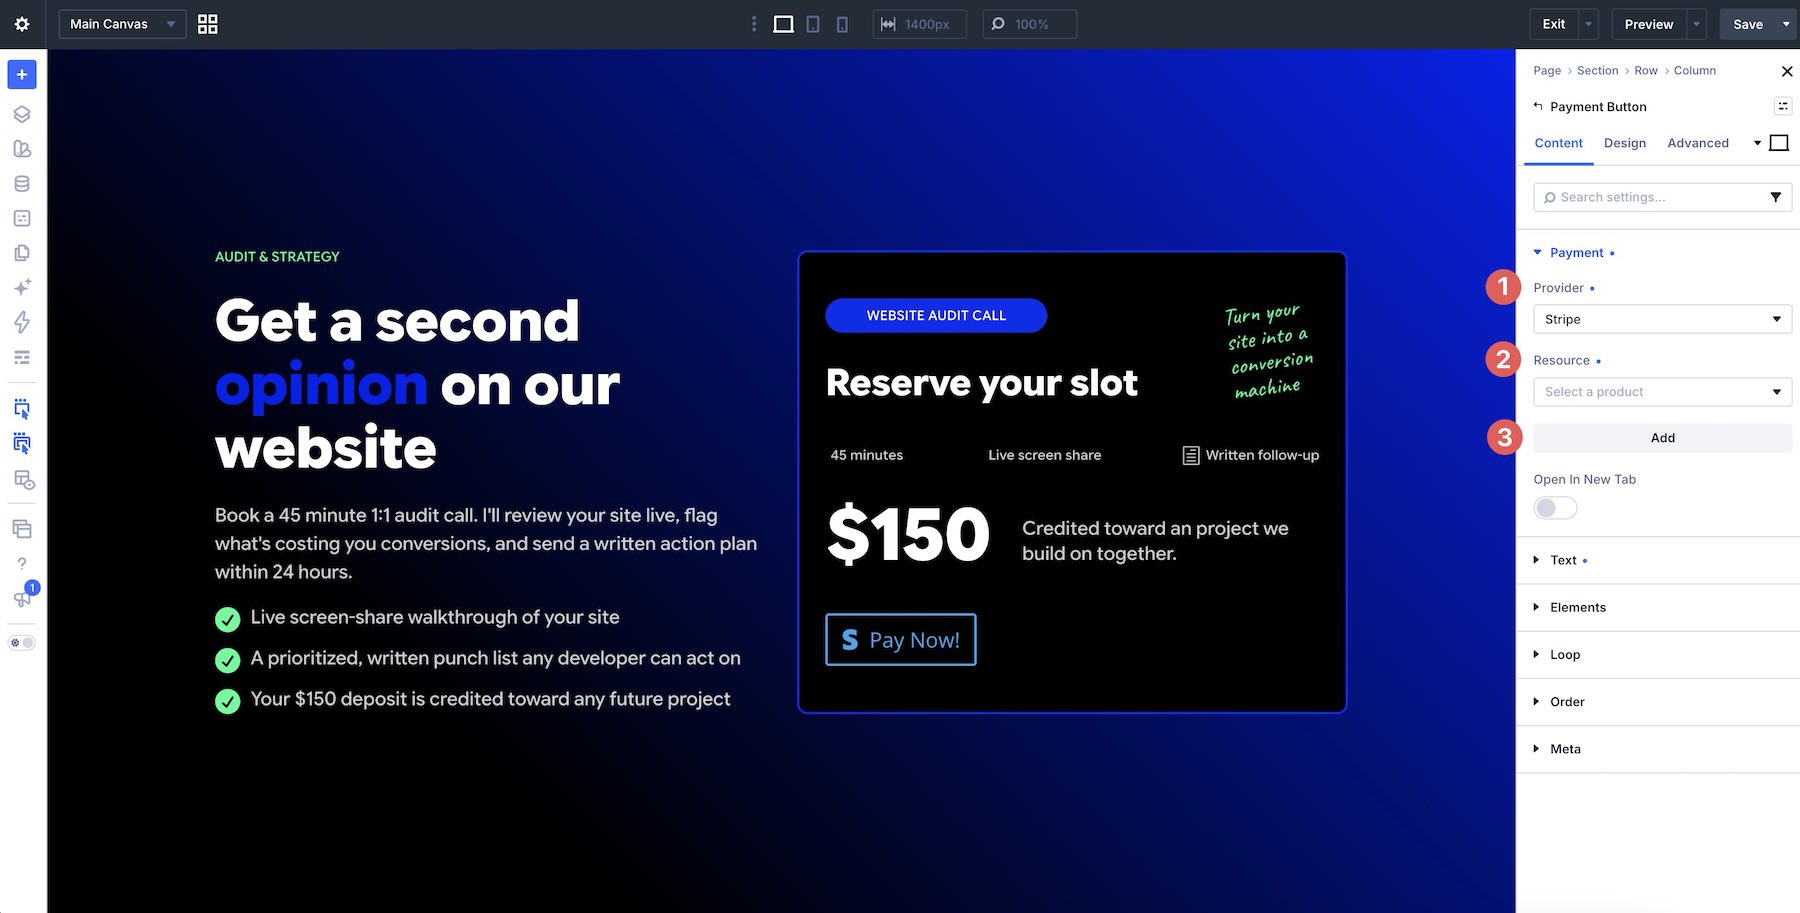
Enter a recognizable Product Name, paste the Payment Link into Checkout URL, and click Submit.
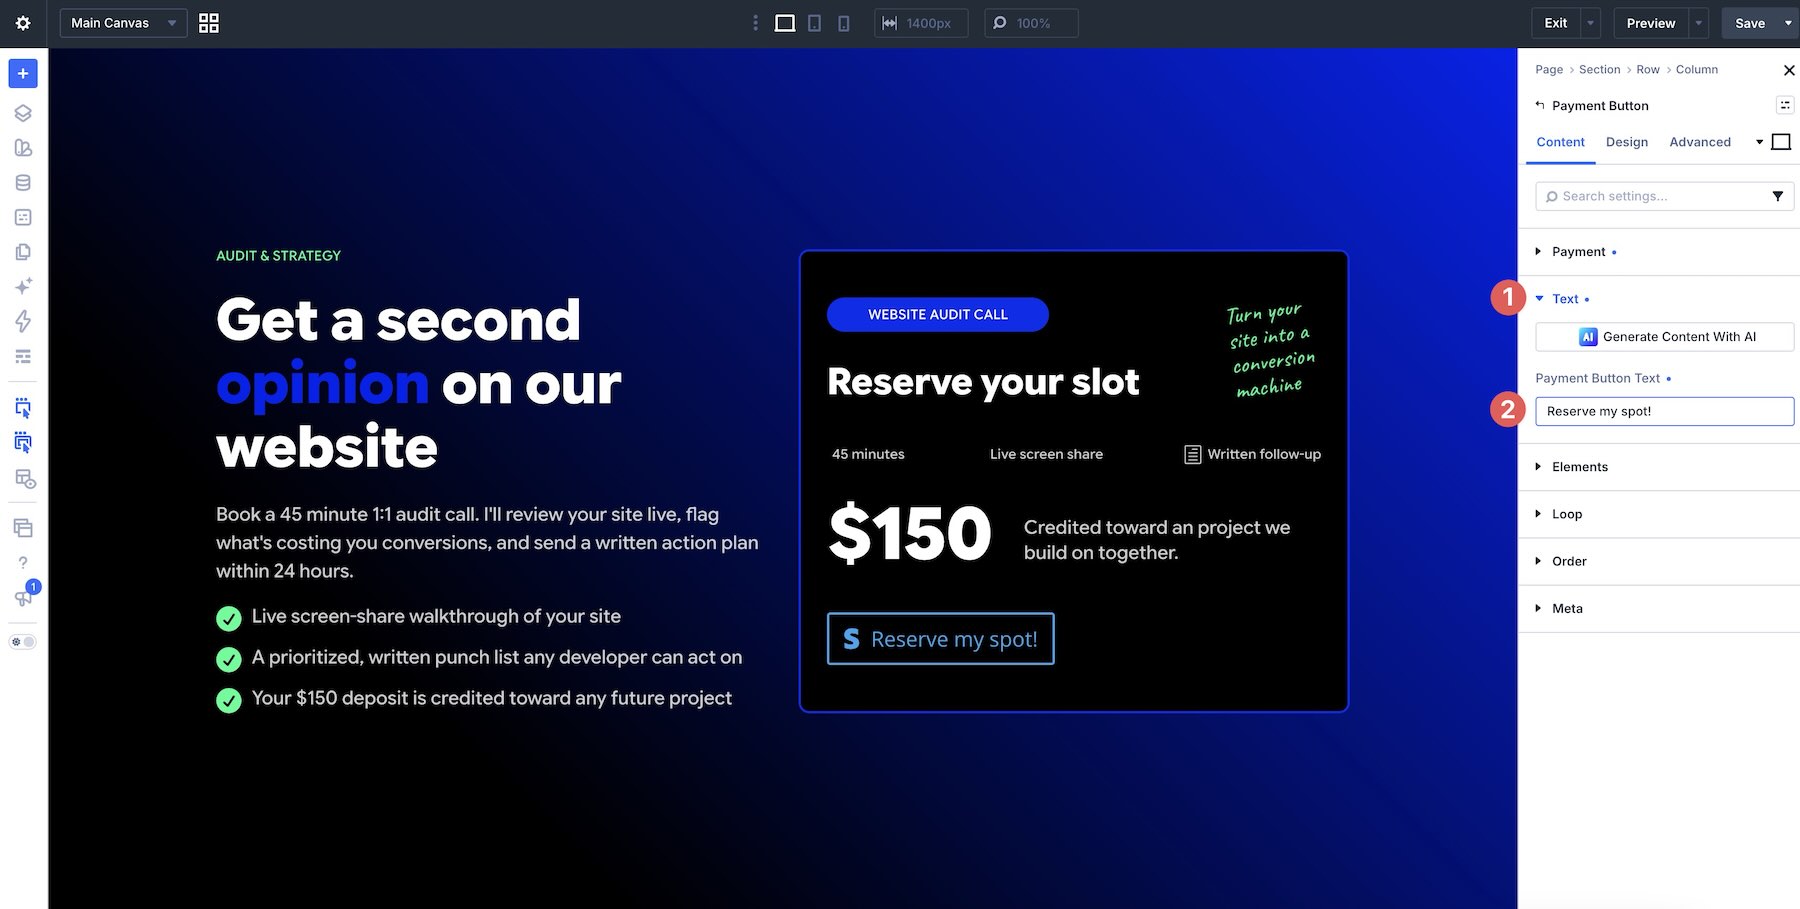
Expand the Text option group in the Content tab and enter the Payment Button Text. Use a label that fits the offer, such as “Book Your Audit” or “Pay For Your Audit.”
Style The Button
The Design tab provides familiar button styling controls. Expand the Button option group to adjust its background, border, text, icon, spacing, and sizing.
Match the surrounding offer card so the payment action feels like part of the page’s design.
Use Divi 5’s state controls to configure the hover appearance. Keep the button label readable in both its default and hover states.
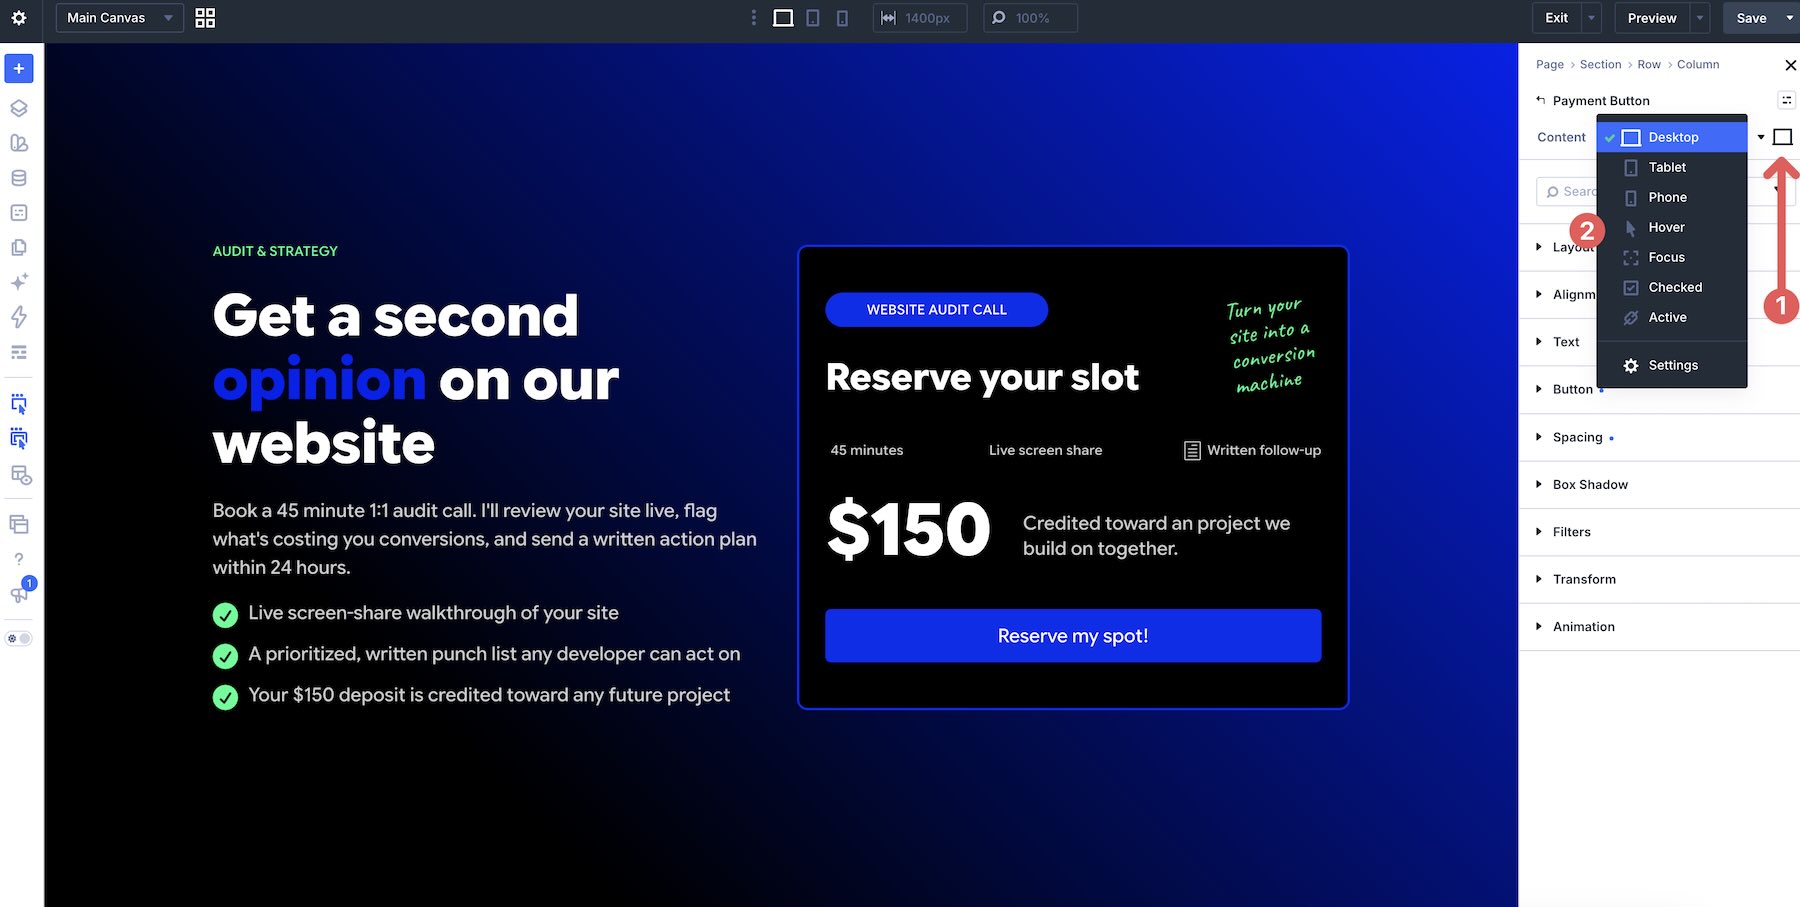
Once the styling is ready, click the Preset icon in the module’s header.
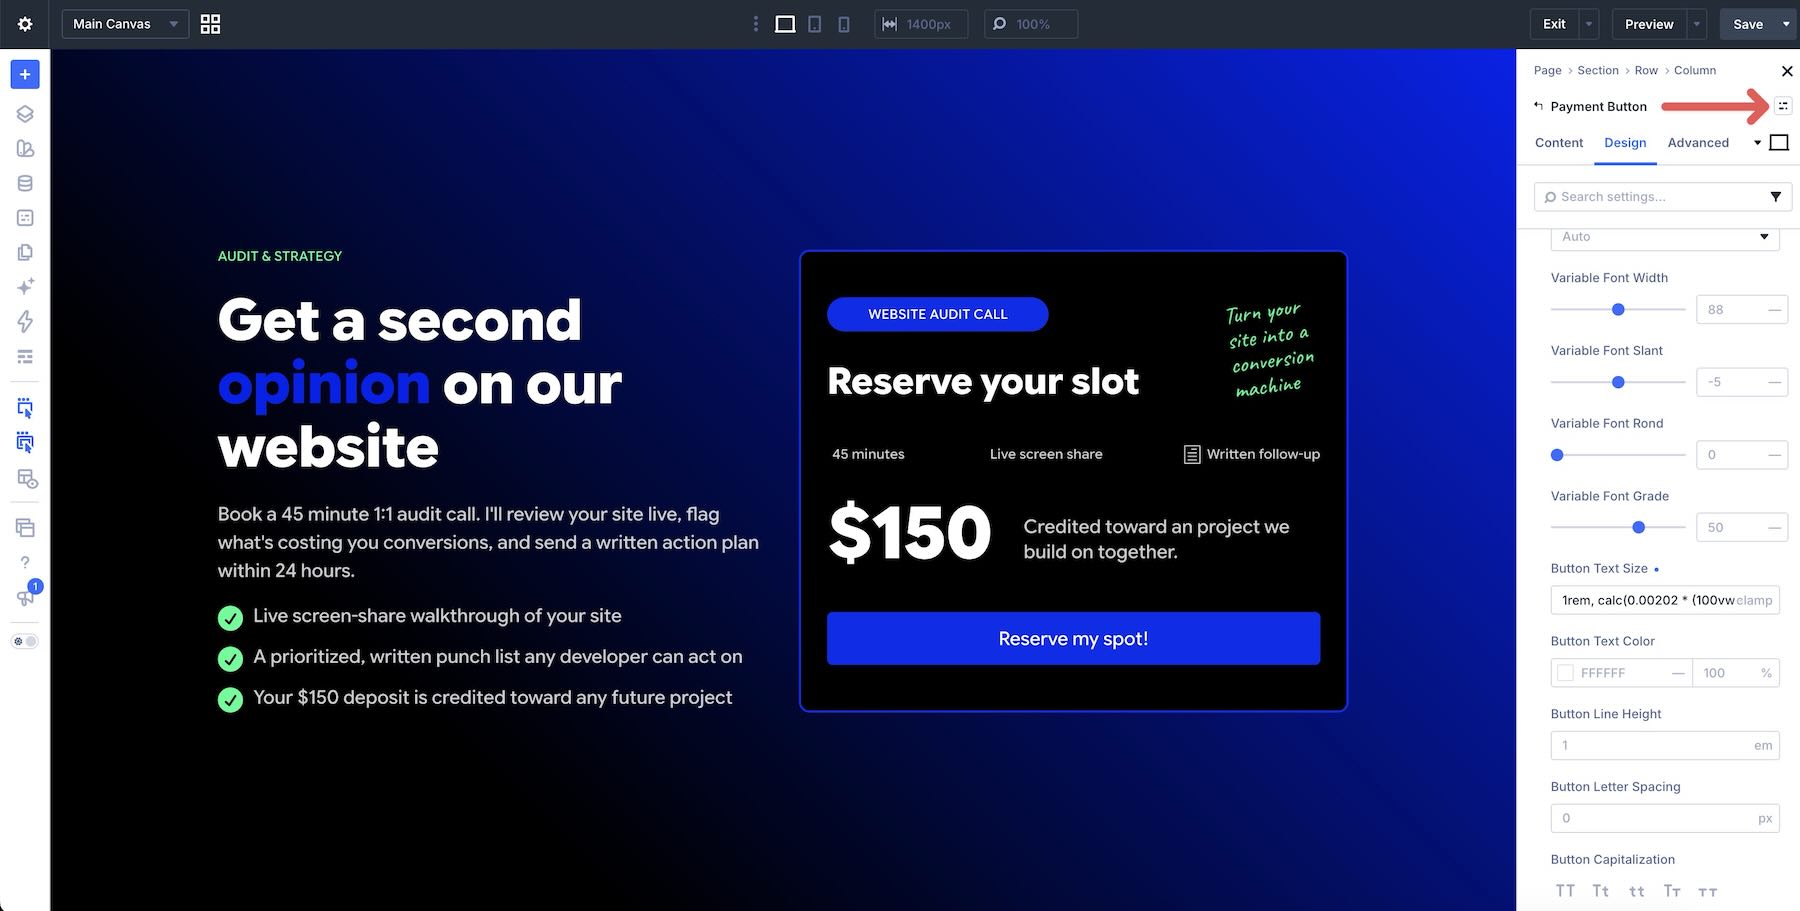
Choose New Preset From Current Styles.
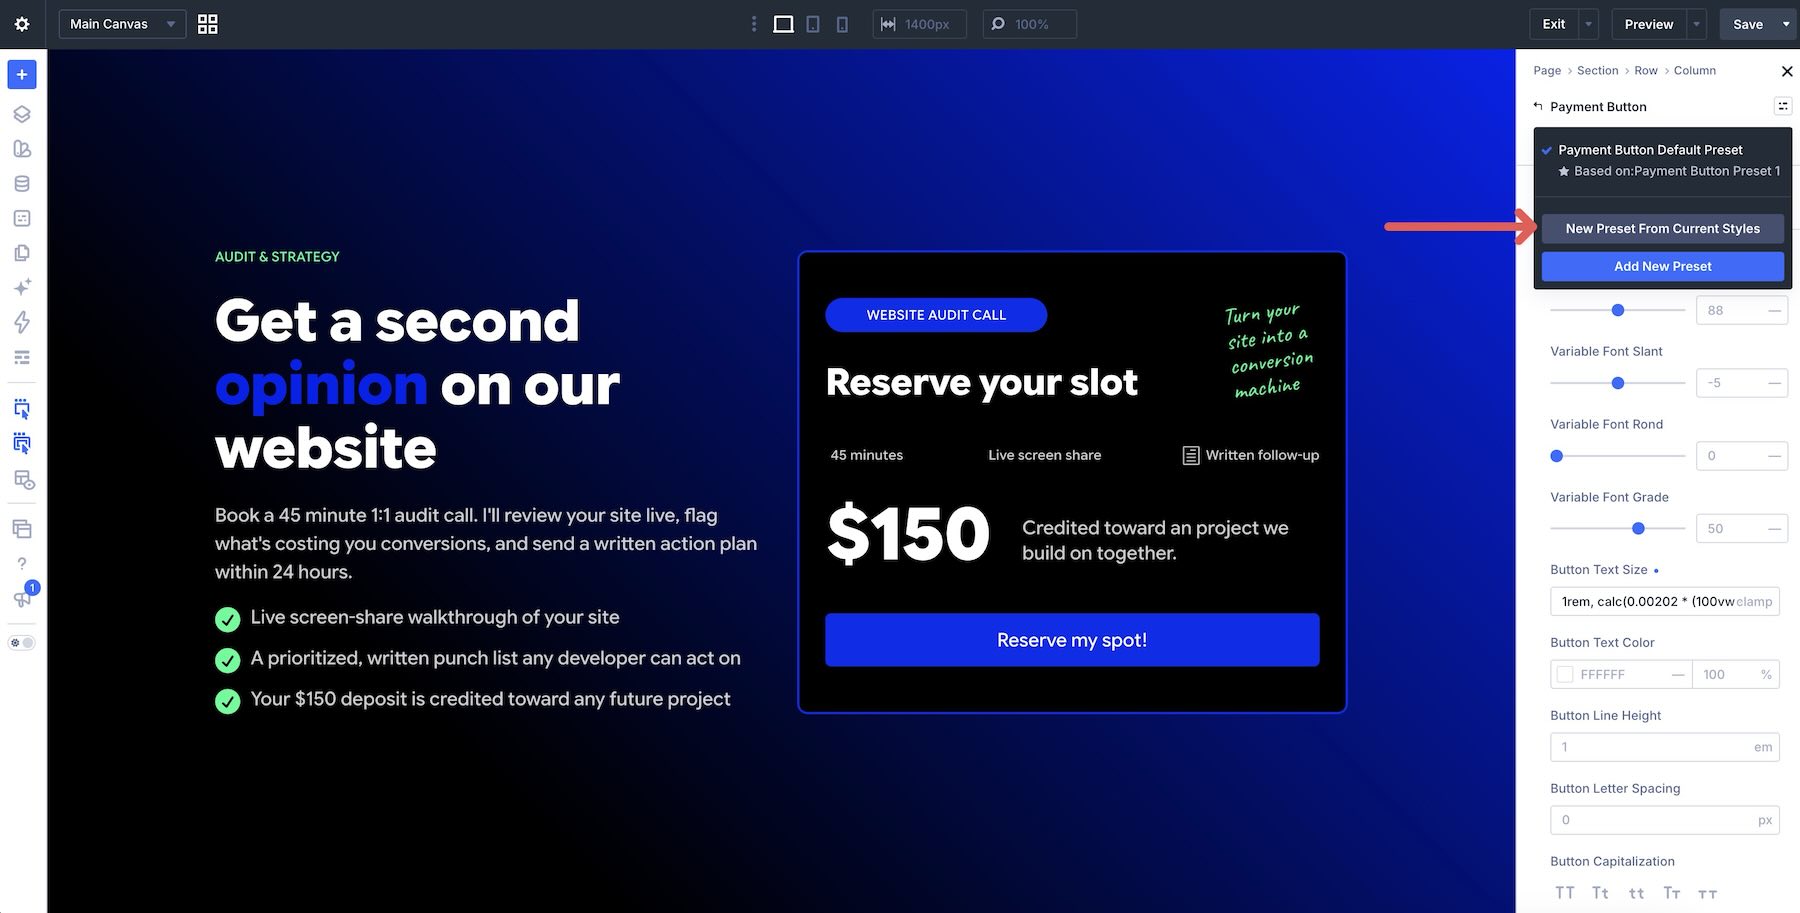
Expand Preset Settings and give the preset a descriptive name.
Review the styles in the Design tab, then click Save Preset. Reuse this Payment Button preset for other offers, while configuring each button’s payment resource separately.
Test The Full Path
Save the page and open it outside the Visual Builder. Click the button and test the complete checkout process for your selected provider.
For PayPal, use Sandbox with a sandbox business resource, then complete the purchase using a sandbox buyer account. Test the Return URL and Cancel URL separately. Before accepting real payments, select your live business resource and switch the environment to Live.
For Stripe, use a Payment Link created in its test environment. A live link remains live regardless of the environment settings used for PayPal in Divi.
In the Stripe dashboard, open a Sandbox or Test Mode, depending on the interface available to your account.
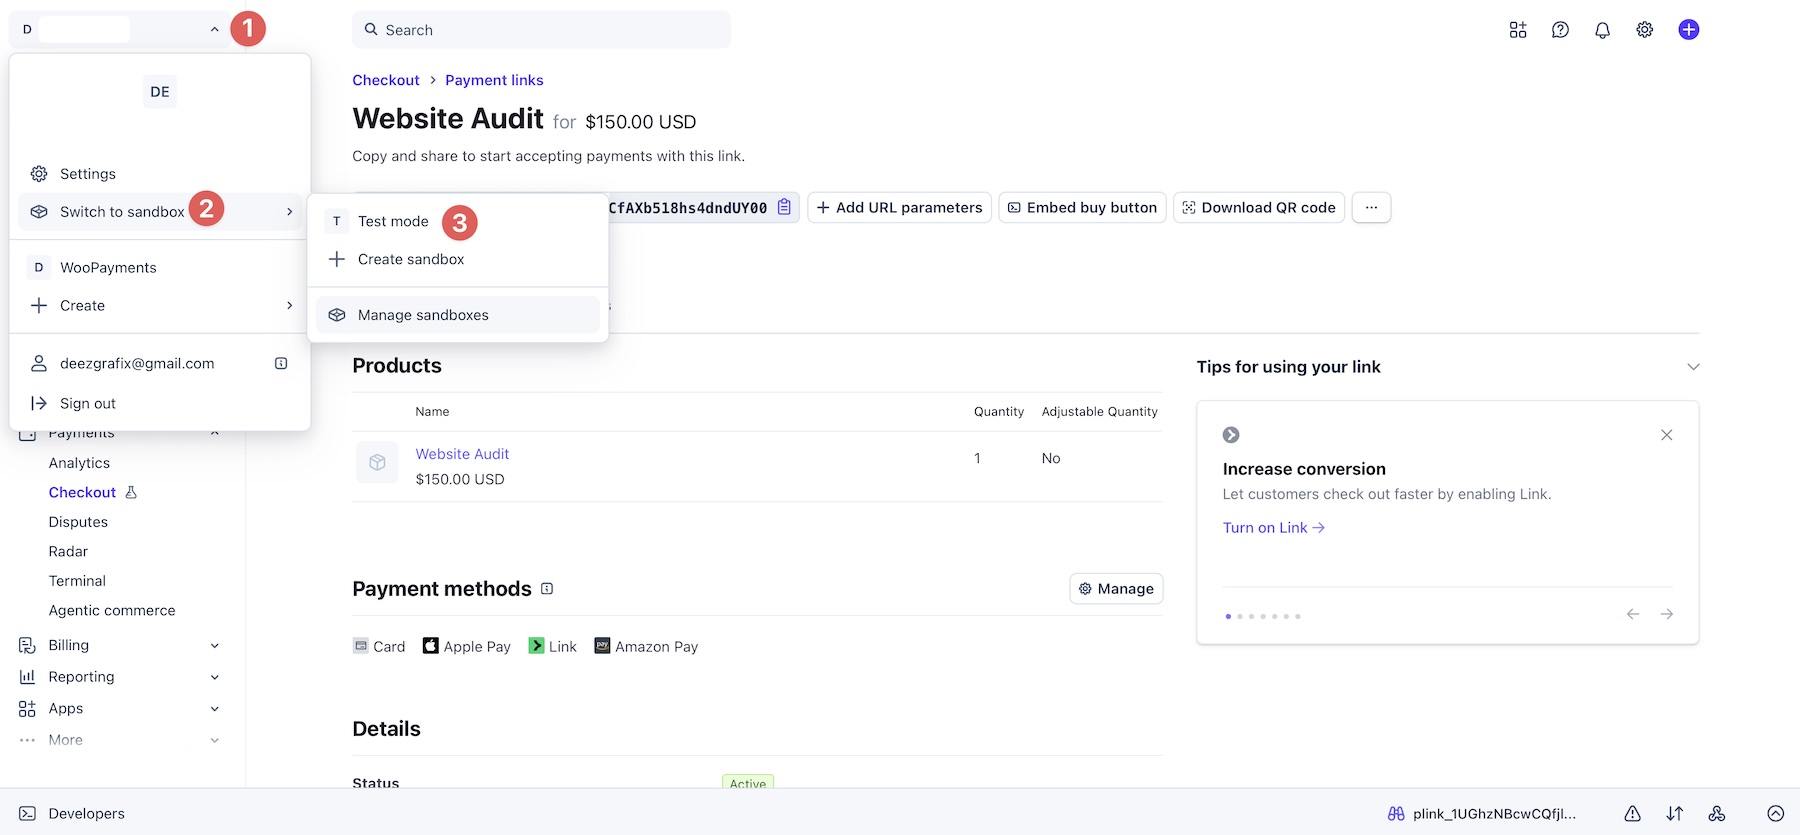
Create a test product and Payment Link matching the offer, if you have not already done so. Save that test URL as a resource in the Payment Button Module.
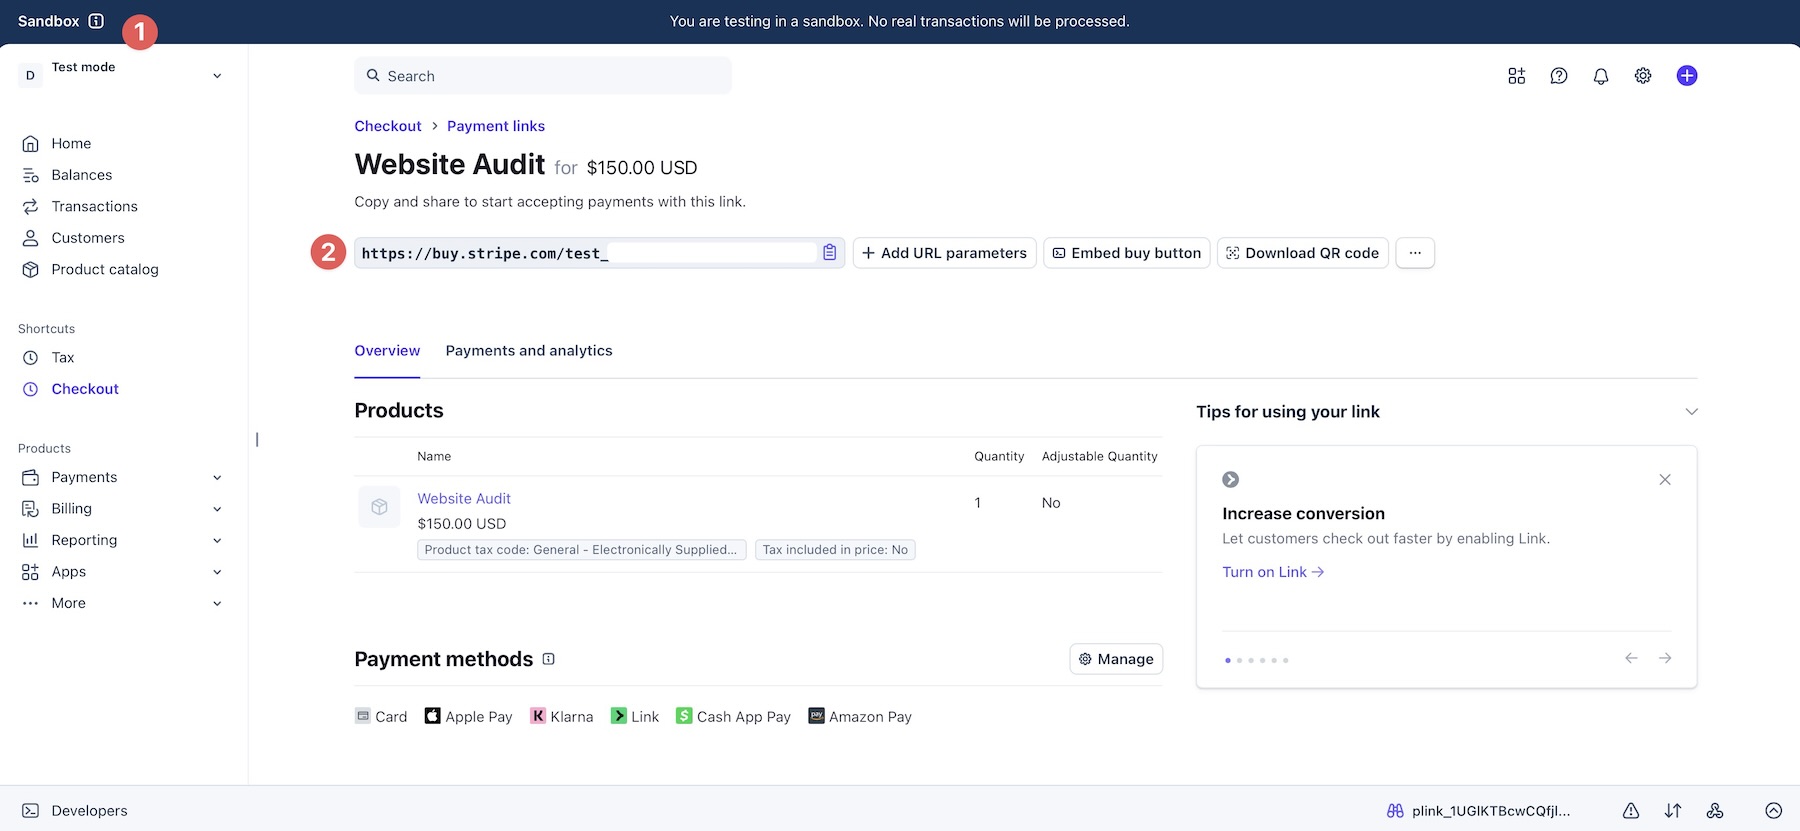
Complete checkout with Stripe’s test payment details. Confirm that the displayed product, amount, and currency match the offer, then check that the after-payment redirect reaches the correct page.
Check the Stripe dashboard for the test transaction. This verifies the payment result separately from the page redirect.
When testing is complete, return to Stripe’s live environment.
Open the corresponding live Payment Link and copy its URL. If you only created the offer in the testing environment, create its live counterpart first. Leaving the sandbox does not convert a test link into a live one.
Add or select the live resource in the Payment Button Module, then save the page.
Your button is now connected to the live checkout. The same setup can be adapted for another service, a donation, or a digital offer, with fulfillment configured separately where needed.
Best Practices
A Payment Button needs both a clear design and a working checkout connection. These checks help keep the offer, payment, and next steps consistent.
Start In Sandbox
For PayPal, match the Sandbox environment with a sandbox receiving account and test buyer. Check both completion and cancellation before switching to your live resource and environment.
For Stripe, test with a Payment Link created in its testing environment. Replace it with the live link only after the test checkout and redirect work as expected.
Connect The Provider Before Publishing
A styled button is not enough to confirm that payments work. Check the selected resource and open checkout from the published page.
Confirm that the receiving account, offer, currency, and amount are correct. This is especially useful after duplicating a button or importing one of the example layouts.
Keep Checkout And Fulfillment Separate
The module connects visitors to payment, but it does not create a complete store or fulfillment system. Arrange any scheduling, ticket issuance, download delivery, or paid access separately.
If you need those processes managed within WordPress, consider WooCommerce or a suitable booking, ticketing, or membership solution. Provider-side checkout options do not automatically add those capabilities to your Divi site.
Create The Thank-You Page First
Give buyers a clear next step, such as booking instructions, delivery information, or a confirmation message.
For PayPal, set this page as the module’s Return URL. For Stripe, choose it in the Payment Link’s after-payment settings. Verify payment through the provider or your fulfillment integration before granting anything that requires a confirmed purchase.
Match The Copy To The Offer
Labels such as “Donate $25,” “Pay For Your Audit,” and “Buy The Guide” explain the action in context. Include the price near the button, and make the offer’s contents and next steps clear.
Use wording such as “Claim Seat” only when your registration workflow actually handles availability. The button label should reflect what the complete process does.
Check Completion And Cancellation
Confirm that successful checkout reaches the intended confirmation page.
For PayPal, test the module’s Cancel URL separately and send visitors back to the offer or a useful retry page. Stripe’s after-payment setting controls completed checkout, not an equivalent Divi Cancel URL. Check the return or back navigation available in your Stripe checkout rather than treating the two providers’ settings as interchangeable.
Reuse Styling With Presets
Use a Payment Button Element Preset across similar payment modules, or compatible Button Option Group Presets when sharing styling with other button elements.
Configure the payment details for each offer separately. For example, three fixed donation amounts and one custom-amount option require four buttons or an appropriate provider-side amount-selection flow. Reusing the styling should not accidentally reuse the wrong payment destination.
Download The Files
To help you get started, we’ve included a ZIP file containing the examples from this post. It includes five section layouts, plus styled thank-you and cancellation layouts that you can import into your Divi Library.

Download and extract the ZIP file. In your WordPress dashboard, go to Divi > Divi Library and click Import & Export.
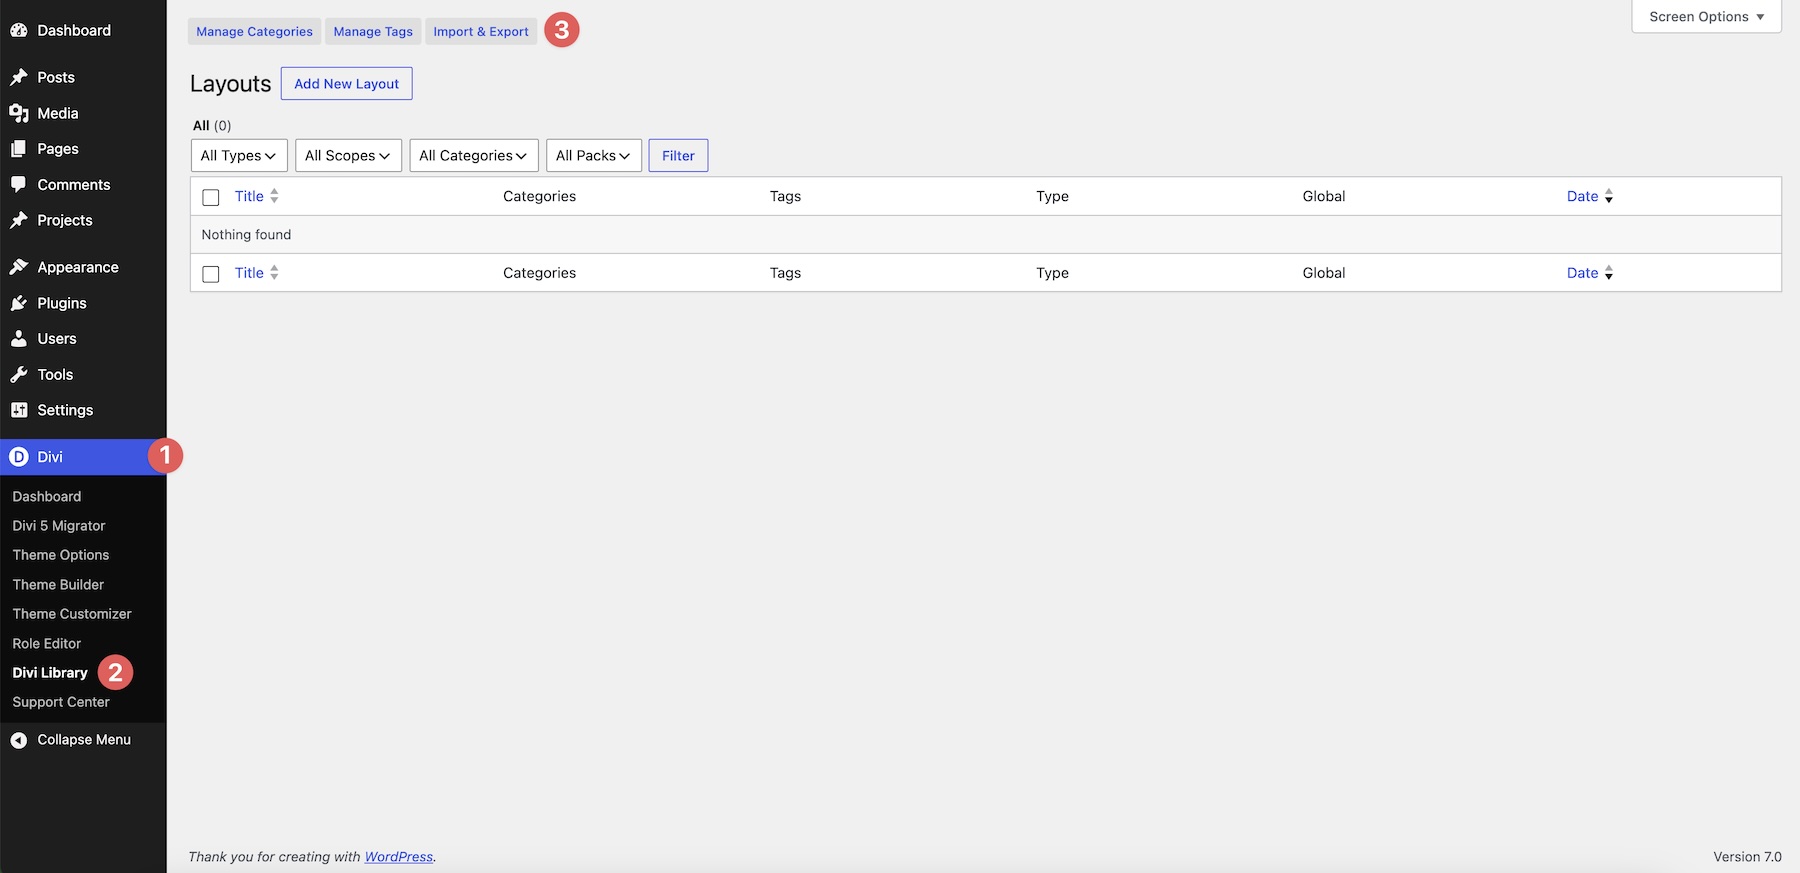
Select the Import tab. Choose Payment Button examples – ALL.json to import the bundled layouts, or select an individual example file. Then click Import Divi Builder Layouts.
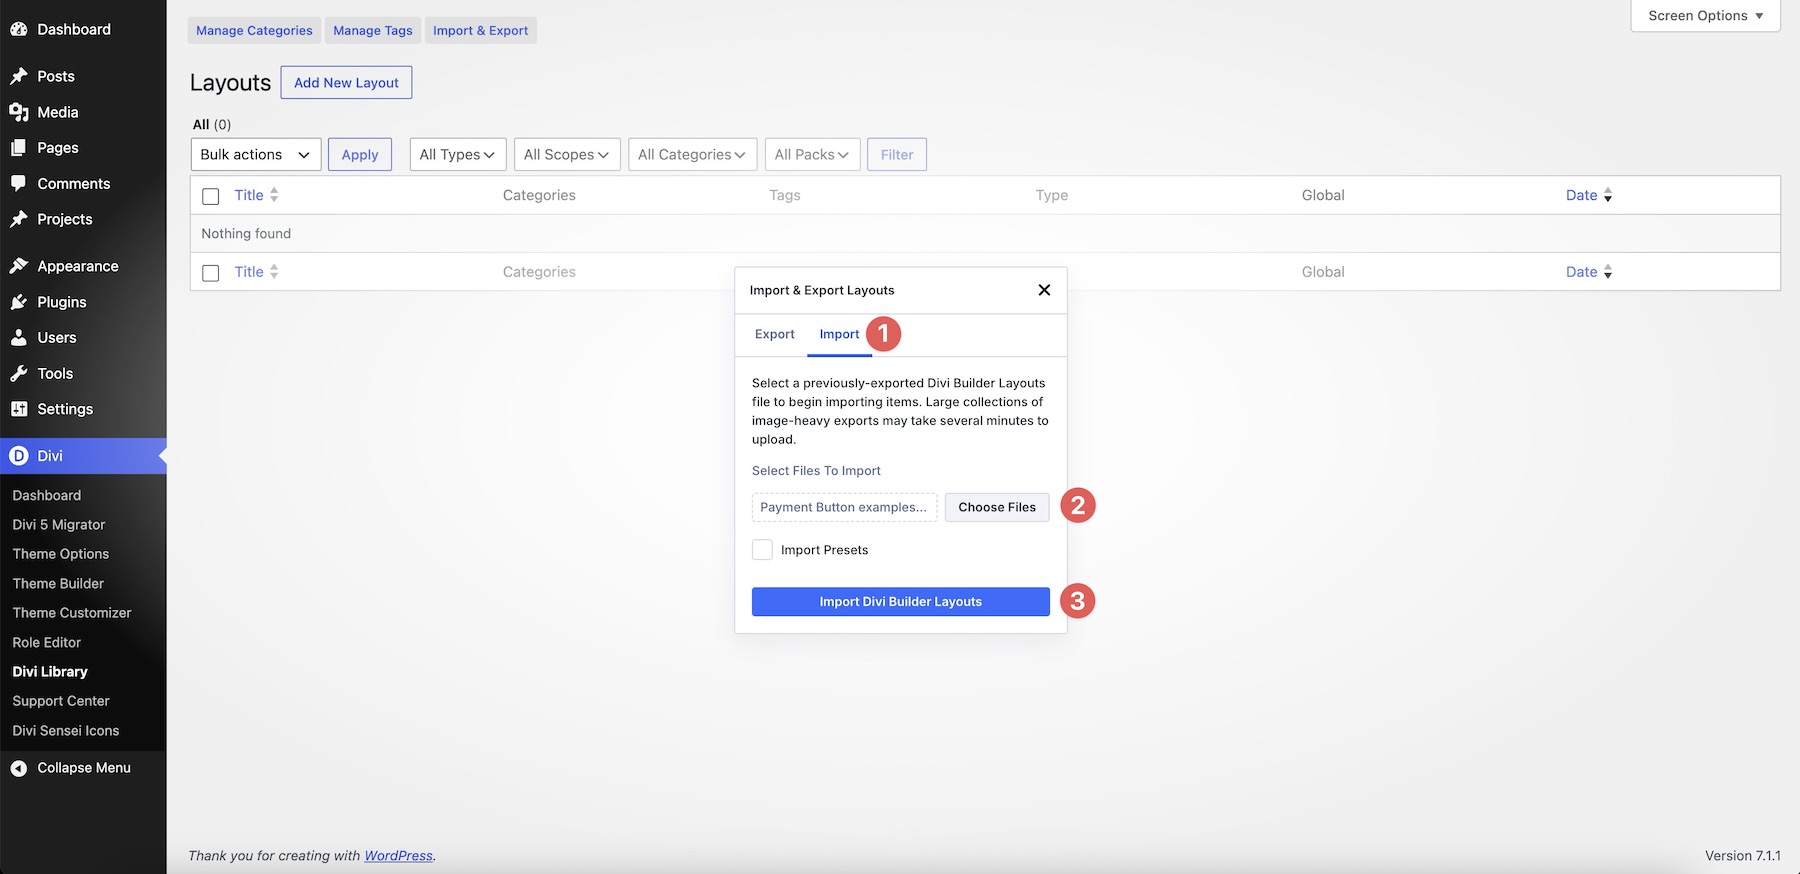
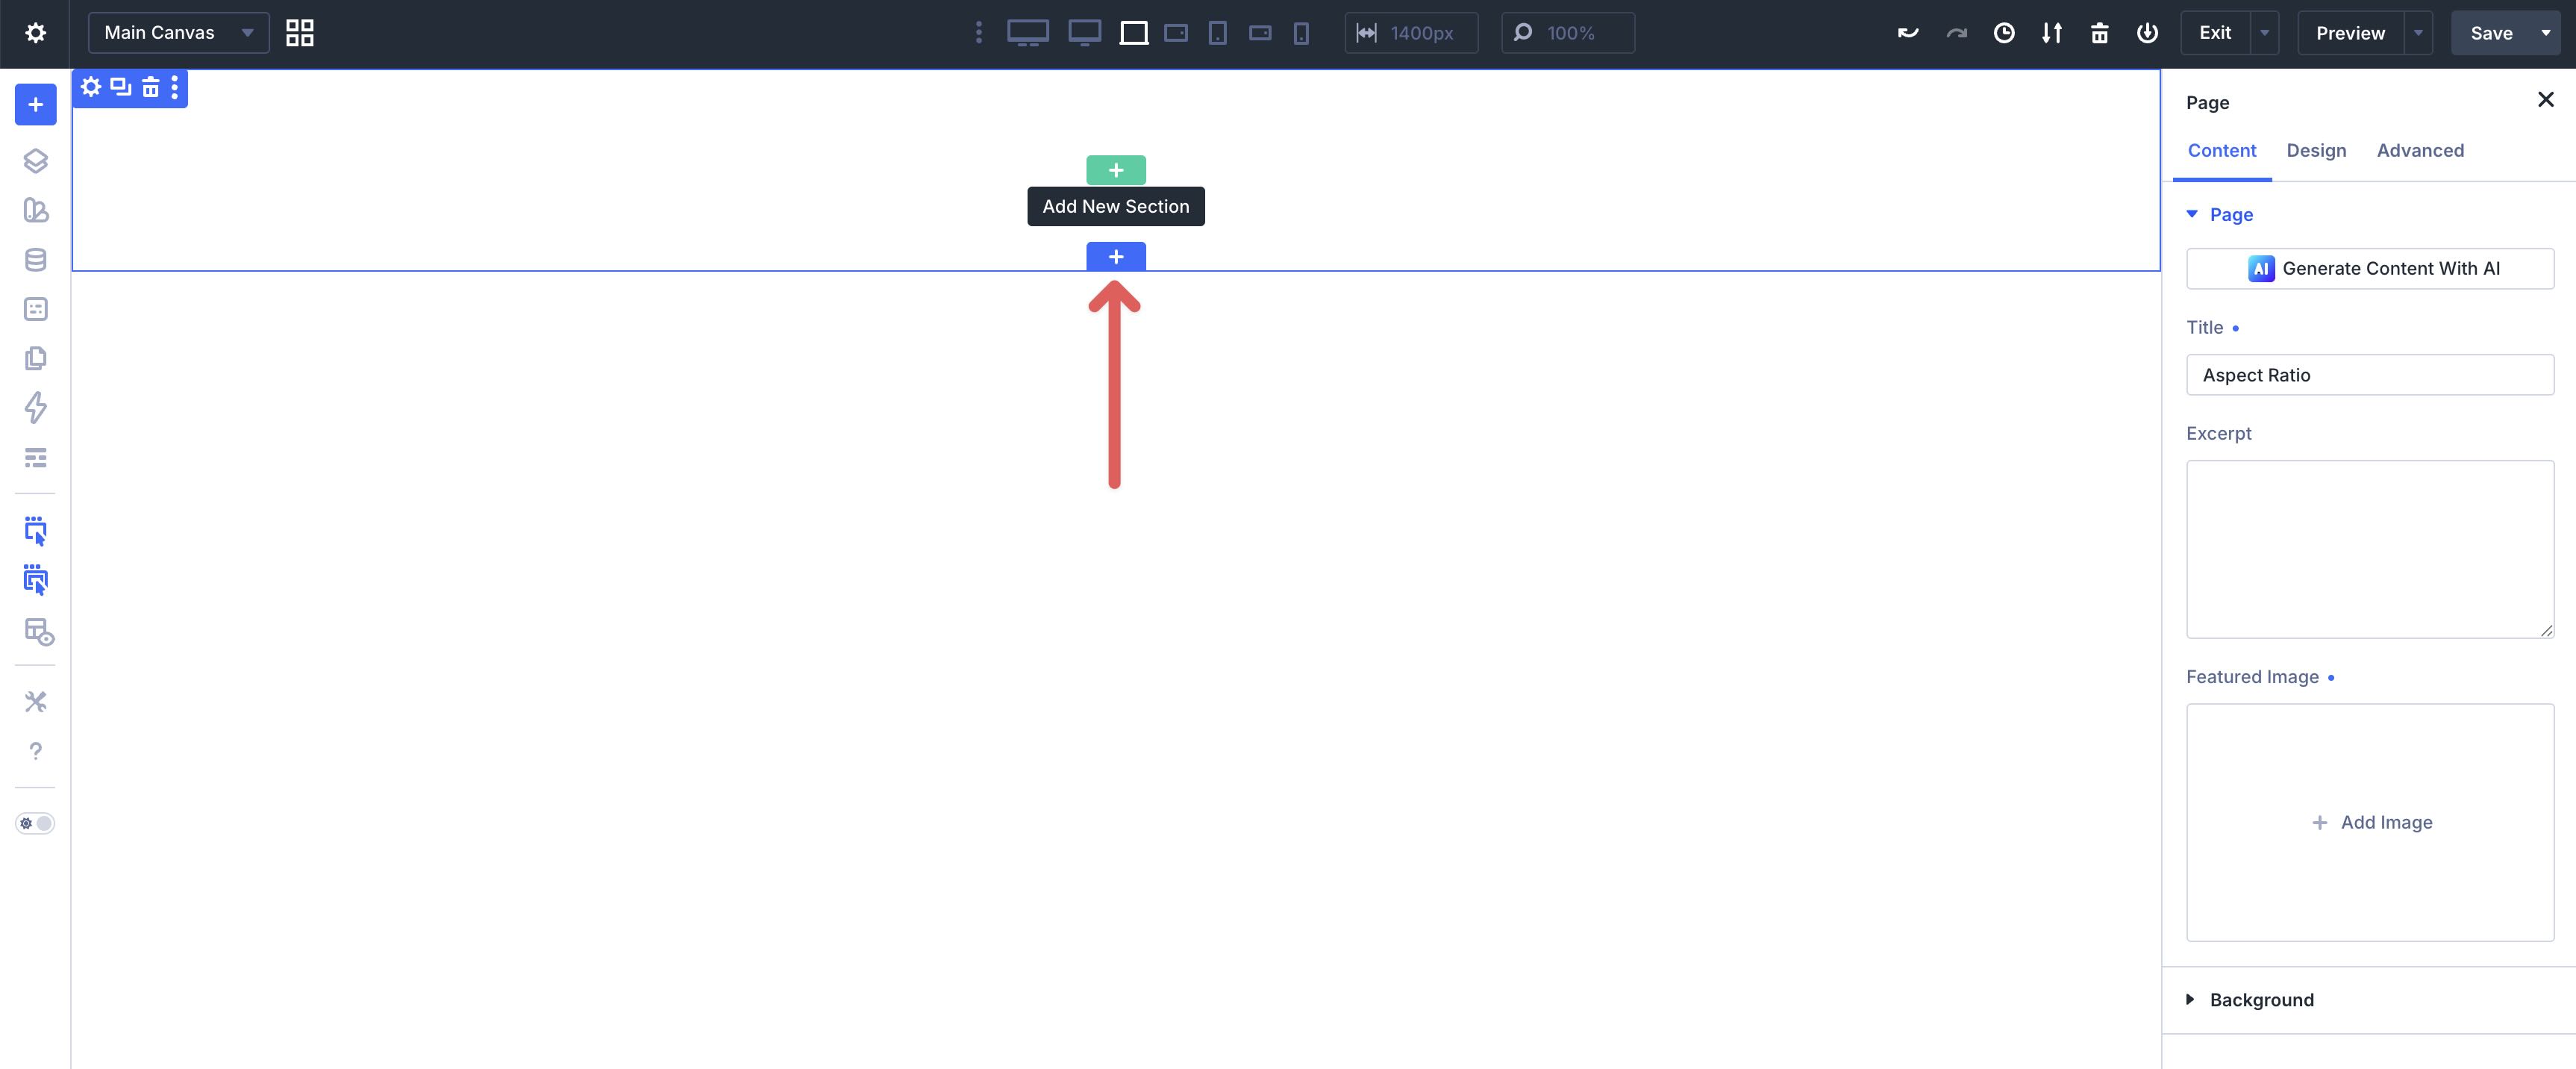
Once imported, create a page or open an existing one in the Visual Builder. Click the blue + Add New Section icon.
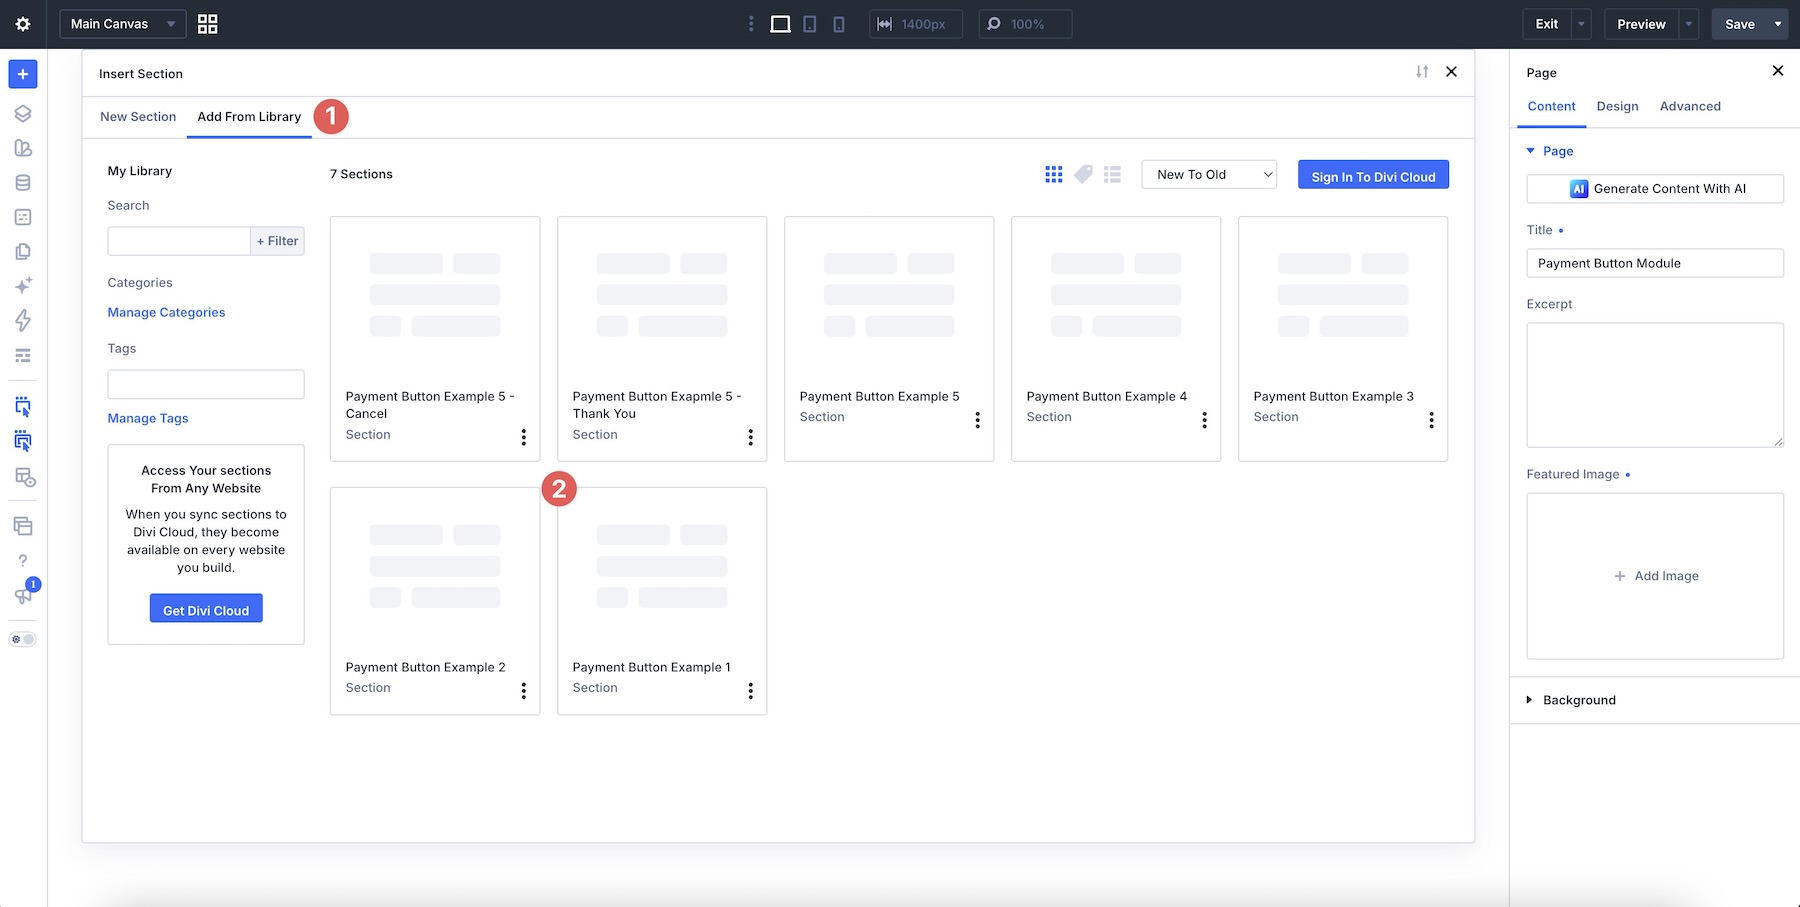
Open Add From Library and choose a layout.
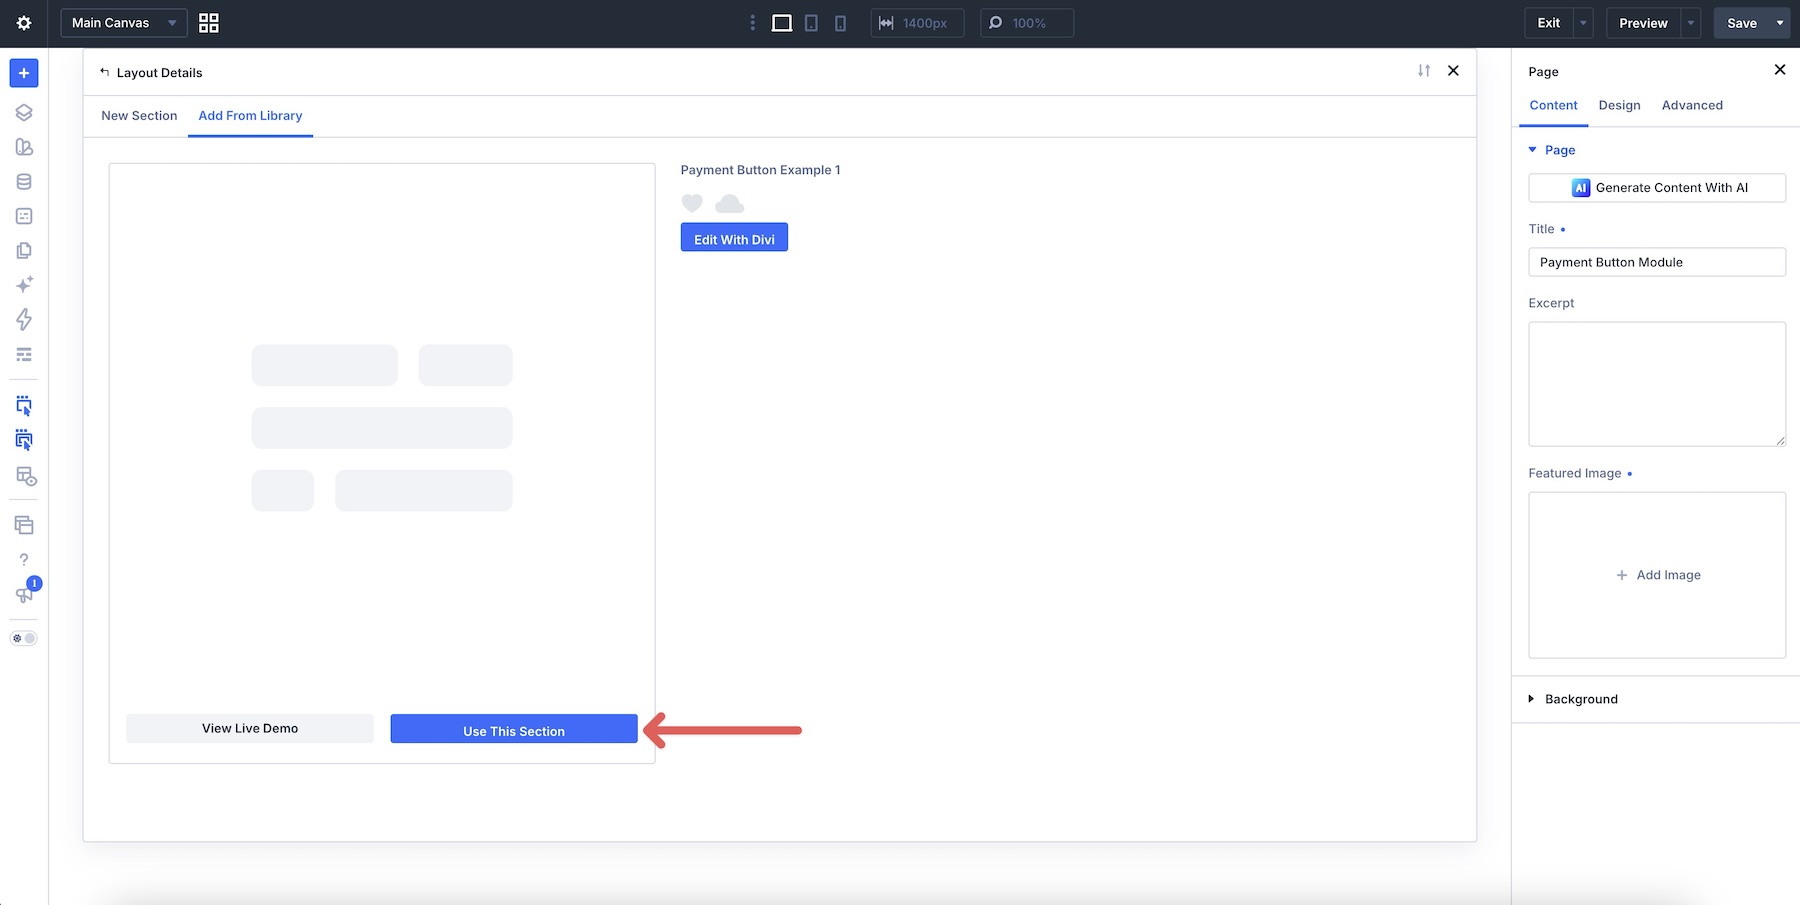
Click Use This Section to add it to your page.
Replace the example content, connect your own payment resources, and update the amounts and destination URLs before publishing. Test each button using the provider-specific steps above.

Accept Payments Without Building A Store
The Payment Button Module gives you a direct way to connect an offer to PayPal or Stripe checkout. It is useful for donation pages, individual services, and other paid offers that do not need a full storefront.
You design the button in Divi 5, configure the payment details for your chosen provider, and decide what buyers should do next. Presets help keep the design consistent across your pages, while your payment provider manages the transactions.
Start with one of the included layouts, connect your own resource, and test the checkout before going live. If the offer also needs delivery, scheduling, or access management, connect that part of the workflow as well.
What would you use the Payment Button Module for? Let us know in the comments.
The post Exploring Divi 5’s New Payment Button Module appeared first on Elegant Themes Blog.
The Tech Zone


Comments
Post a Comment