How To Connect Instagram Feeds To Client Websites With Divi 5
The Instagram Feed Module in Divi 5 is easy to add to a page. Connecting it to a client’s Instagram account is the more involved part because the module requires an Access Token generated through a Facebook App in Meta’s developer dashboard.
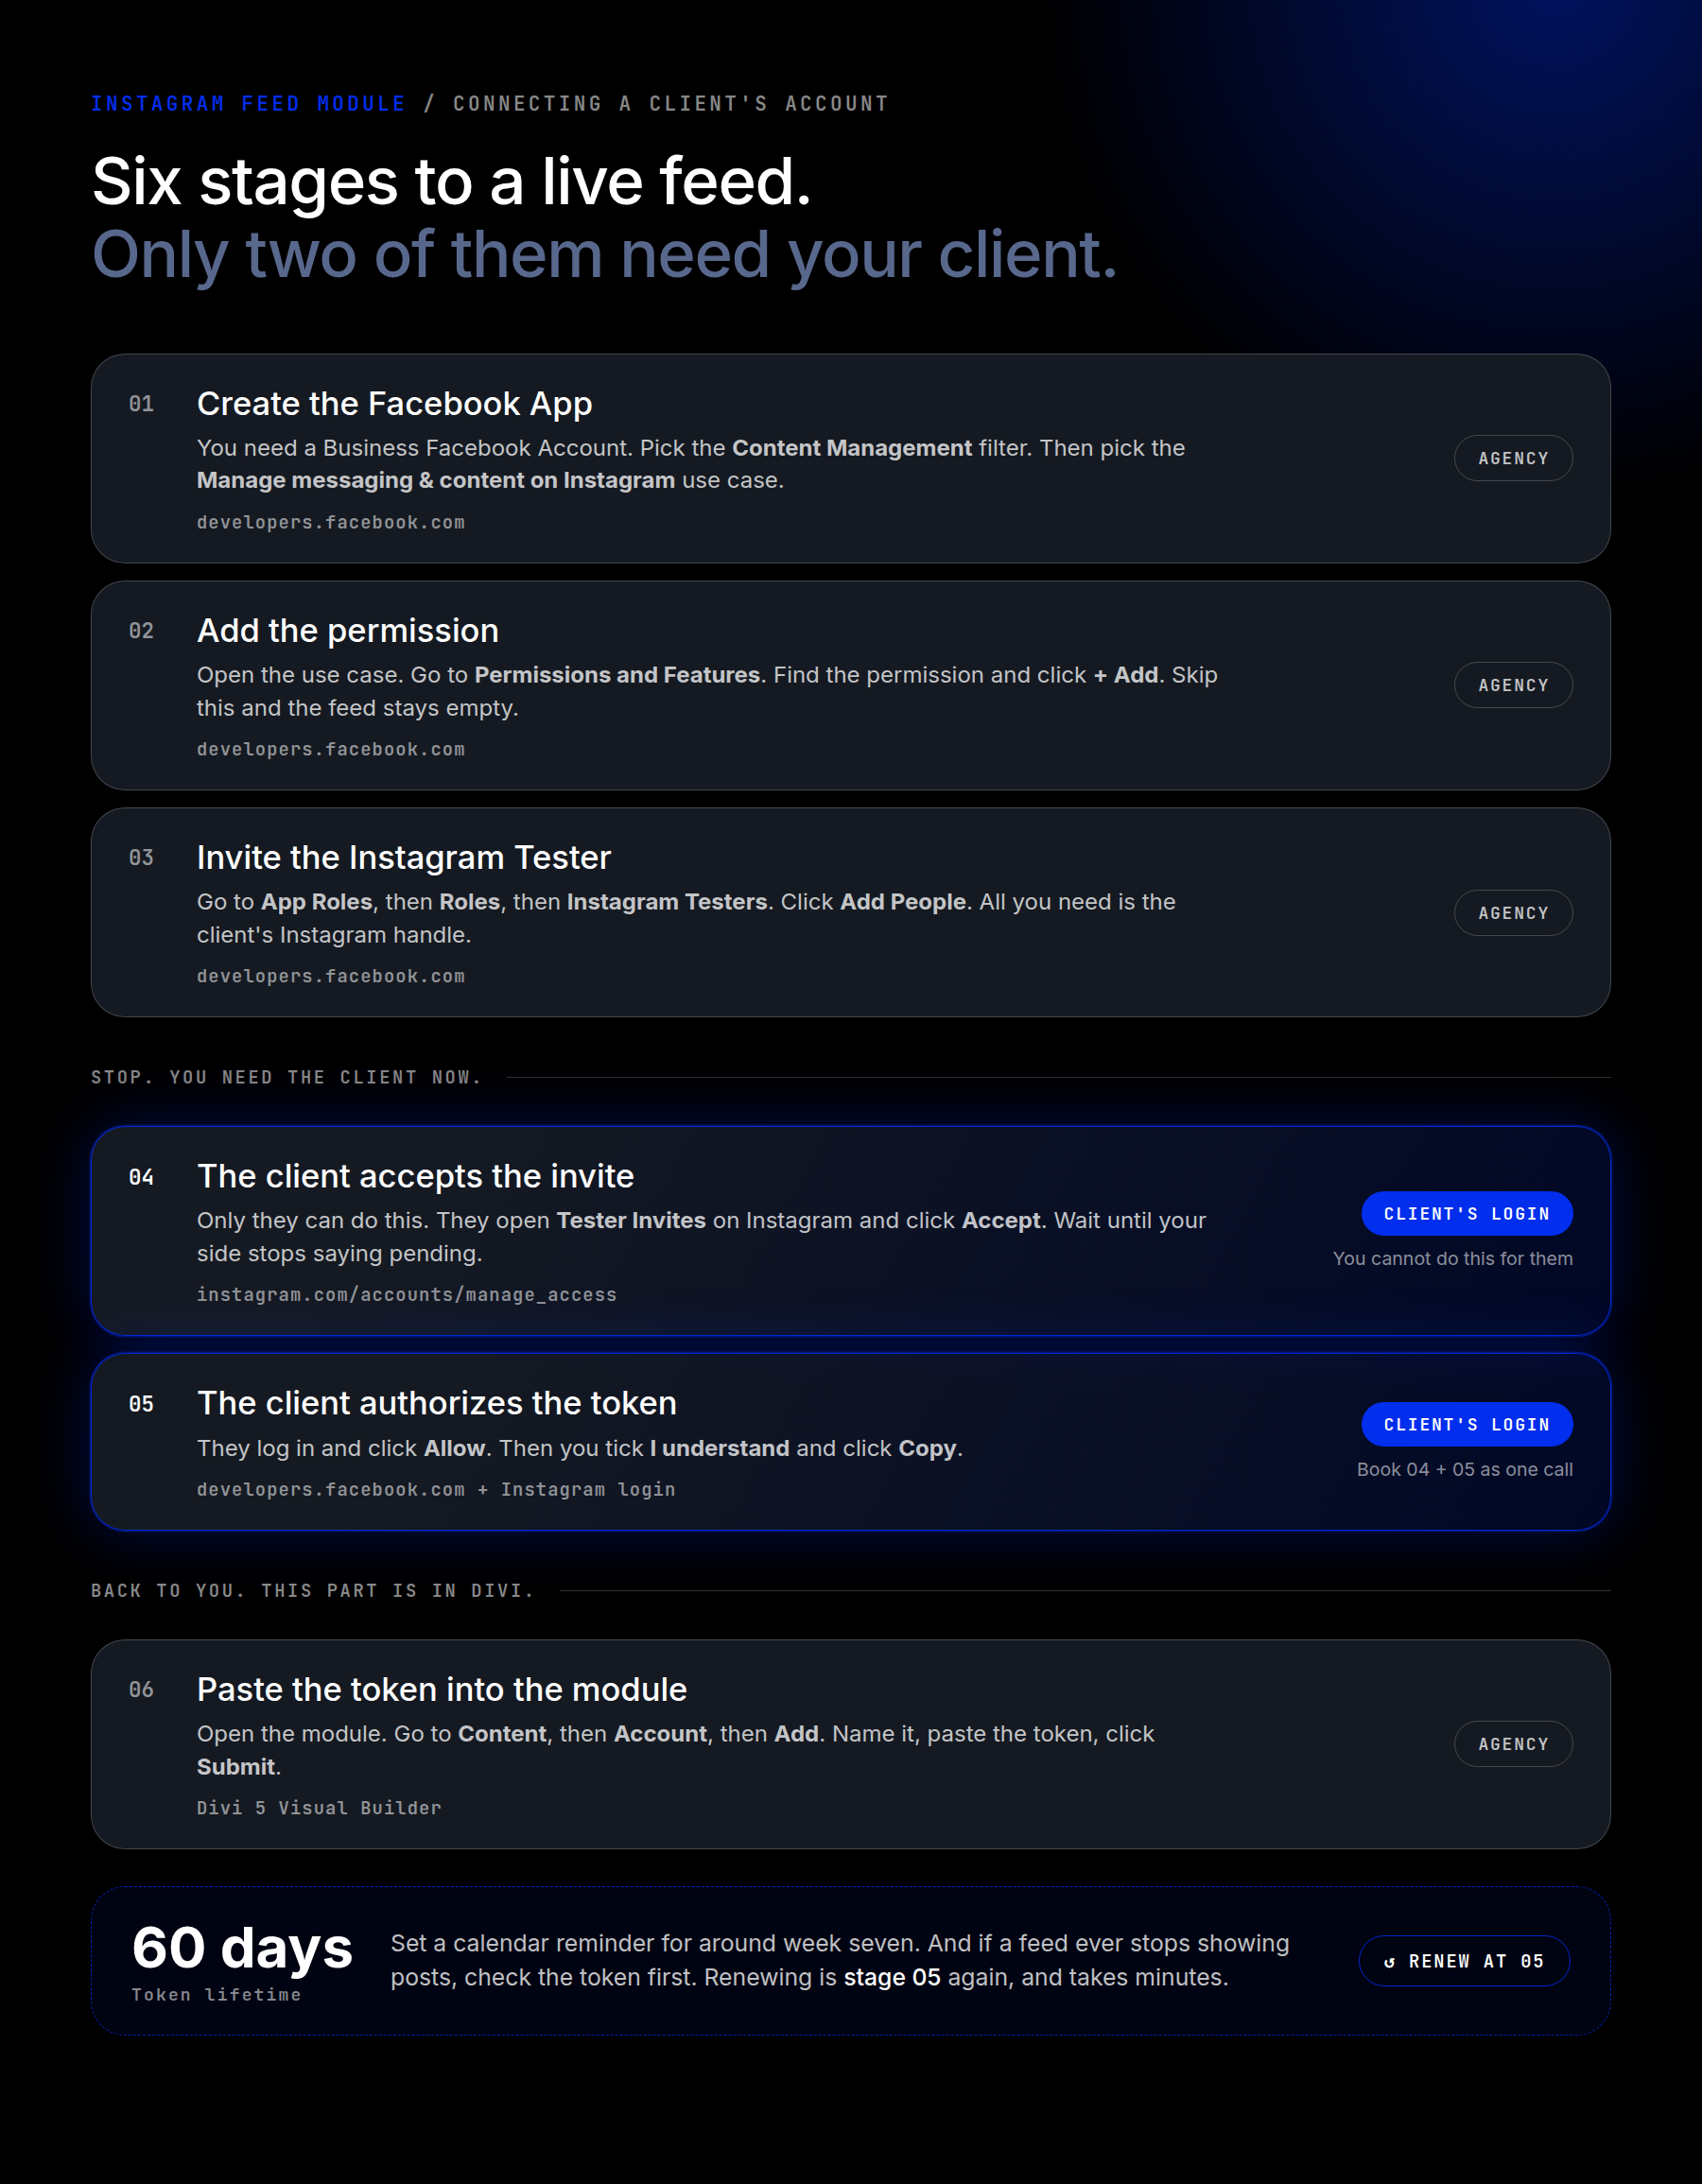
Most of the setup can be completed without the client. Two checkpoints require the Instagram account owner’s login: accepting the tester invitation and authorizing the Access Token. Prepare everything else first, and you can handle both during one focused client call instead of creating a long chain of messages and follow-ups.
In this tutorial, we’ll cover the complete agency workflow, including who should own the Facebook App, what to prepare in advance, what the client must do, and how to connect the account in Divi 5. We’ll also show you how to reuse a client’s existing Divi styles when designing the feed and keep the connection working after launch.
Decide Who Owns The Facebook App First
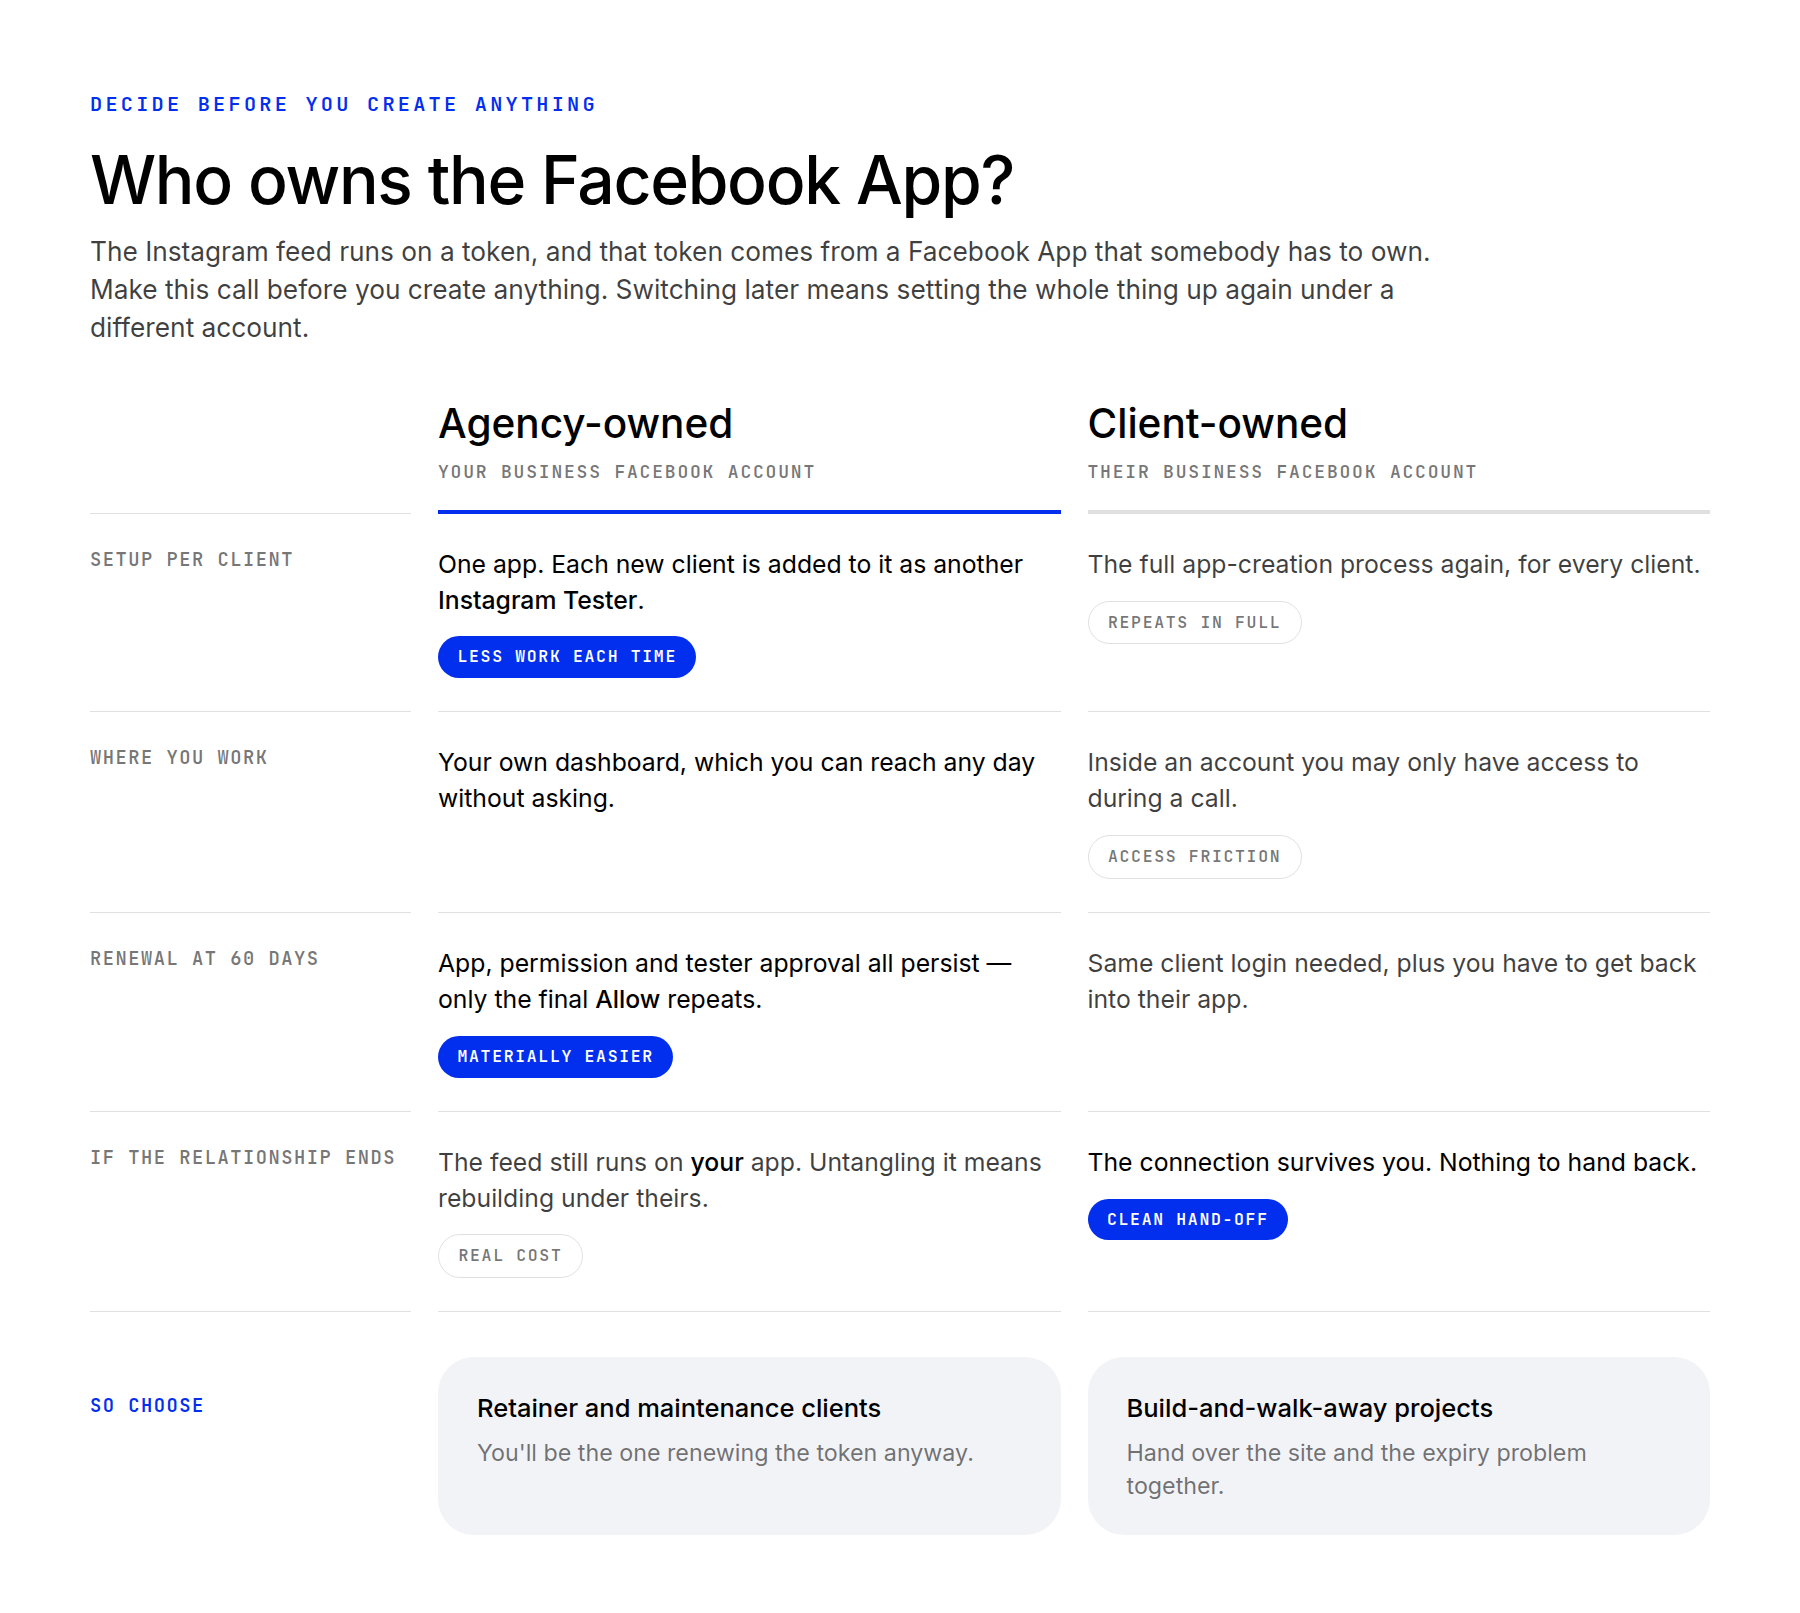
This decision affects maintenance and handoff, so make it before creating the app.
Agency-owned. Create and manage the Facebook App under your agency’s Business Facebook Account, then add the client’s Instagram account as an Instagram Tester. This gives you one place to manage permissions and generate replacement tokens. The tradeoff is that the connection depends on an app your agency controls. If the relationship ends, moving it to the client will require repeating the setup under their account.
Client-owned. Create the app under the client’s Business Facebook Account while guiding them through the process on a screen share. The connection stays with the client after the project ends, which usually makes this the better arrangement for a build-and-handoff project. The tradeoff is repeating the setup for each client inside an account you may not be able to access later.
Use an agency-owned app for clients whose websites you maintain on an ongoing basis. Use a client-owned app when you are delivering the website and transferring responsibility for future maintenance.
Prepare Everything Before The Client Joins
With an agency-owned app, most of the process requires nothing from the client. Complete these steps before the call so their involvement stays limited to accepting the invitation and authorizing the connection.
Using a client-owned app instead? The workflow stays largely the same, but the app must be created inside the client’s Business Facebook Account. That means this section happens with the client on a screen share rather than in advance. The permission, tester invitation, and token-generation steps are otherwise the same.
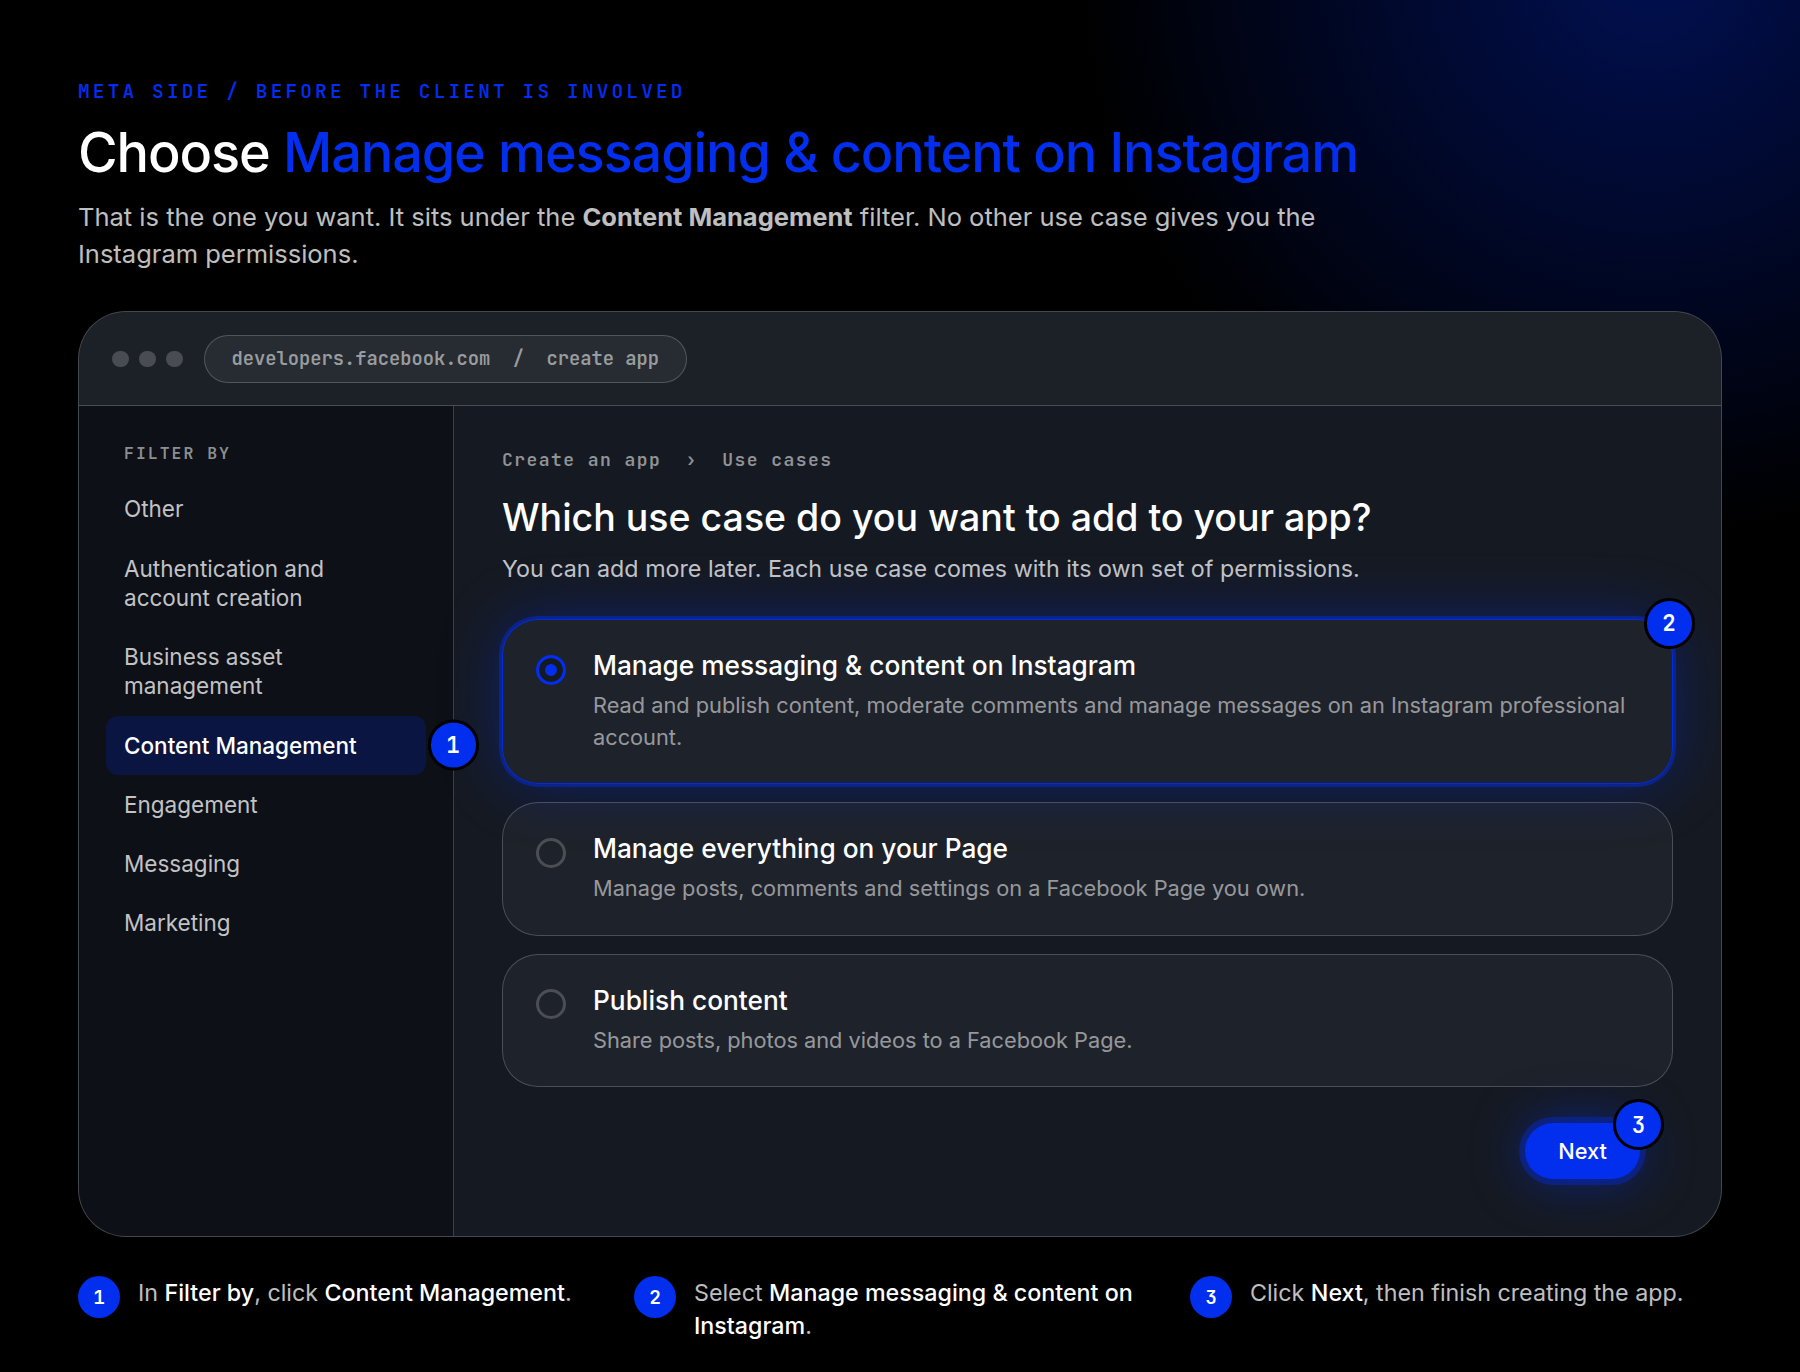
Log in to the Meta for Developers dashboard and click Create App. Enter an app name and contact email, then click Next. In the Filter By sidebar, choose Content Management, select Manage Messaging & Content On Instagram, and click Next. Select the relevant profile, continue through the requirements screen, click Create App, and confirm the action with your Facebook password.
Choosing the correct use case matters. If you select the wrong one, the permissions and token-generation controls needed later may not appear. Elegant Themes documents the complete sequence in How To Connect The Instagram Feed Module With An Instagram Account In Divi 5. Keep that guide open the first time you complete the setup because its screenshots make the Meta portion easier to follow.
Name the app after the client or website rather than after yourself. Clear naming becomes especially important once your dashboard contains several client apps.
Add The Permission And Invite The Client
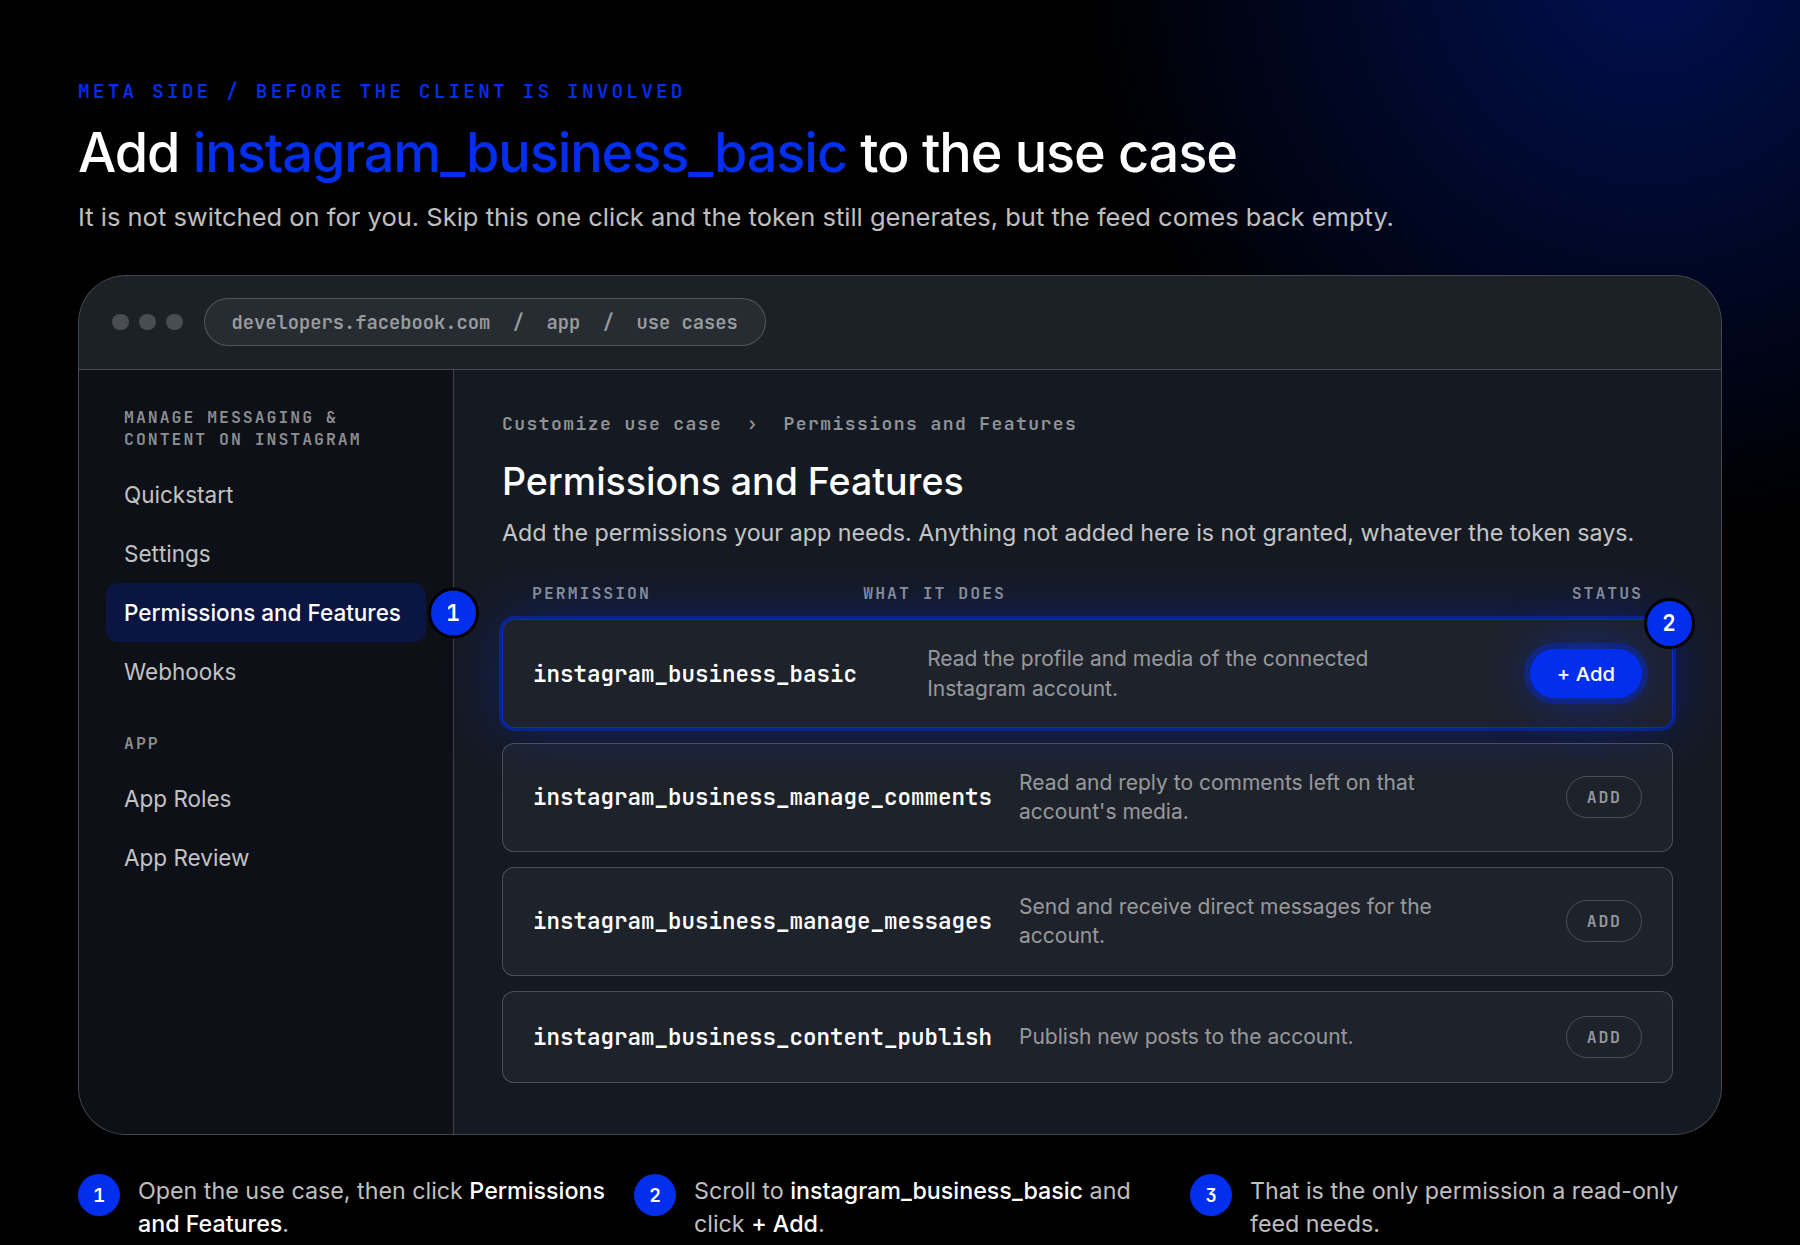
Open Customize The Manage Messaging & Content On Instagram Use Case, click Permissions And Features, find instagram_business_basic, and click + Add. This permission allows the app to read the professional Instagram account’s profile information and media. Meta may display additional permissions associated with the selected use case, but the feed does not need you to configure messaging or publishing access.
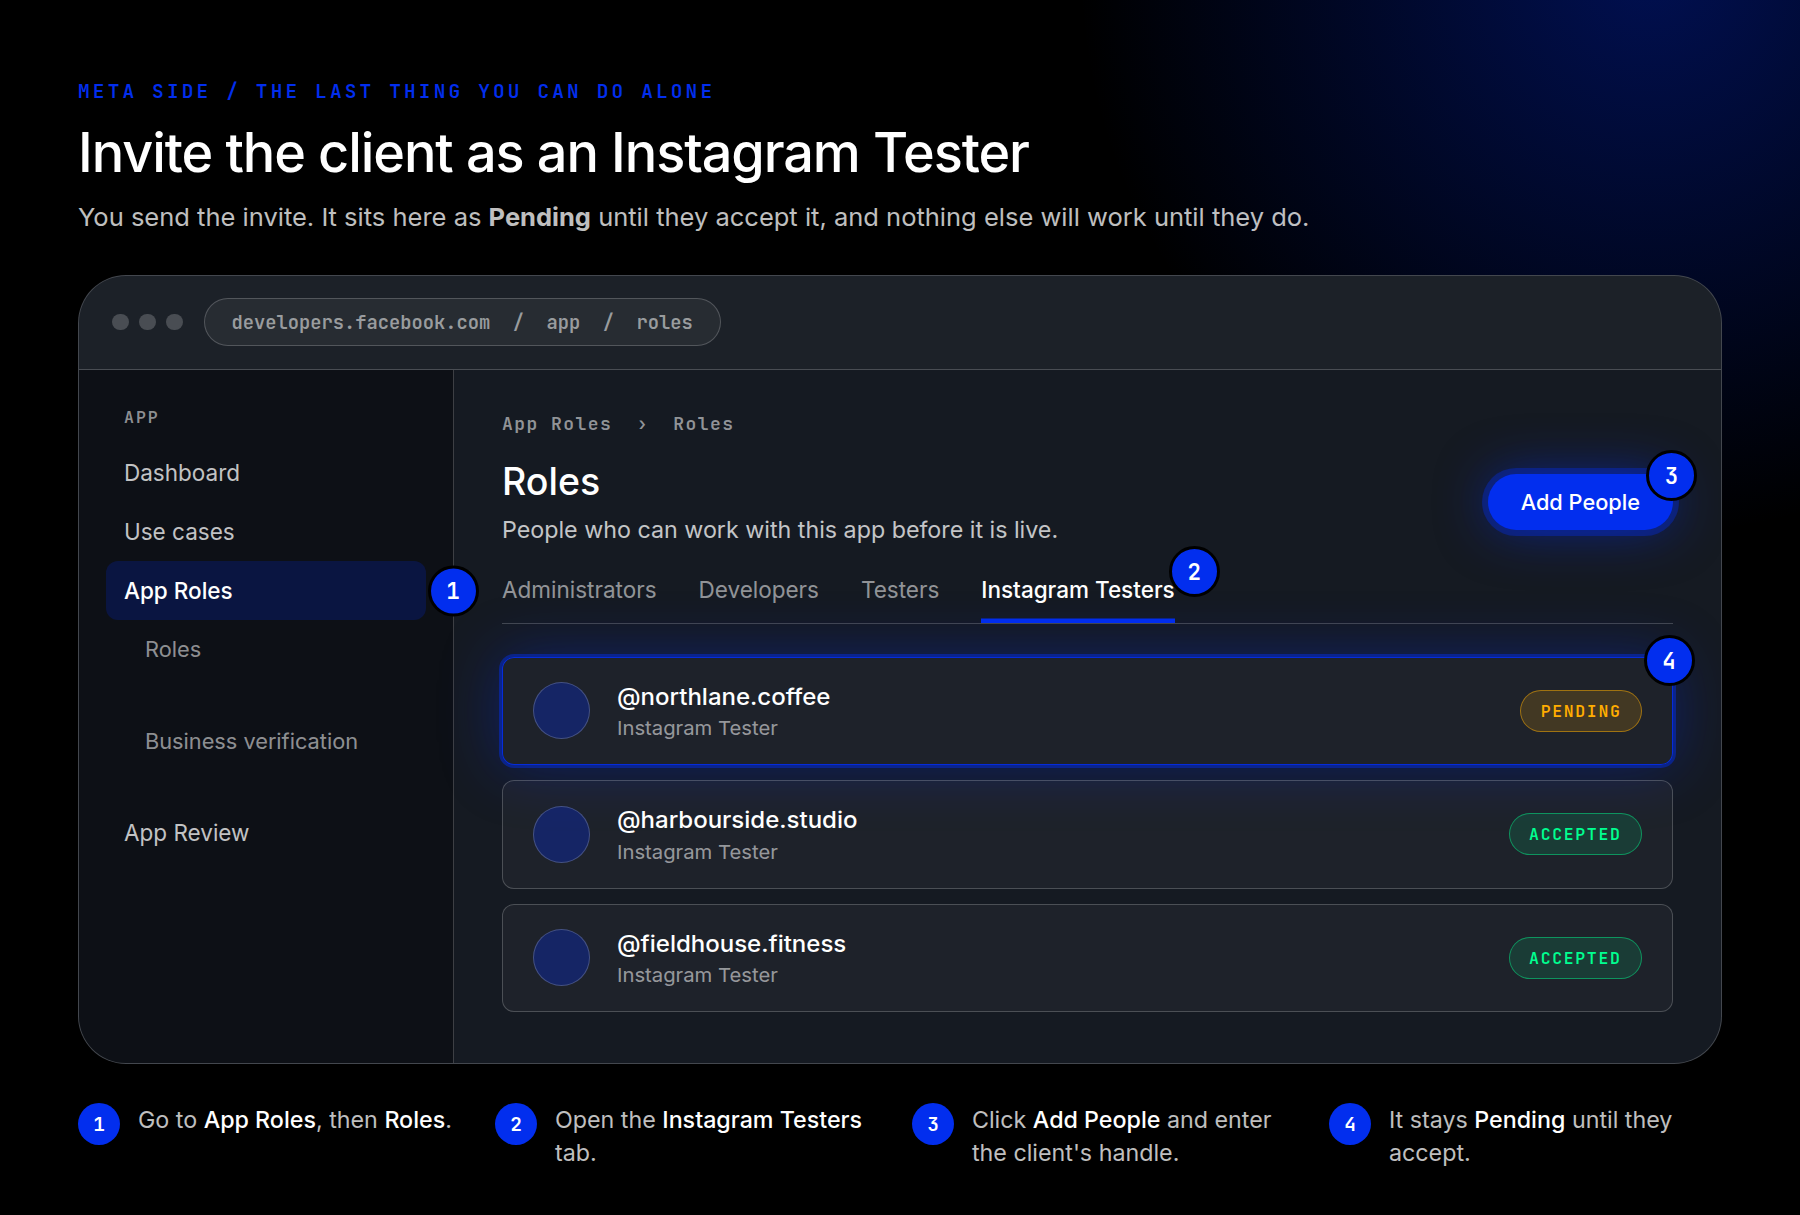
Next, go to App Roles > Roles. Open the Instagram Testers tab, click Add People, choose Instagram Tester, enter the client’s Instagram username, and click Add. This sends the tester invitation to the client’s account.
The Client’s Fifteen Minutes
Two steps require the client to use the Instagram account you are connecting.
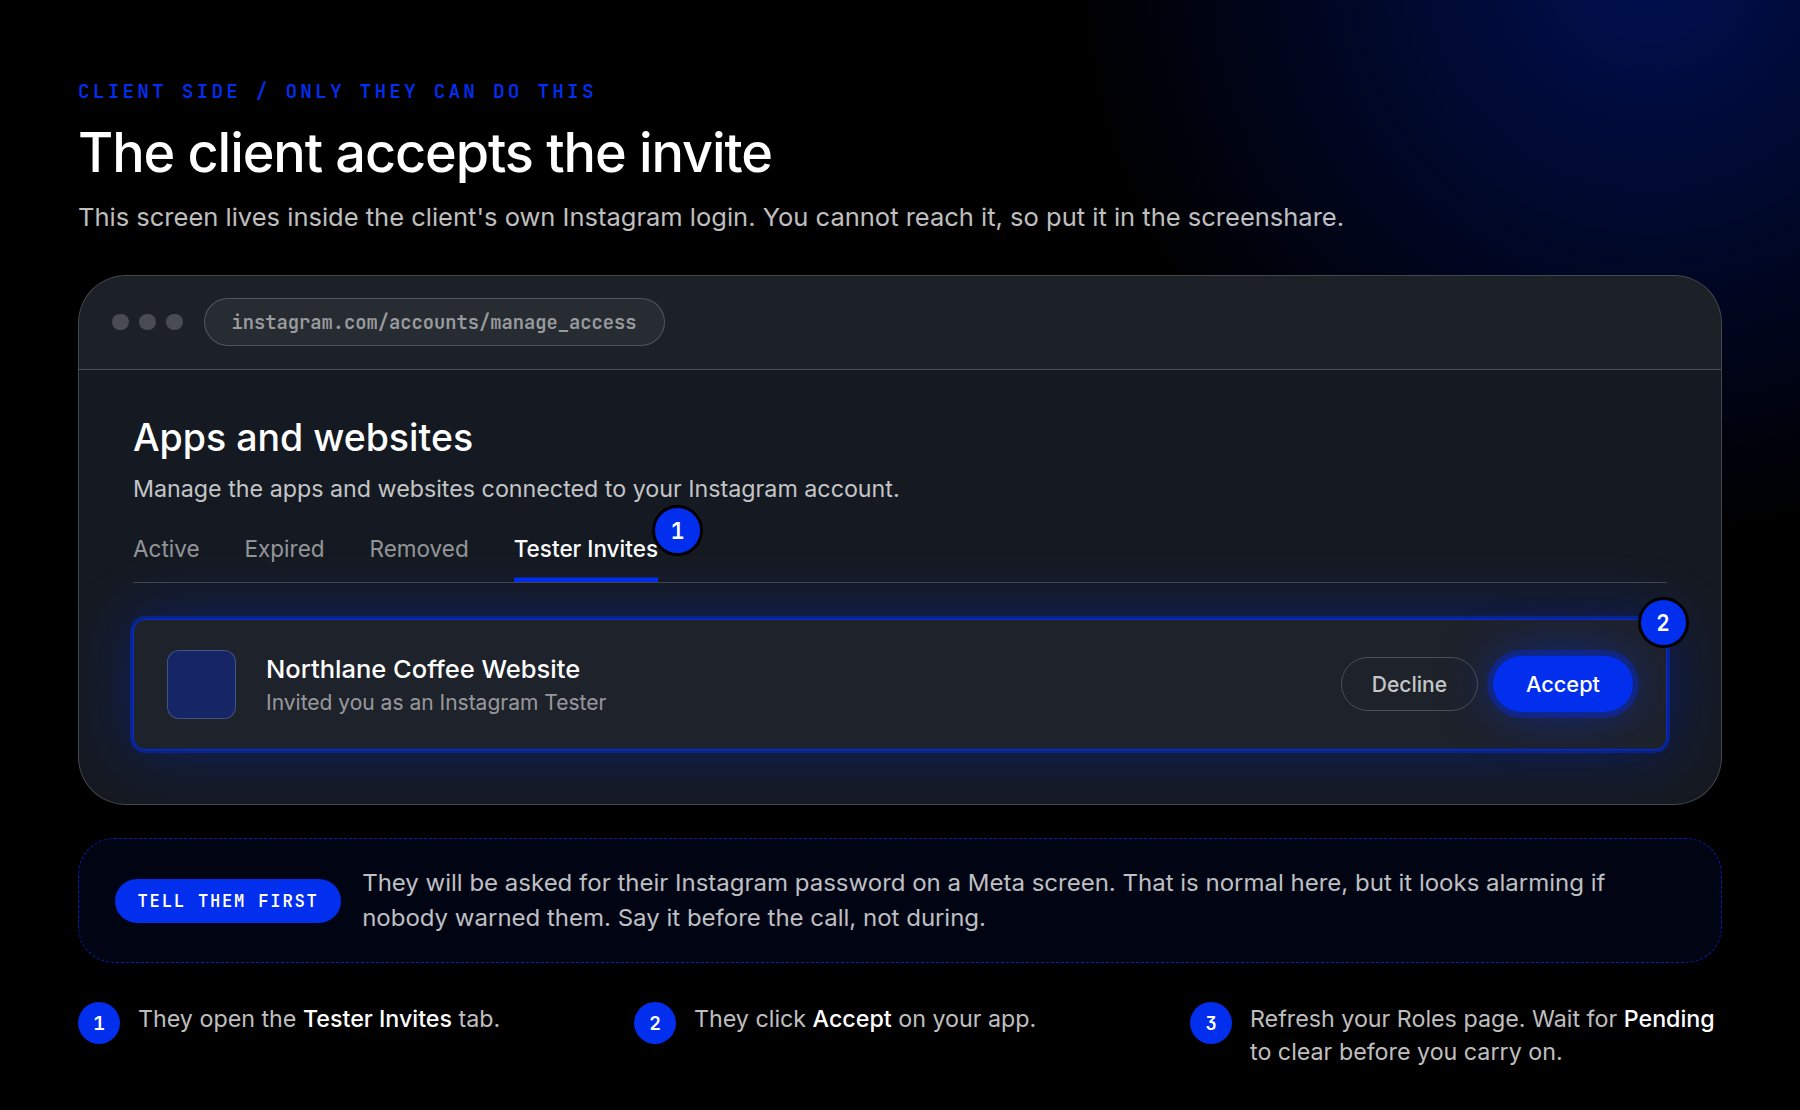
First, the client must accept the tester invitation. Ask them to open Instagram’s Apps And Websites page, select the Tester Invites tab, and click Accept. Refresh the App Roles page in Meta’s developer dashboard and confirm that the account no longer appears as pending before continuing.
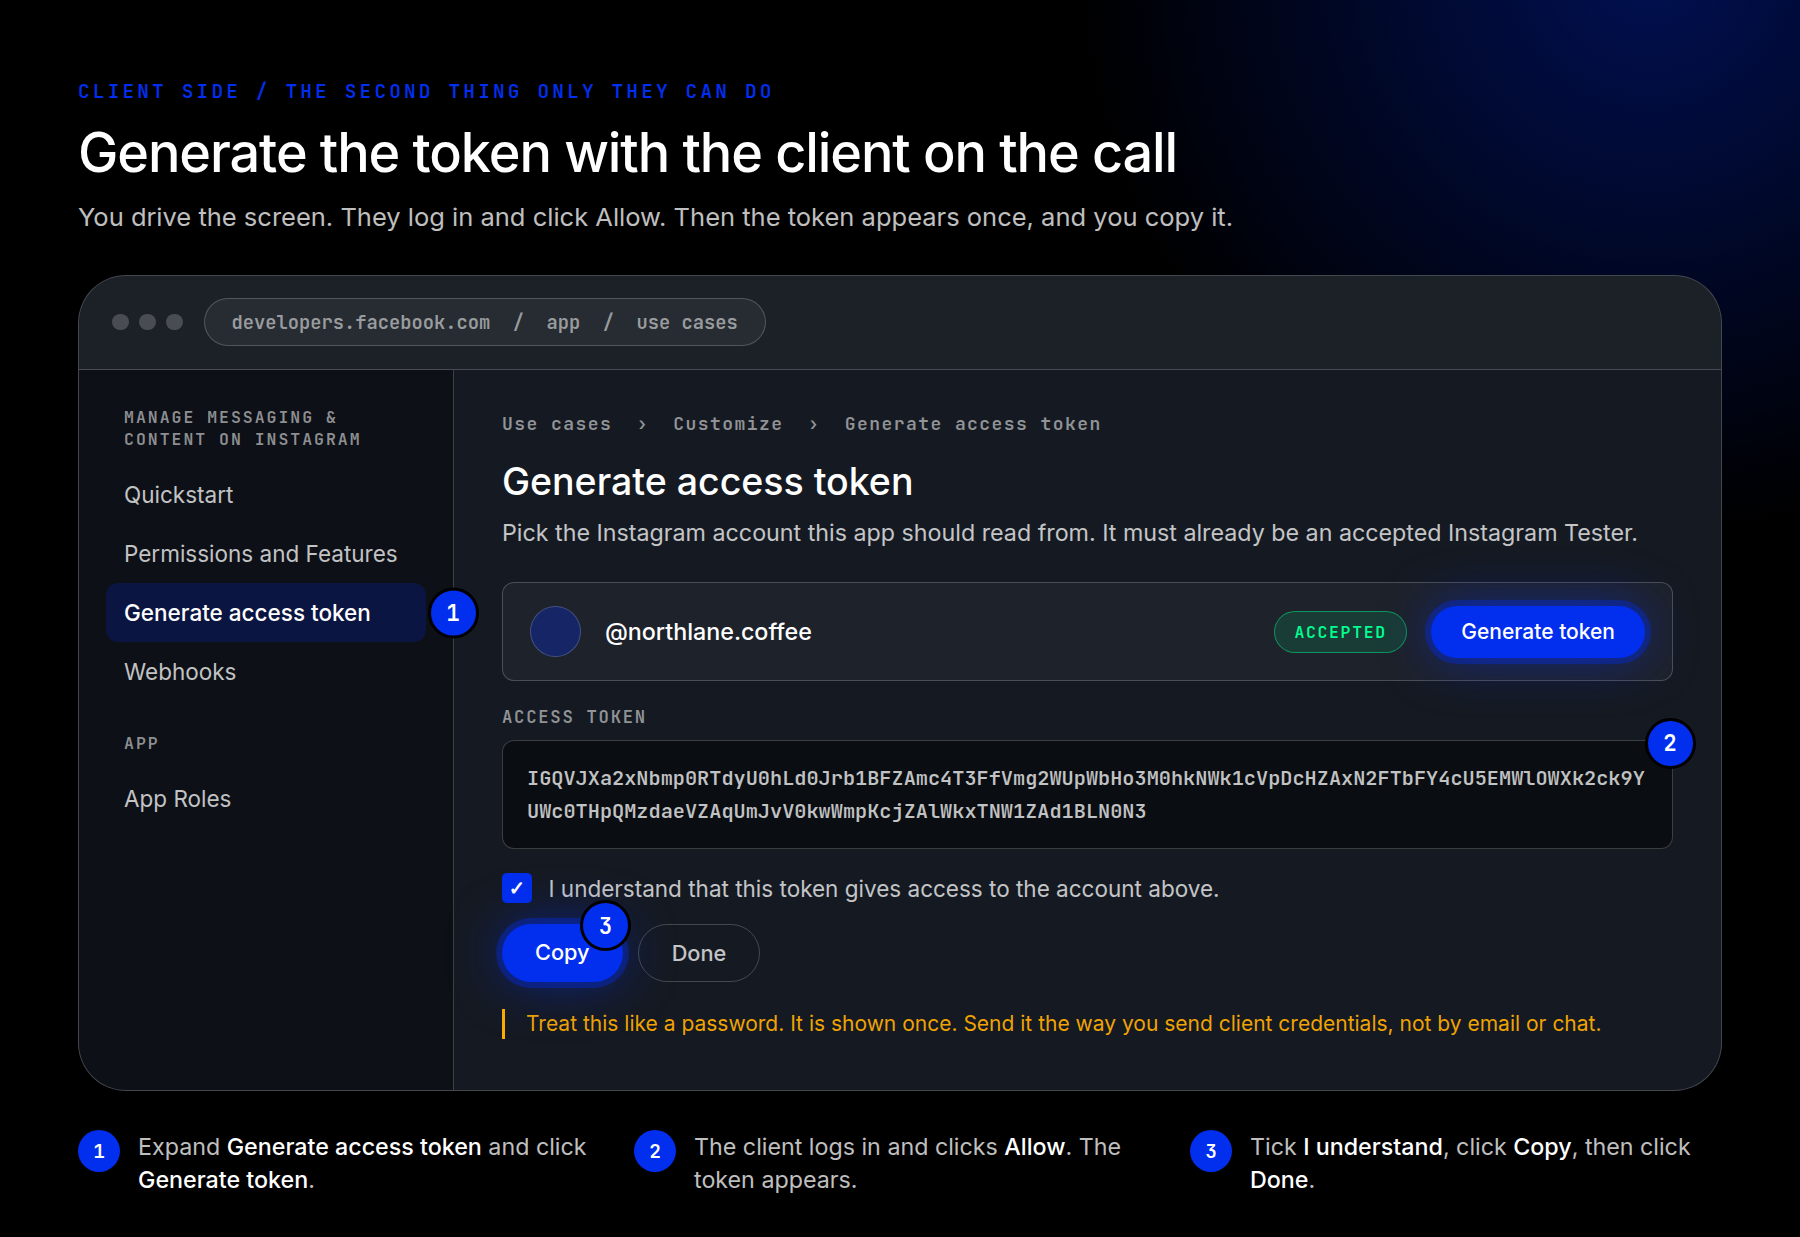
Second, generate the Access Token. Go to Use Cases, select Manage Messaging & Content On Instagram > Customize, expand Generate Access Token, and click Generate Token. When the Instagram authorization window opens, the client should log in with the same account you added as a tester and click Allow. Return to the app dashboard, check I Understand, click Copy, and then click Done.
Prepare the client for two details before the call. They will enter their Instagram password on Meta’s authorization screen, and the Instagram account must be a professional account, either Business or Creator. If the client still uses a personal account, ask them to convert it before the session.
Treat the copied token as a credential. It grants read access to the connected account’s content, so transfer and store it using the same secure system you use for client passwords. Avoid sending it through email or chat, and remove it from your clipboard history after adding it to Divi.
Bring The Token Into Divi 5
The remaining setup in Divi is much shorter. Open the Visual Builder, click the gray plus icon inside a Column, and add the Instagram Feed Module. Open the module settings, go to Content > Account, and click Add. Enter an Account Name, paste the Access Token, and click Submit.
The account name is an internal label, so use the client’s Instagram handle or another name your team will recognize. Clear labels are useful when you manage several feeds across multiple websites.
Choose how many posts to display in the Feed option group, then open the Design tab.
Reuse The Site’s Existing Design System
Once the account is connected, the feed can be designed like the rest of the page. Use the module’s settings to control its layout, image treatment, spacing, and Follow button. Divi 5’s Preset-Based Design System makes these decisions reusable across the website.
Option Group Presets are particularly useful when the feed should match established image, spacing, border, or button treatments. Apply the site’s relevant Presets instead of recreating those styles inside the module.
In this example, existing Option Group Presets control the Follow button, spacing, and border styles. Applying them brings the feed into the site’s wider design system without styling each option from scratch.
Keep The Feed Running After Launch
The Instagram Access Token used by this connection is valid for 60 days. The token does not renew itself inside the Instagram Feed Module, so ongoing client sites need a simple maintenance plan.
Add a recurring reminder for every connected site. Schedule it for around week seven so you can replace the token before it expires. Renewing early keeps the maintenance on your schedule and prevents the client from discovering a blank feed first.
Check the token first when a working feed stops displaying posts. An expired token is the most common cause, and checking its age takes less time than troubleshooting the module’s design or layout settings.
To replace the token, return to the same Generate Access Token section in the Facebook App and generate a new one. Then open the Instagram Feed Module, go to Content > Account, remove the existing connection, and add it again with the new token. The Instagram account owner will need to authorize the new token. With an agency-owned app, the app configuration, permission, and accepted tester role remain in place, so only the final authorization and module update need to be repeated.
Elegant Themes covers each step in How To Refresh The Instagram Access Token.
If you are handing the website over completely, document the renewal process. Record the Facebook App’s name, identify who controls its login, and note when the token is expected to expire. That gives the client or their next developer enough information to maintain the feed.
If The Feed Stops Working
Three situations account for most Instagram Feed Module connection problems. Check each one before assuming the issue is inside Divi.
It worked before but is now blank. Check the token first. If it has expired, generate a new one, remove the old account connection from the module, and add the account again with the replacement token.
It has never worked, or it displays a permission error. Return to Meta and confirm that the tester invitation was accepted and that instagram_business_basic appears under Permissions And Features. Correct the missing step, then generate a new token. A token created before the required permission was added will not gain that permission automatically.
It connects but displays no posts. Confirm that the professional Instagram account has visible posts available to return. If it does, remove the connection from the module and add it again with a newly generated token to replace an incomplete or outdated authorization.
Build A Repeatable Instagram Workflow In Divi 5
The Instagram Feed Module lets a client’s latest posts become part of the website without requiring someone to upload the same content twice. The setup takes place across Meta and Divi, but it becomes manageable once ownership, authorization, secure token storage, and renewal are treated as parts of one documented workflow.
After the connection is active, Divi 5 handles the presentation. The module works with Divi 5’s image controls, composable settings, and reusable Presets, so the feed can follow the same visual system as the rest of the website. The client keeps publishing on Instagram, and the site displays those posts in a layout you have already designed.
The post How To Connect Instagram Feeds To Client Websites With Divi 5 appeared first on Elegant Themes Blog.
The Tech Zone


Comments
Post a Comment