How To Build A Filterable Real Estate Listings With Divi 5
Real estate websites live or die by their search experience. Visitors expect to enter an address or city, choose a property type, select the number of bedrooms and bathrooms, pick an amenity, and see matching listings without leaving the page or wrestling with a clunky filtering plugin.
In this post, we’ll build that kind of filterable listings page using Divi 5 and Advanced Custom Fields (ACF). We’ll combine two Divi 5 features, the Loop Builder and the Post Filter module introduced with the Loop Filter Modules, to create a fully custom property grid that visitors can search and filter on the front end. ACF will handle the custom fields, including price, city, bedrooms, bathrooms, square footage, amenities, and agent name, that power the loop cards and filter form.
By the end, you’ll have a polished real estate layout you can use on your next project, along with a downloadable JSON file of the completed design.
Let’s get started.
What Is The Loop Builder In Divi 5?
The Loop Builder is one of the most flexible features in Divi 5. It lets you turn any Divi element into a dynamic loop of content pulled from your site’s database. That content can be posts, custom post types, terms (categories or tags), or users.
In simple terms, you design one item exactly the way you want it to look, tell Divi which content to cycle through, and the builder automatically repeats that design for every matching item.
Here’s how it works:
1. Design The Template
Build a single loop item using any combination of Divi modules and design settings. You aren’t limited to a premade Blog or Portfolio module, so you have complete creative freedom.
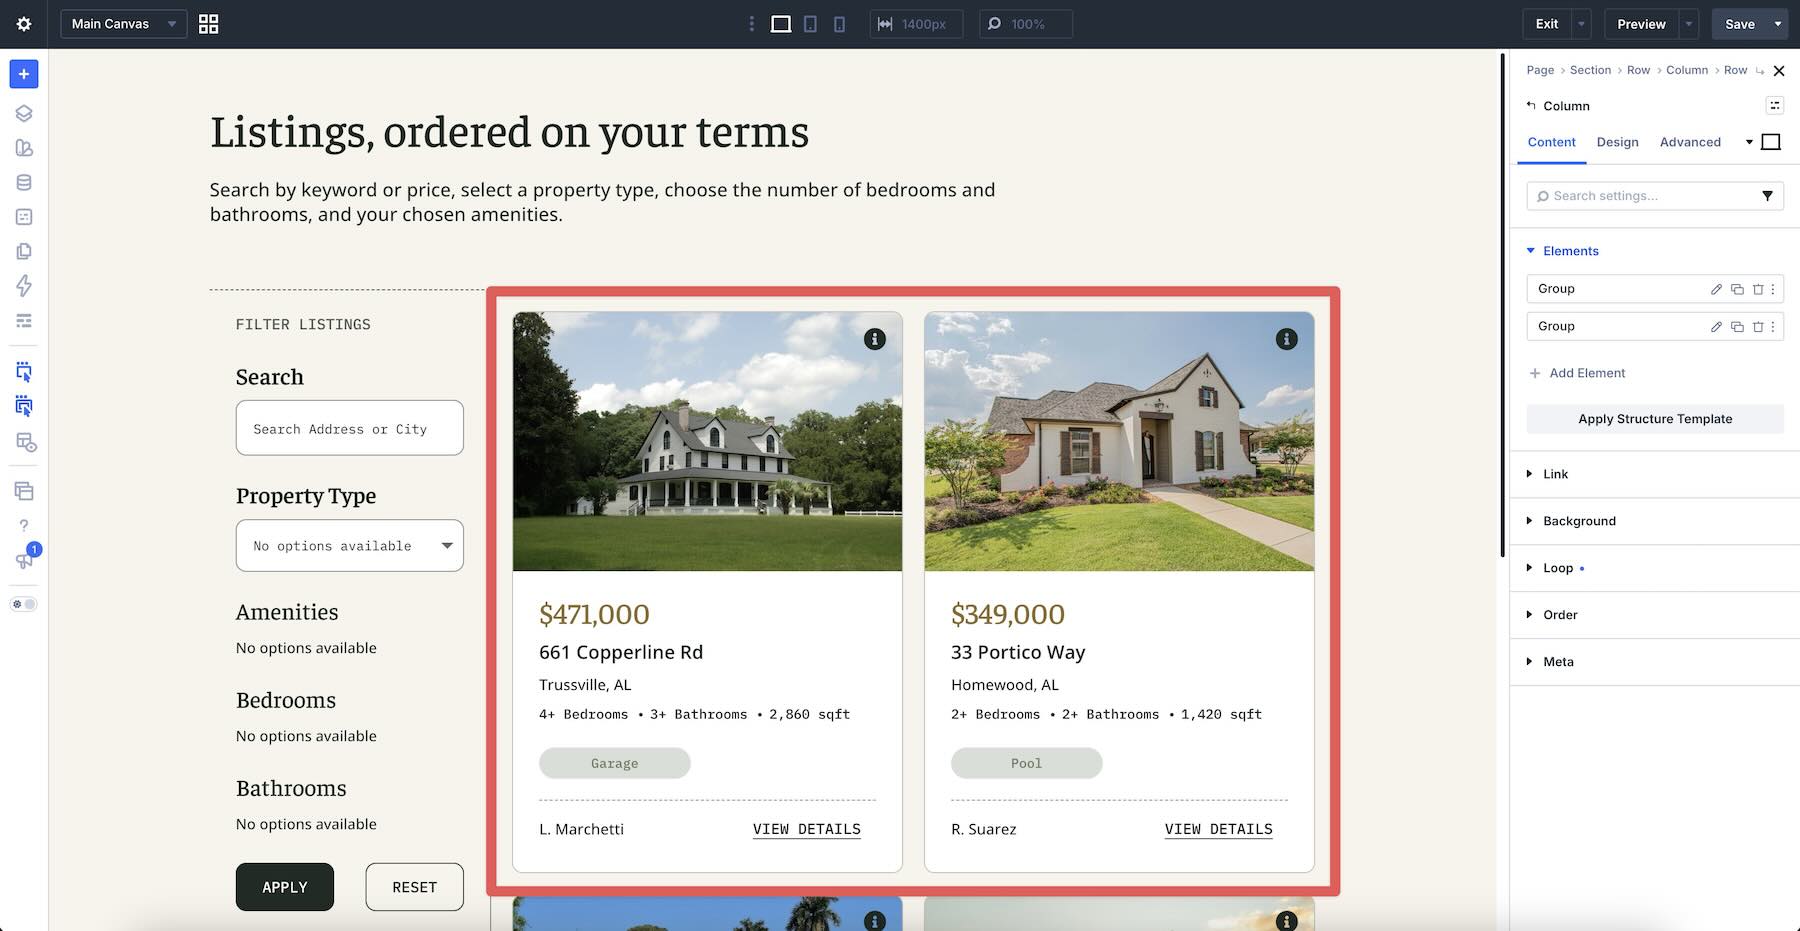
2. Enable Looping And Configure The Query
Turn looping on for the container that holds your design. Then set the query options: choose the post type (or terms/users), filter by categories or tags, include or exclude specific items, set the order, decide how many items appear per page, apply an offset, or create custom meta queries.
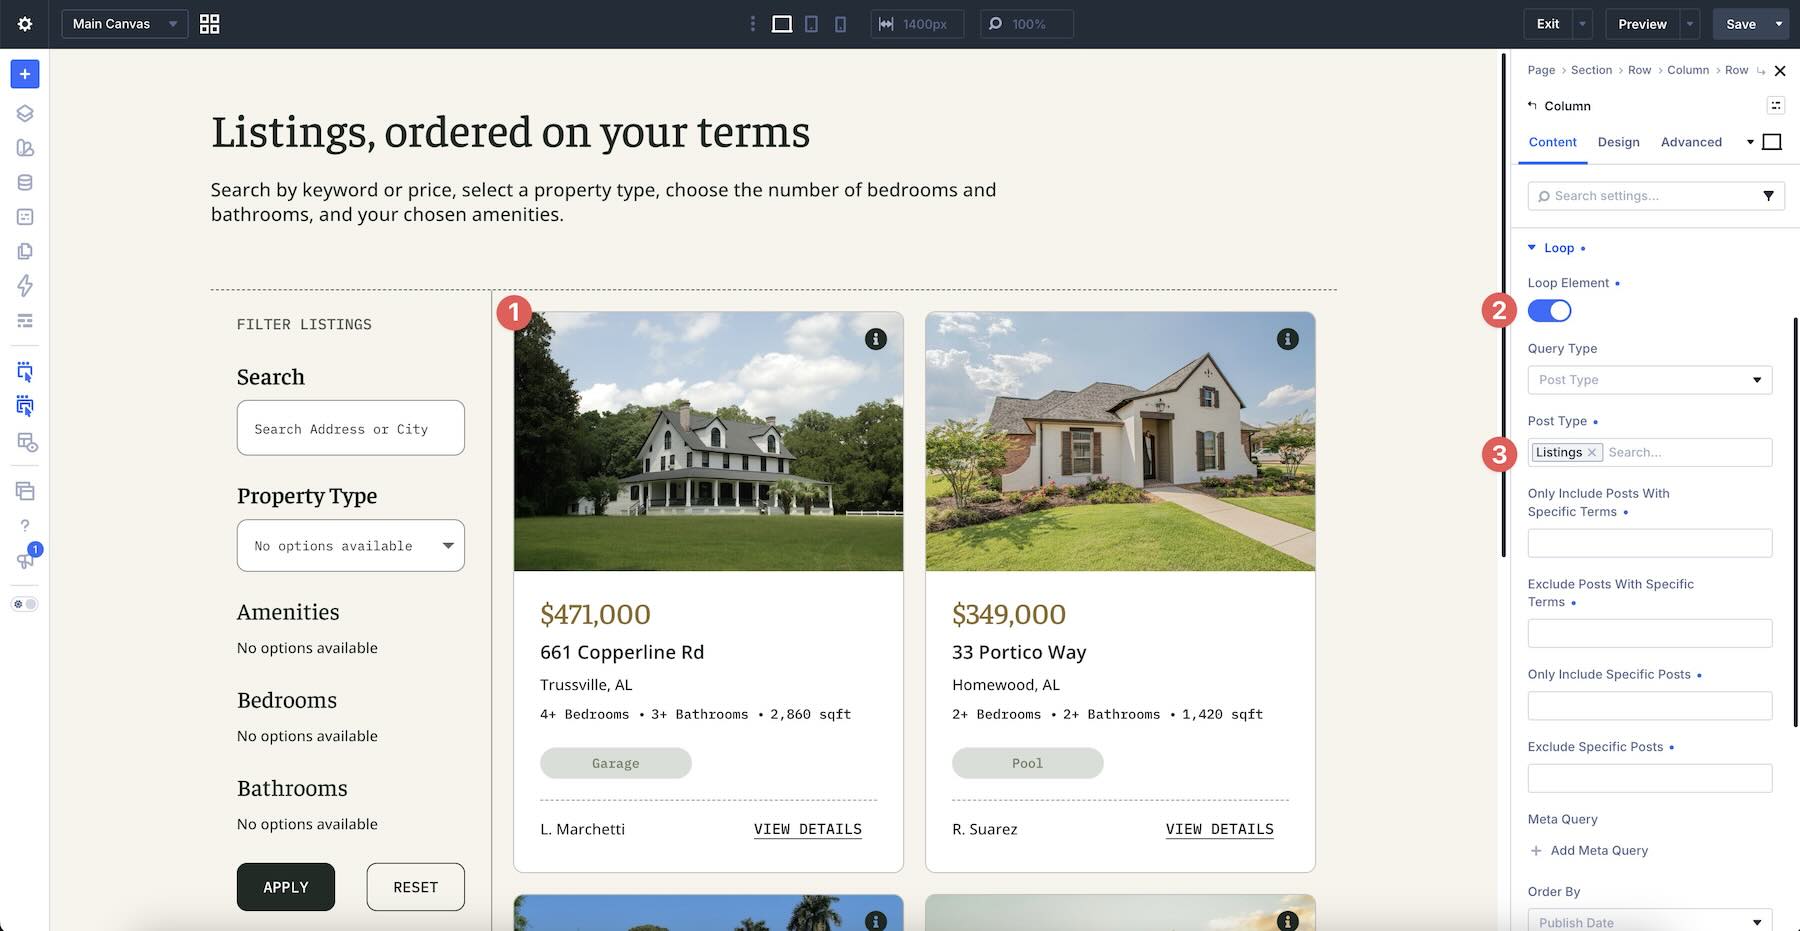
3. Insert Dynamic Content
Replace static text and images with dynamic content from the loop, including the post title, Featured Image, excerpt, custom fields, and more. Each repeated item automatically displays its own data.
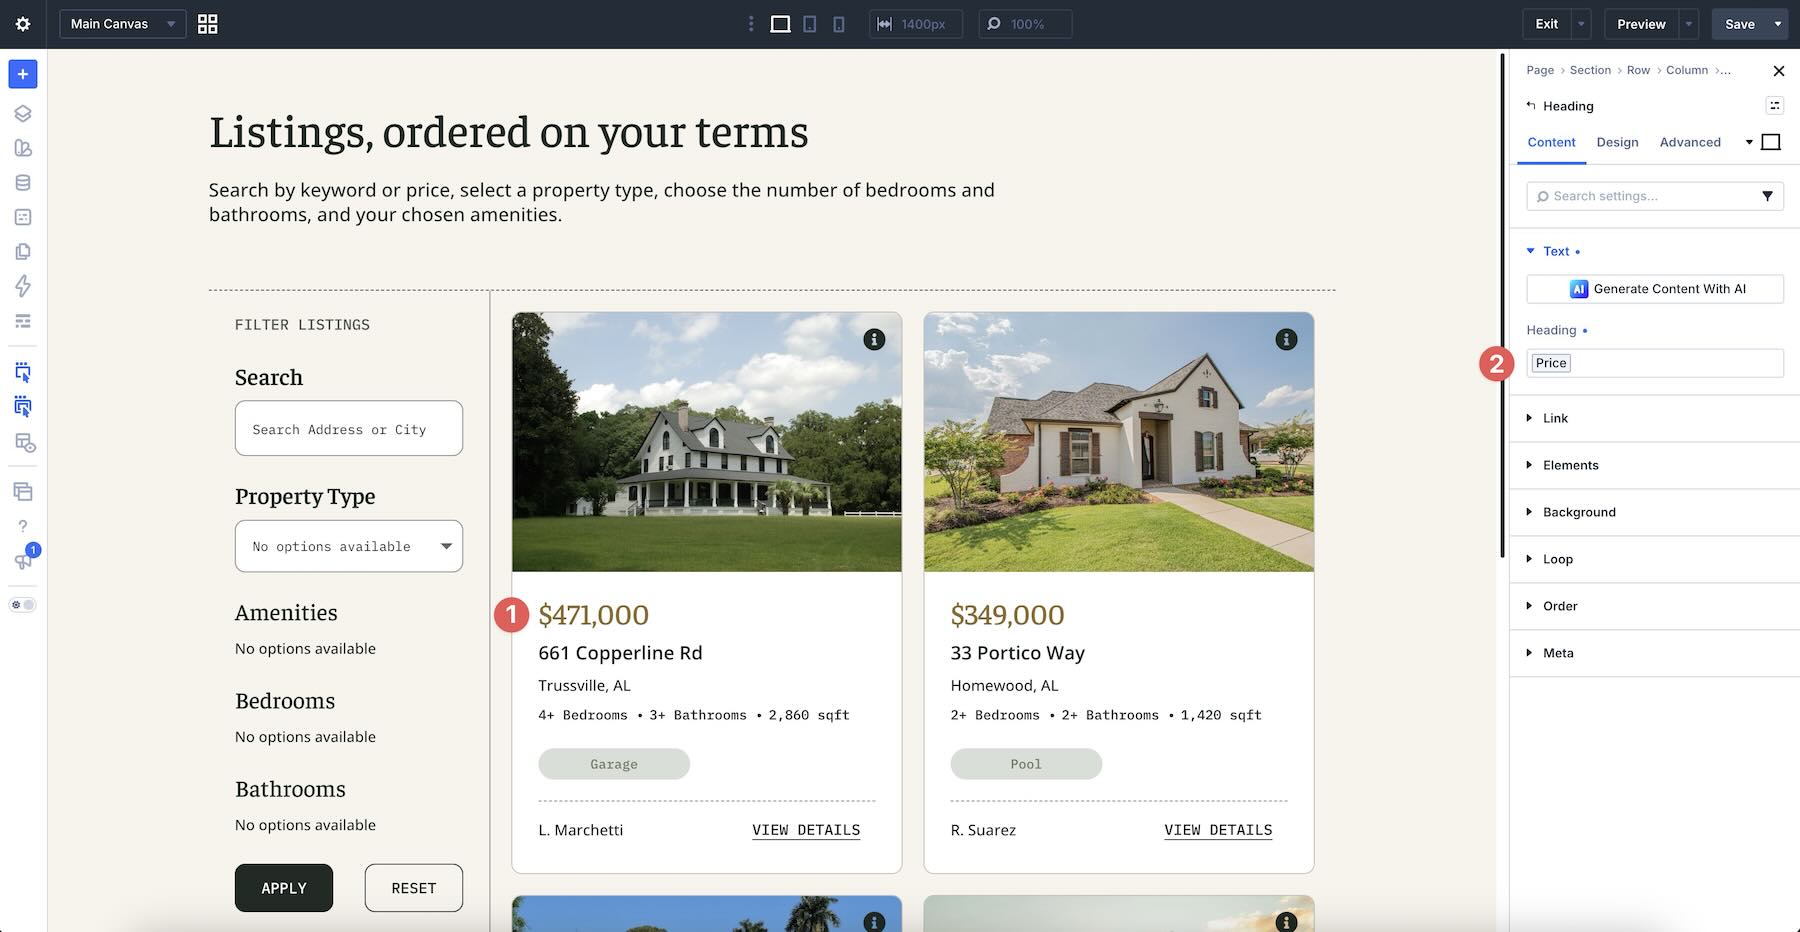
Because the Loop Builder works with any Divi element, you have full control over the design of each repeated item. It supports custom post types, ACF fields, WooCommerce products, taxonomy terms, and users. This makes it suitable for many types of dynamic content.
Why It’s Perfect For Real Estate Listings
For a real estate website, you can design a custom property card that pulls in the exact fields you need, then have Divi automatically generate a responsive grid of those cards. This gives you control over the layout while keeping it connected to the listing data.
What Are The Loop Filter Modules?
The Loop Filter Modules add front-end controls to the Loop Builder. They let visitors search, filter, and sort looped content without leaving the page or relying on a separate third-party filtering plugin.
The foundation is the Post Filter module. It serves as a form wrapper with one or more Post Filter Item modules that create the controls visitors interact with.
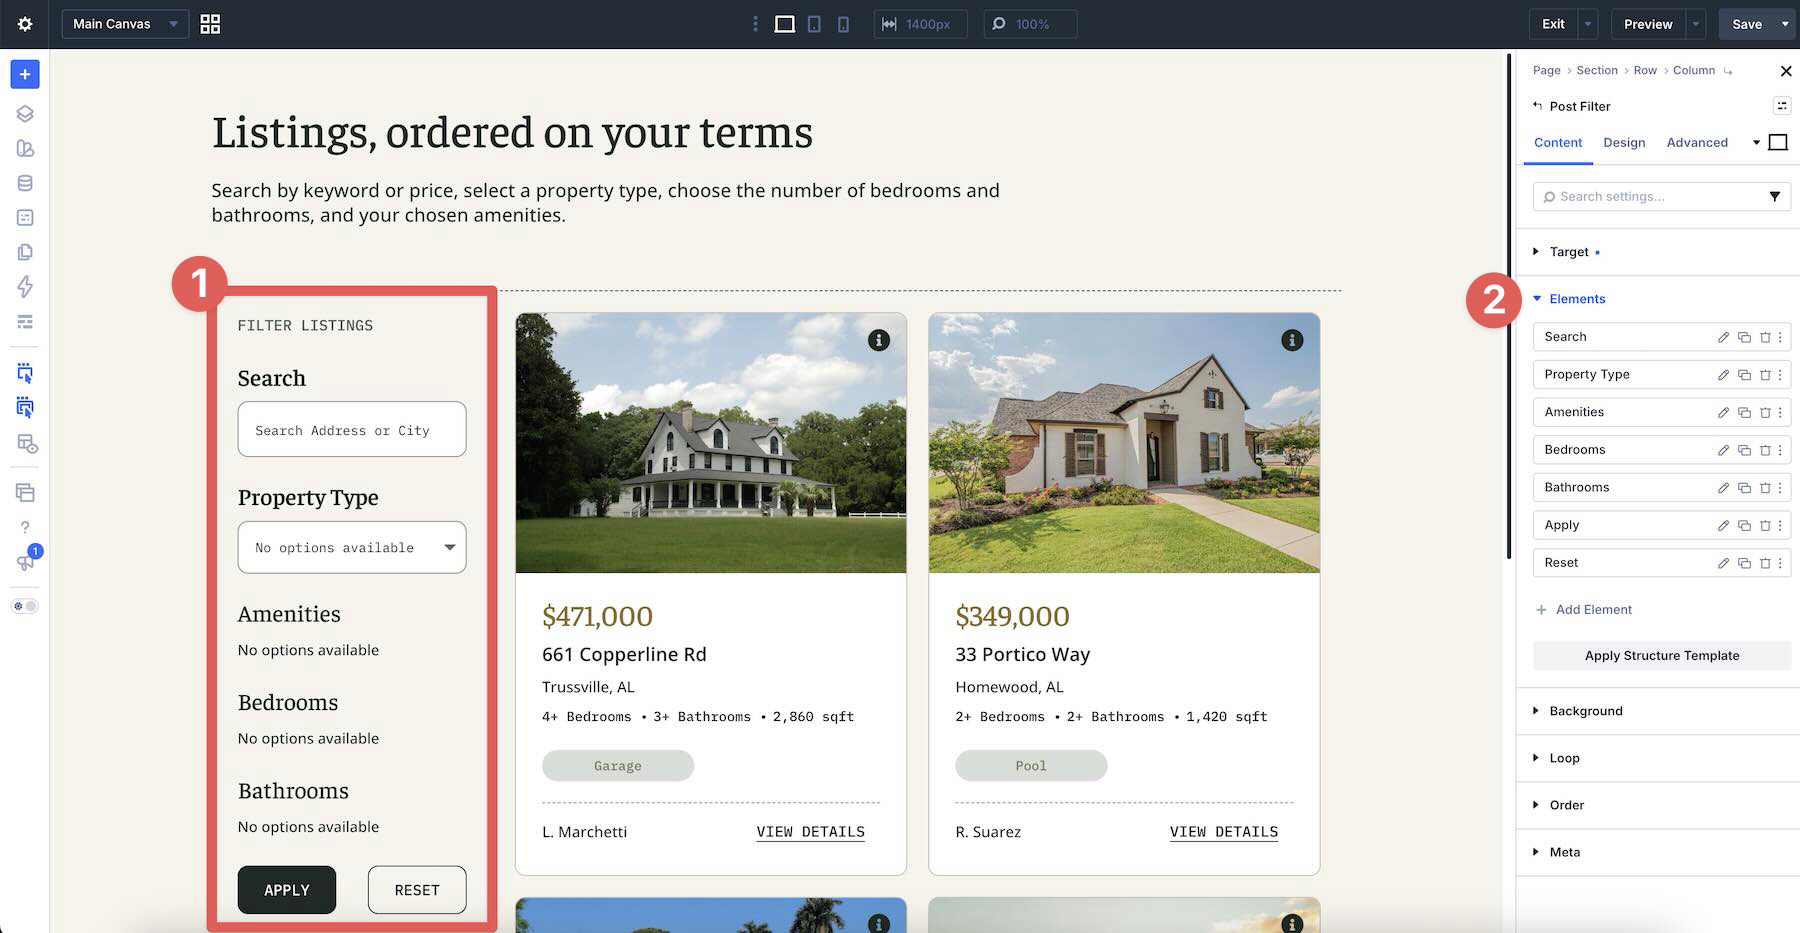
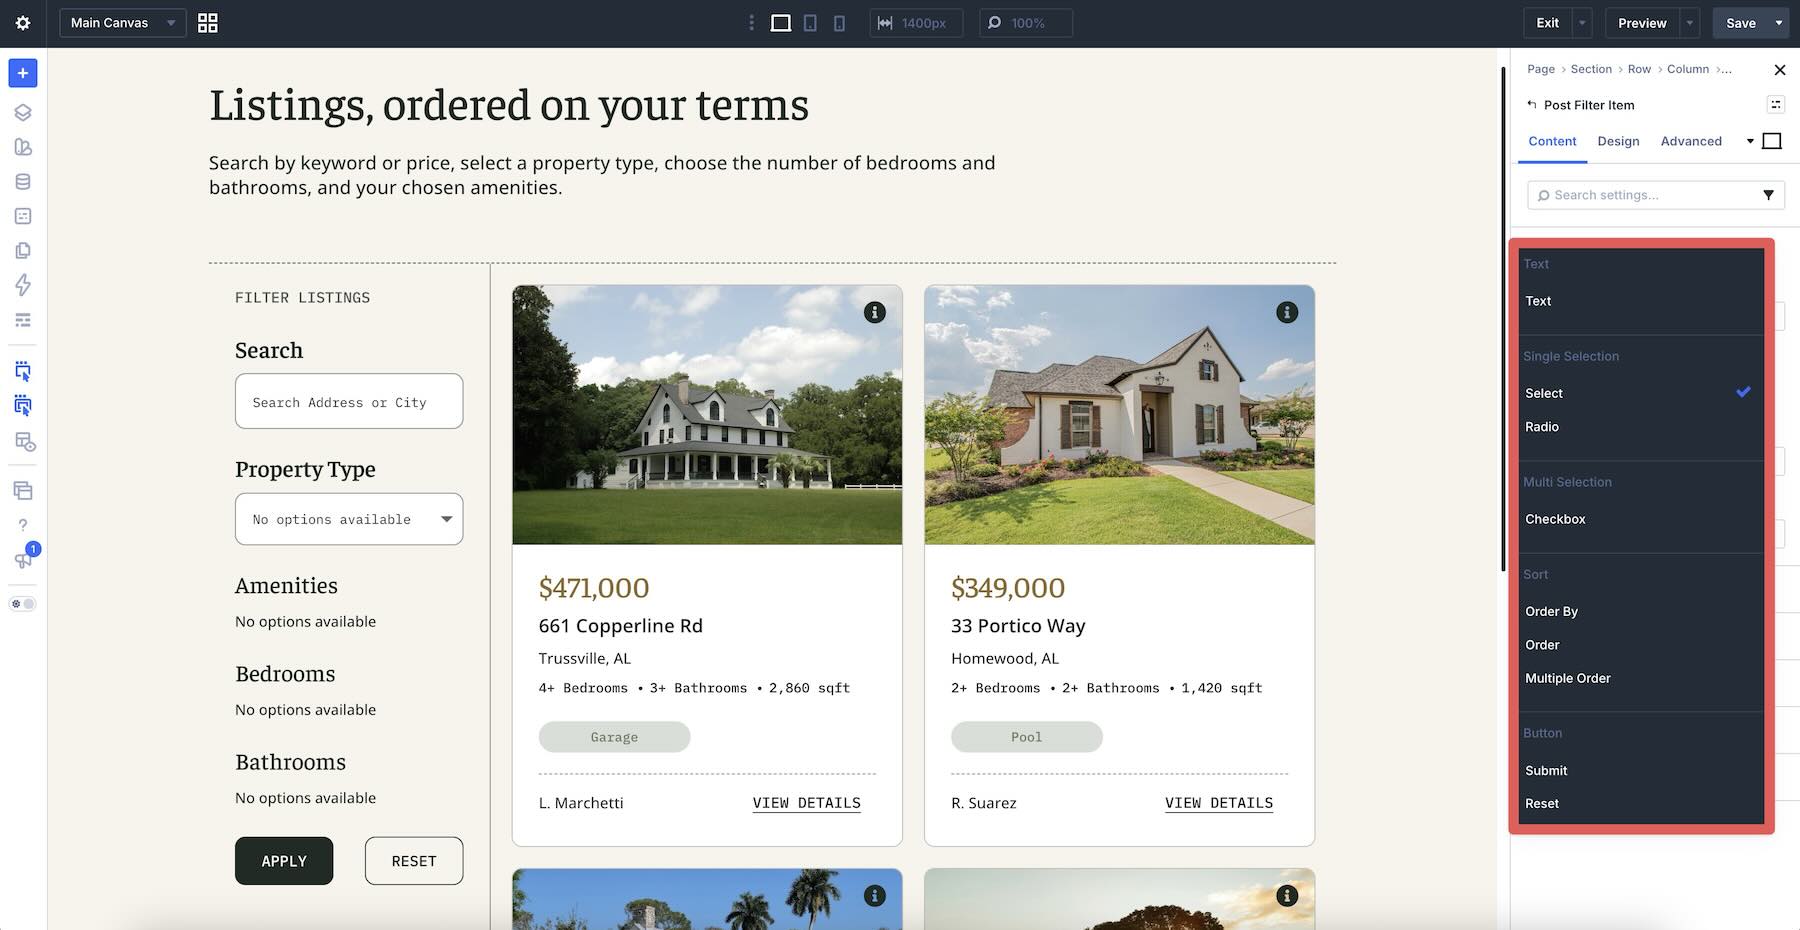
There are a variety of field types associated with the Post Filter module, including:
- Text: A search field that queries post titles, content, or selected custom fields. We’ll use it to let visitors search by address or city.
- Select: A dropdown menu that pulls taxonomies or meta values.
- Radio: A list of single-choice buttons.
- Checkbox: Multi-select options that let users combine filters.
- Order / Order By: Controls that let visitors choose how the results are sorted.
- Buttons: Submit and Reset buttons that apply or clear the filters.
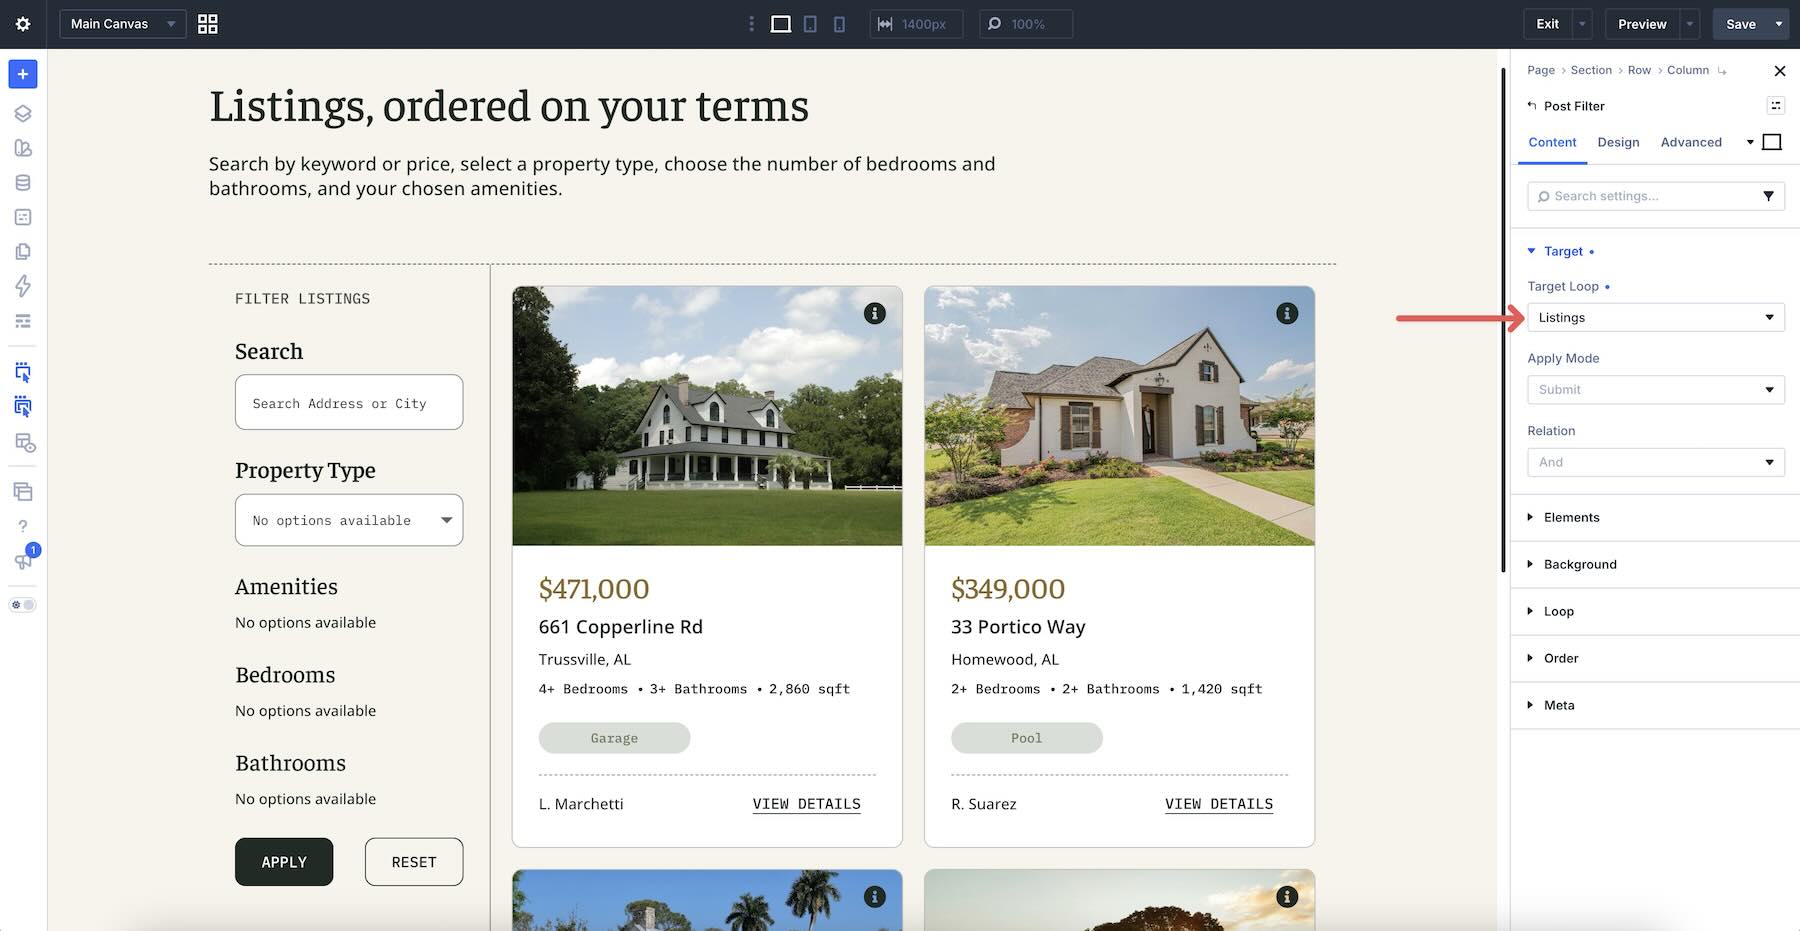
Once you connect the Post Filter module to a specific Loop Target, the visitor’s submitted choices update the query that powers the loop. The matching results then refresh without requiring the visitor to leave the page.
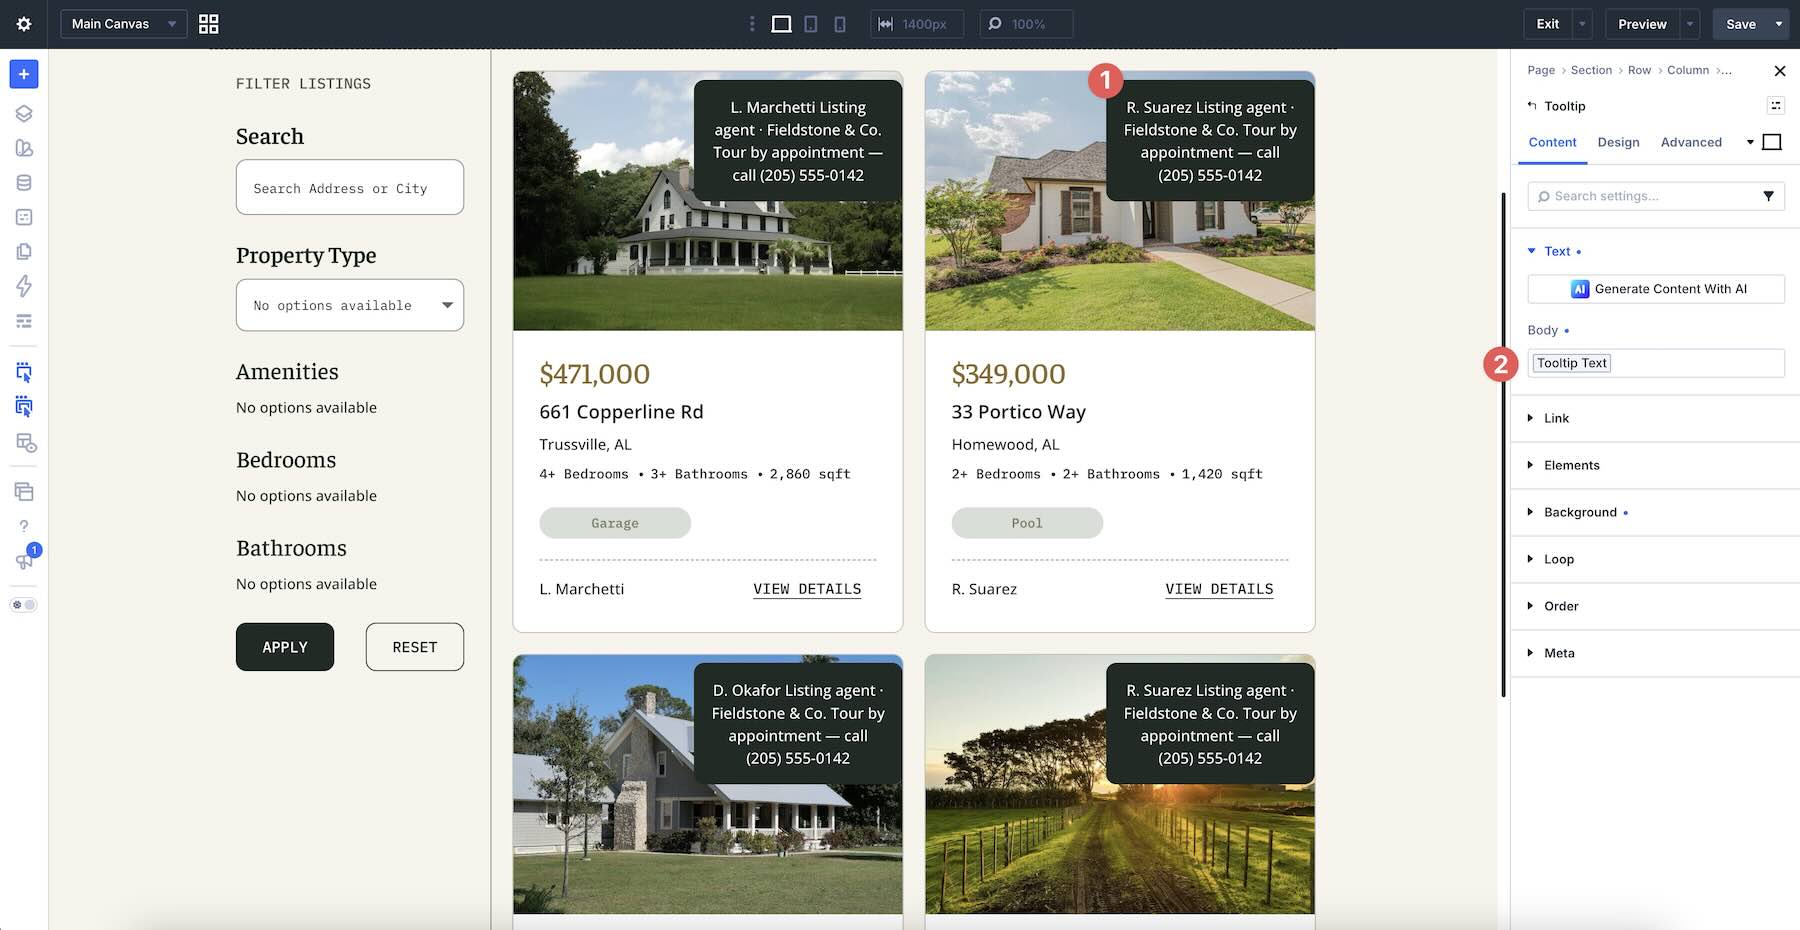
Divi 5 also includes a Tooltip module. You can nest it inside any module, including an item within a loop. Hovering over or clicking the parent element reveals the Tooltip, making it useful for the additional information often included on property listing cards.
Prerequisites & Setup
Before we start building the listings page, we need a solid foundation of data. Here’s everything you’ll set up first.
Create A Custom Post Type
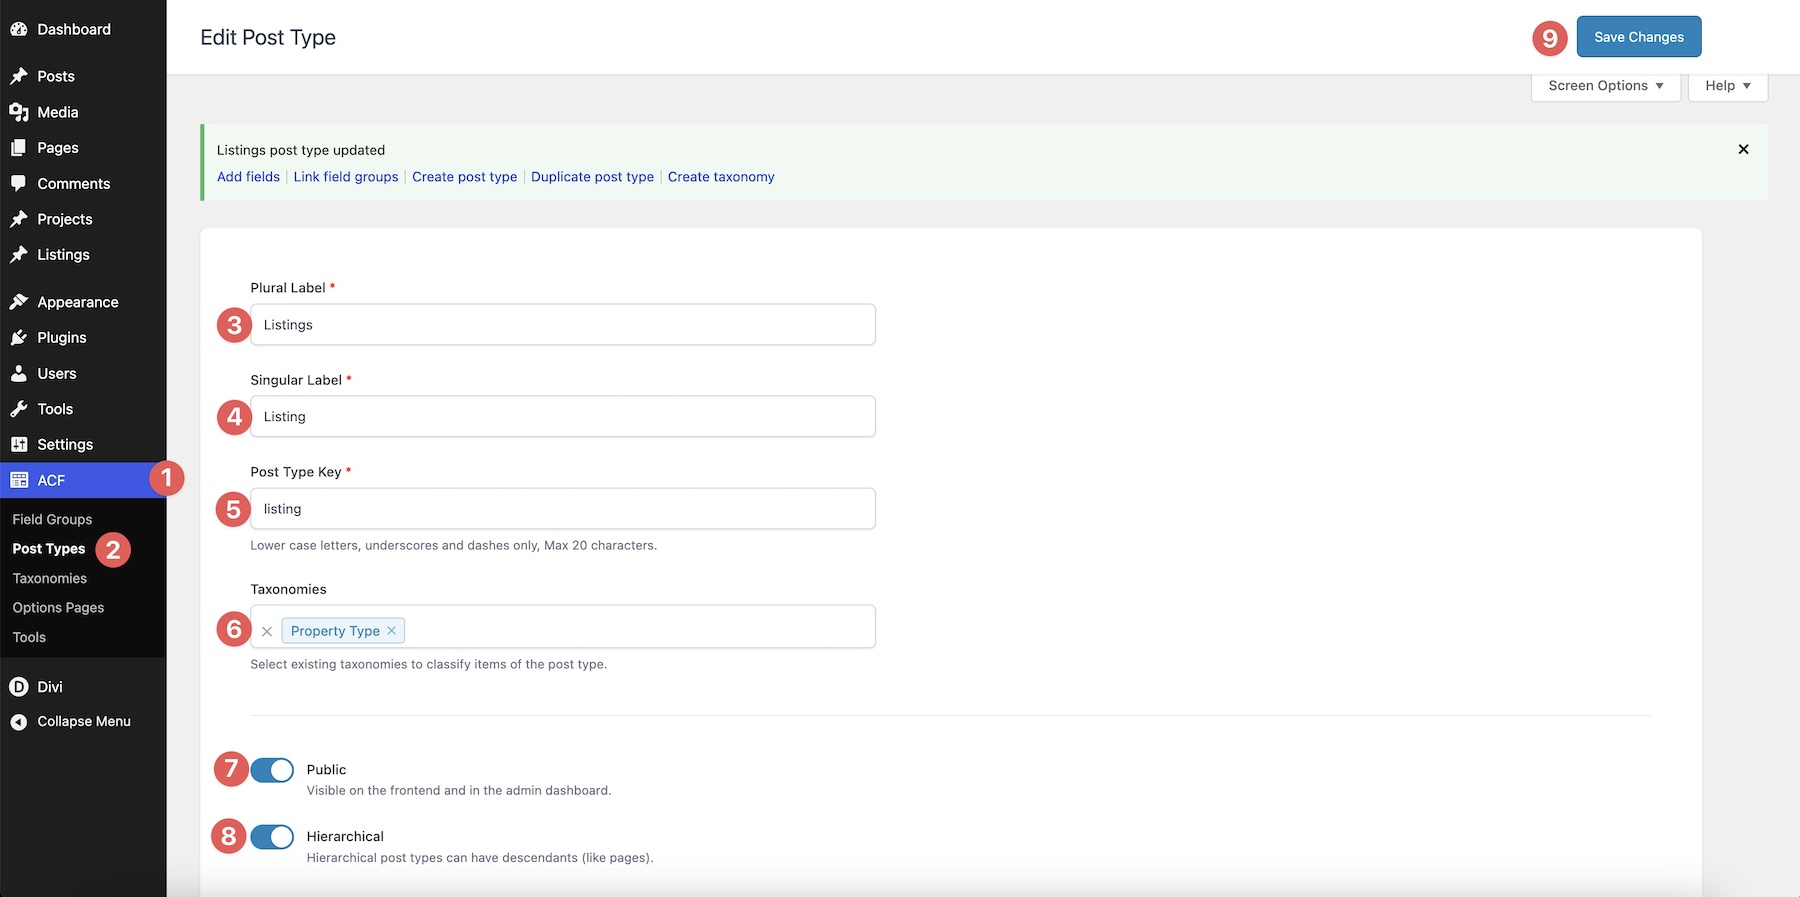
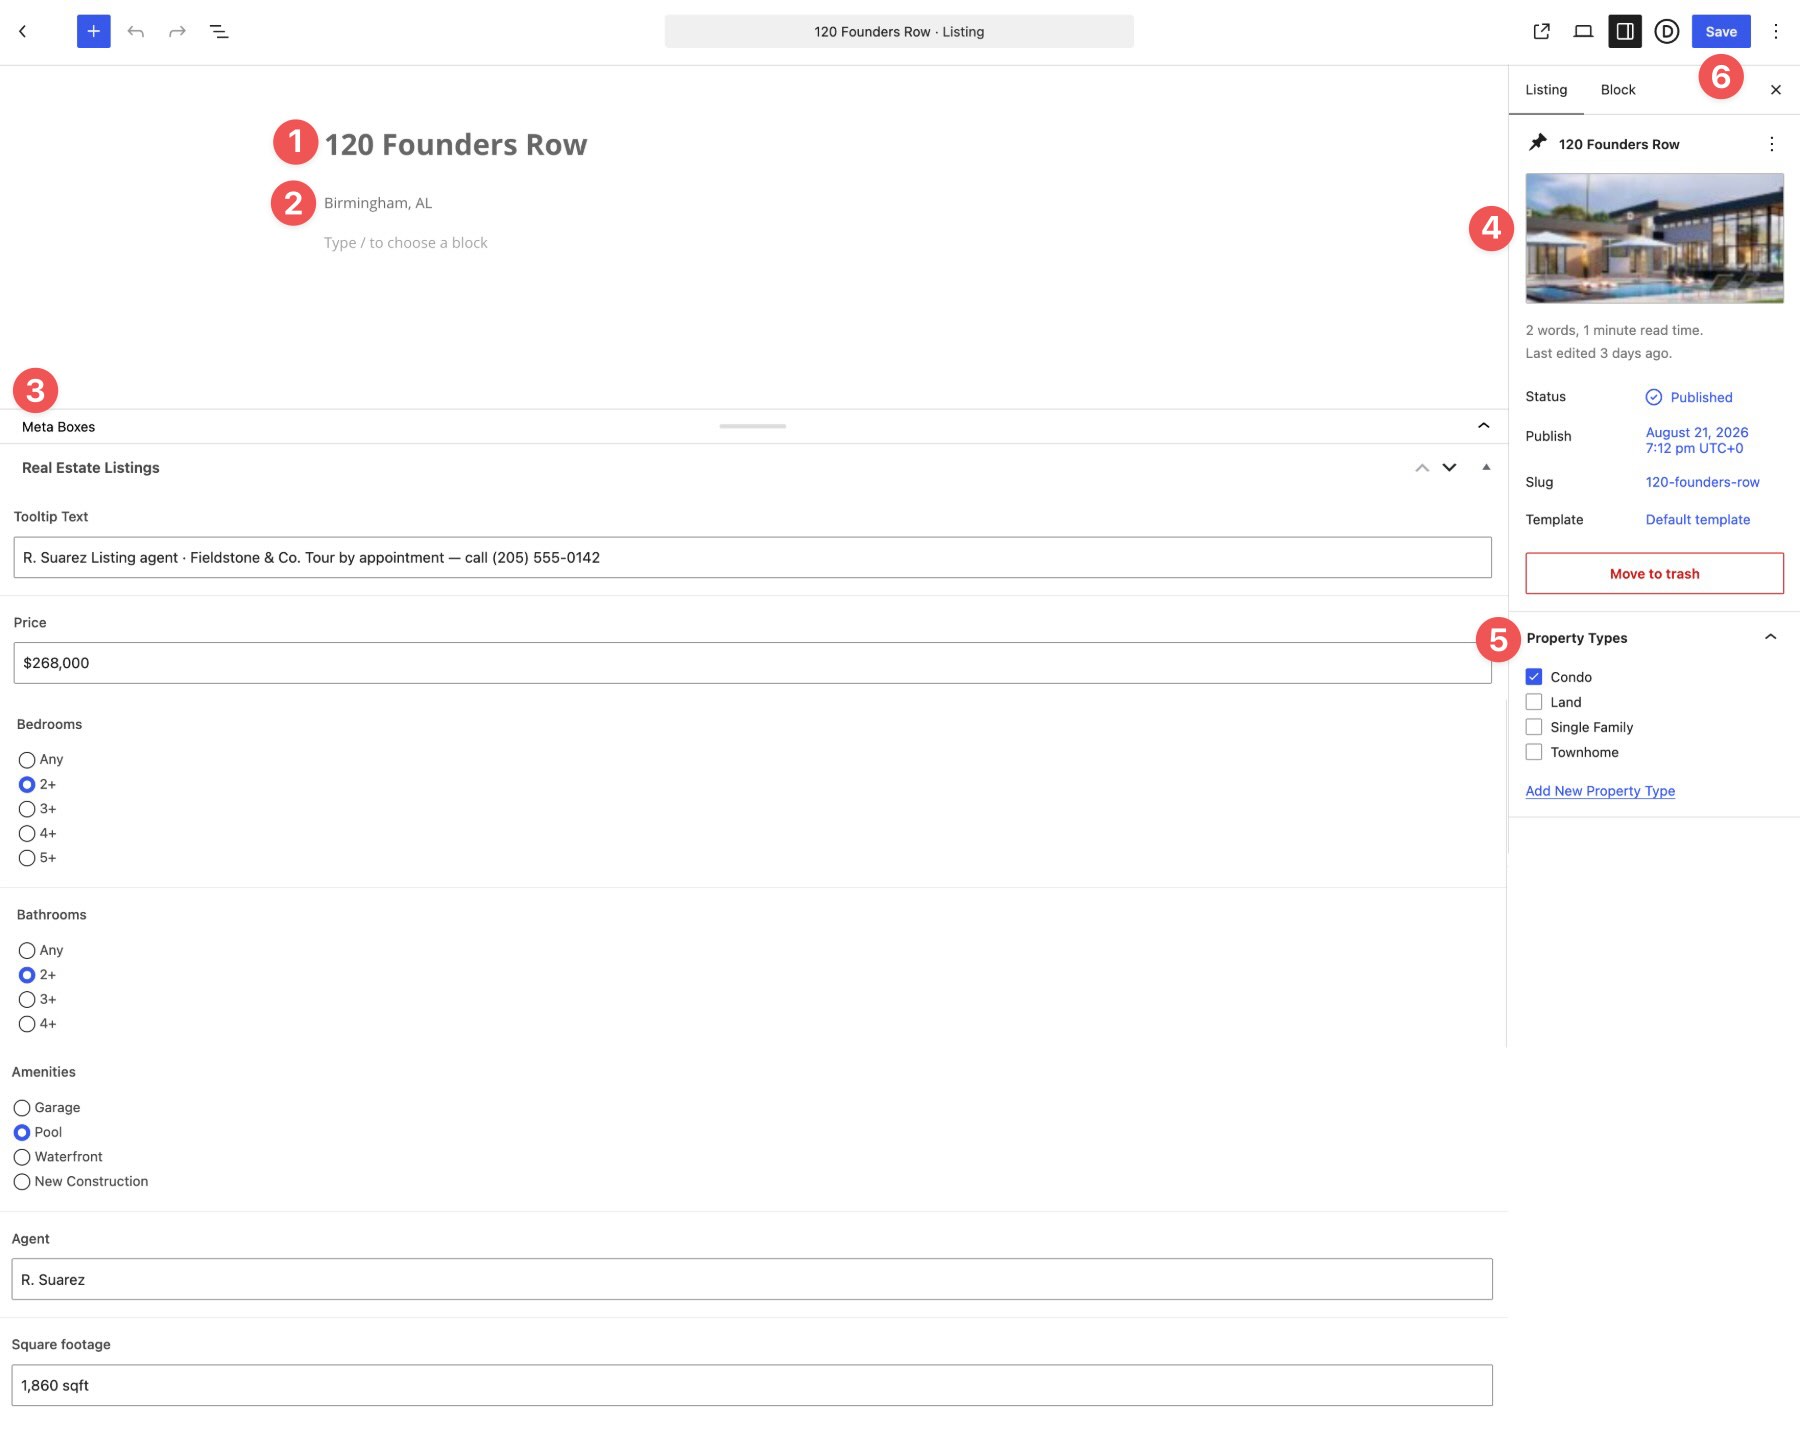
Using Advanced Custom Fields, register a new post type called Listings. This keeps your property data separate from regular blog posts and gives you control over its admin interface.
Add Taxonomies And Custom Fields
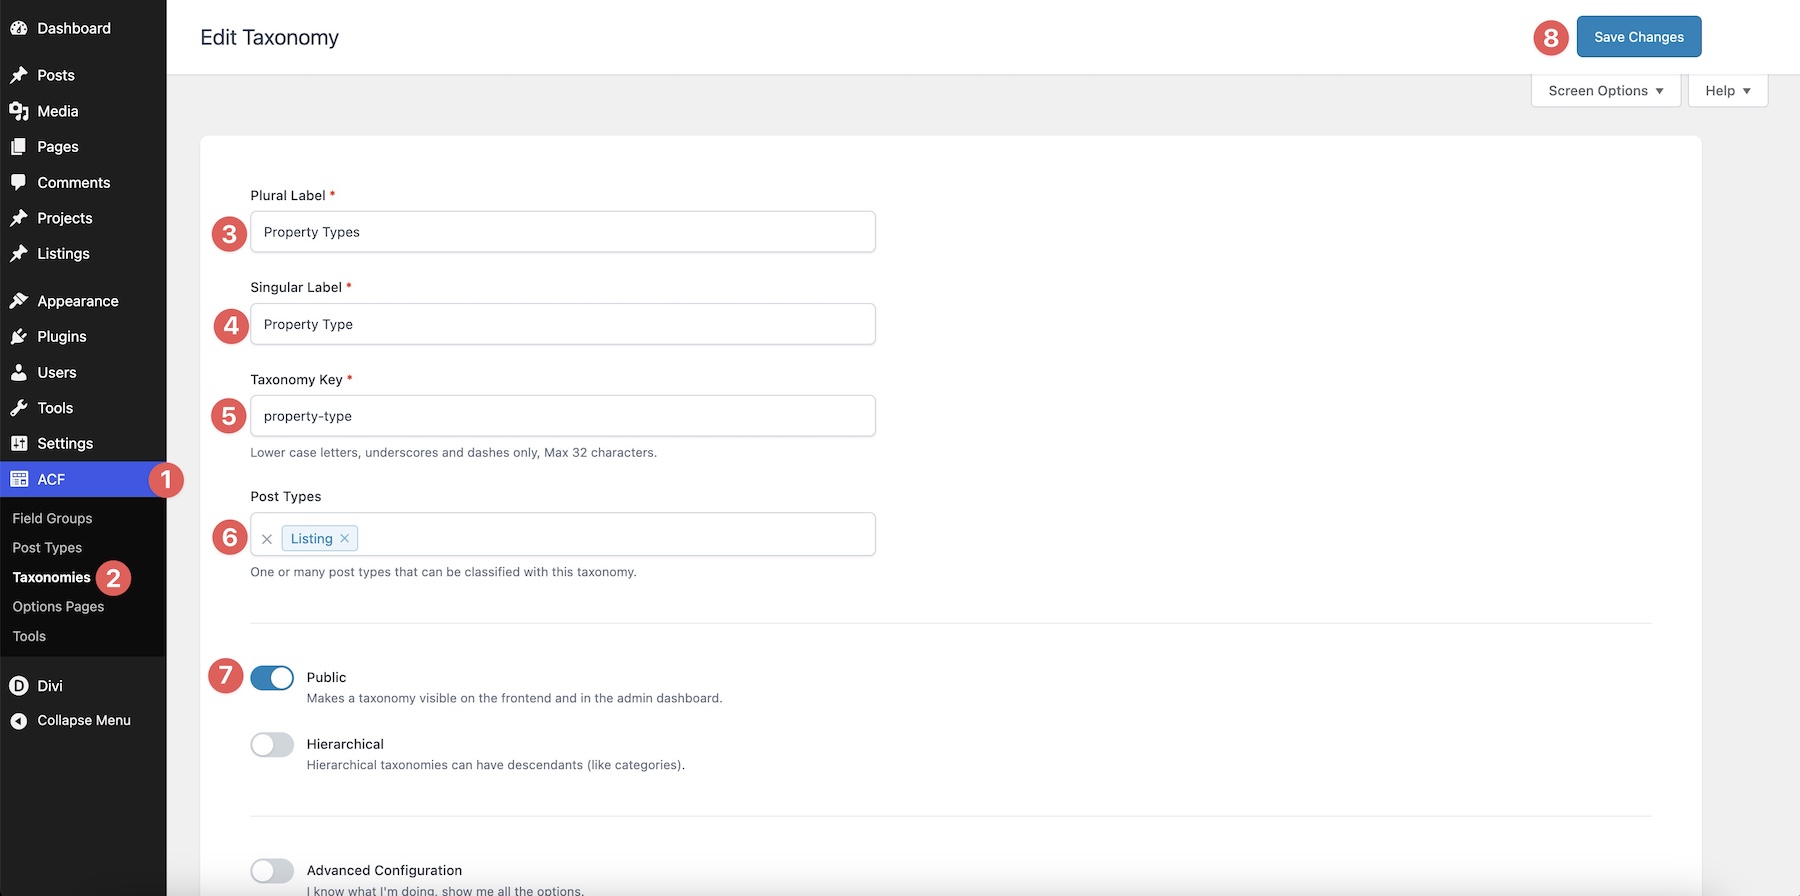
Still inside ACF, create a Taxonomy for Property Types. Make sure the Listings Post Type is selected before saving. This will power the Property Type control in the Post Filter form.
Next, create a new Field Group and name it Real Estate Listings.
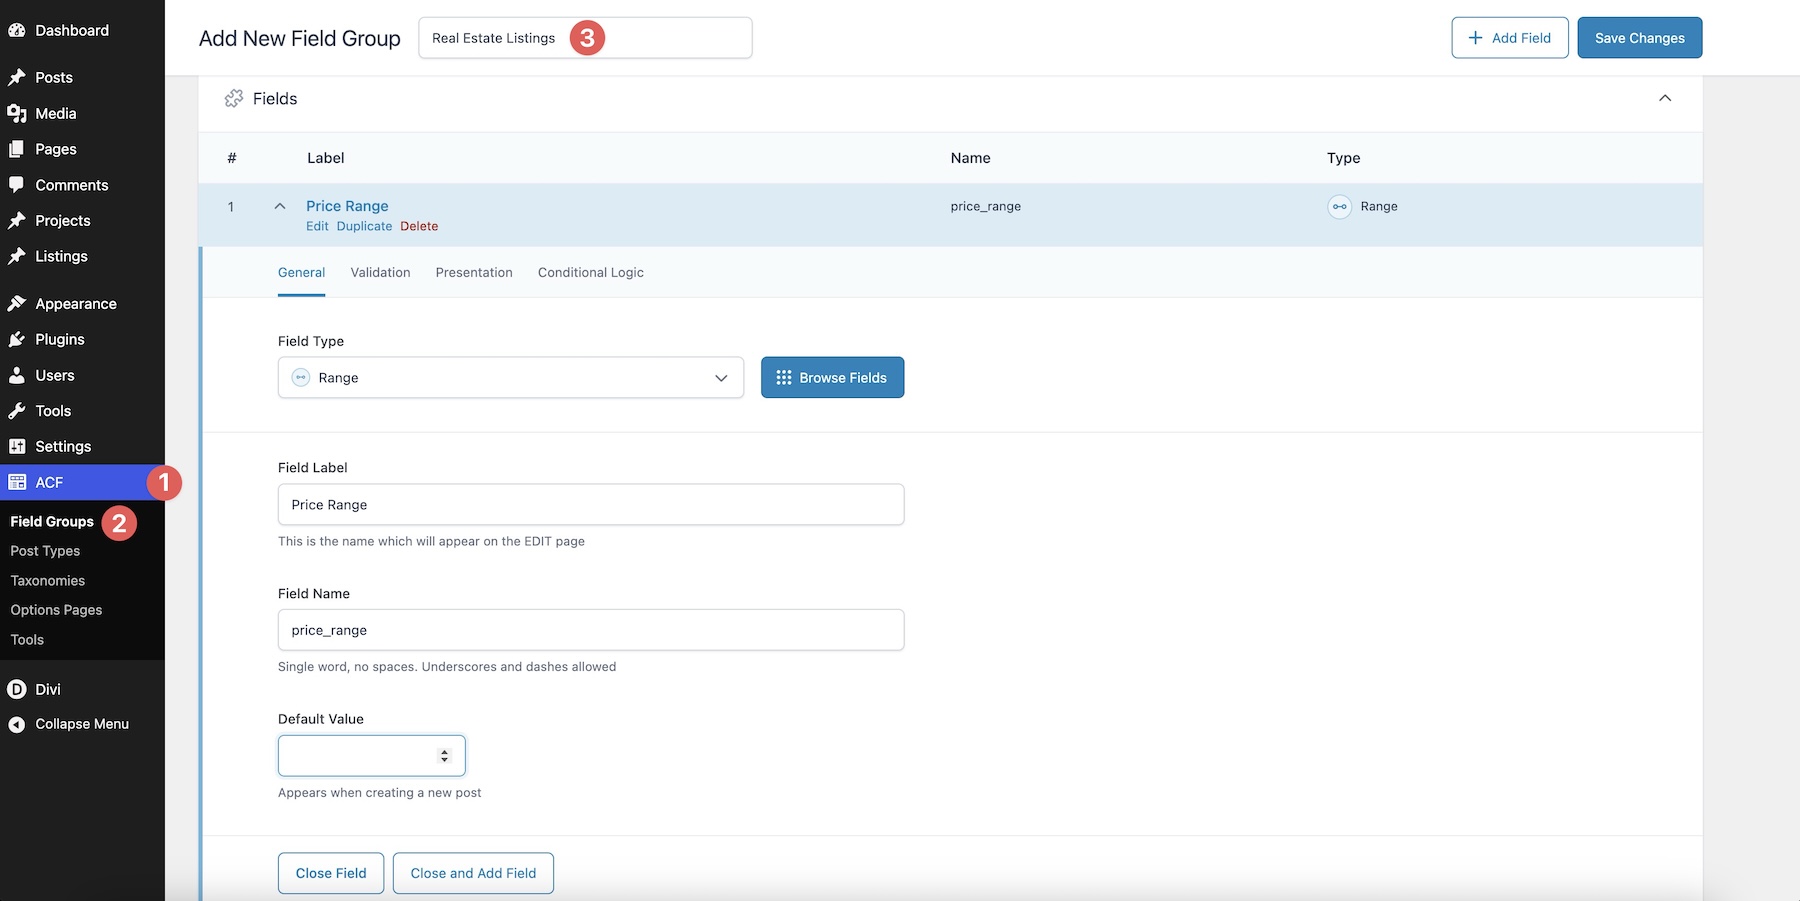
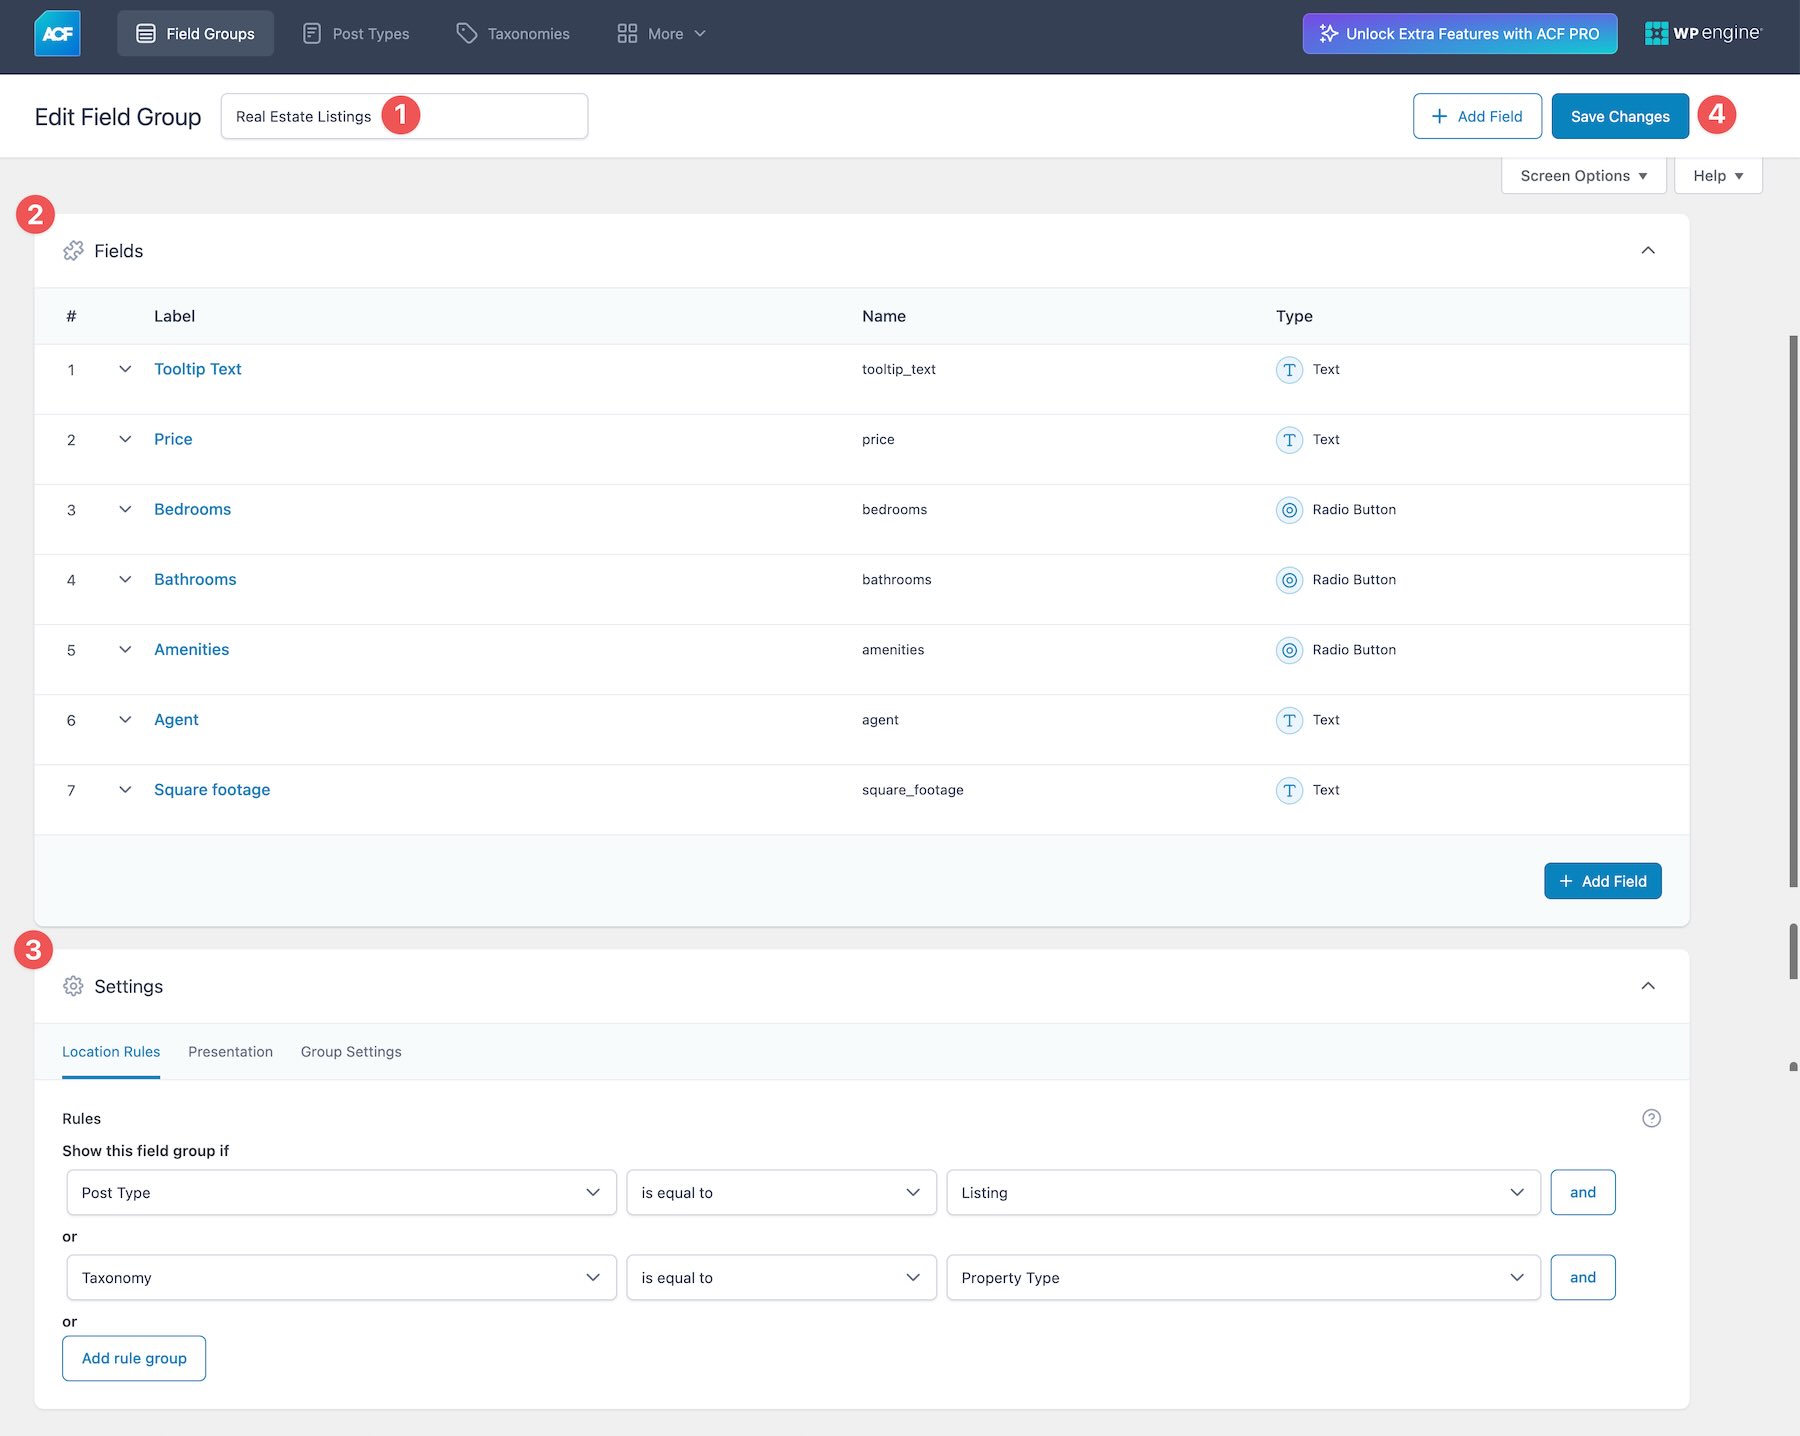
From there, you’ll create the following Custom Fields:
- Tooltip Text (Text): This is the content that will appear in the info tooltip.
- City (Text): This stores the location visitors can search alongside the listing address.
- Price (Text): This will hold the listing’s price in the loop card.
- Bedrooms (Radio Button): This will display the number of bedrooms (2-5) on the listing card and serve as a Radio field in the Post Filter module.
- Bathrooms (Radio Button): Displays the number of bathrooms (2-5) in the card and Post Filter module.
- Amenities (Radio Button): Stores one amenity value, such as Garage, Pool, Waterfront, or New Construction, for the card and filter.
- Agent (Text): Displays the listing agent’s name in the listing card.
- Square Footage (Text): Displays the listing’s total square footage on the listing card.
Create Sample Listings
Add several listings (we’ll add 12) using your new custom post type.
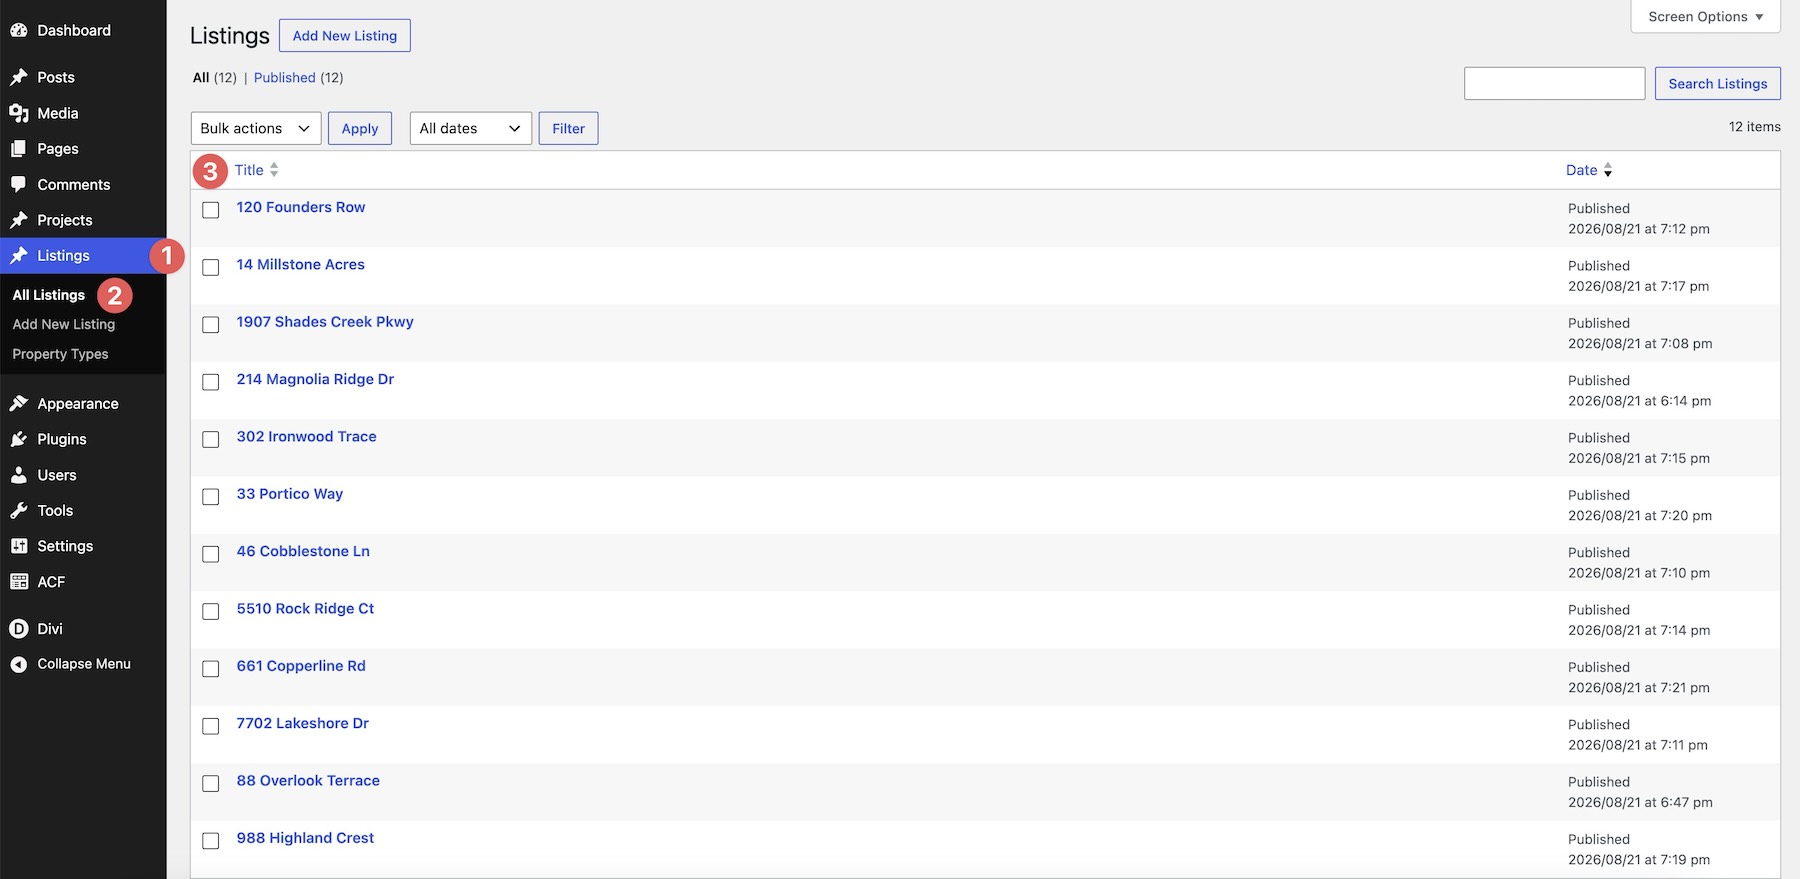
Fill in the Title using the listing’s address, add the Featured Image, complete all the custom fields, and assign a Property Type. The more varied your sample data is, the better you’ll be able to test the filters later.
Create A New Page
In the WordPress admin dashboard, create a new page, name it Listings, and open it with the Visual Builder. This is where we’ll build the entire filterable real estate layout.
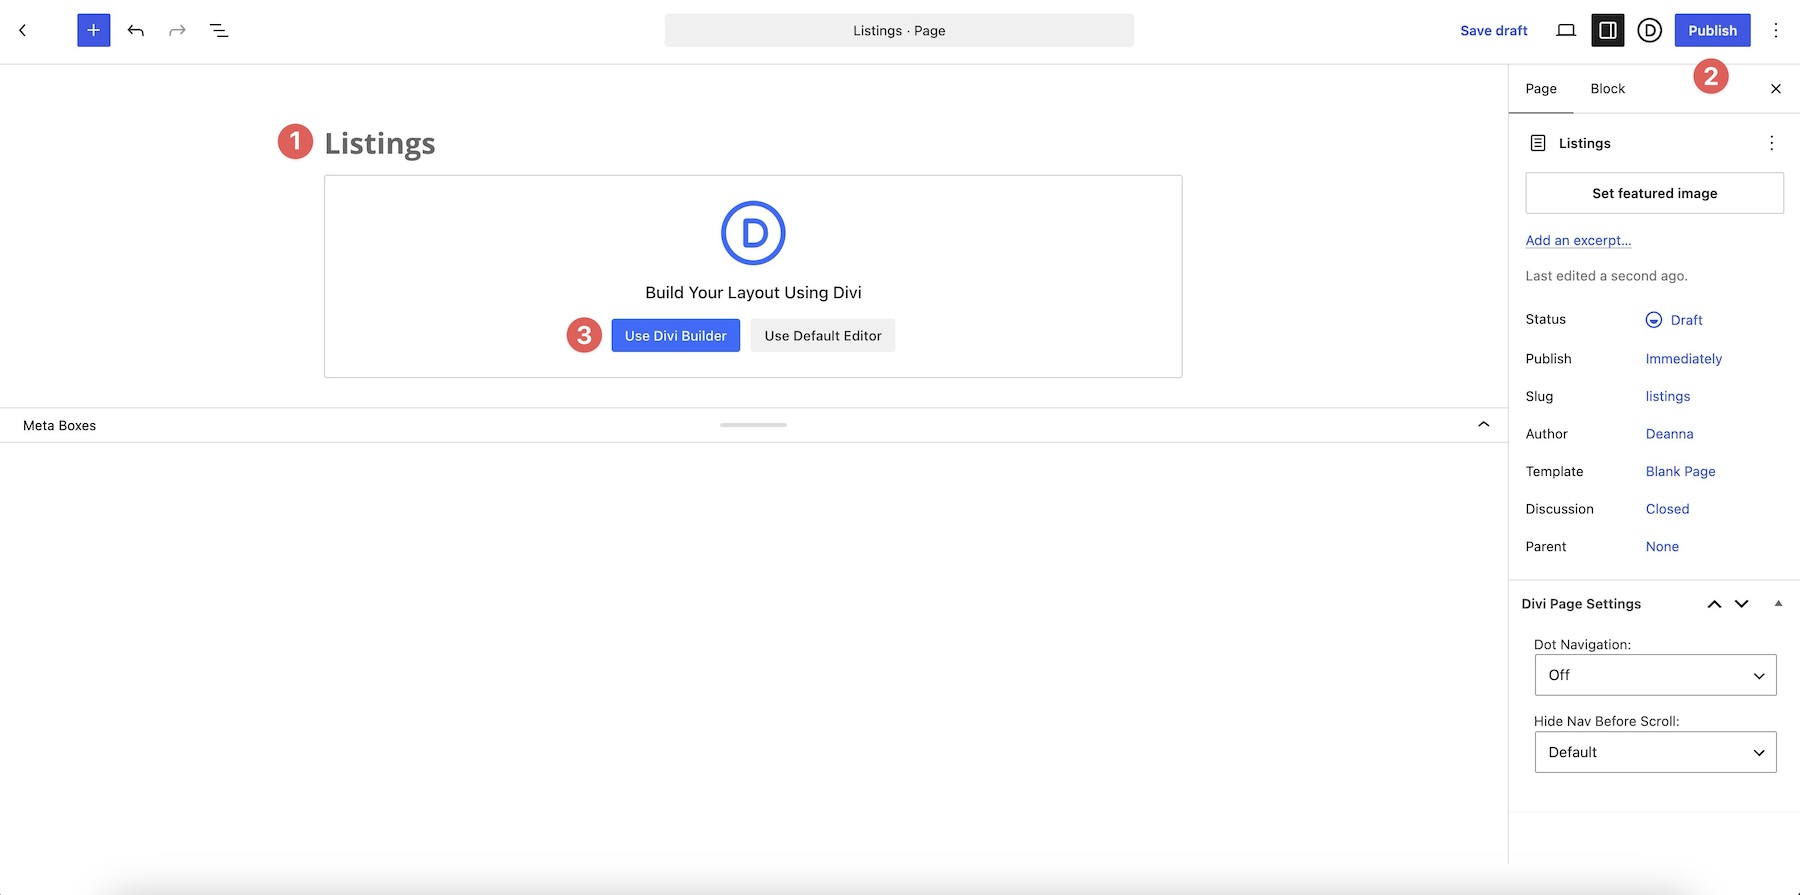
Once these four steps are complete, you’re ready to start designing the loop and the filter form.
Build The Real Estate Listings Loop
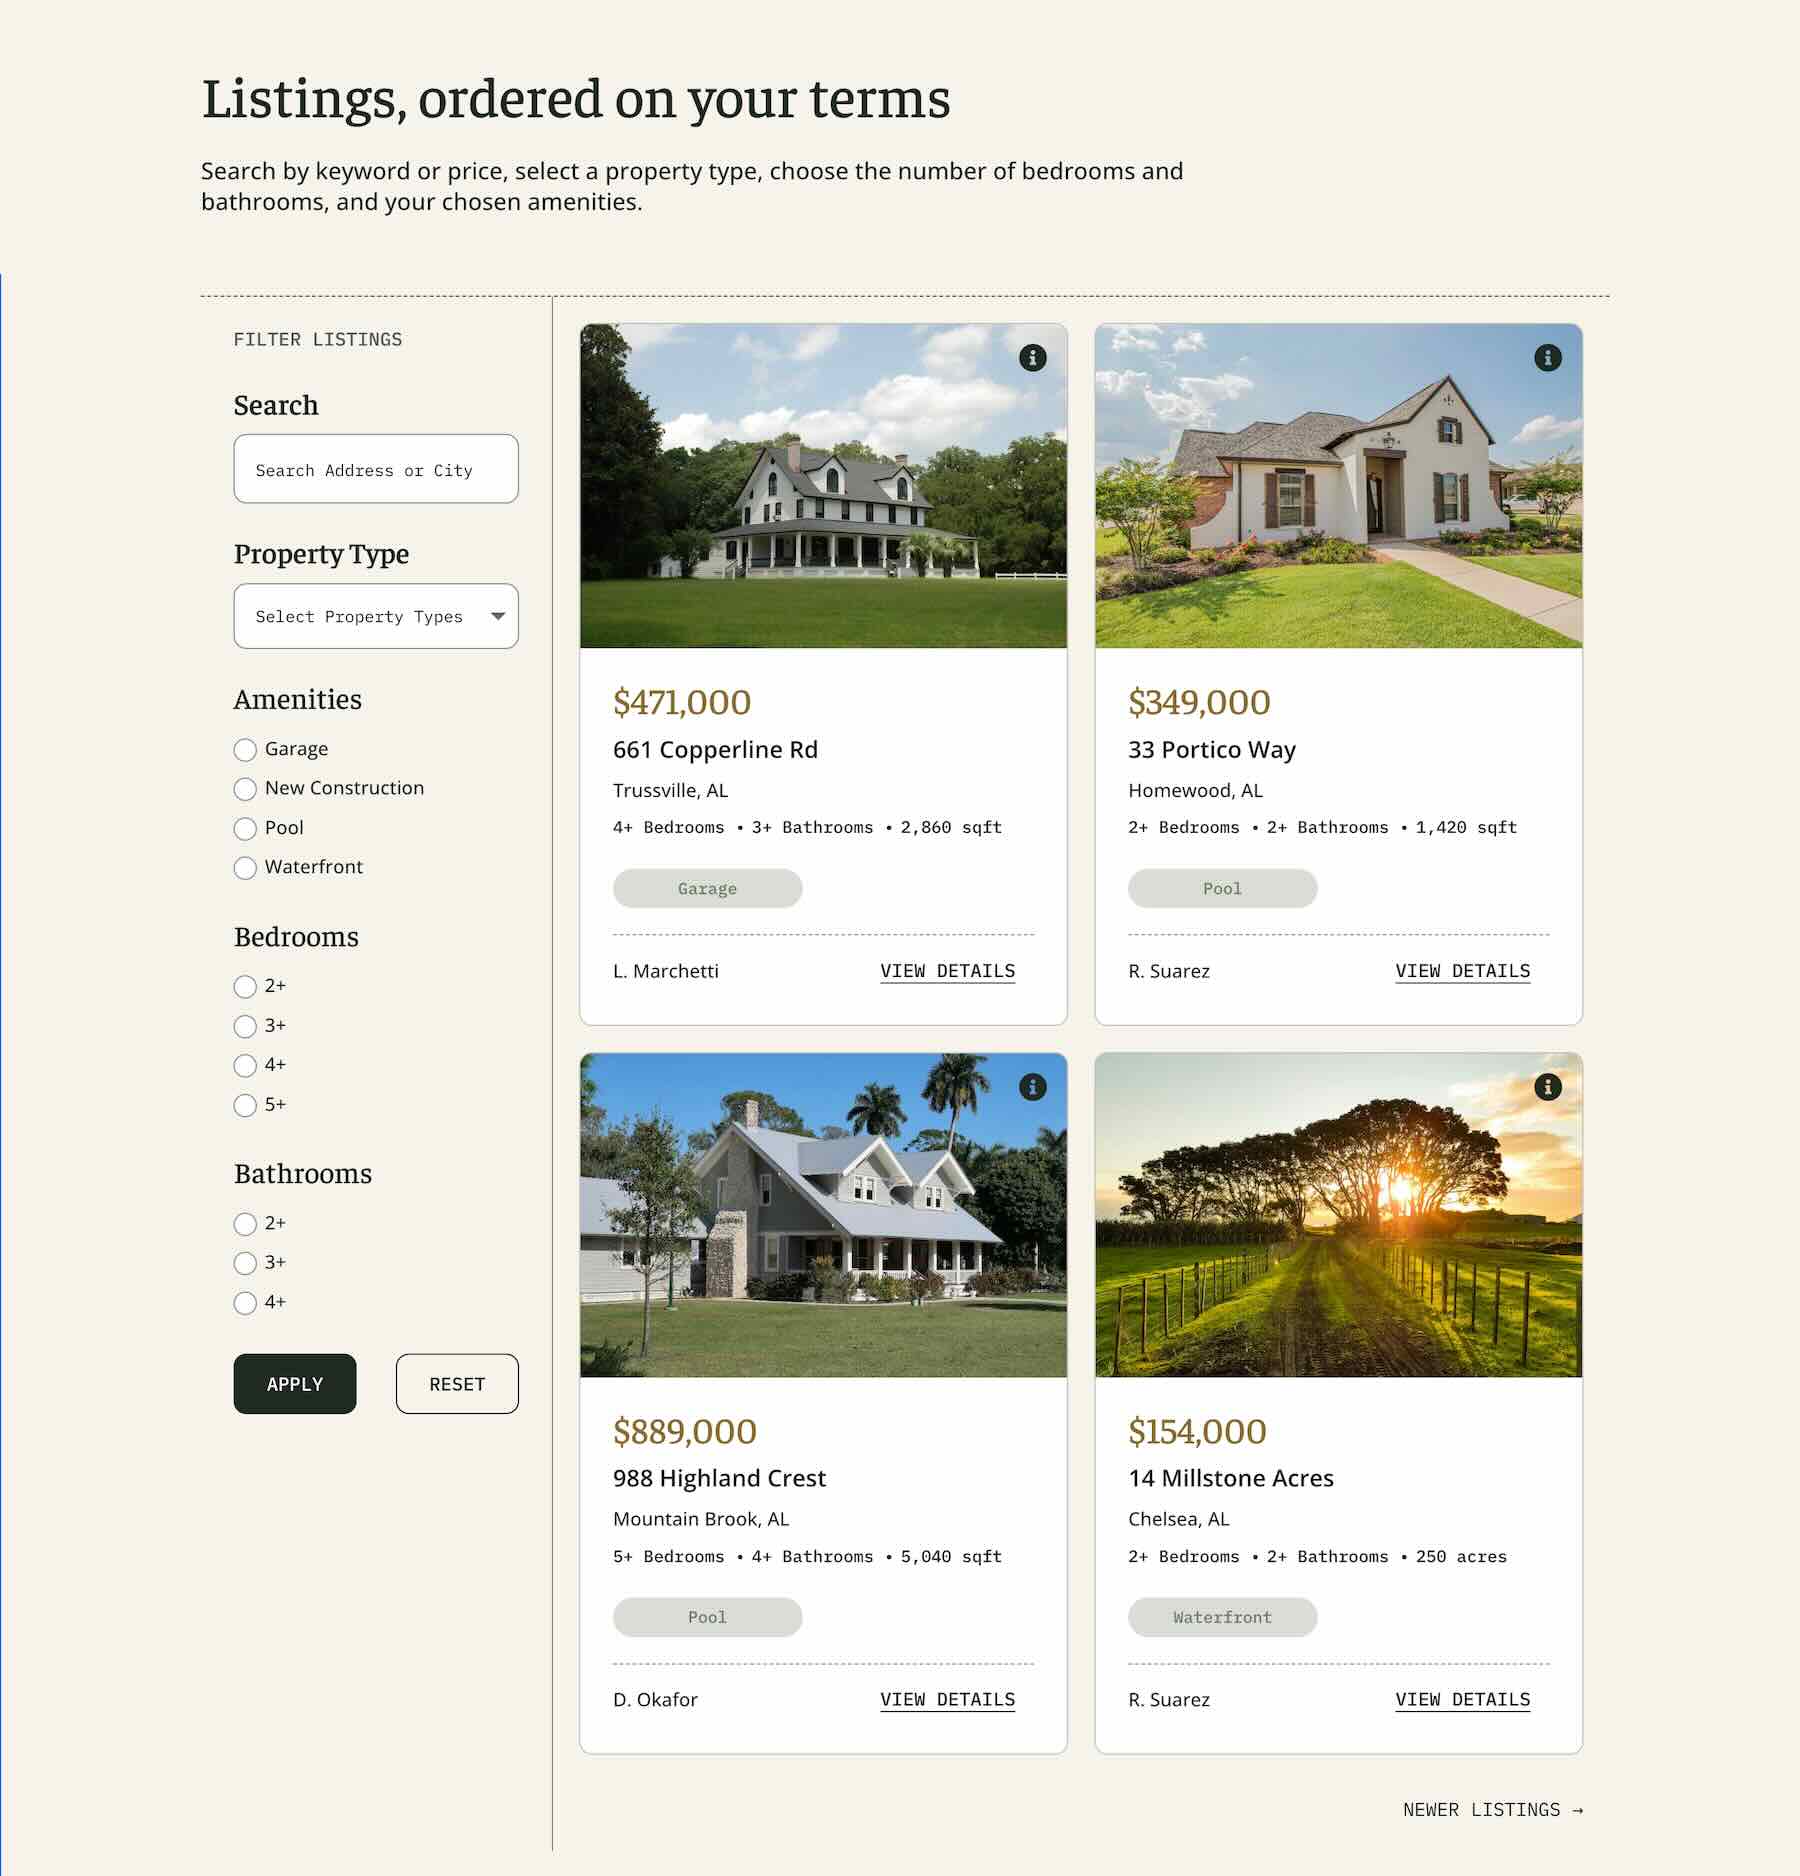
Now that the data foundation is in place, it’s time to design the heart of the page: the listings loop itself. In this section, we’ll create a clean, fully custom property card and turn it into a dynamic loop that pulls in real listing data. By the end, you’ll have a responsive grid that looks like the finished layout below, ready to be filtered and searched in the next steps.
Create The Foundation
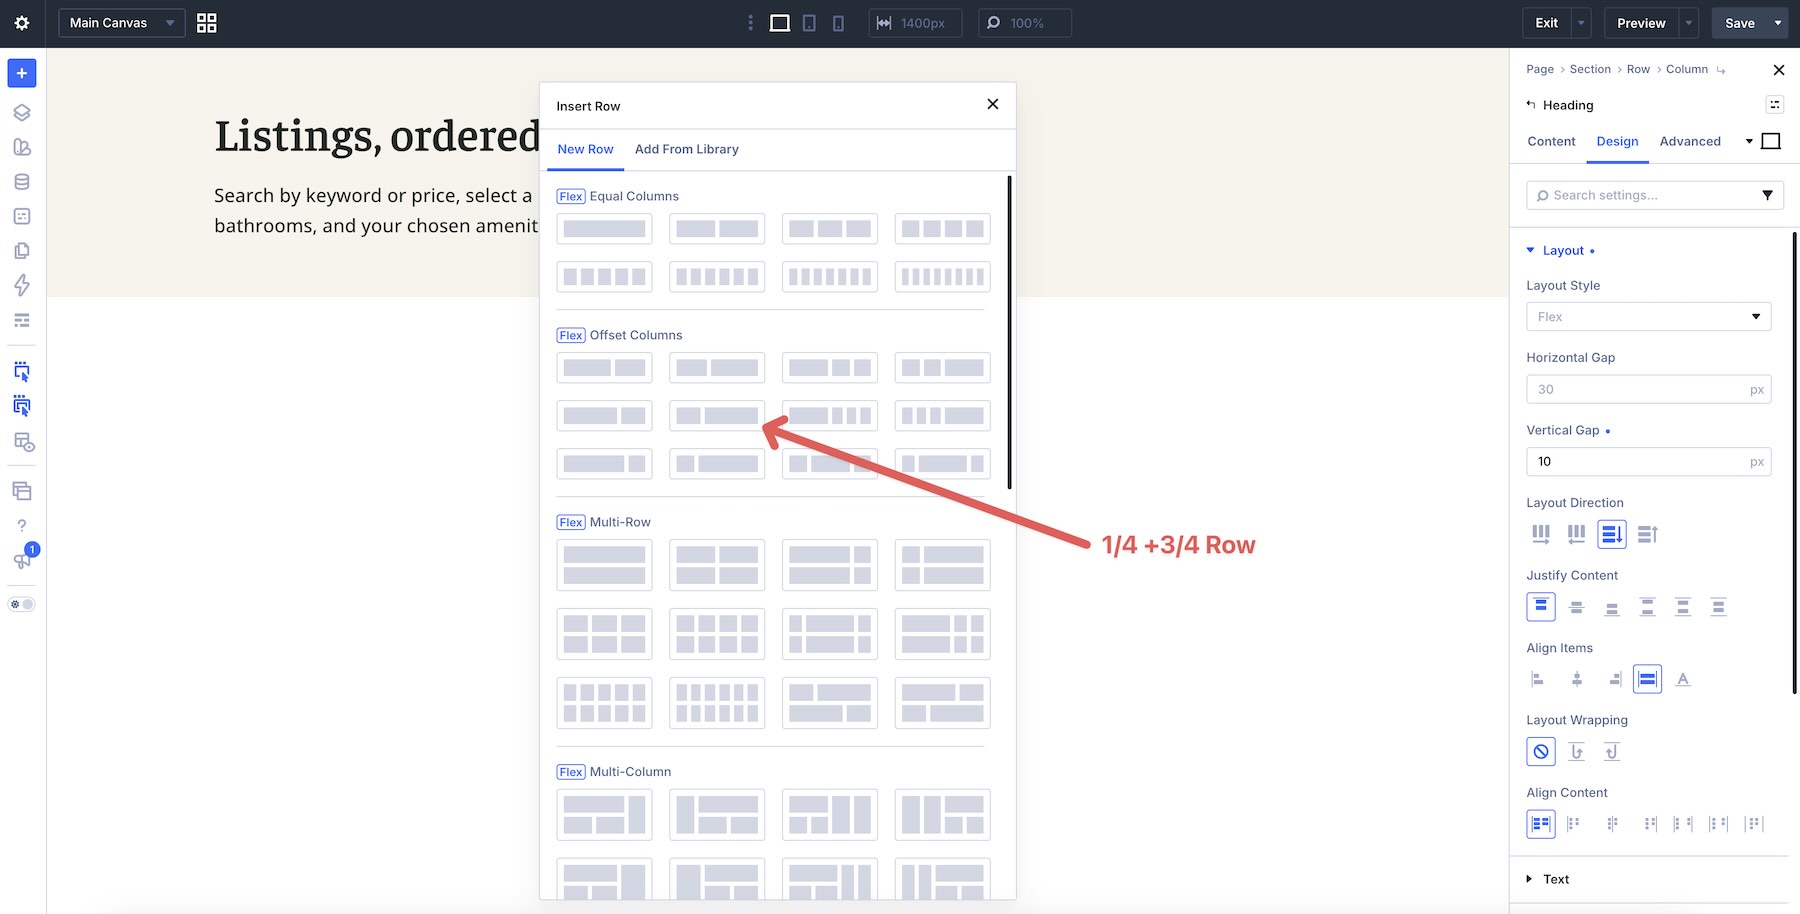
Start by adding a 1/4 + 3/4 Column Row to the page.
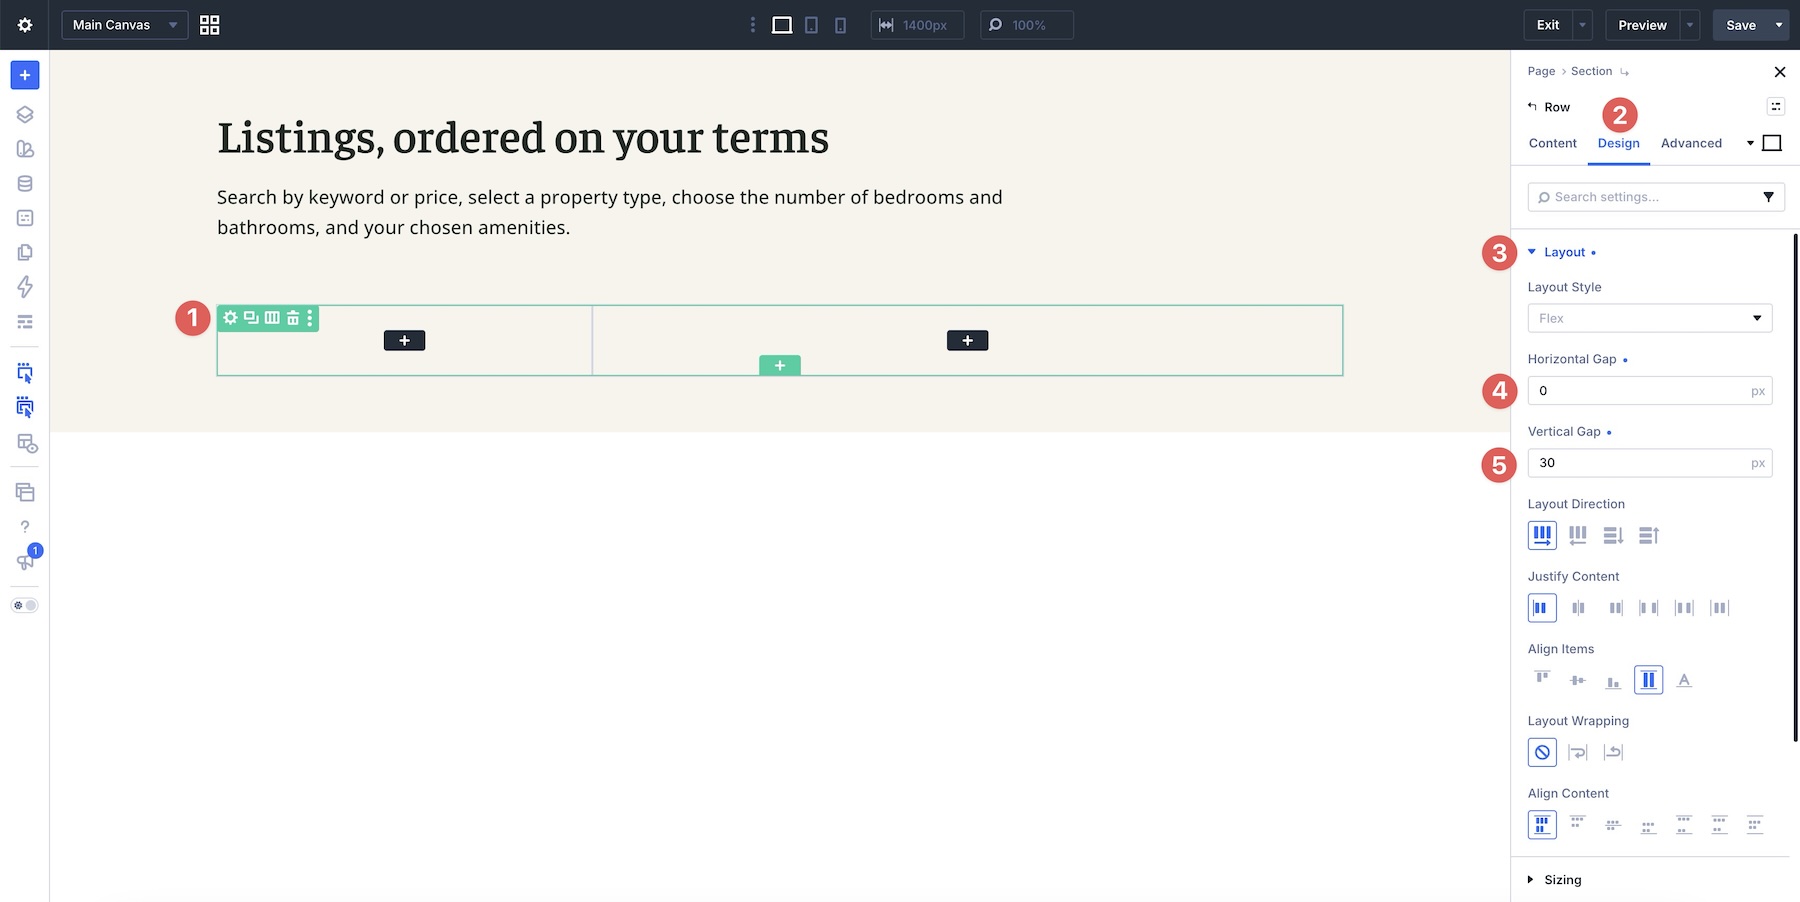
In the Row’s Design tab, expand the Layout option group and assign a 0px Horizontal Gap and a 30px Vertical Gap.
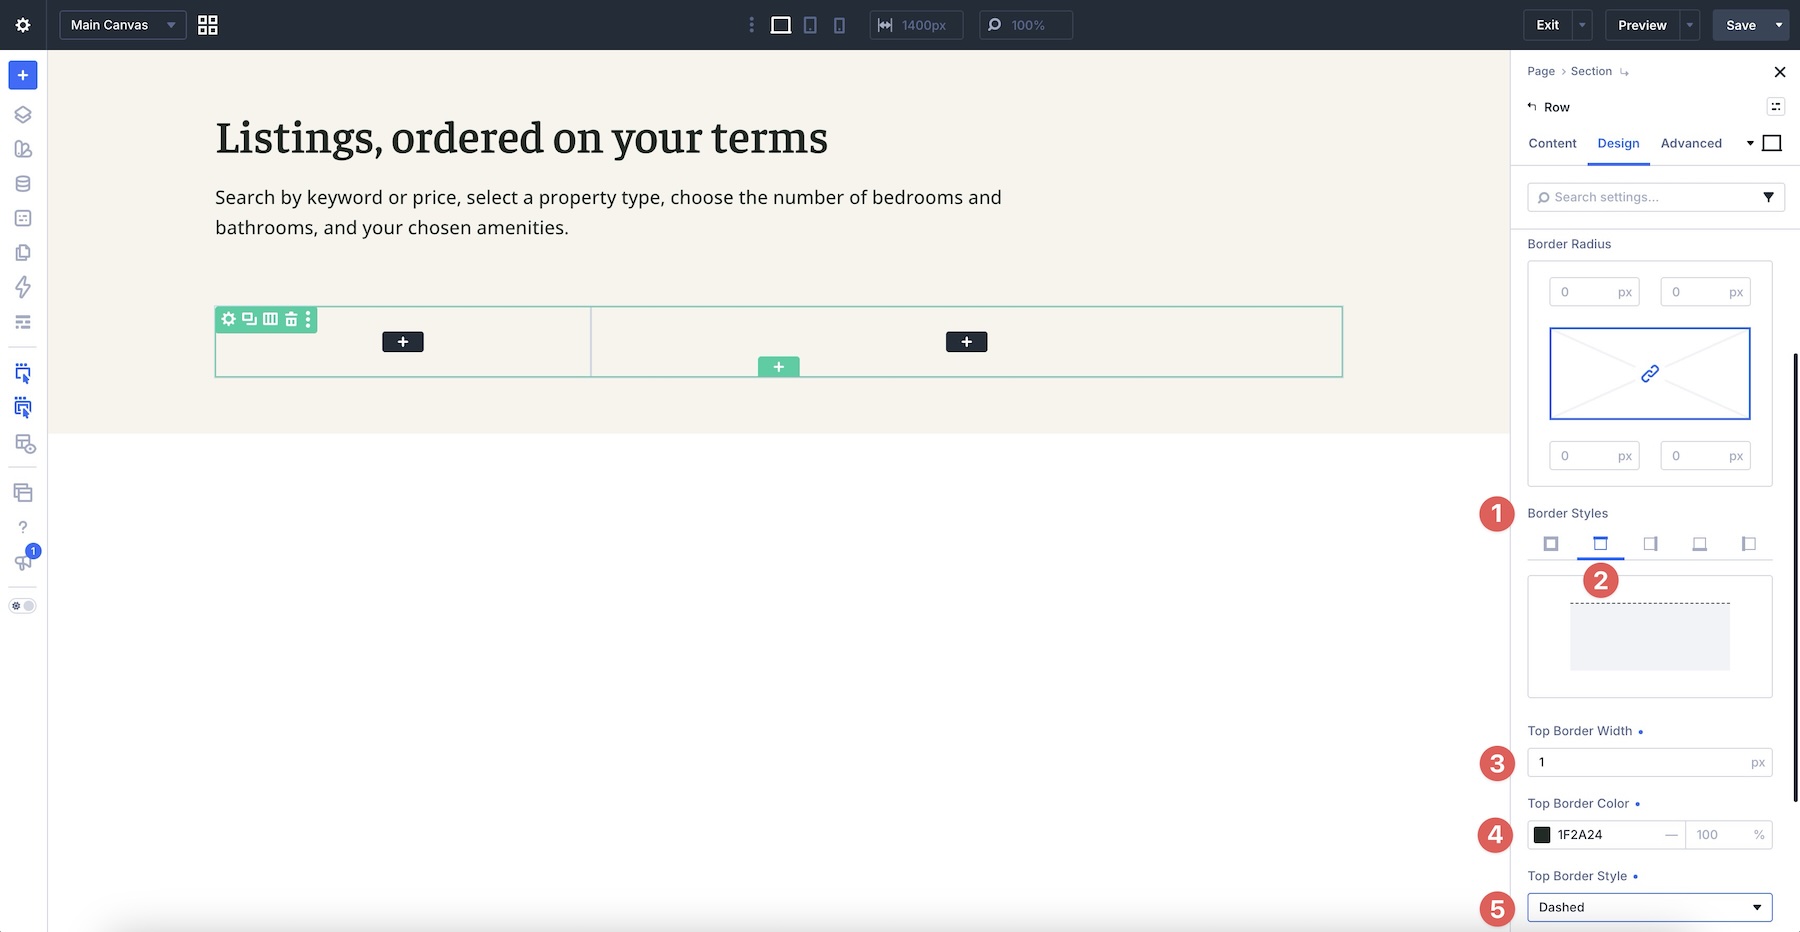
Next, expand the Border option group. Under Border Styles, select the Top Border tab, assign a 1px Top Border Width, add a Top Border Color, and set the Top Border Style to Dashed.
Configure The First Column
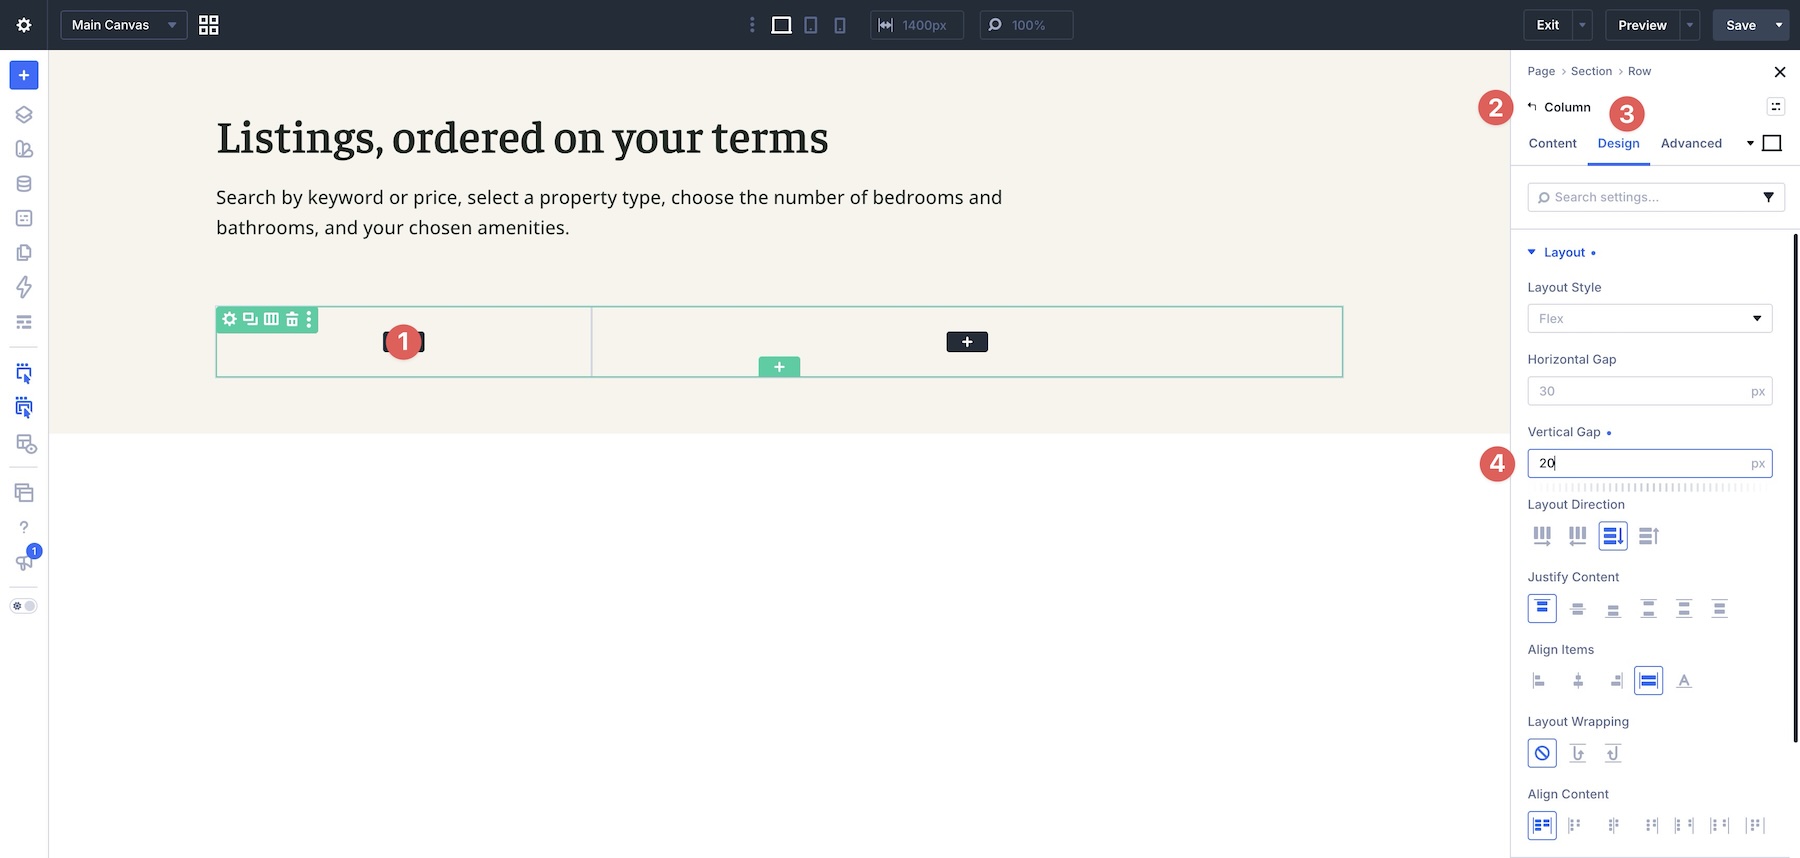
Now, open the first Column of the Row and navigate to the Design tab. Expand the Layout option group and assign a 20px Vertical Gap.
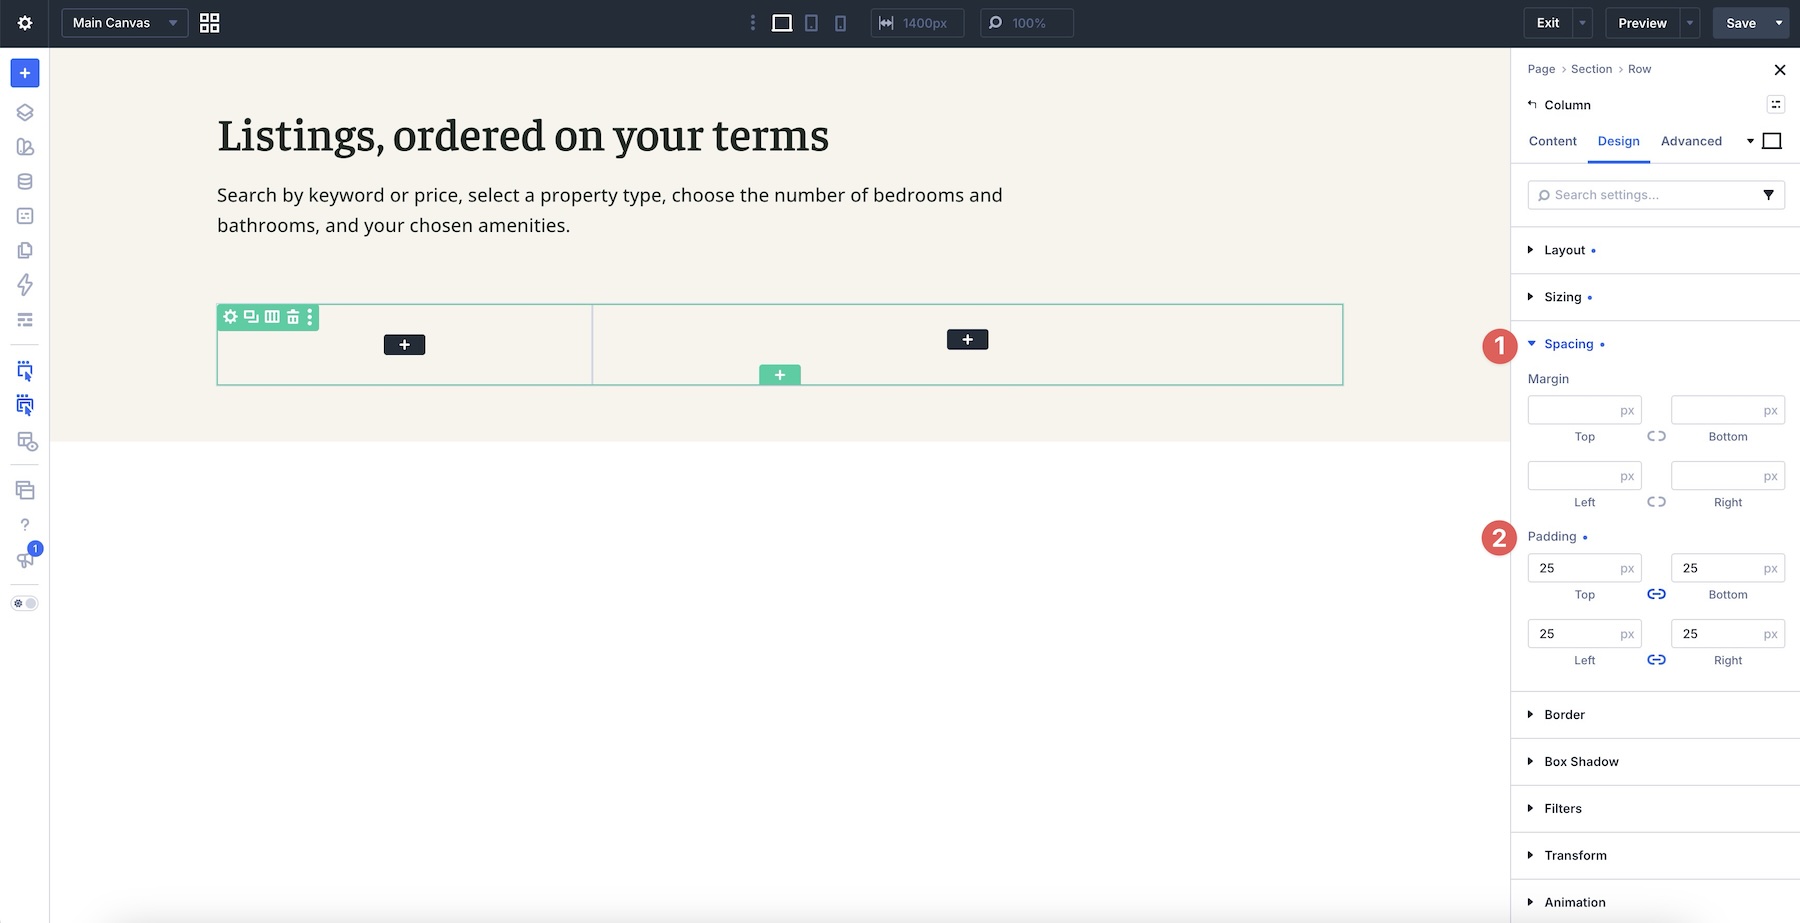
While in the Design tab, expand the Spacing option group and add 25px Padding on all four sides.
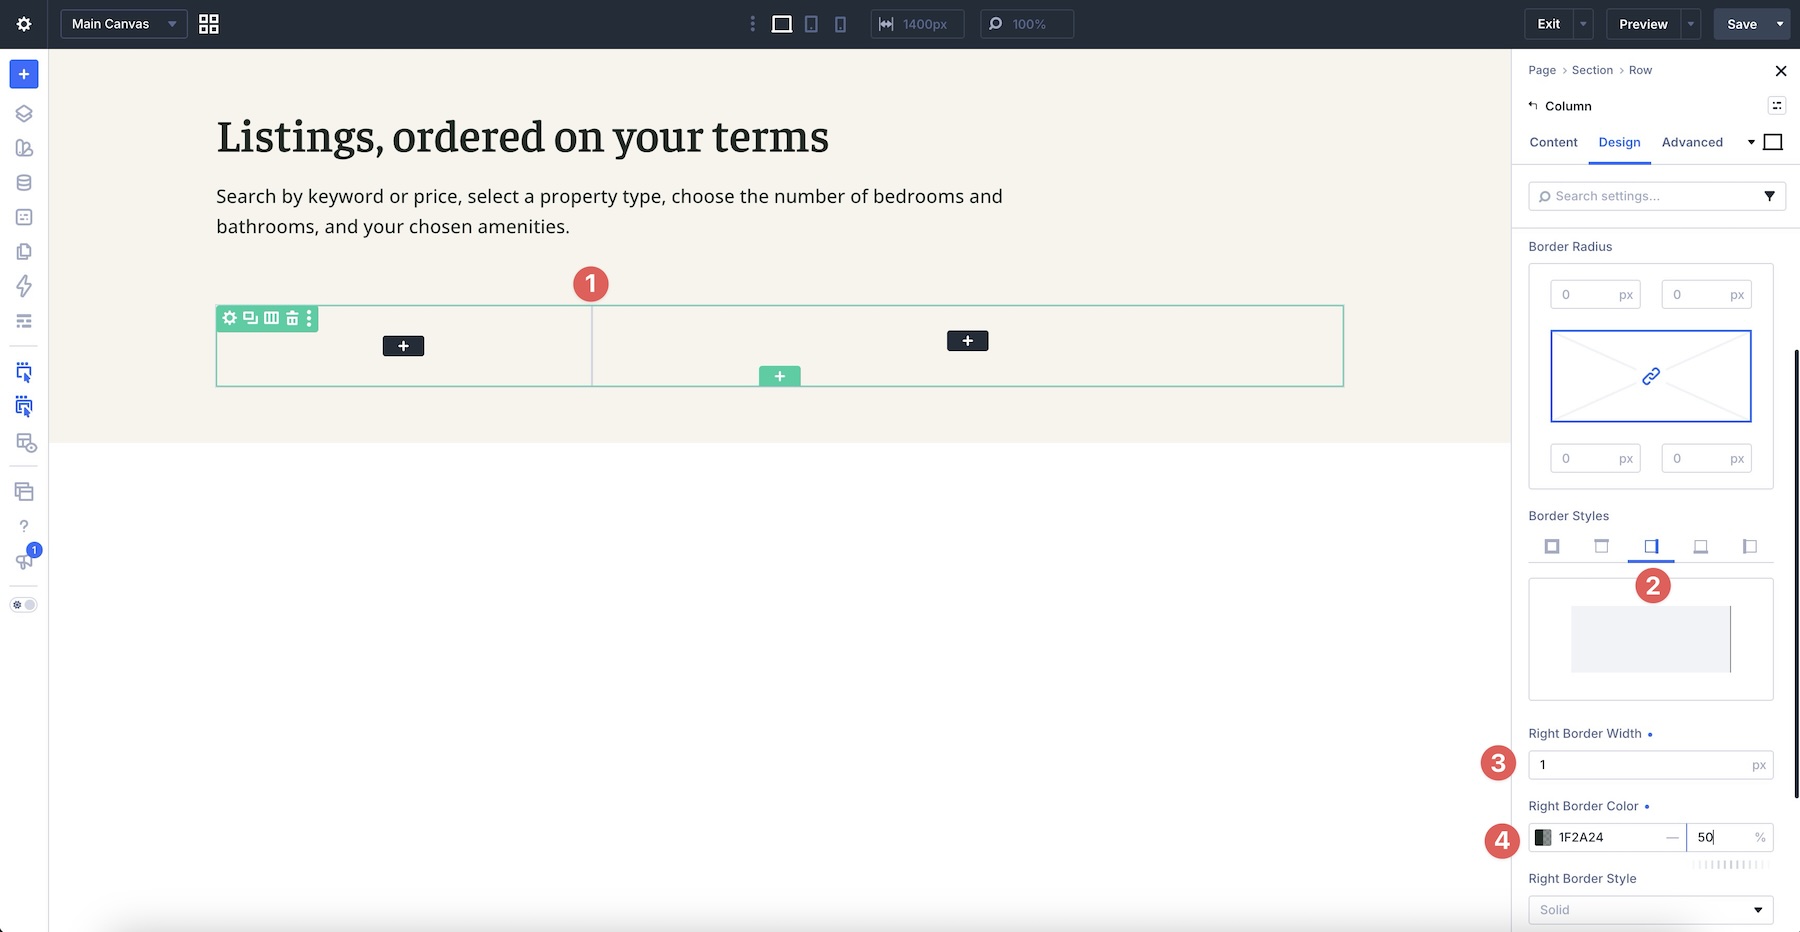
In the Border option group, add a 1px Right Border to the Column.
Configure The Second Column
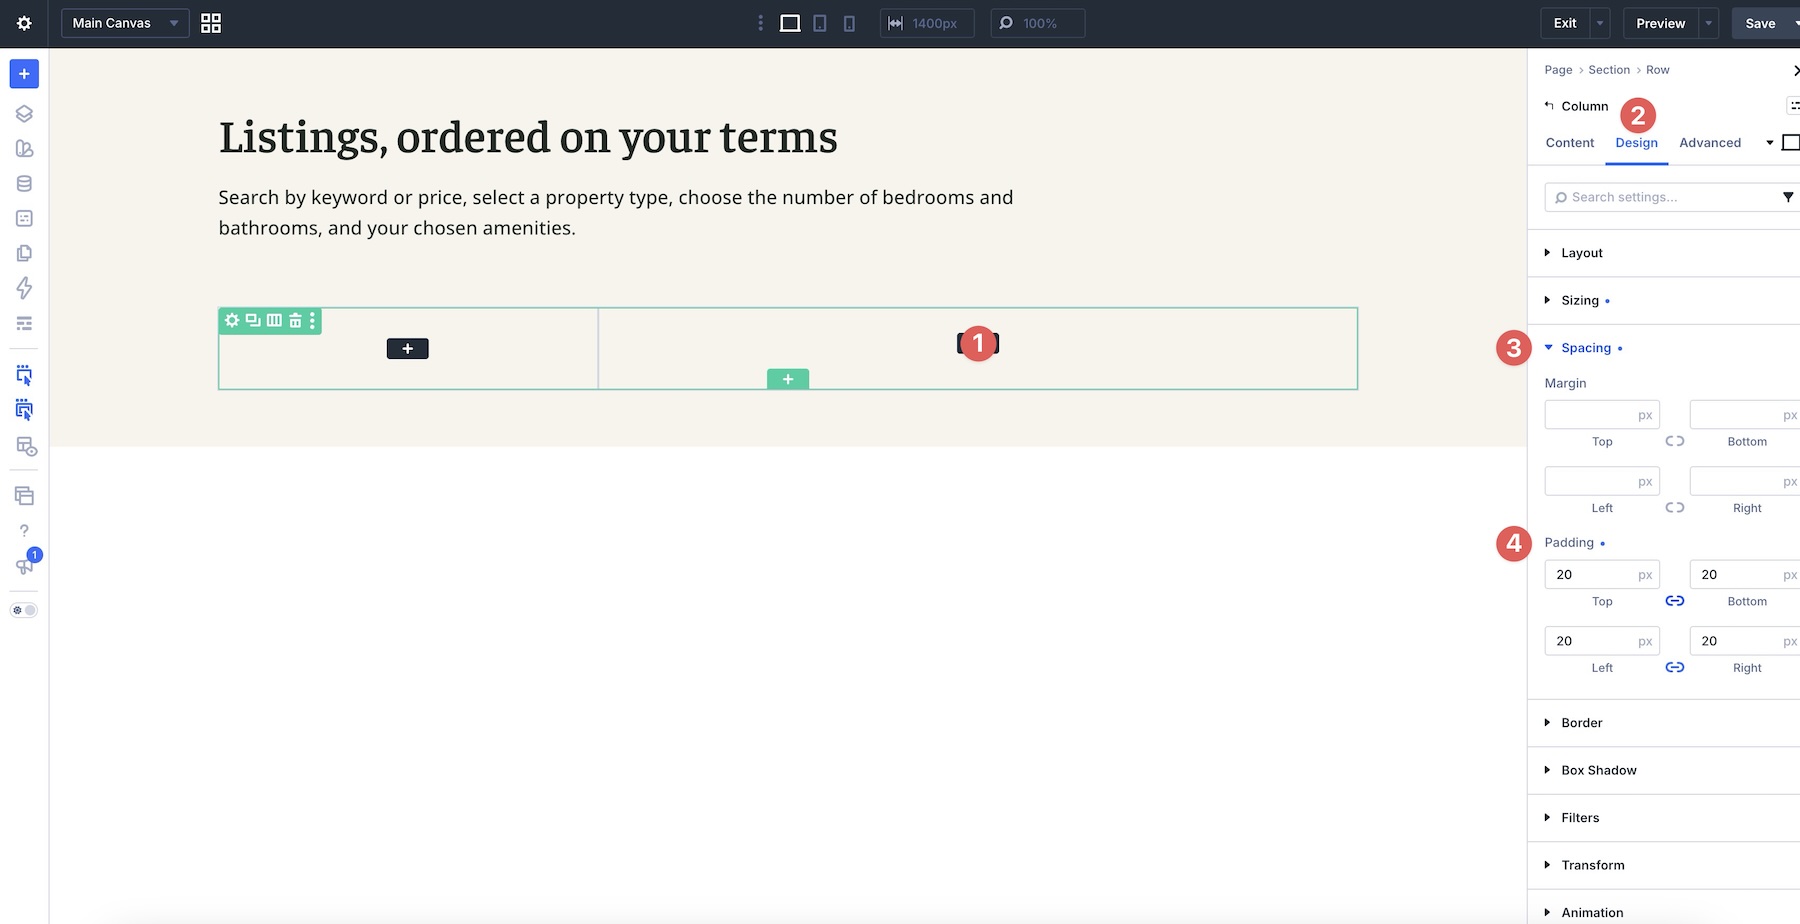
Open the second Column in the Row. Go to the Design tab, expand the Spacing option group, and add 20px Padding on all four sides.
Add A Nested Row
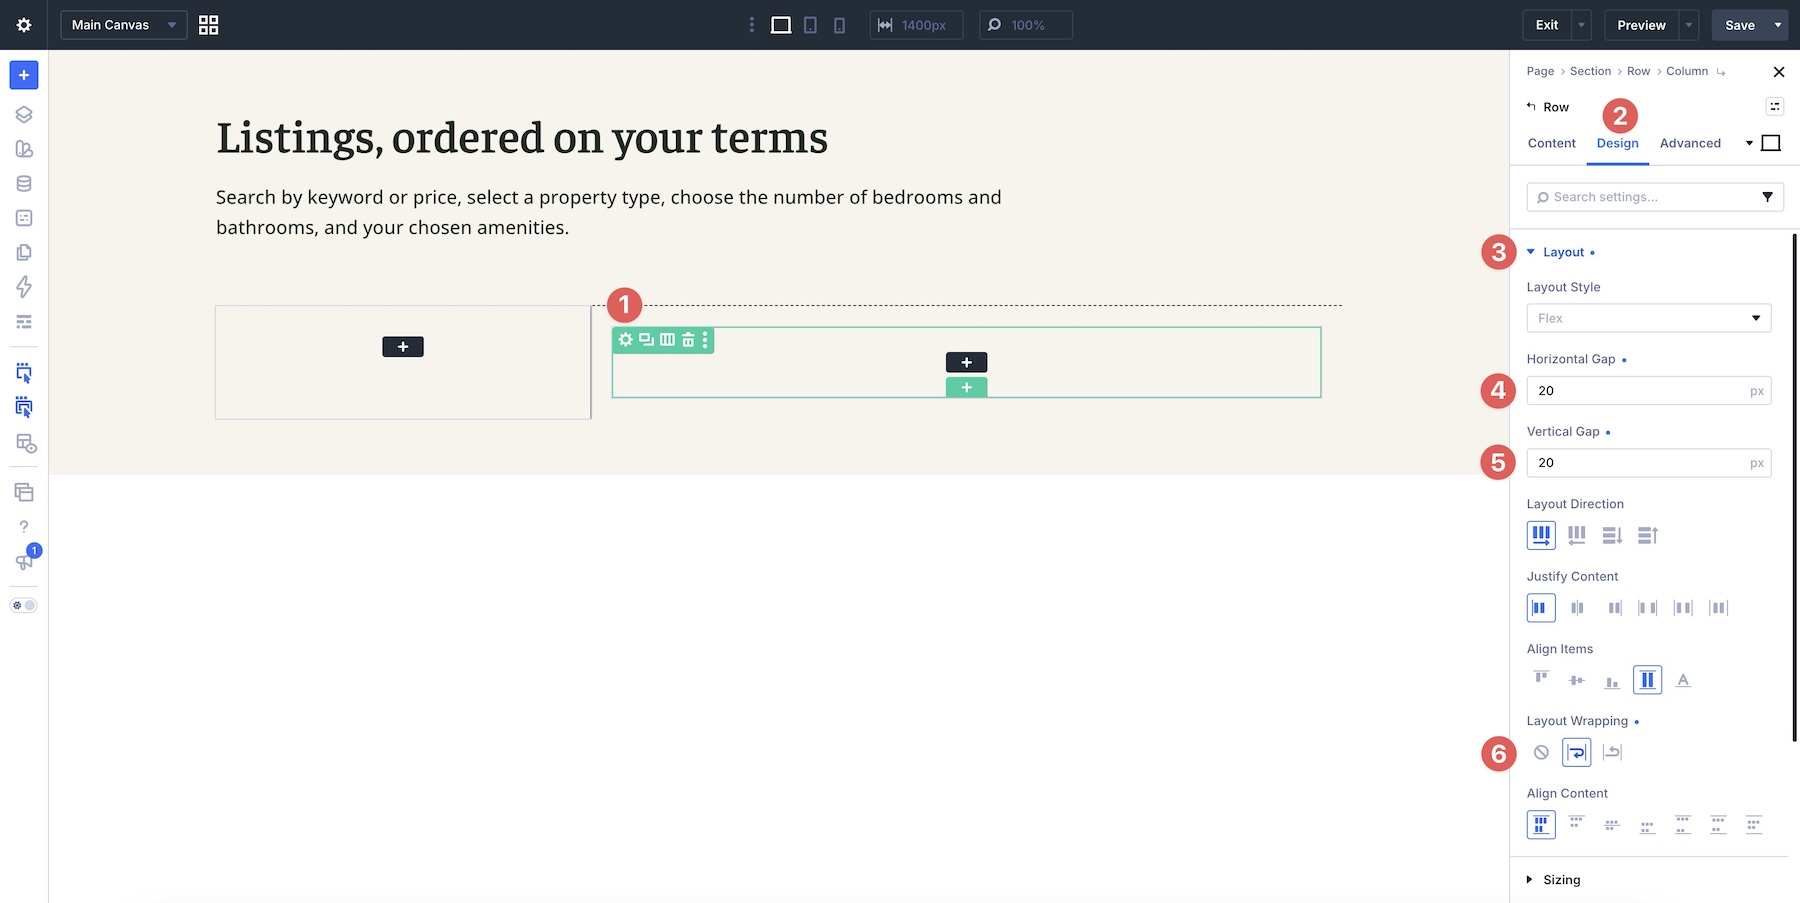
With the Gaps, Borders, and Spacing set, add a Nested Row to the second Column. Click the black + icon and select a single-column Row.
In the new Row’s Design tab, expand the Layout option group and assign a 20px Horizontal and Vertical Gap. Also enable Wrap under Layout Wrapping. This will keep the spacing consistent and allow items to flow to the next line once the loop runs out of available space.
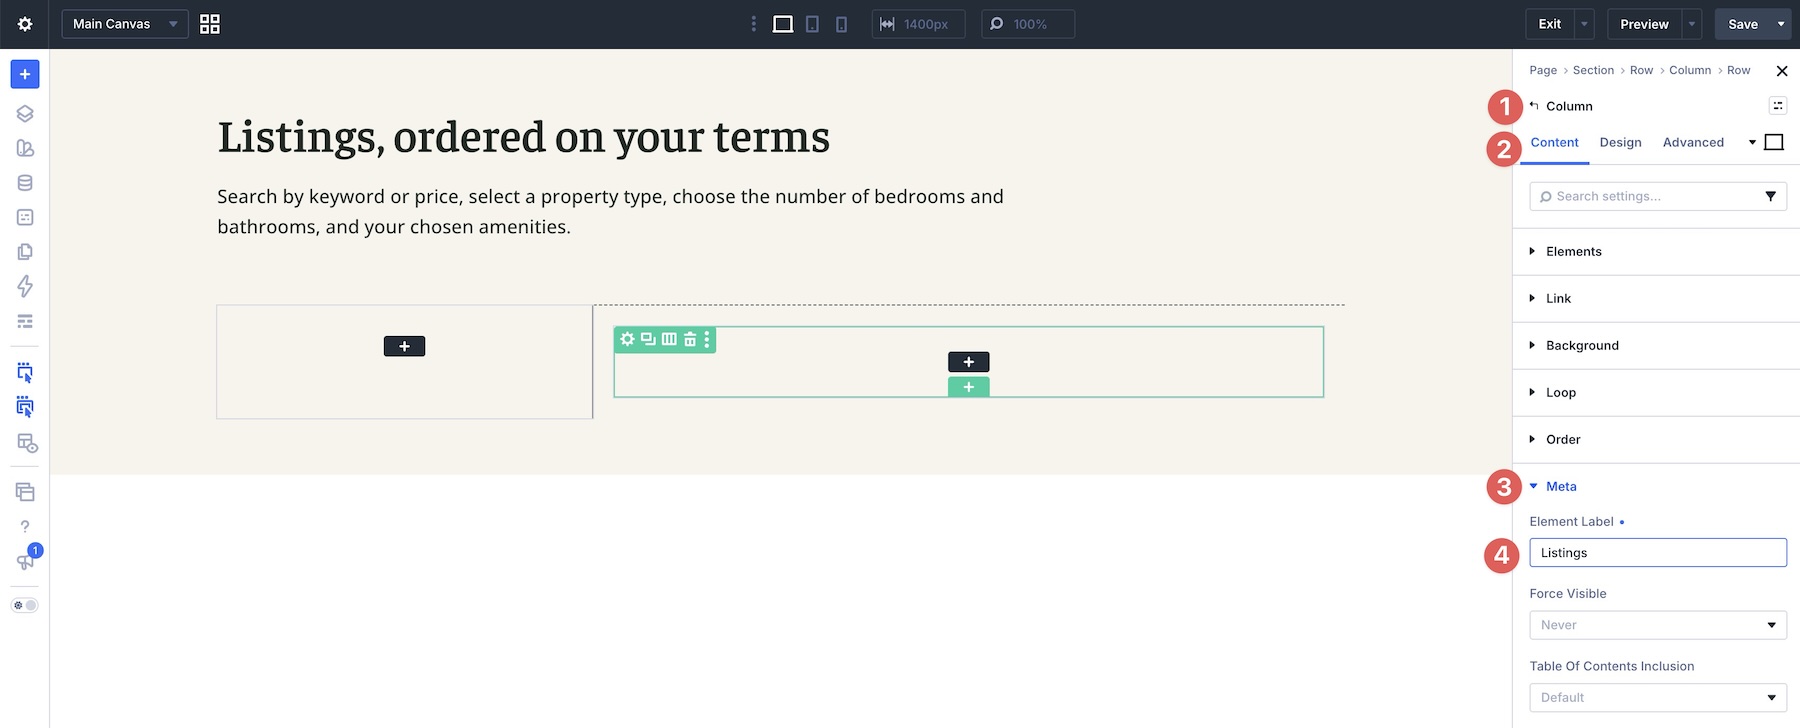
Next, click to edit the Column. In the Content tab, expand the Meta option group and add Listings as the Element Label. This will allow you to easily assign a Loop Target when we build the Post Filter form in the next step.
Next, go to the Design tab. Open the Layout option group and set the Vertical Gap to 0px.
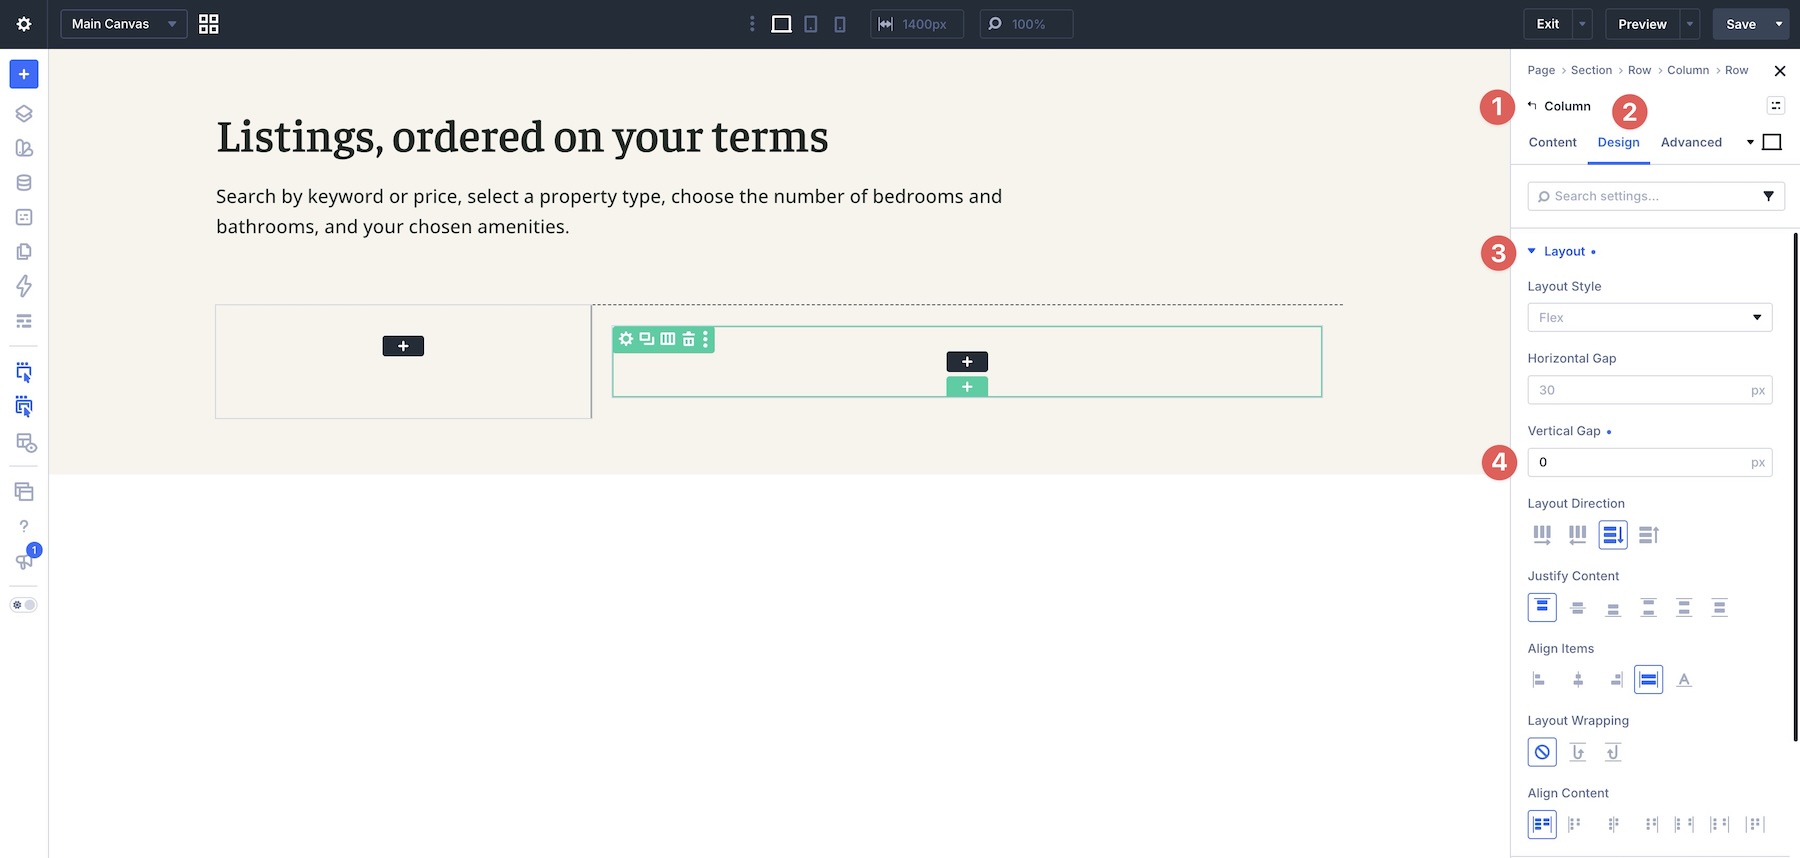
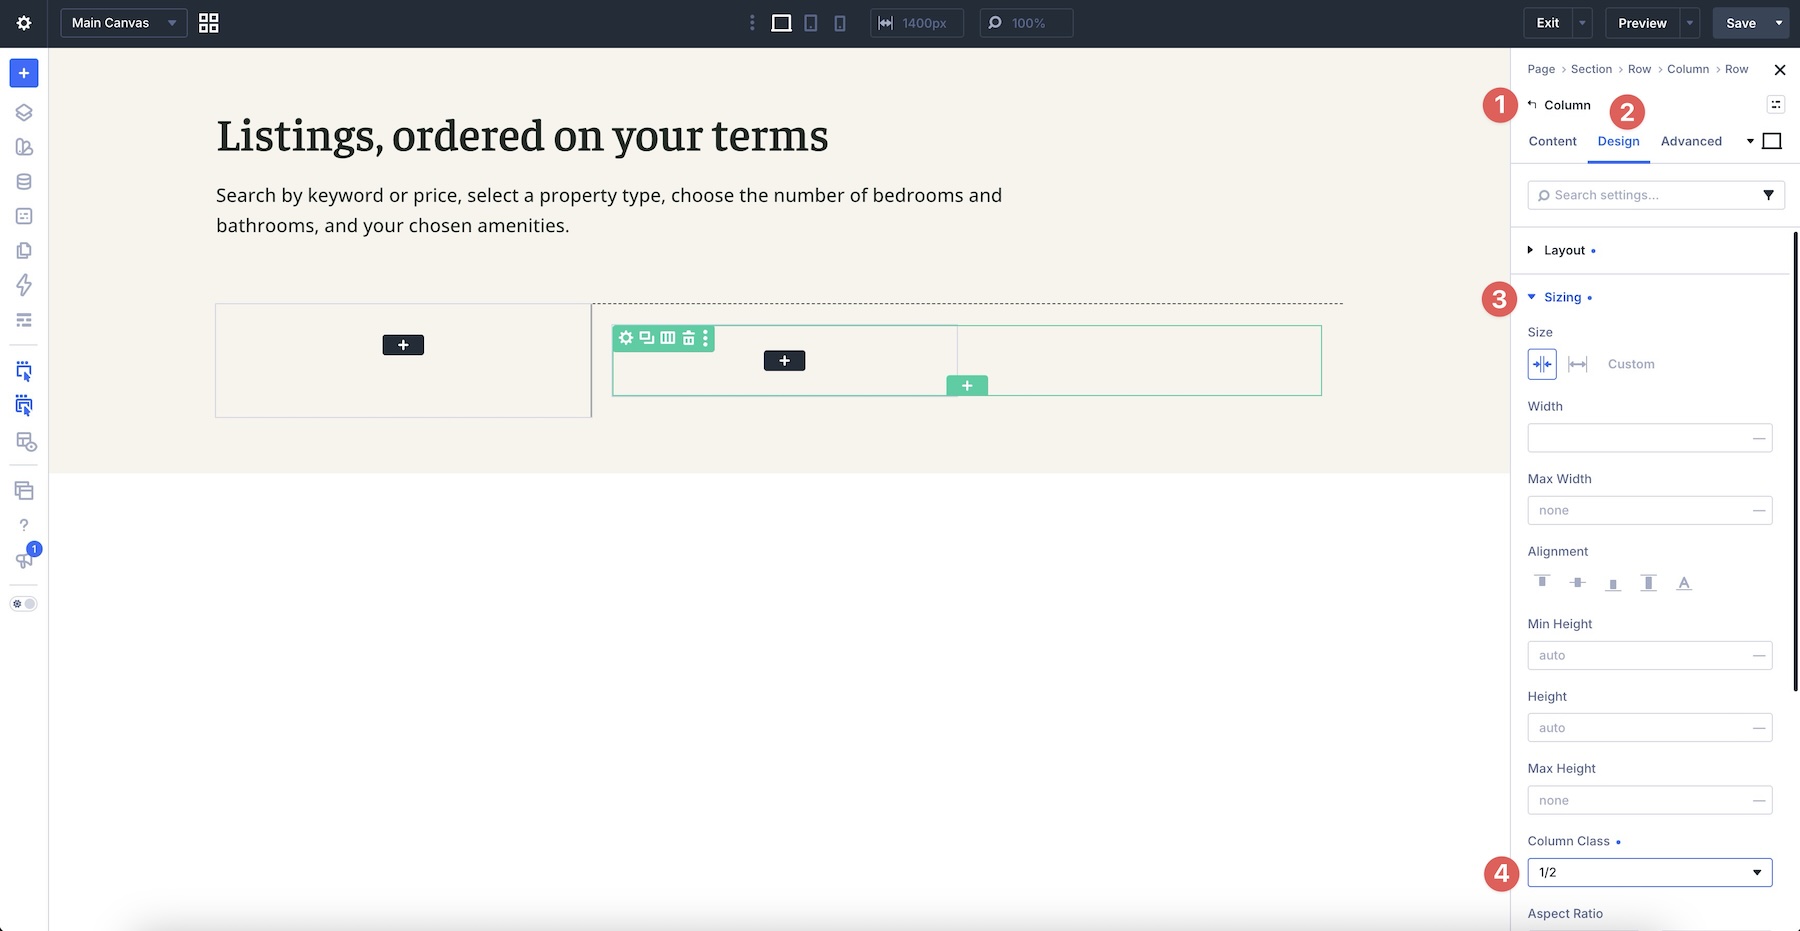
In the Sizing option group, set the Column Class to 1/2.
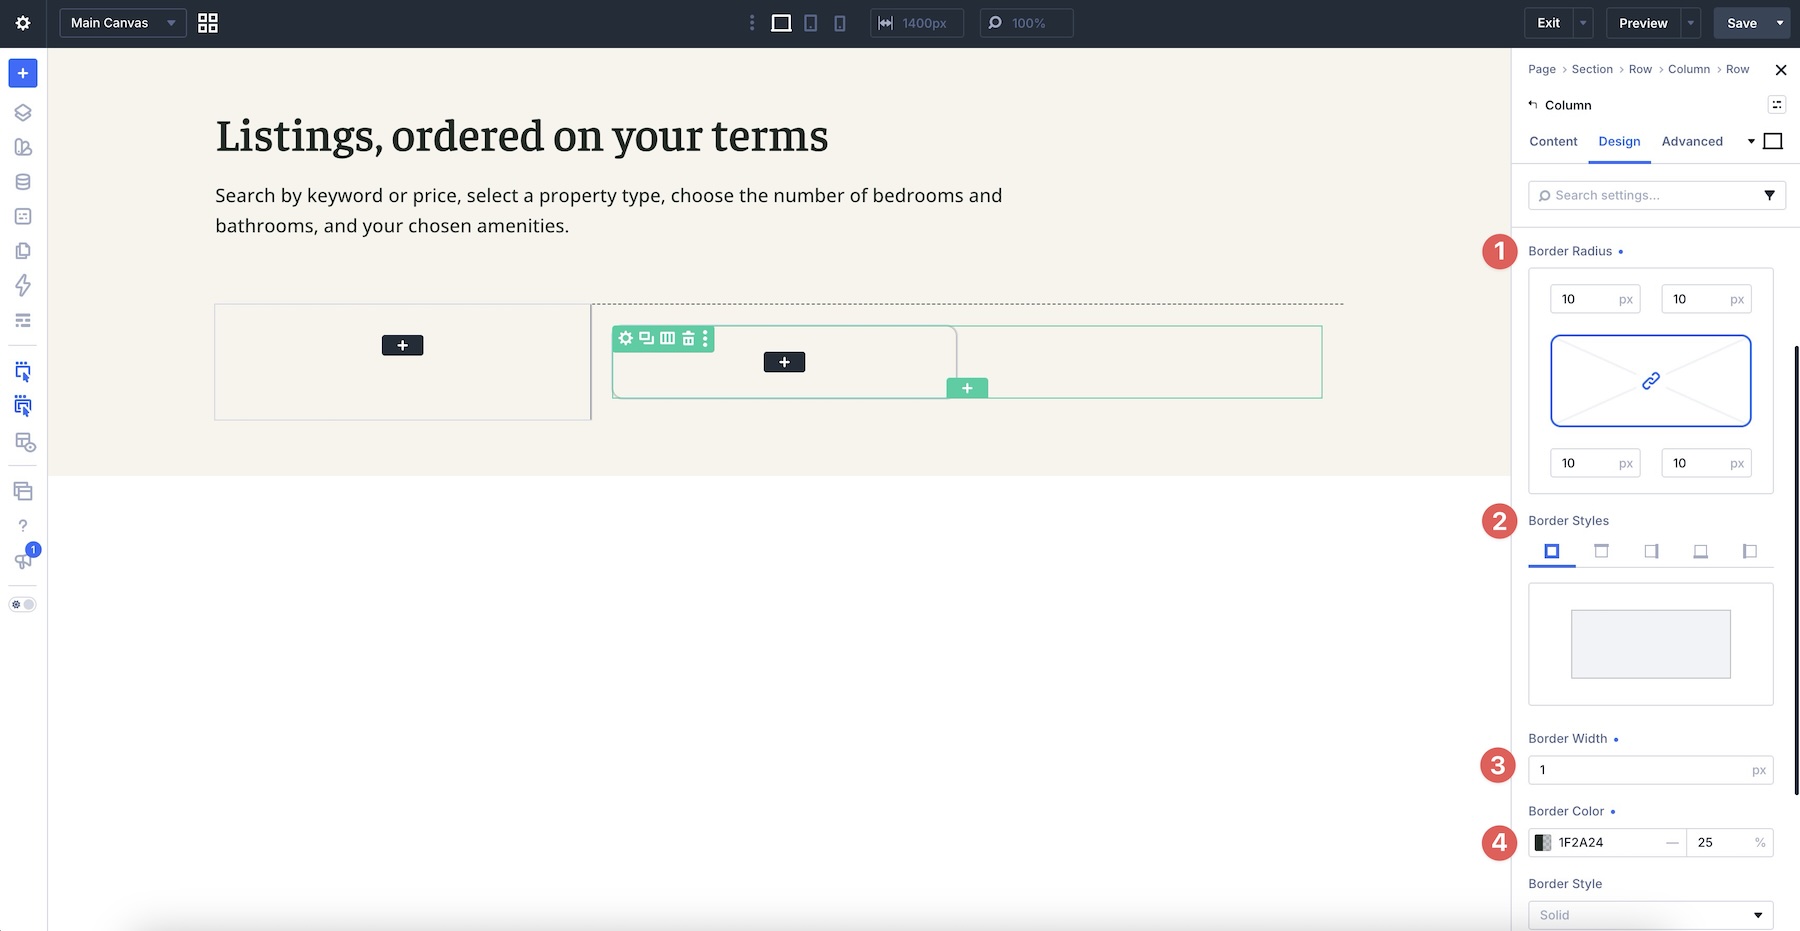
Lastly, expand the Border option group. Assign a 10px Border Radius, 1px Border Width, and enter a Border Color for the Column.
Enable The Loop Builder
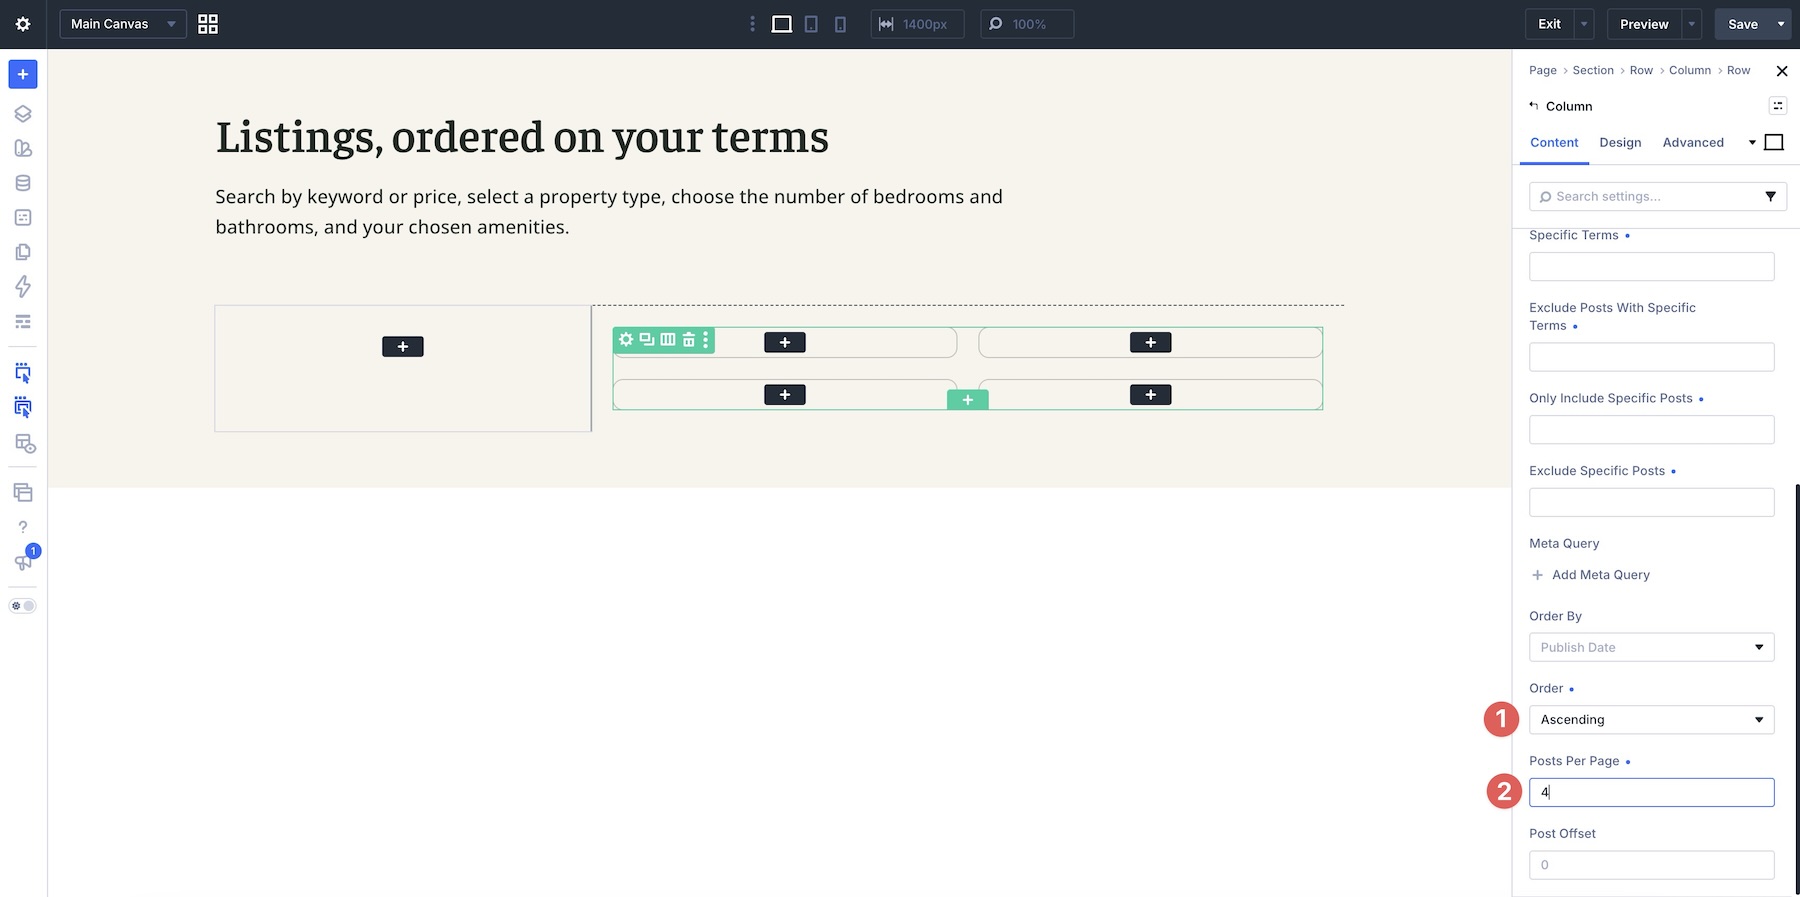
With the Column’s structure set, the next step is to enable the Loop Builder. While in the Column, go back to the Content tab and expand the Loop option group. Toggle Loop Element on.
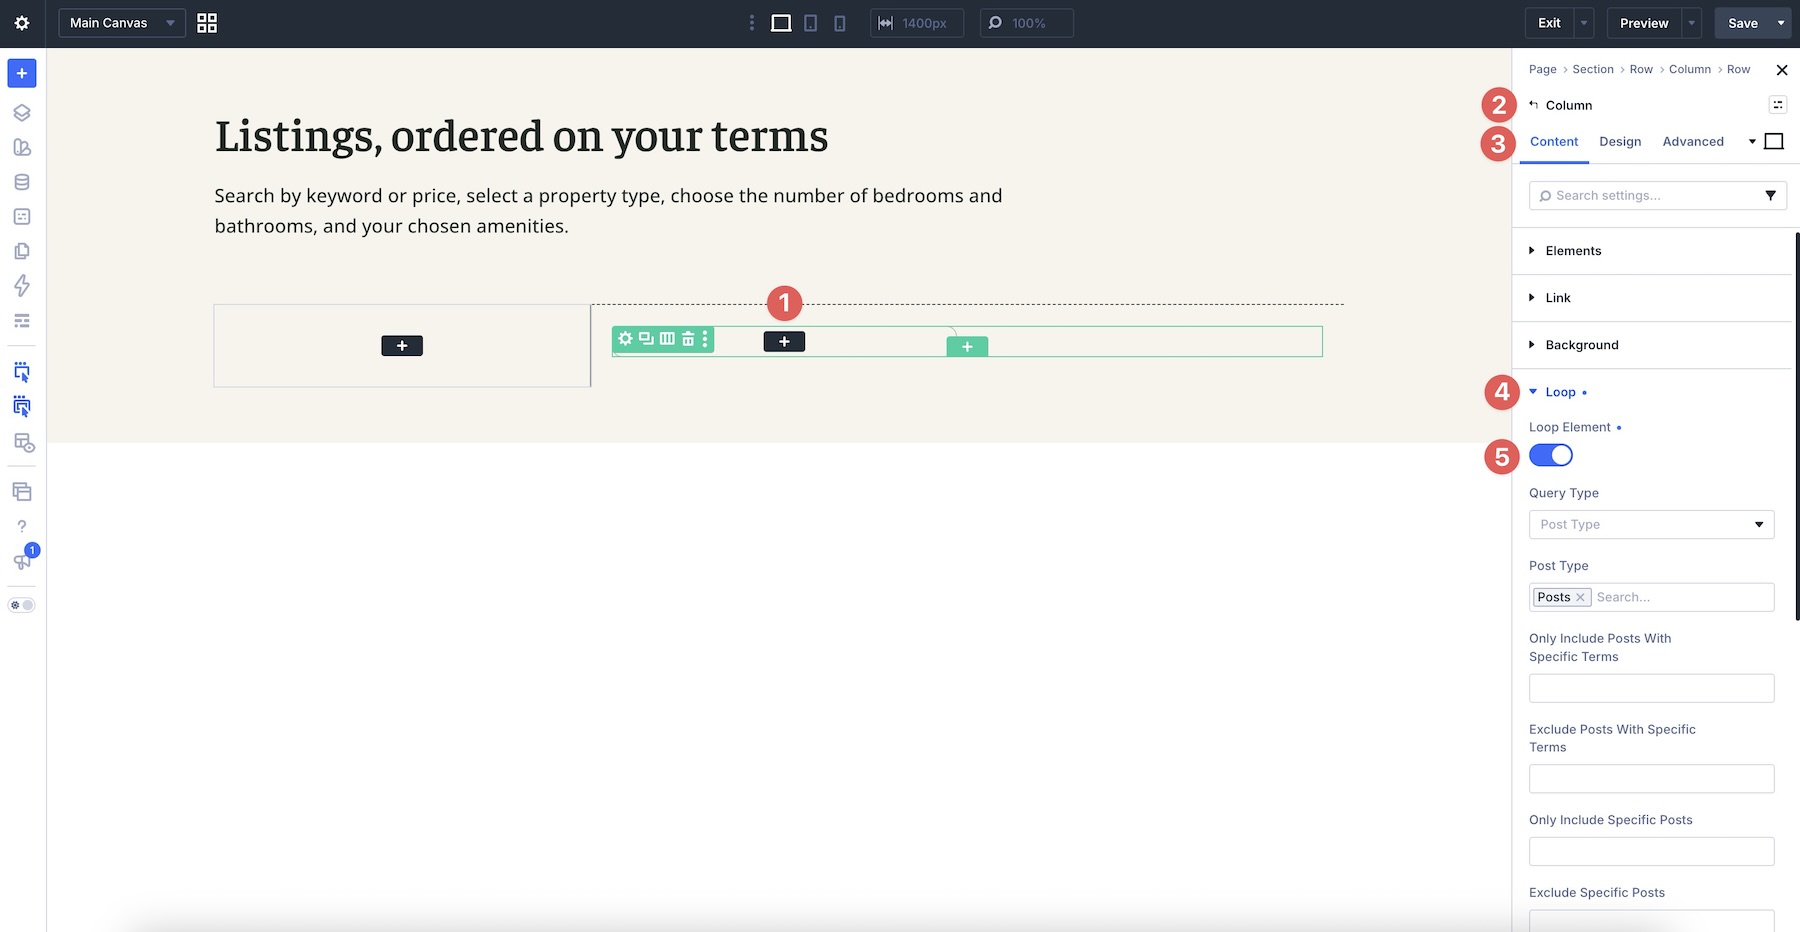
Leave the Query Type set to Post Type, but remove the default Posts under Post Type. Instead, select the Listings post type we created in the previous step.
Scroll to reveal the Order and Posts Per Page fields. Set Order to Ascending and Posts Per Page to 4. This setting controls how many listings appear per page. Because we created 12 sample listings, add a Pagination module and target this loop if you want visitors to access the remaining results.
Add Modules To The Loop
Now that the Loop Builder is enabled, we can start adding modules to the layout.
Insert A Module Group
Start by adding a Module Group to the Column. Within the Group, add an Icon module.
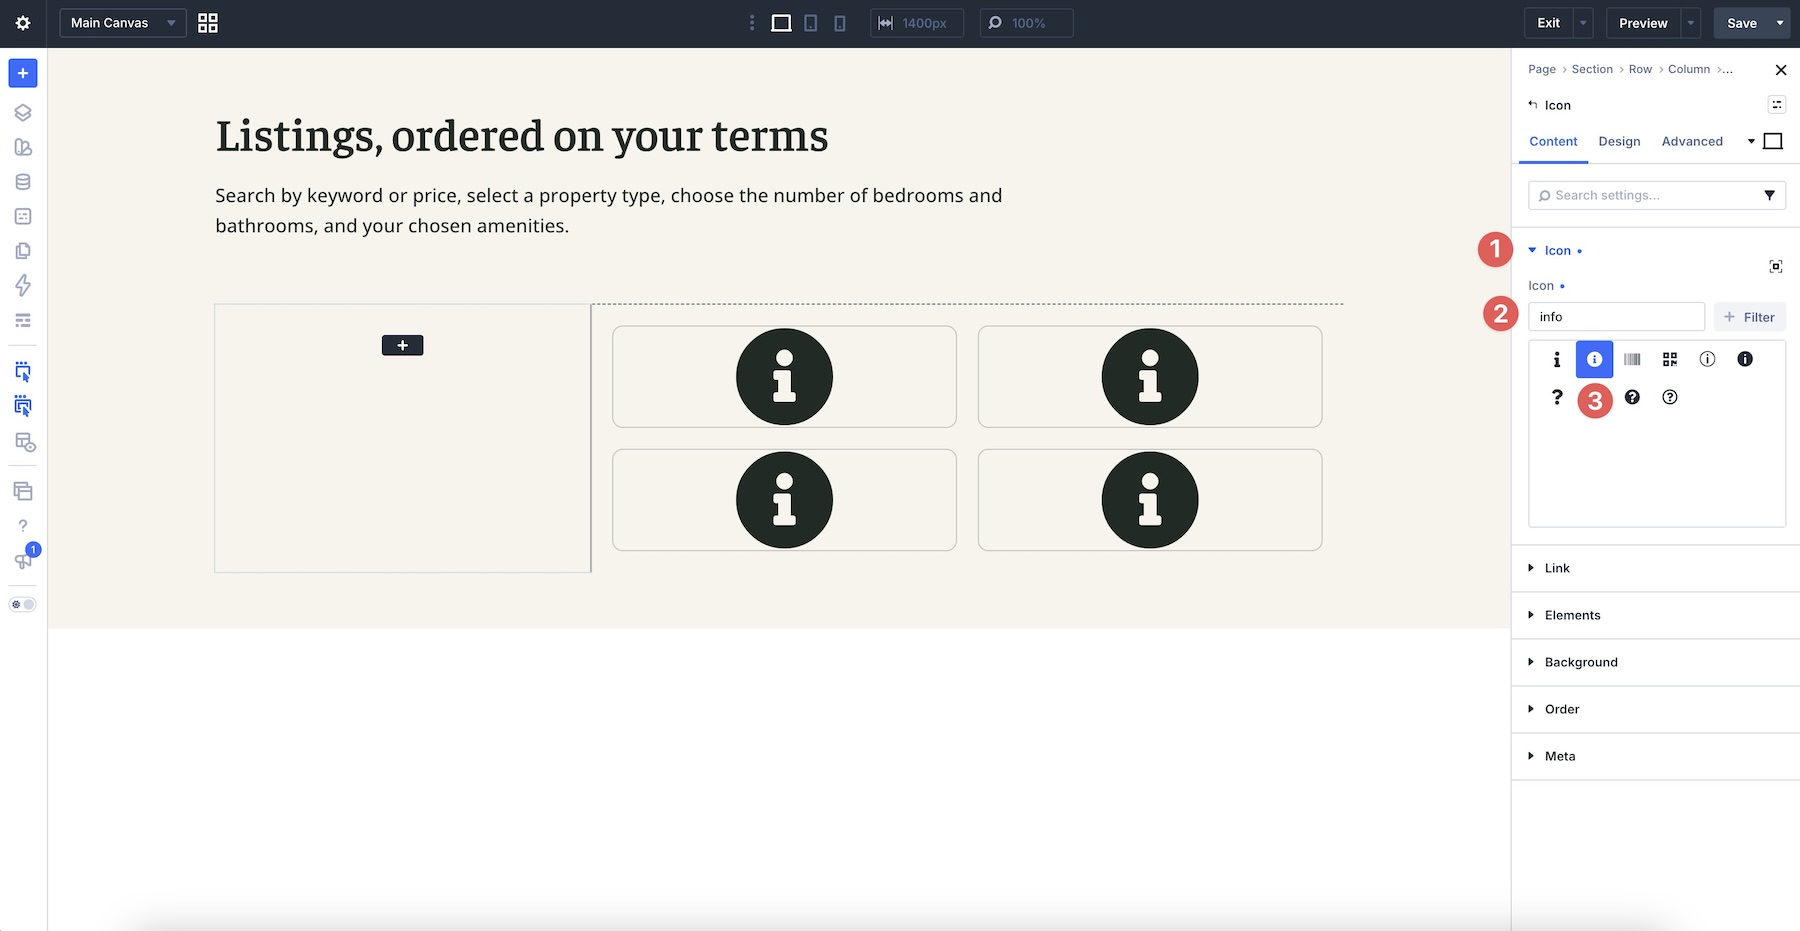
Choose an Info Icon in the Content tab.
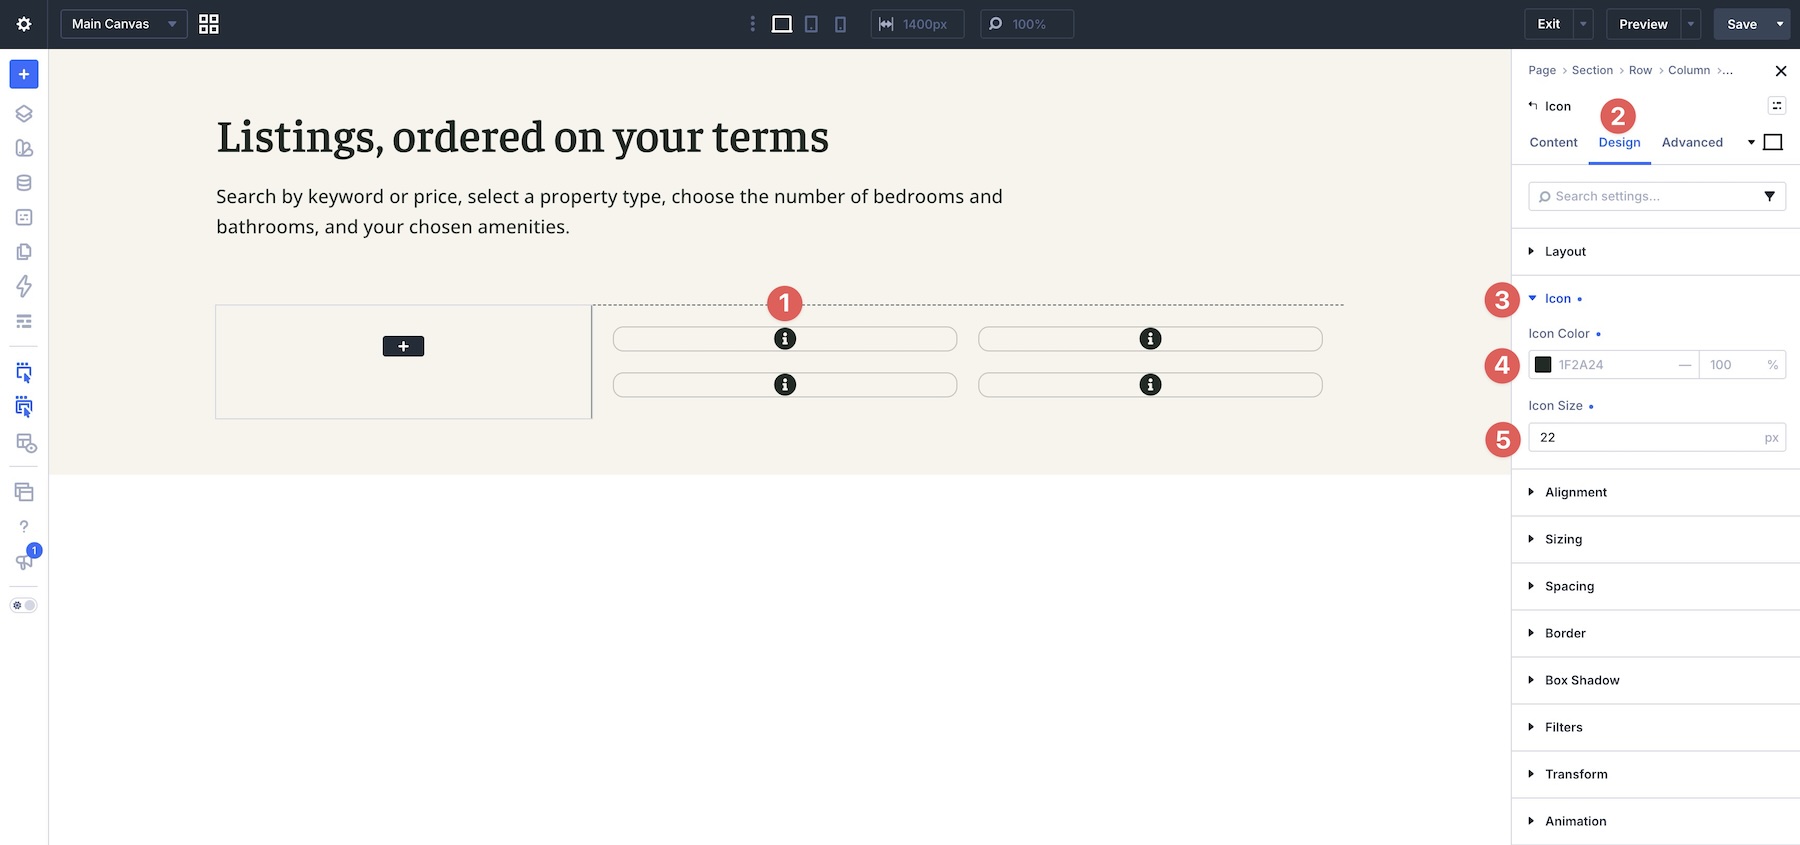
In the Icon’s Design tab, set an Icon Size and Icon Color.
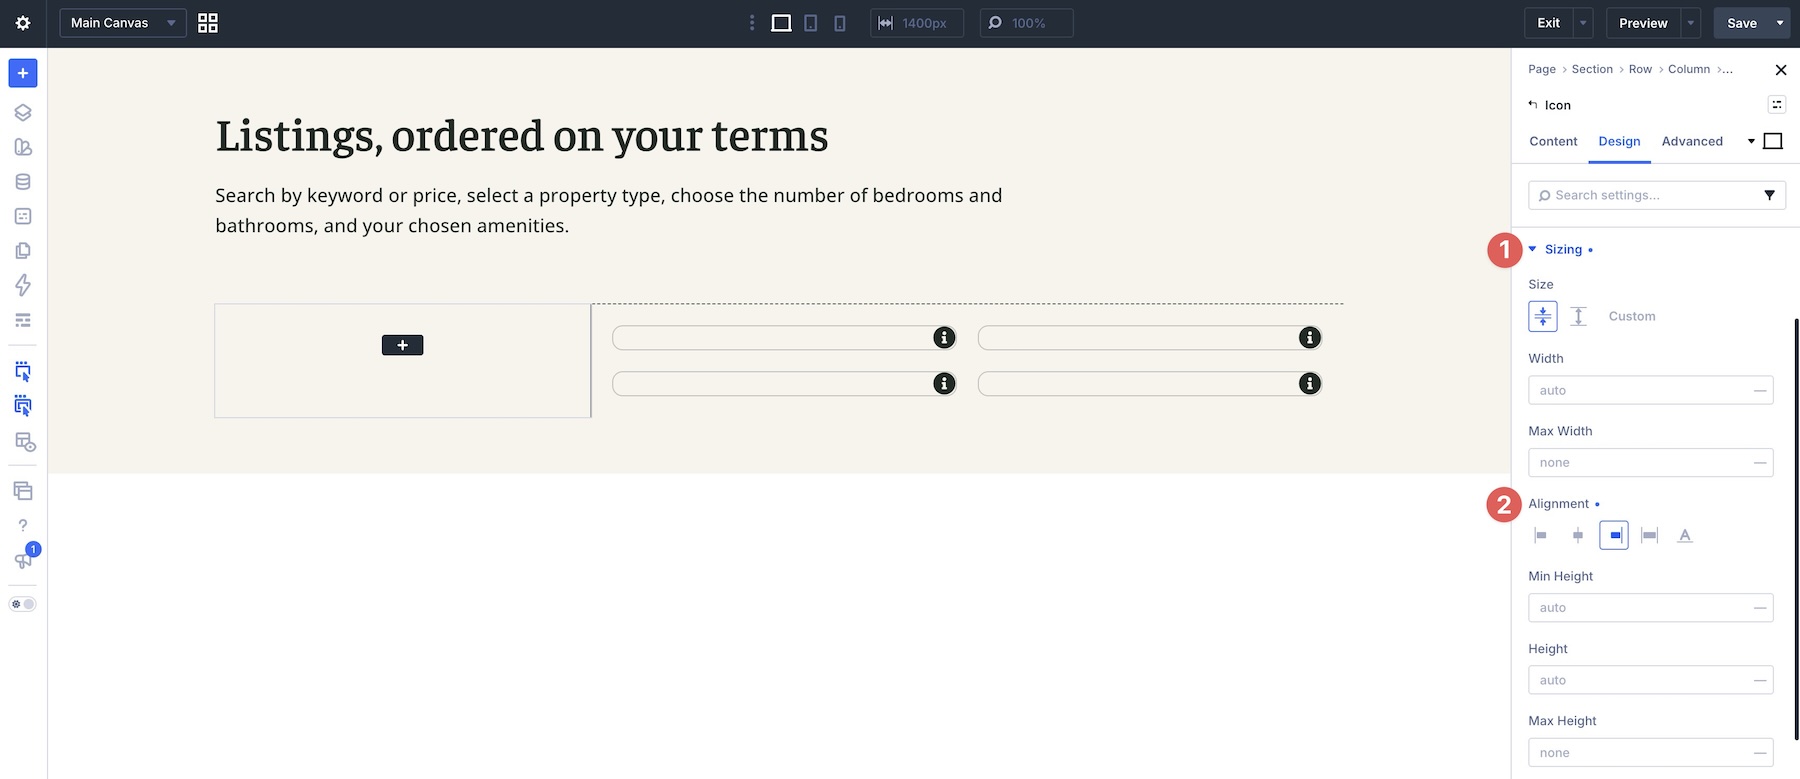
While in the Design tab, expand the Sizing option group. Set Alignment to End.
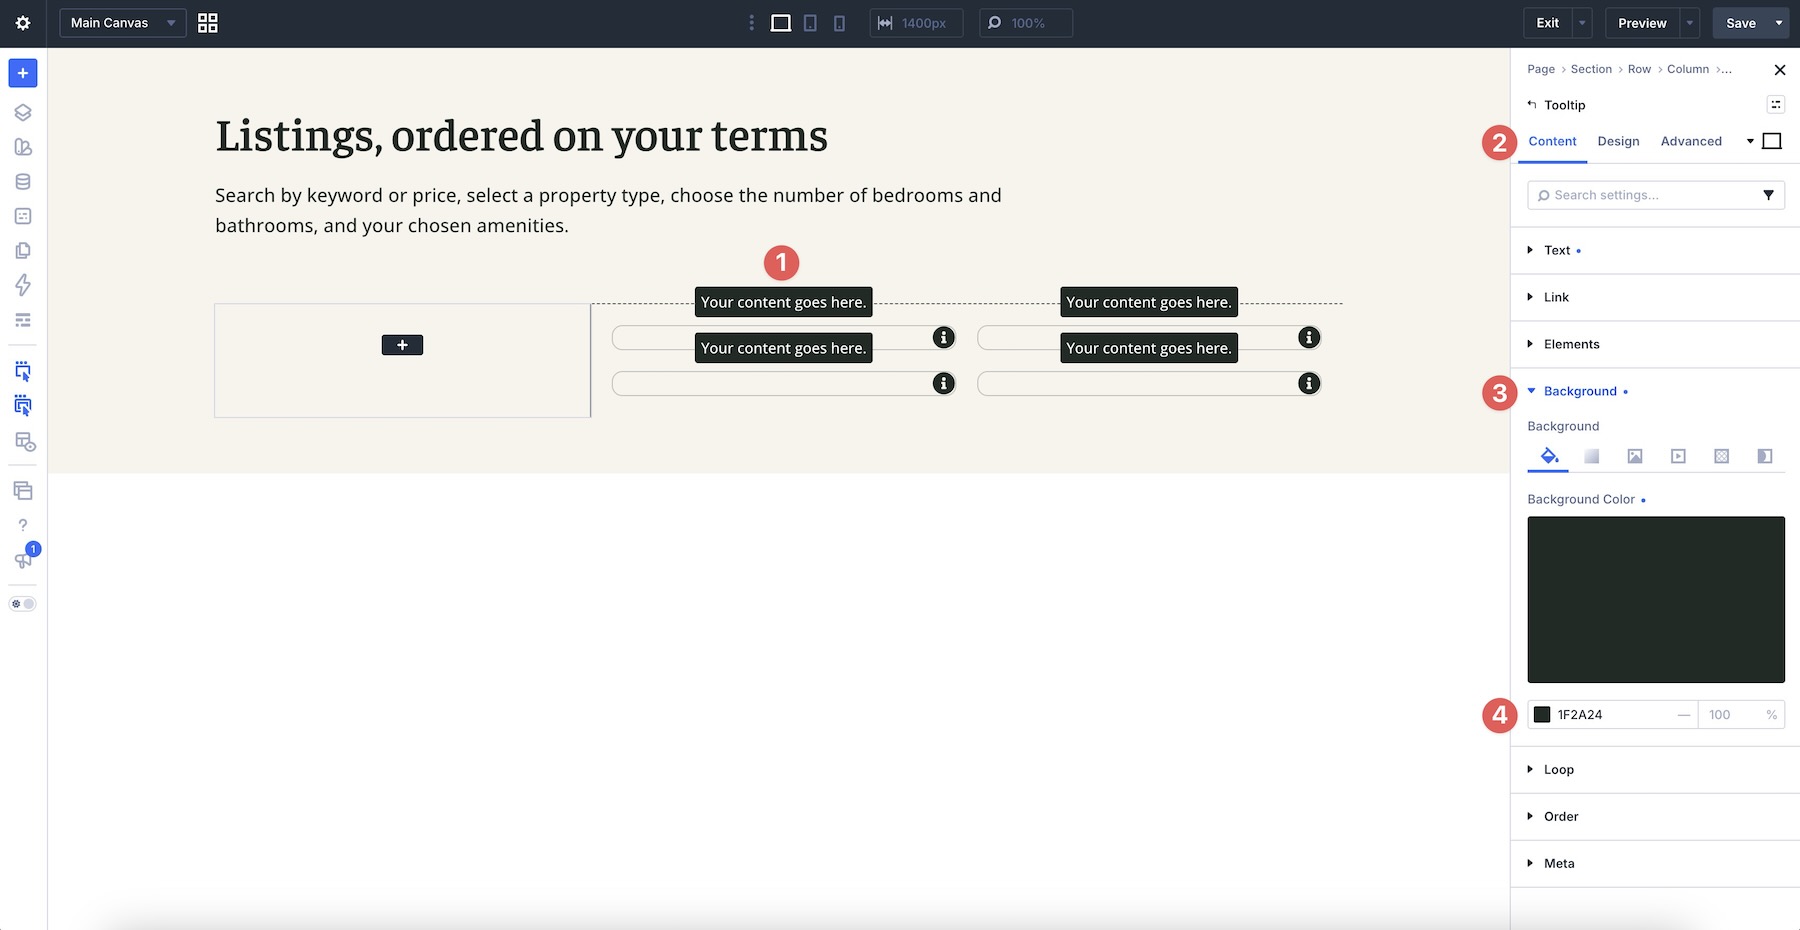
Finally, add a Tooltip module beneath the Icon. In the Content tab, add a Background Color.
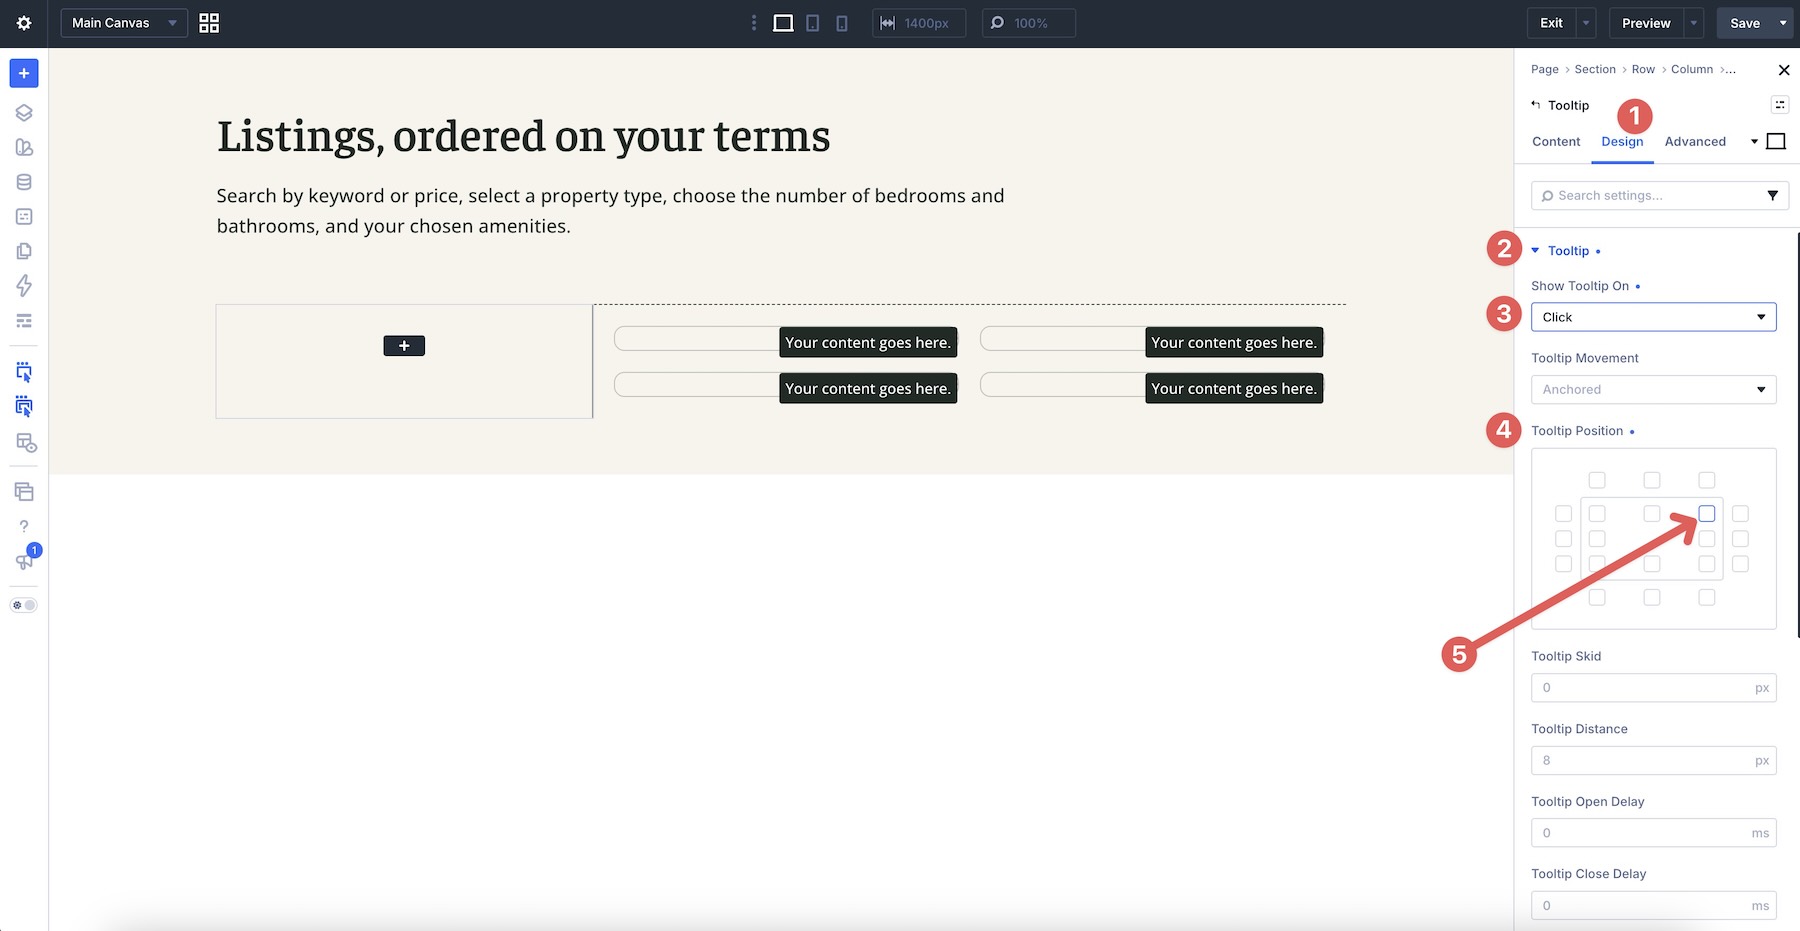
In the Tooltip’s Design tab, expand the Tooltip option group and set Show Tooltip On to Click. Set the Tooltip Position as shown in the screenshot below. While in the Design tab, adjust Spacing, Border, and any other design settings as needed.
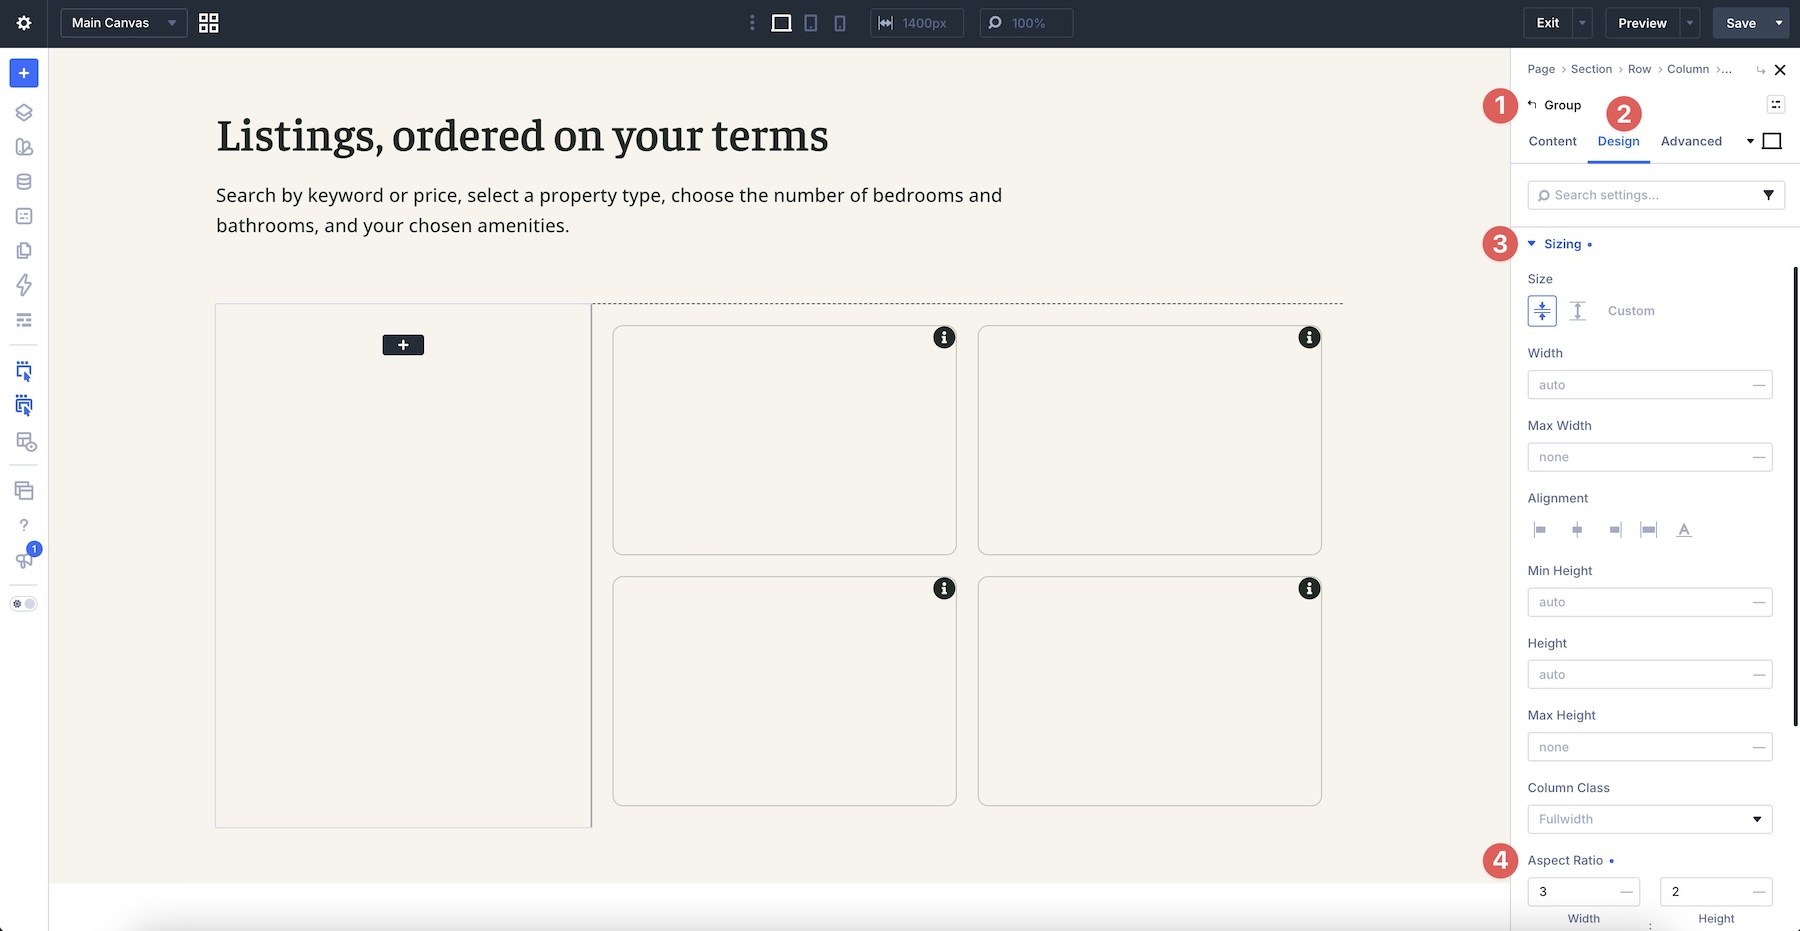
Now, open the Group’s Design tab. Expand the Sizing option group and assign an Aspect Ratio of 3 by 2.
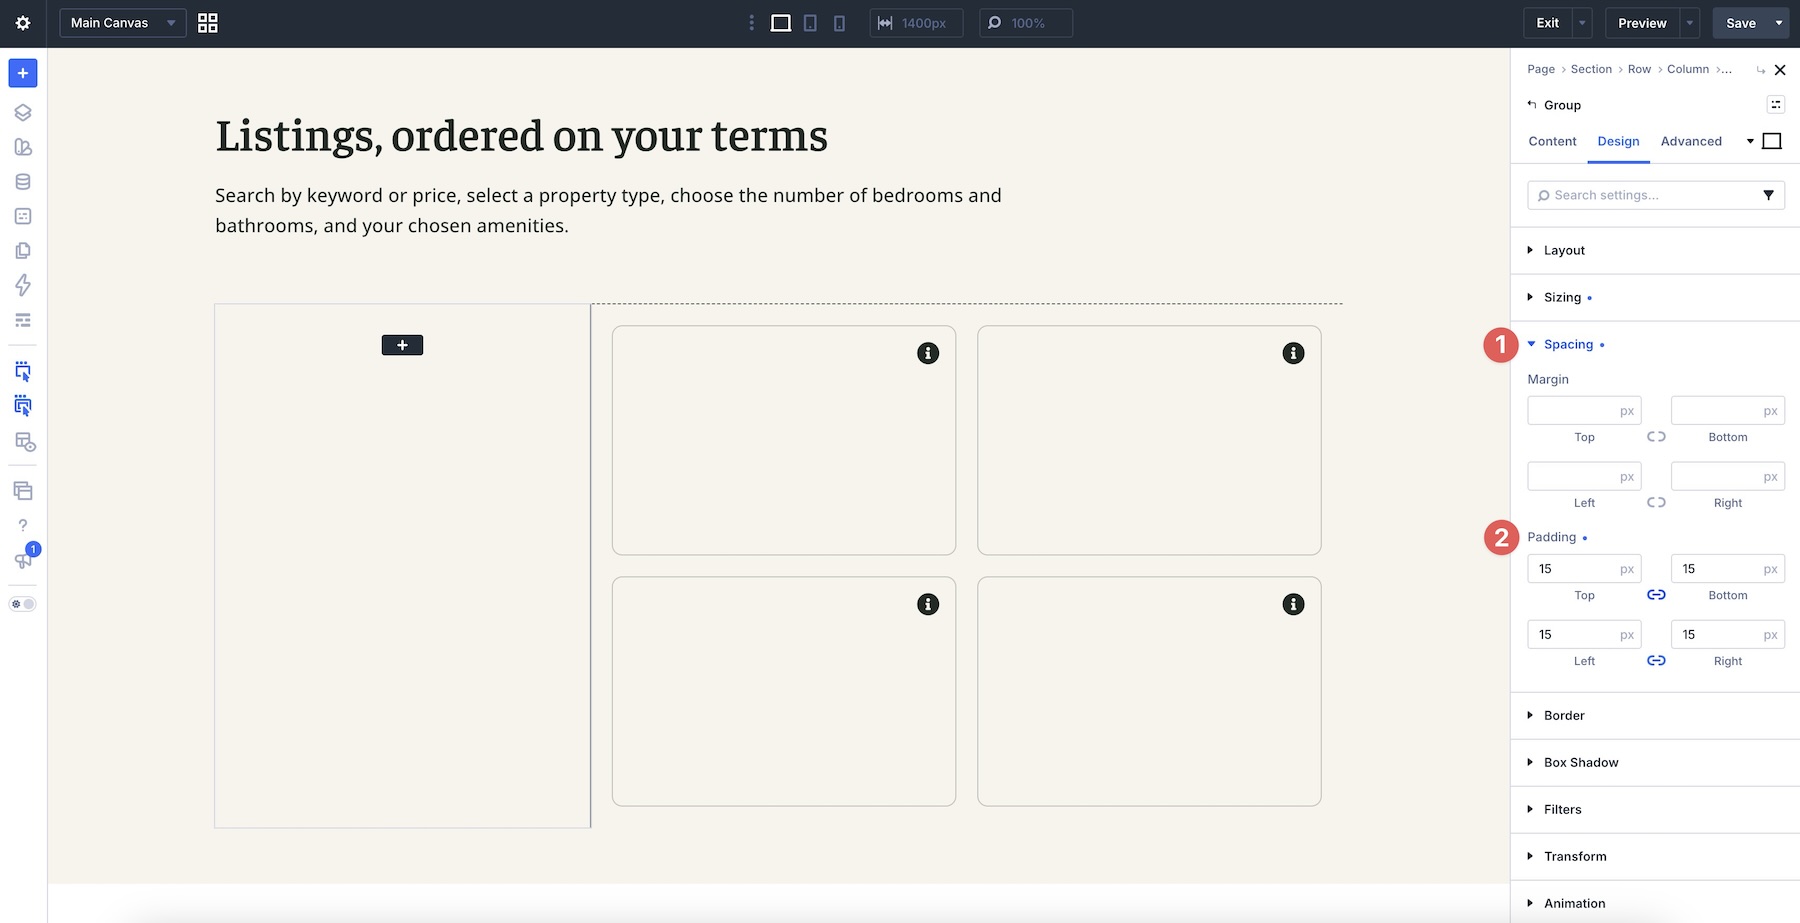
Next, expand the Spacing option group and assign 15px Padding on all four sides.
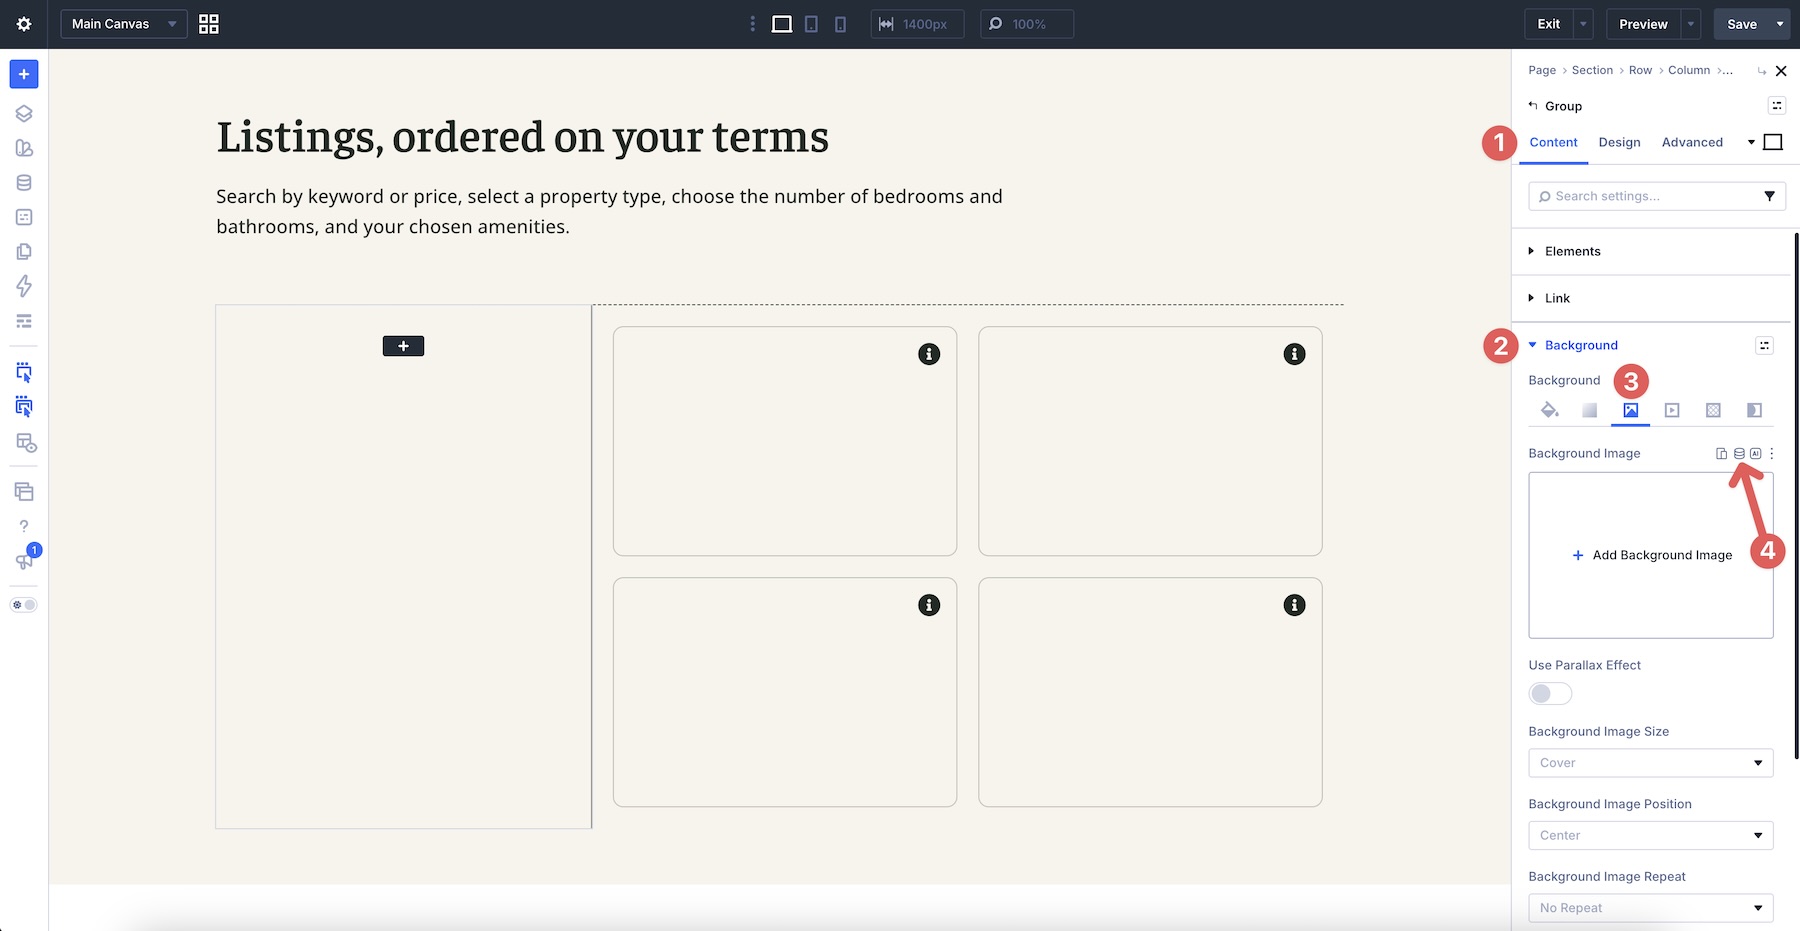
Still within the Group settings, navigate to the Content tab. Expand the Background option group and tab over to assign a Background Image. Hover just above the Background Image field to reveal the Insert Dynamic Content icon.
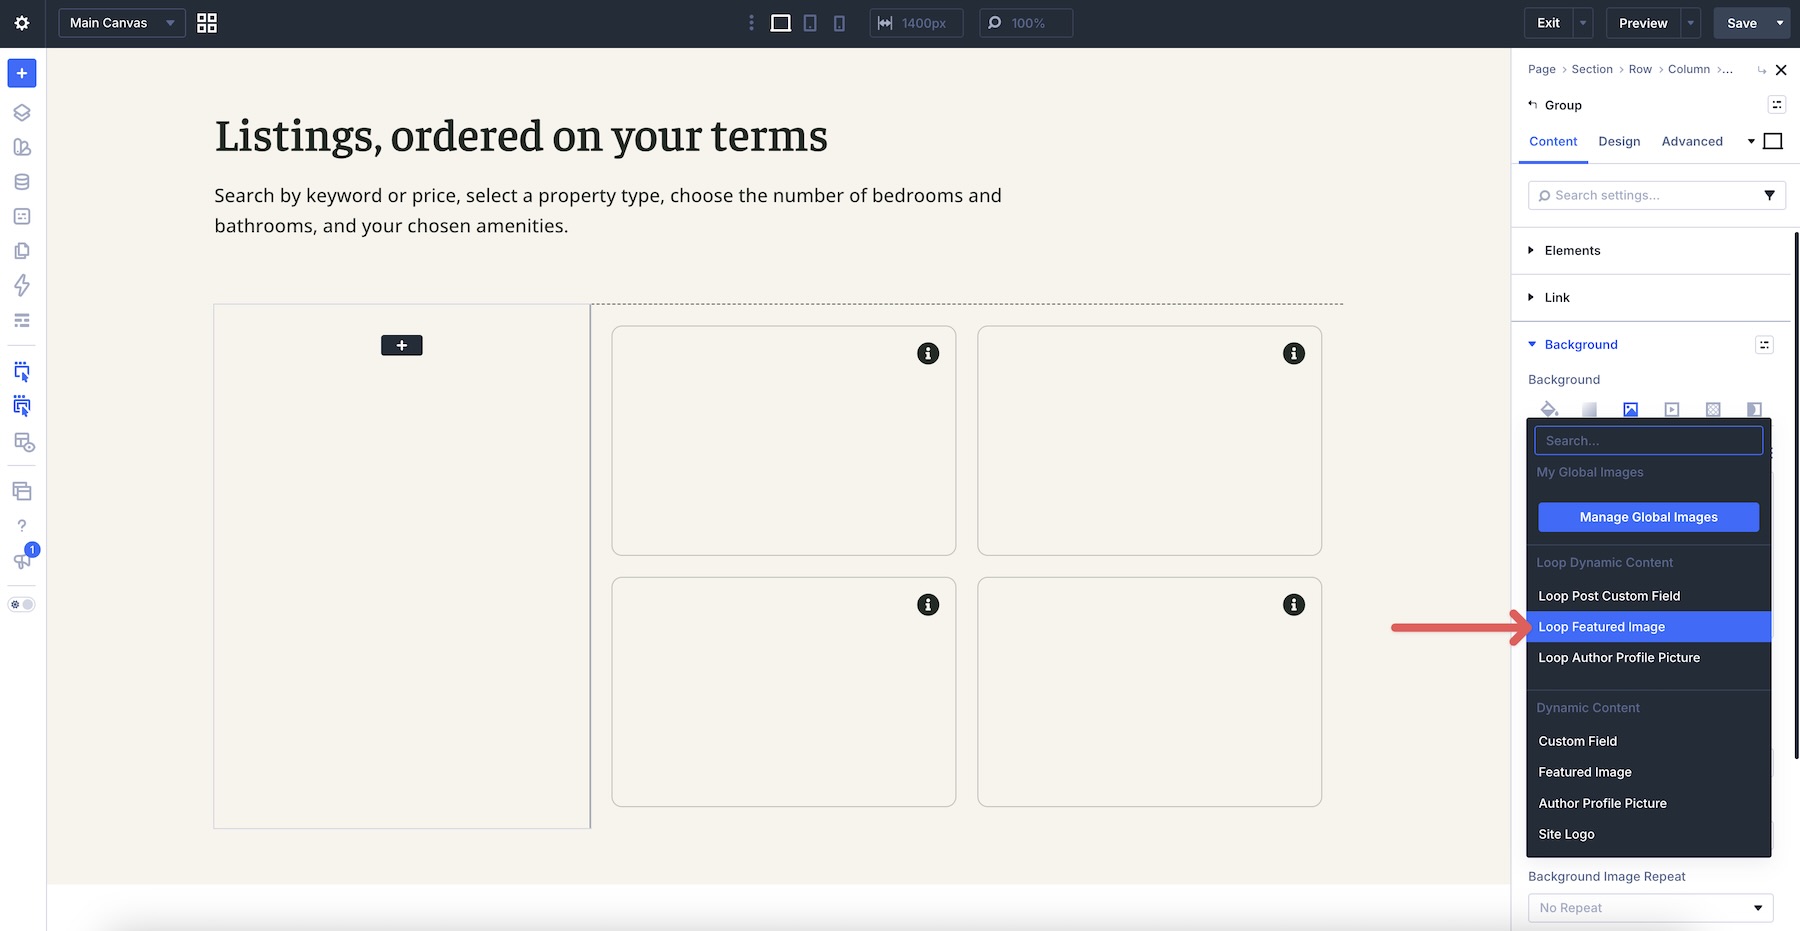
When the list of dynamic content options appears, choose Loop Featured Image. Divi 5 will load the Featured Image from each of your Listings posts.
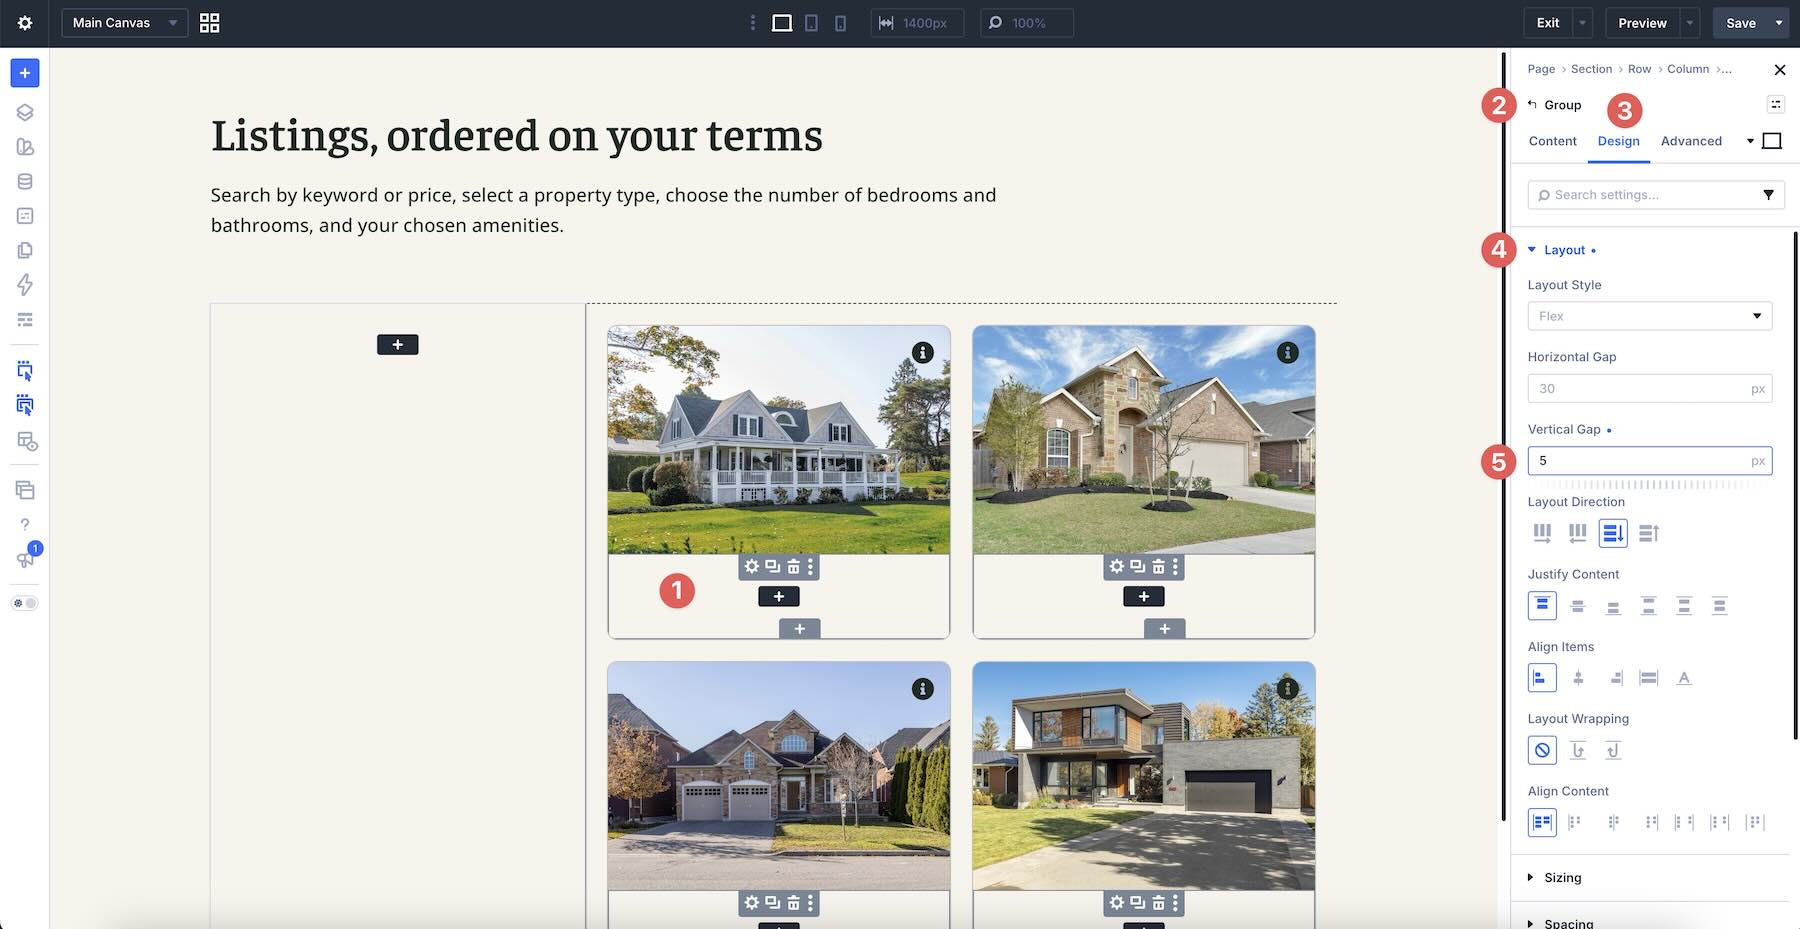
Add A Second Module Group
With the first Module Group styled, we’ll add another directly beneath it. Within the Group, go to the Design tab and expand the Layout option group. Set the Vertical Gap to 5px.
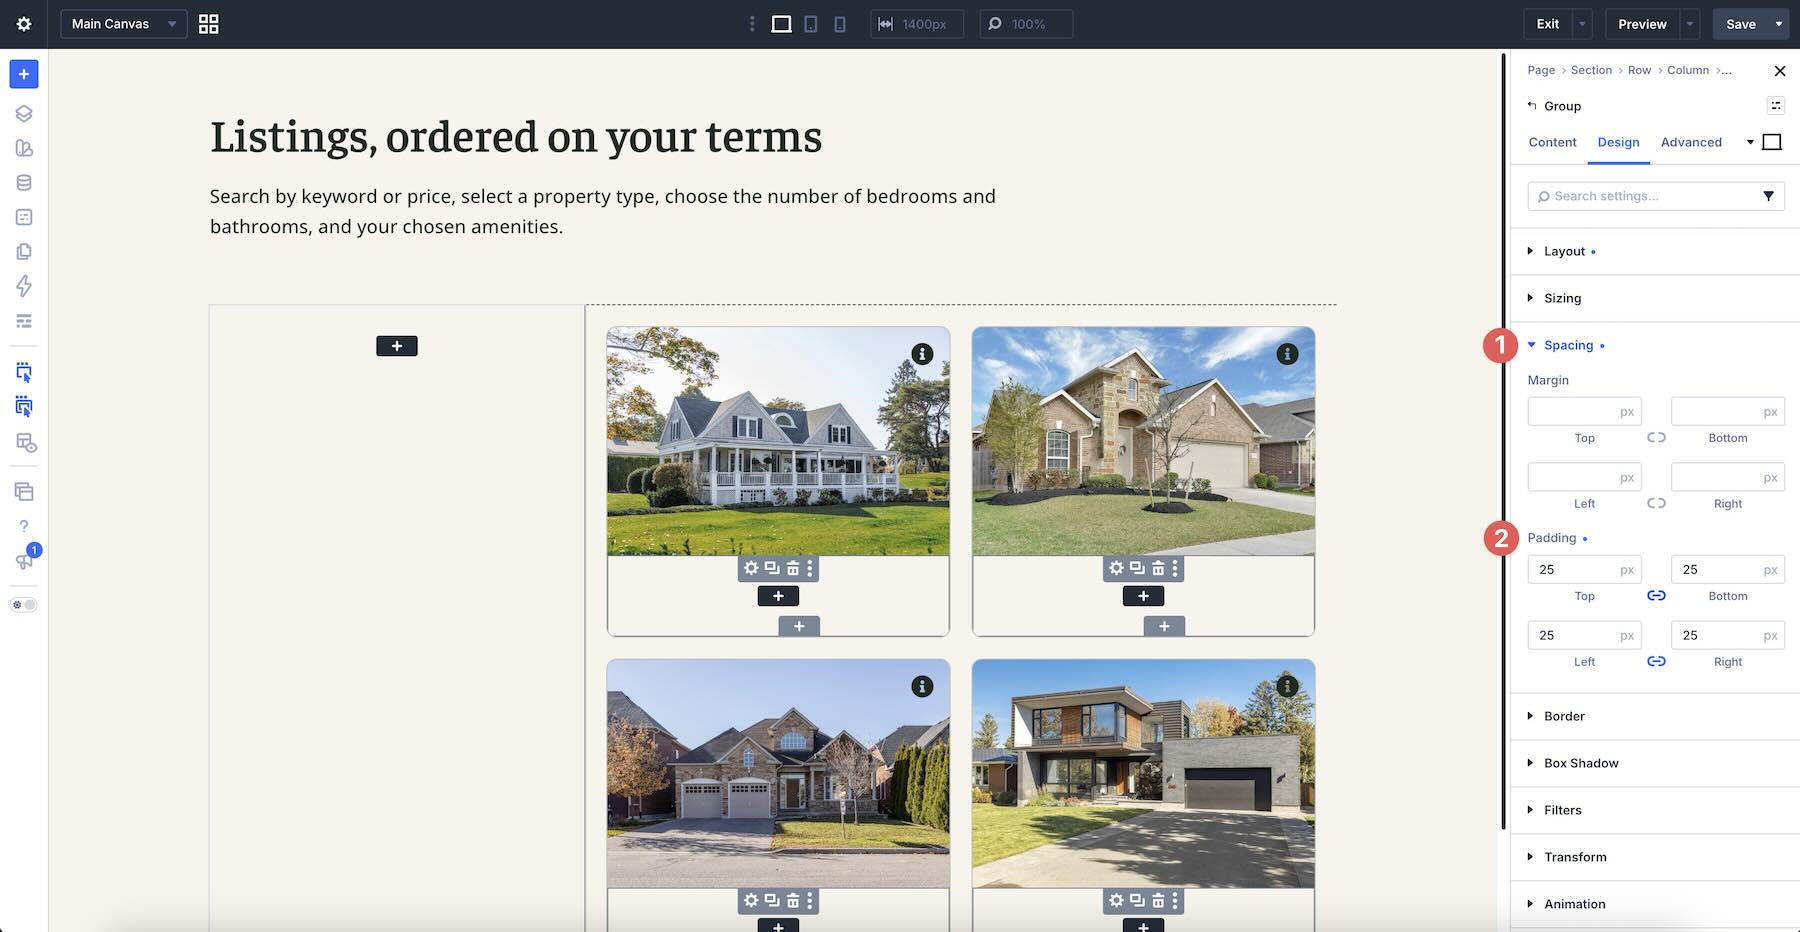
Next, expand the Spacing option group and add 25px Padding on all four sides.
Click into the Group’s Content tab and expand the Background option group. Assign a Background Color.
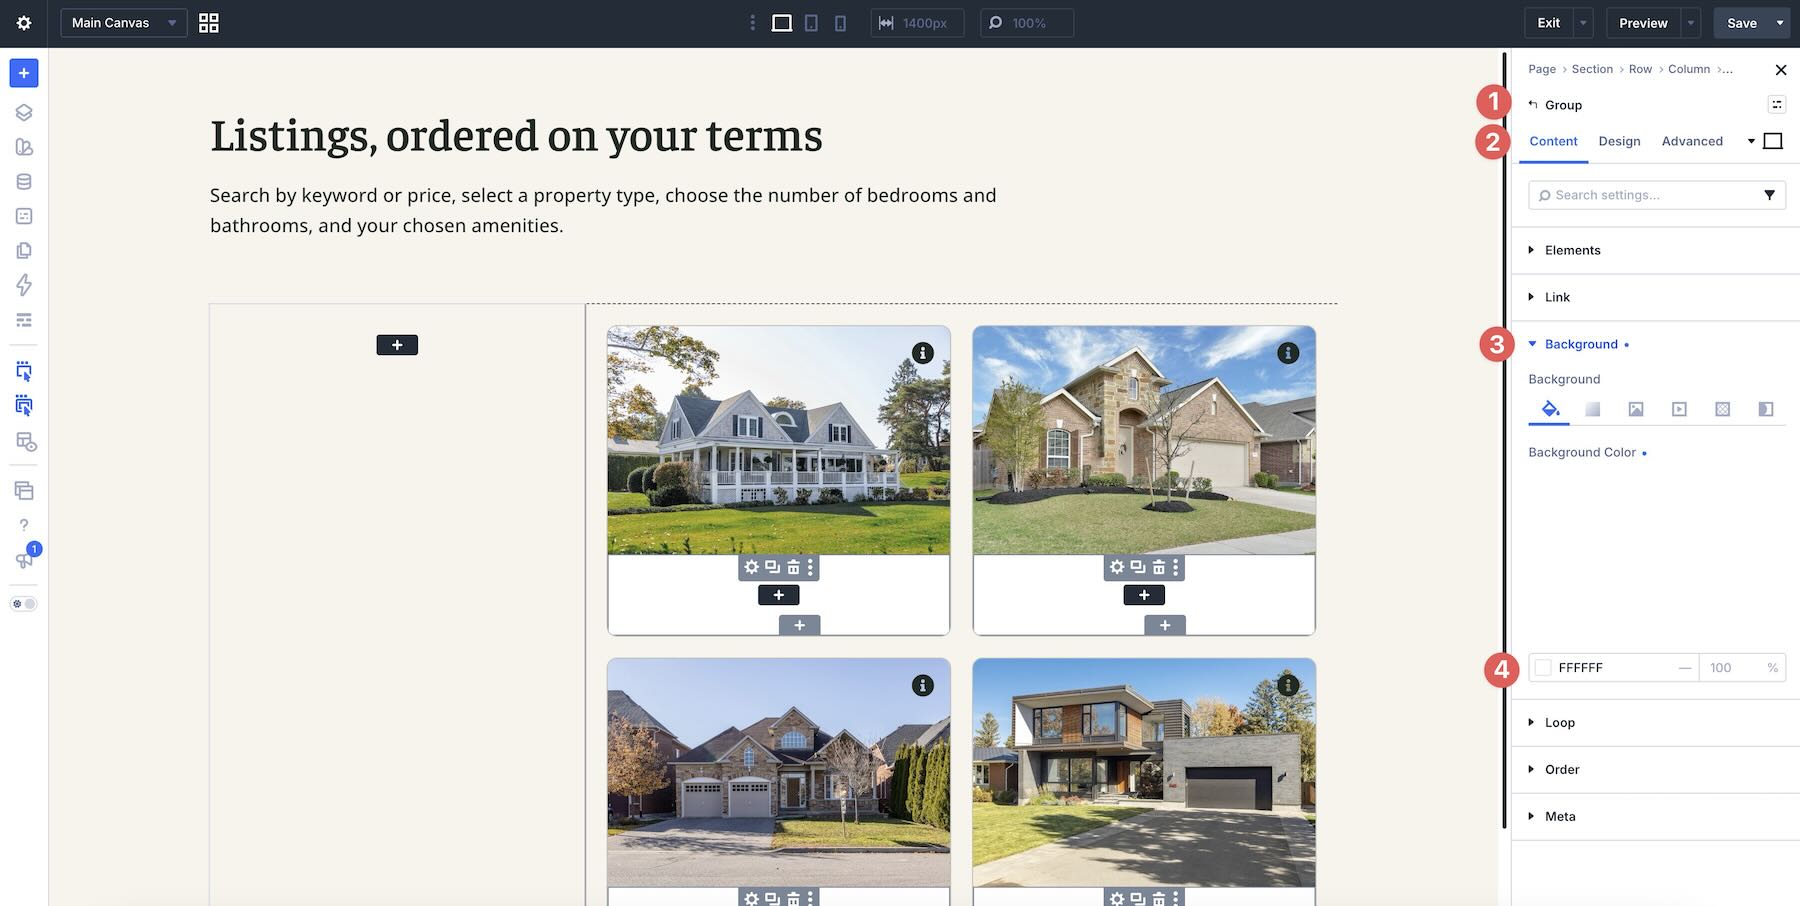
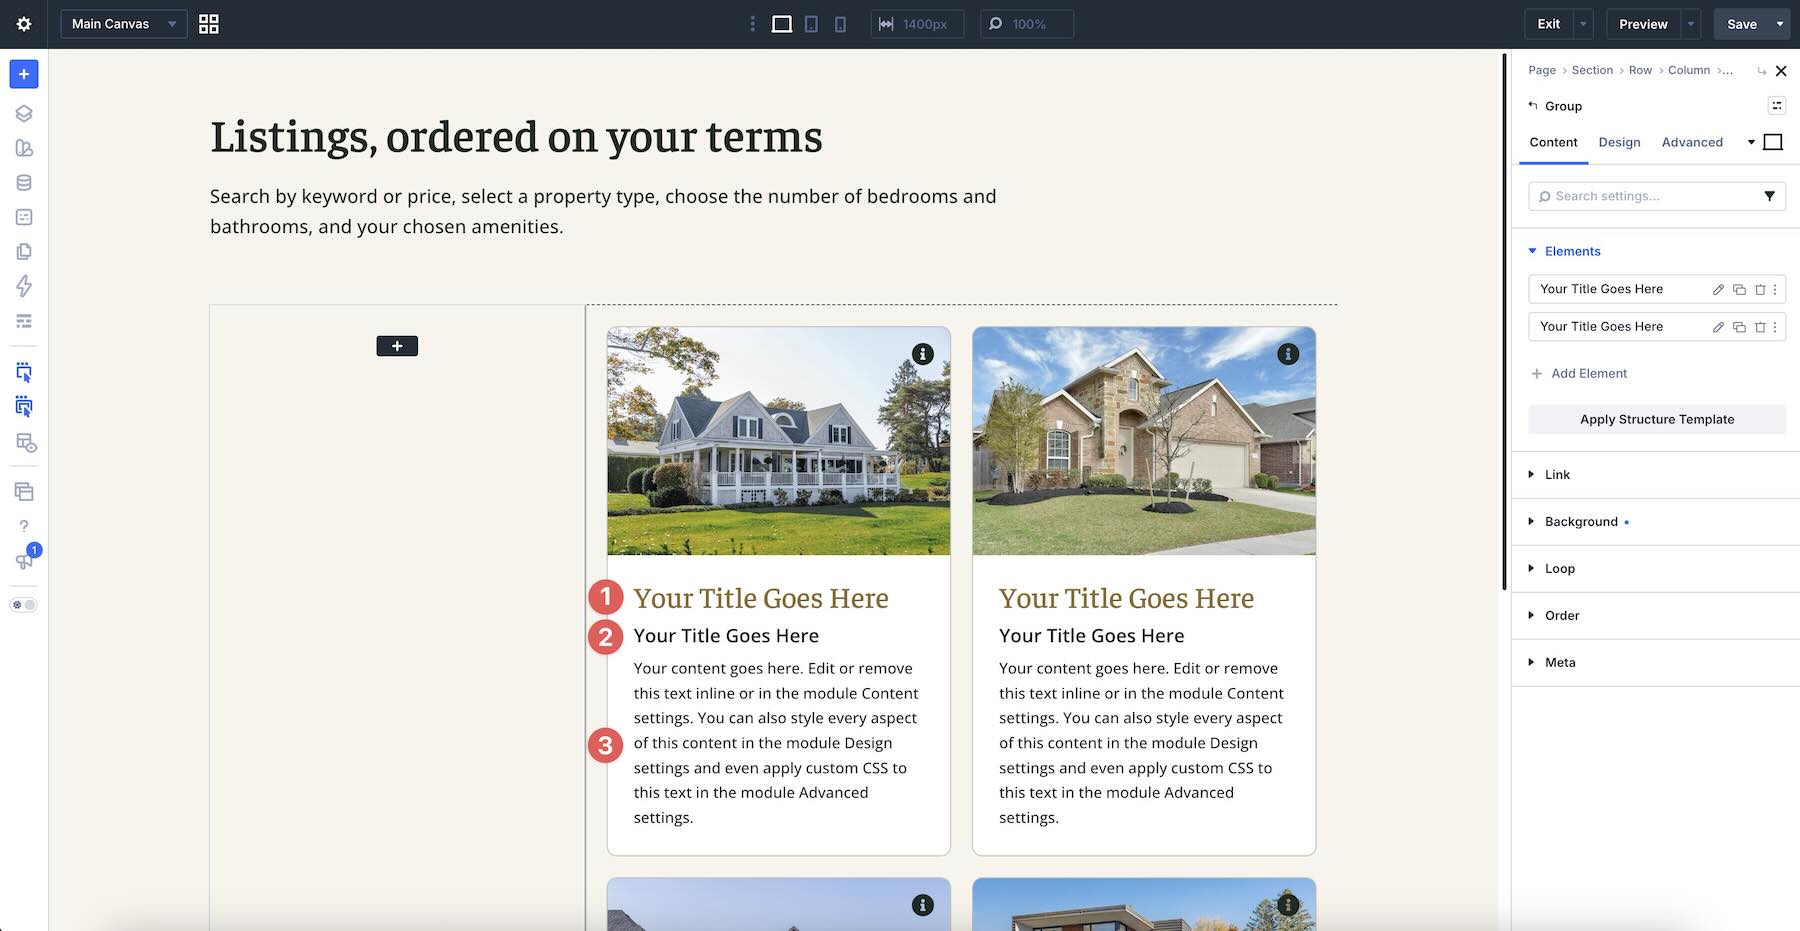
Now, expand the Elements option group and add two Heading modules and a Text module to the Group. Style them as desired.
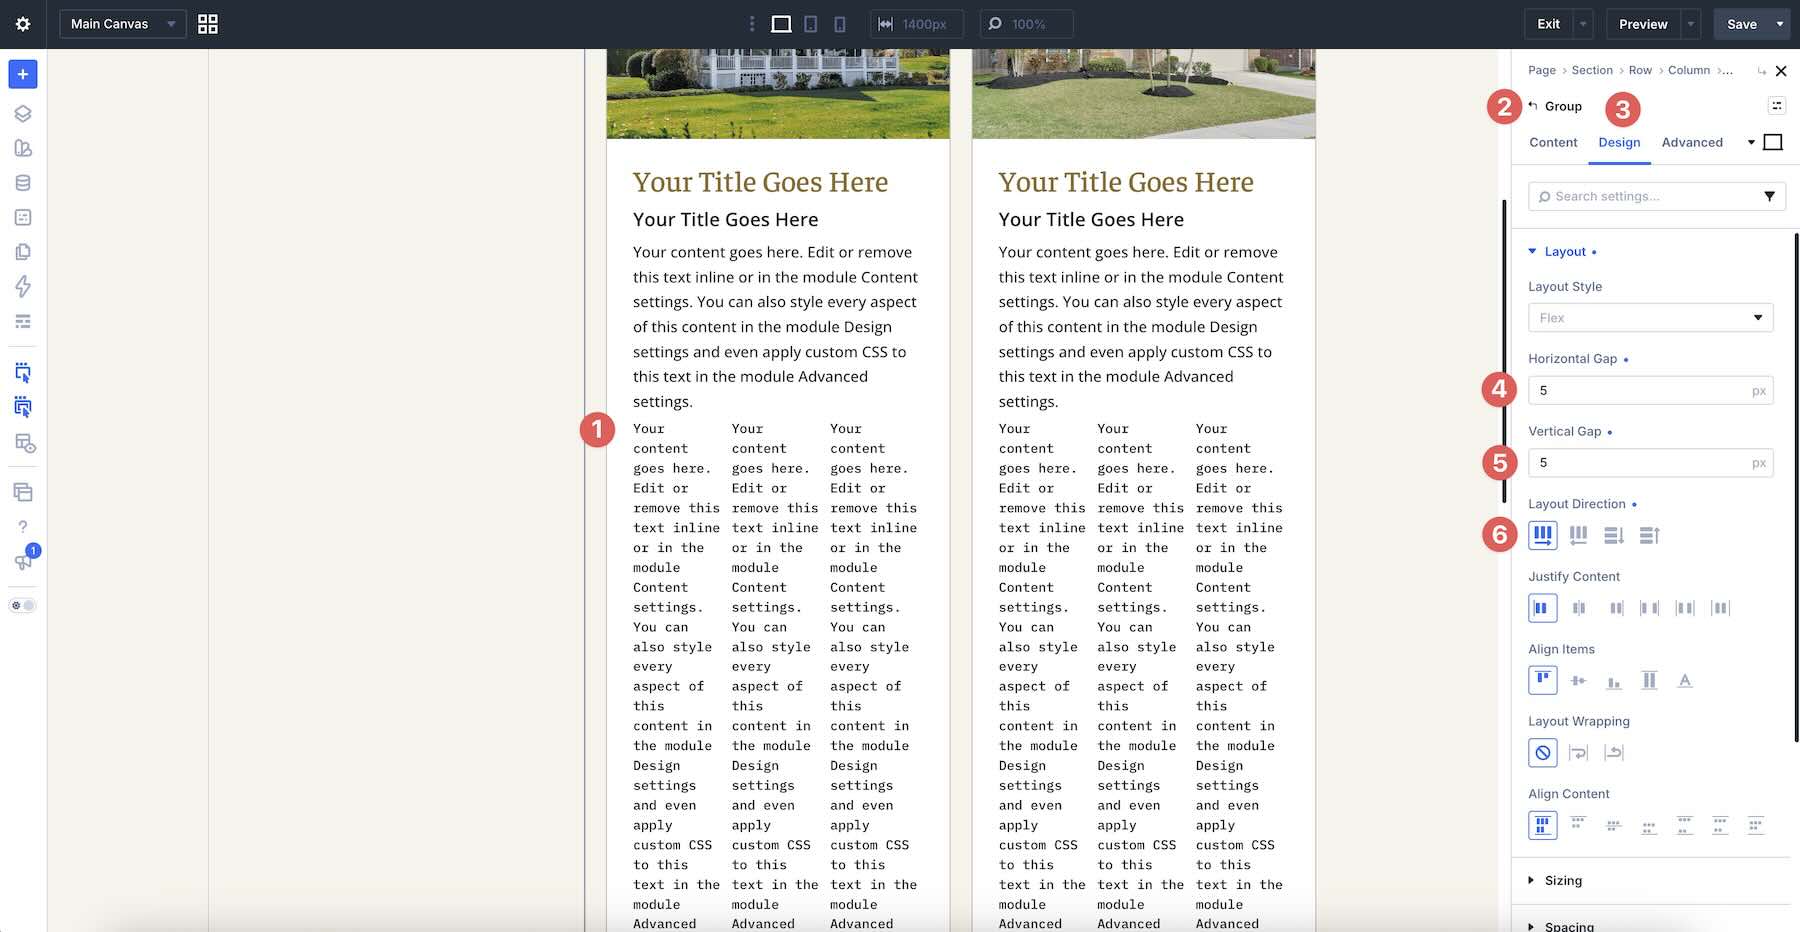
Add another Module Group to the Column, nest three Text modules inside it, and style them as desired. In the Group’s Design tab, expand the Layout option group and set Layout Direction to Row. Apply 5px to the Horizontal Gap and Vertical Gap fields.
Add two more modules to the Column, including a Text module and another Module Group. Style the Text module as desired.
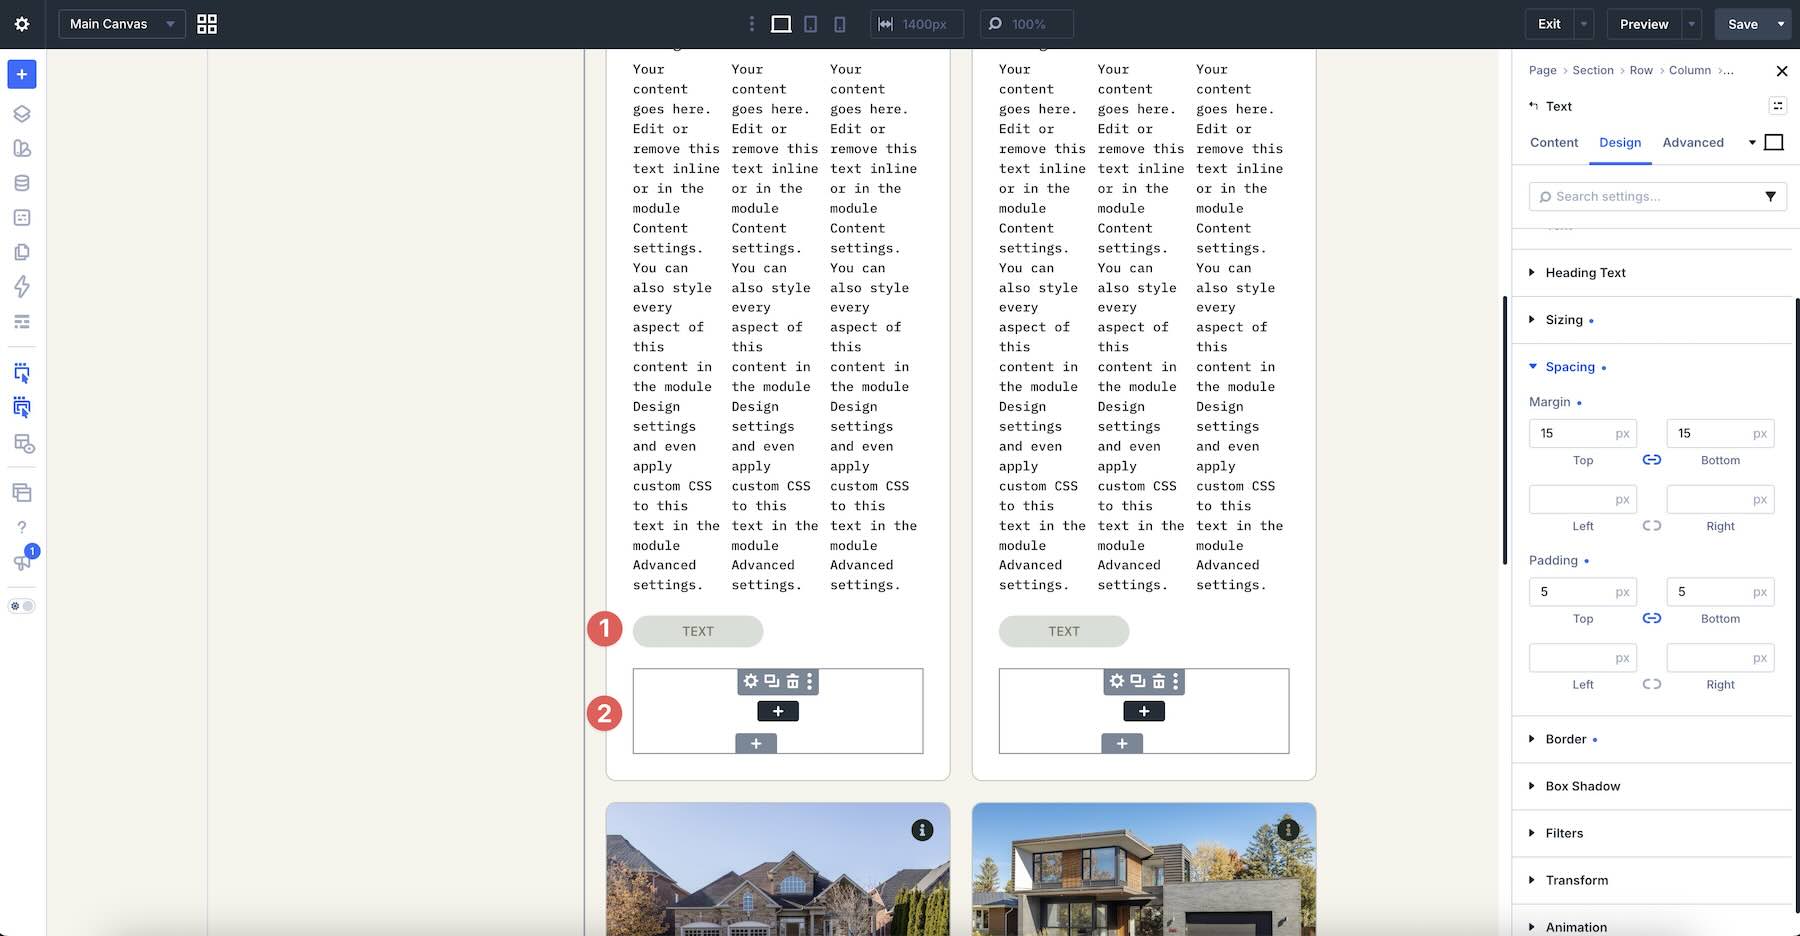
In the newly added Module Group settings, go to the Design tab and expand the Layout option group. Set Layout Direction to Row, Justify Content to Space Between, and Align Items to Center.
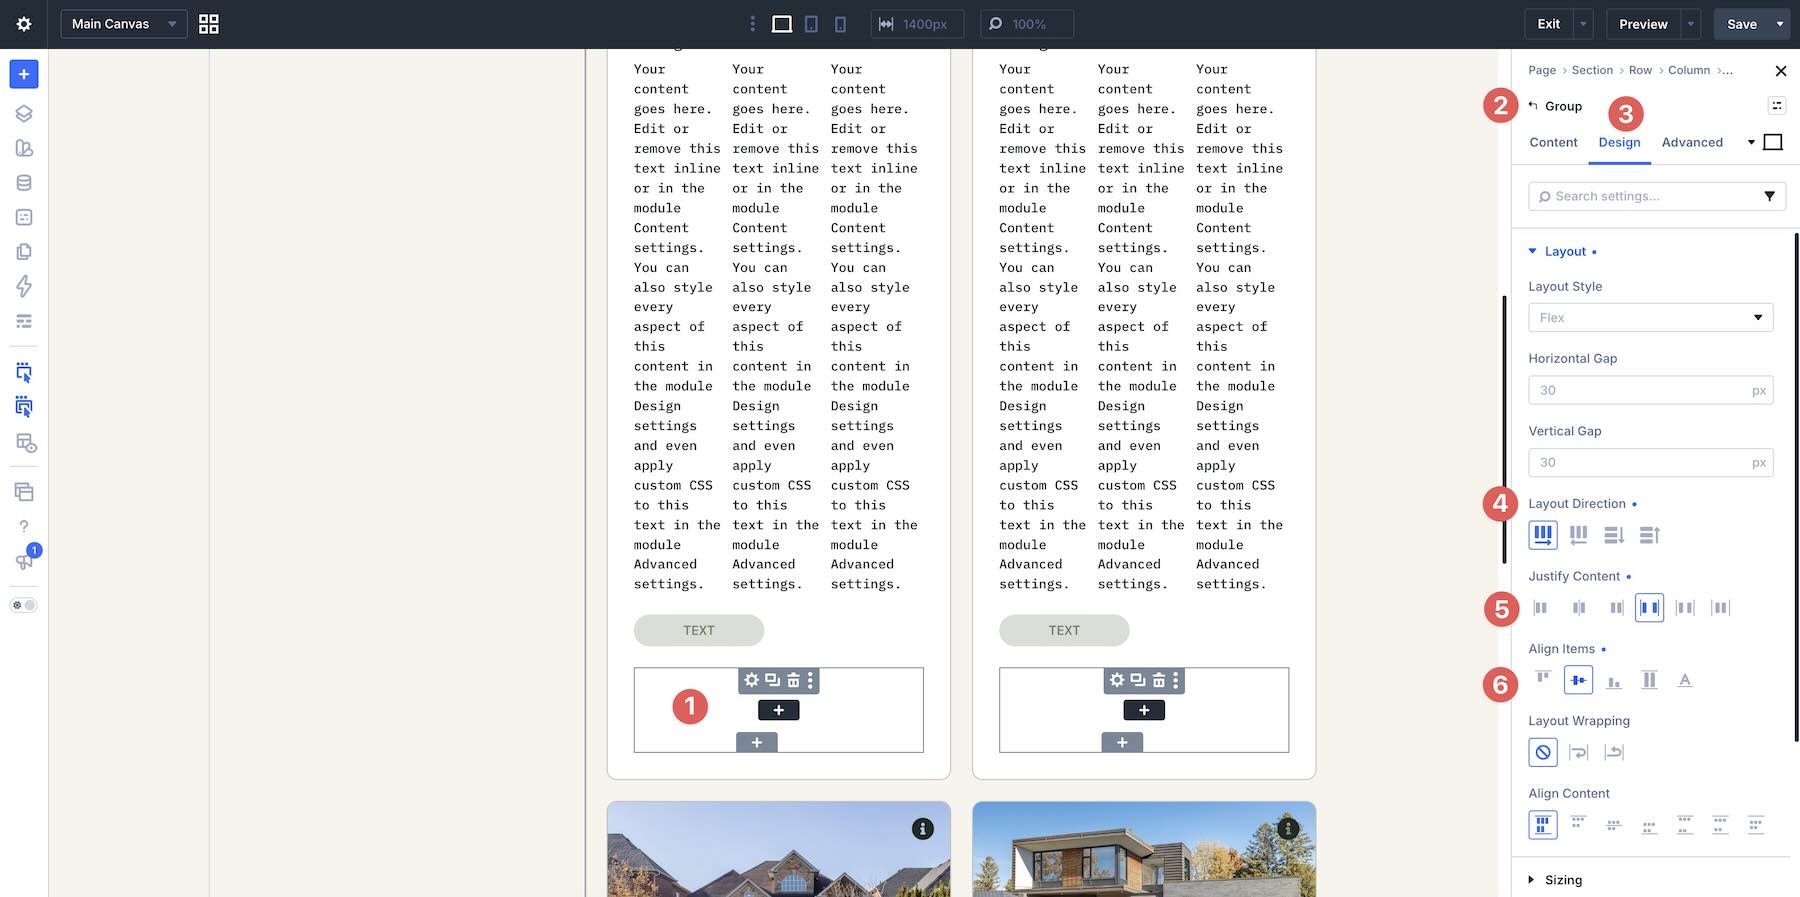
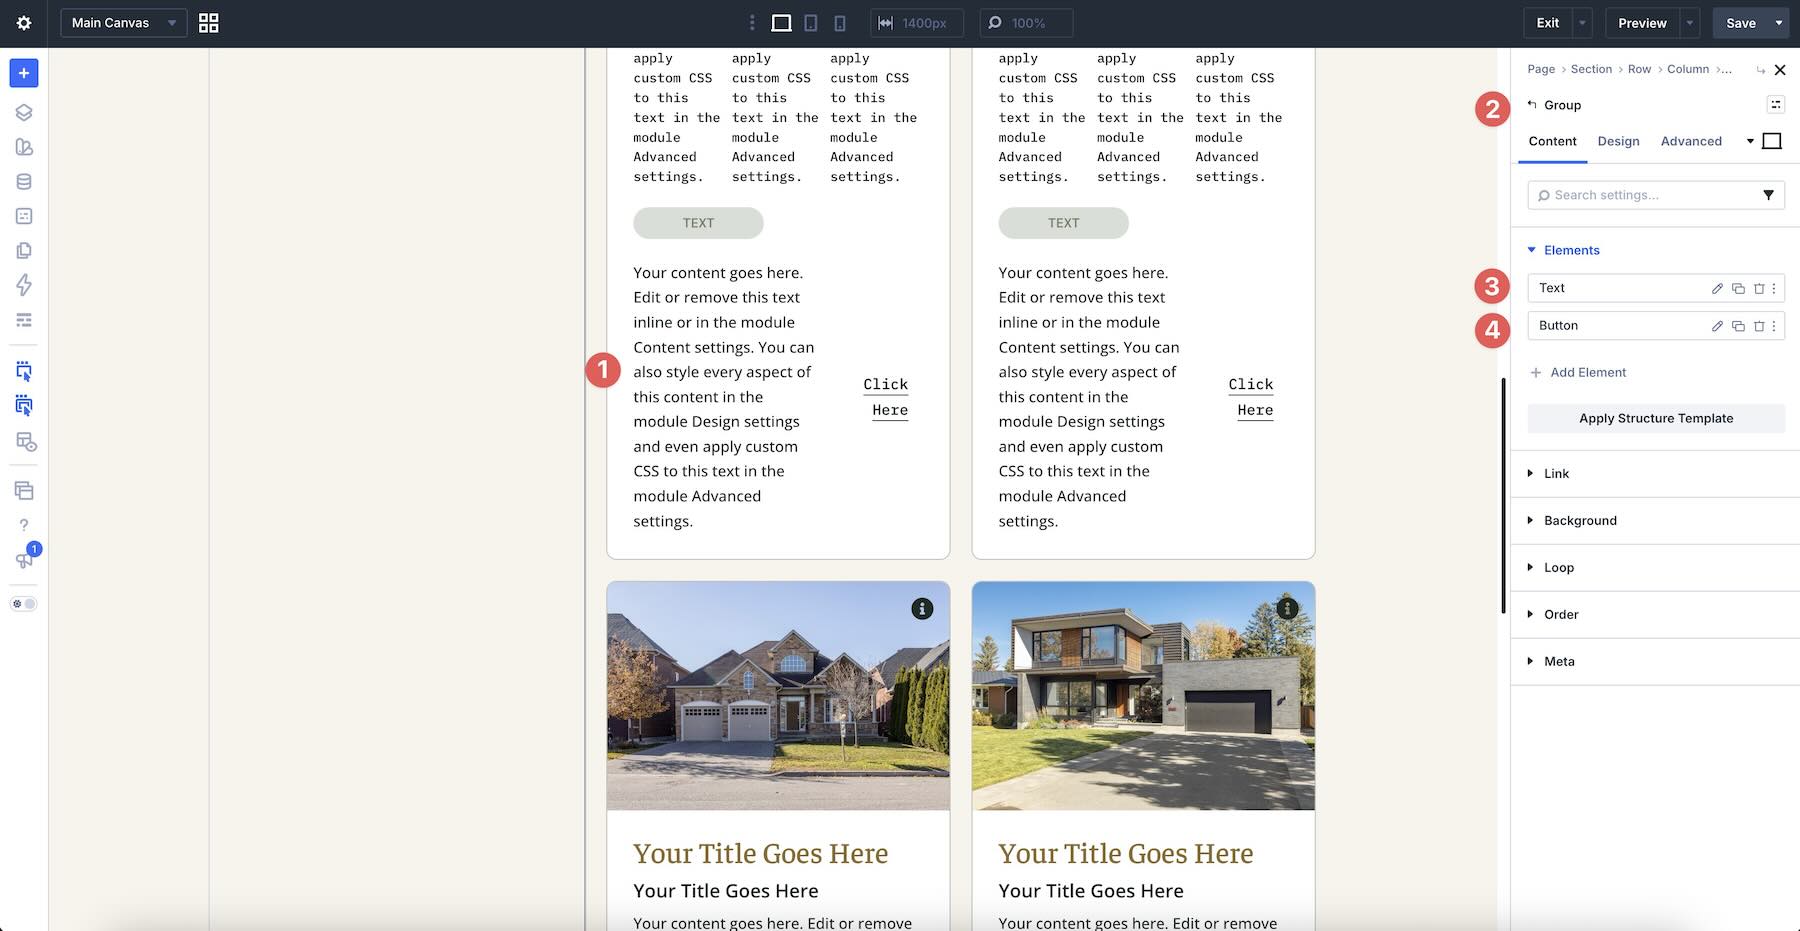
Within the Module Group, add a Text and Button module and style them as desired.
Link The Custom Fields
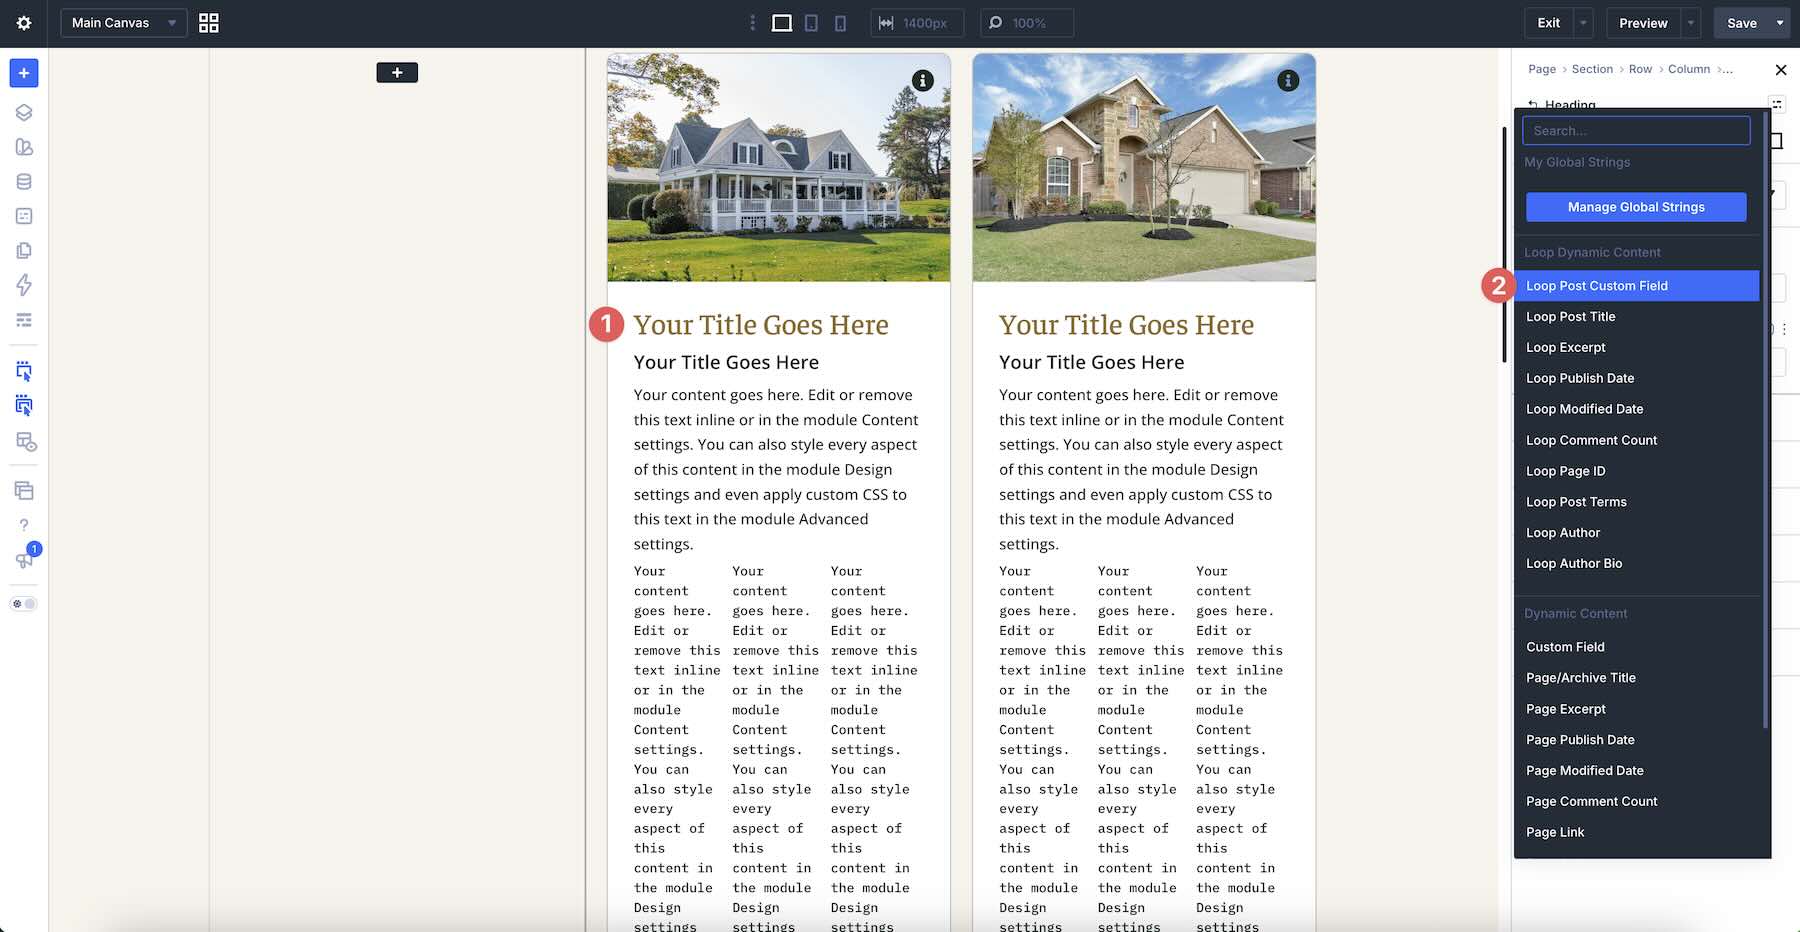
Now, we need to connect the custom fields we created to the modules in the loop Column. Start by selecting the first Heading module we added in the last step. In the Content tab, expand the Text option group and hover next to the Heading field to reveal the Insert Dynamic Content icon. Choose Loop Post Custom Field from the available options.
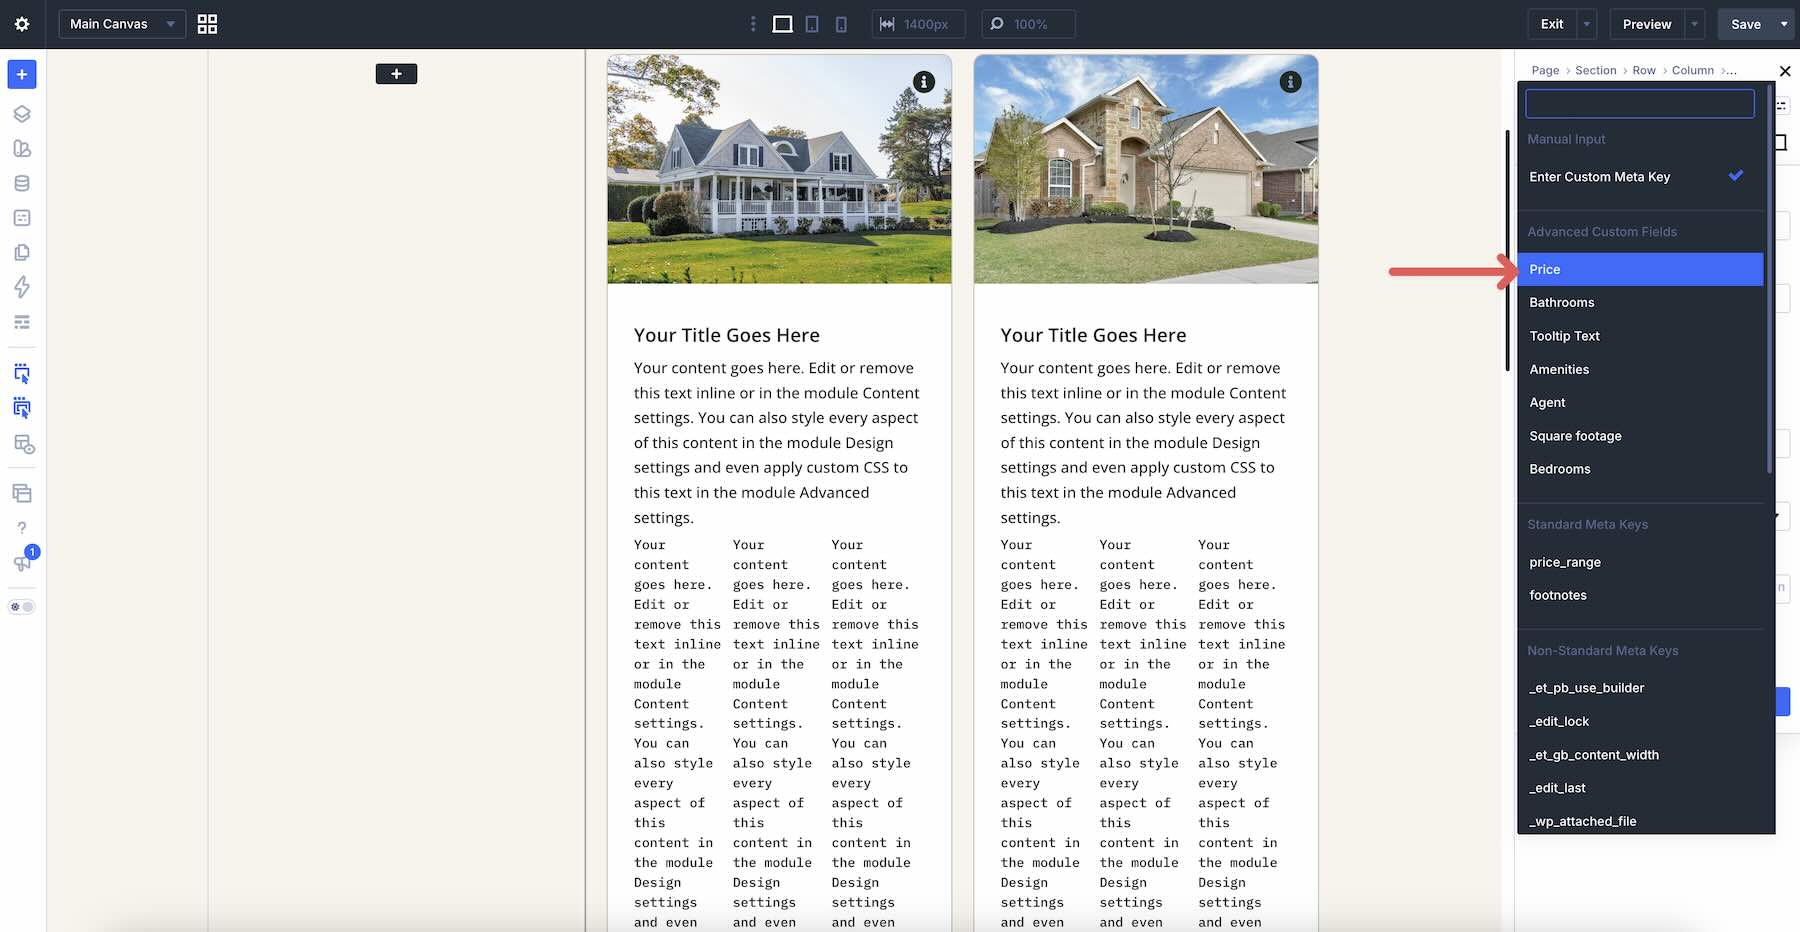
When the modal appears, click Enter Custom Meta Key in the Select Custom Field dropdown menu.
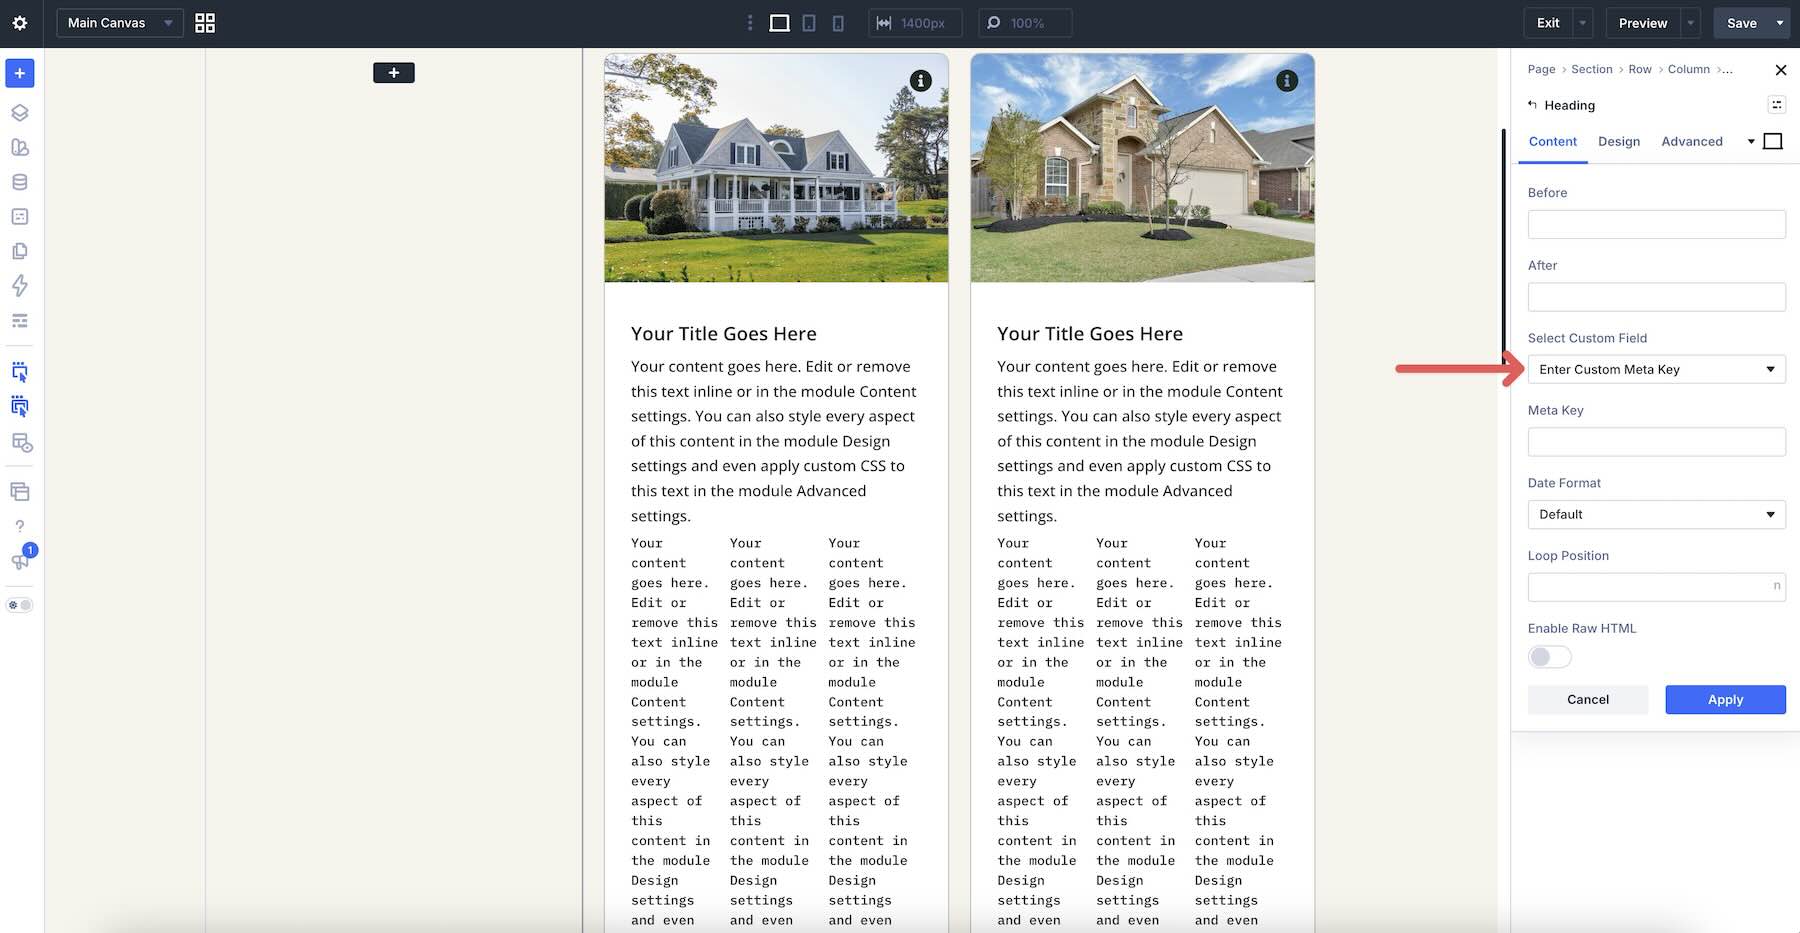
When the options appear, choose the Price custom field.
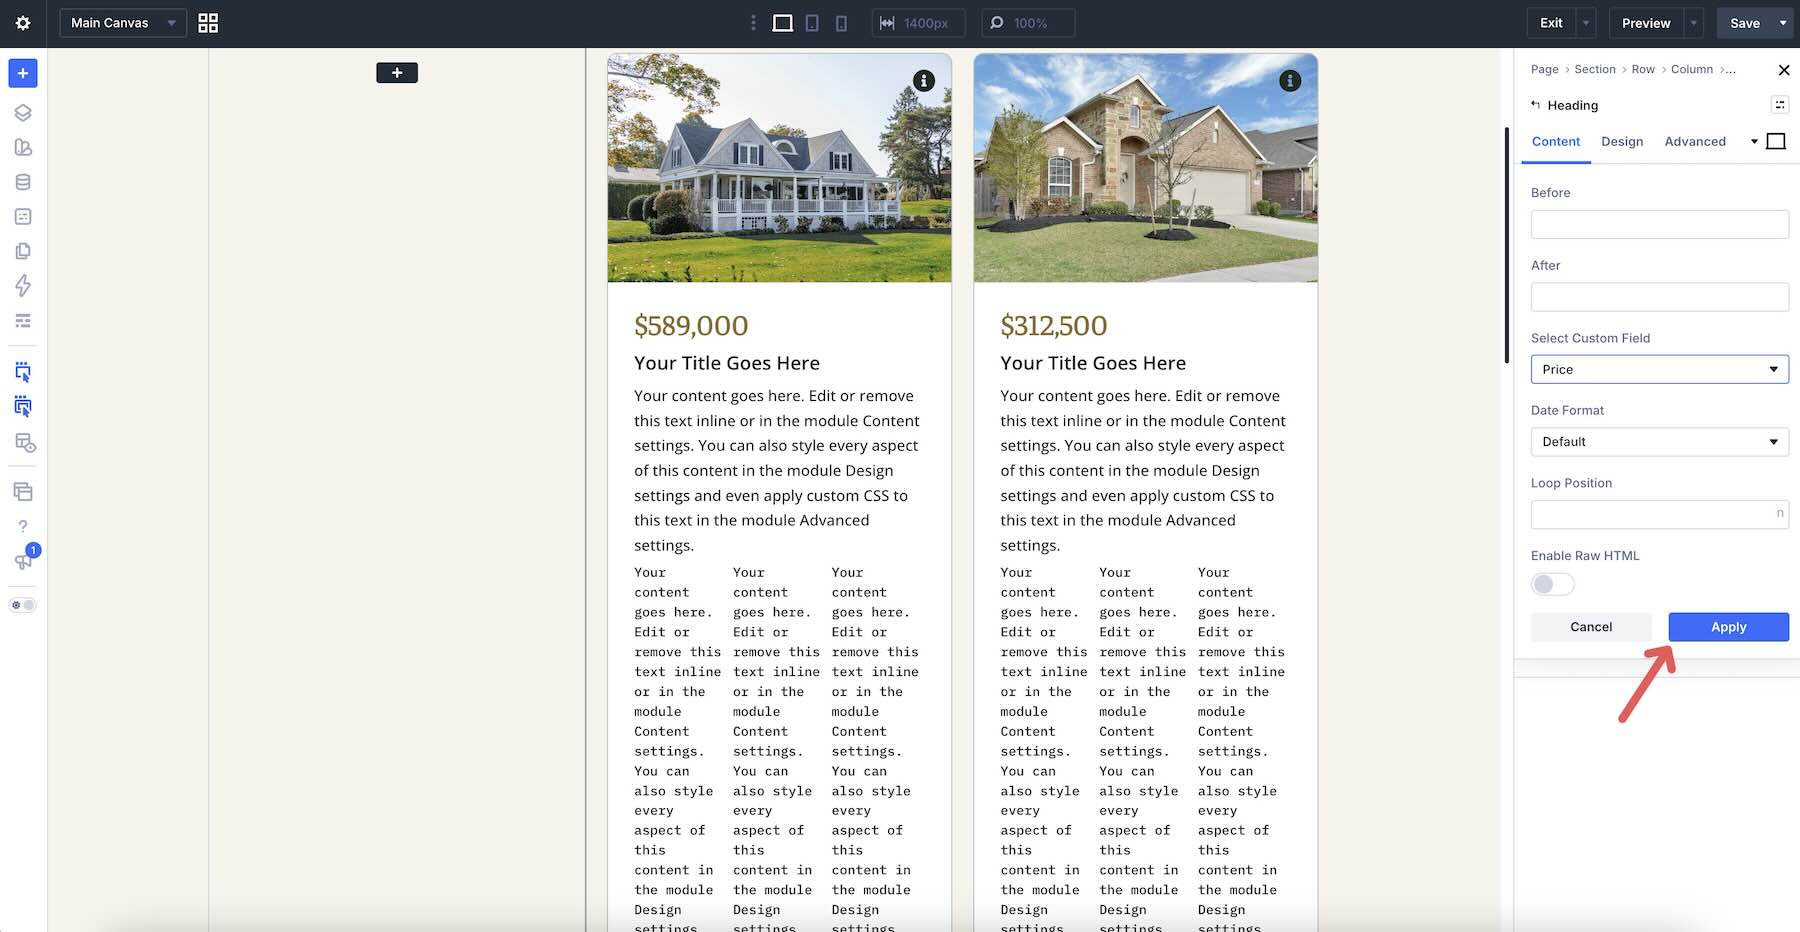
Finally, click the Apply button to assign the field to the module.
Repeat these steps to assign the remaining dynamic content to the corresponding modules. For the second Heading module, choose Loop Post Title. For the Text module, choose Loop Excerpt.
For the Module Group with three Text modules, assign the Bedrooms custom field to the first Text module and add a separator in the After field.
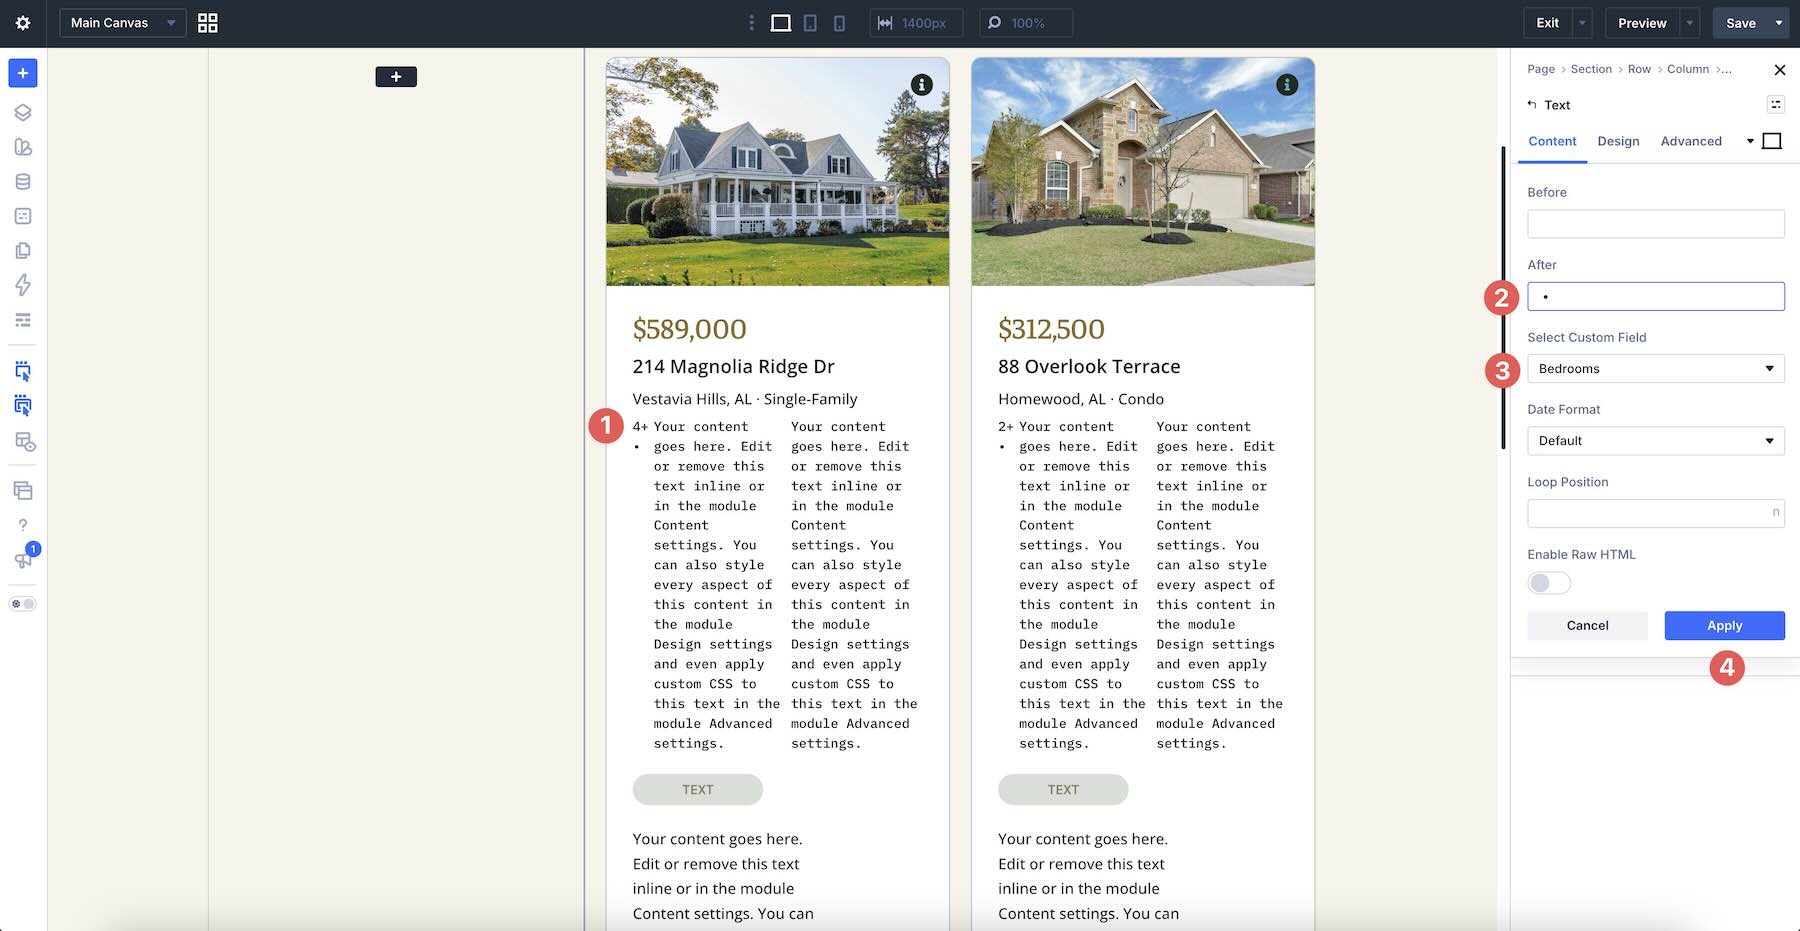
Use the Bathrooms custom field for the second Text module and Square Footage for the third.
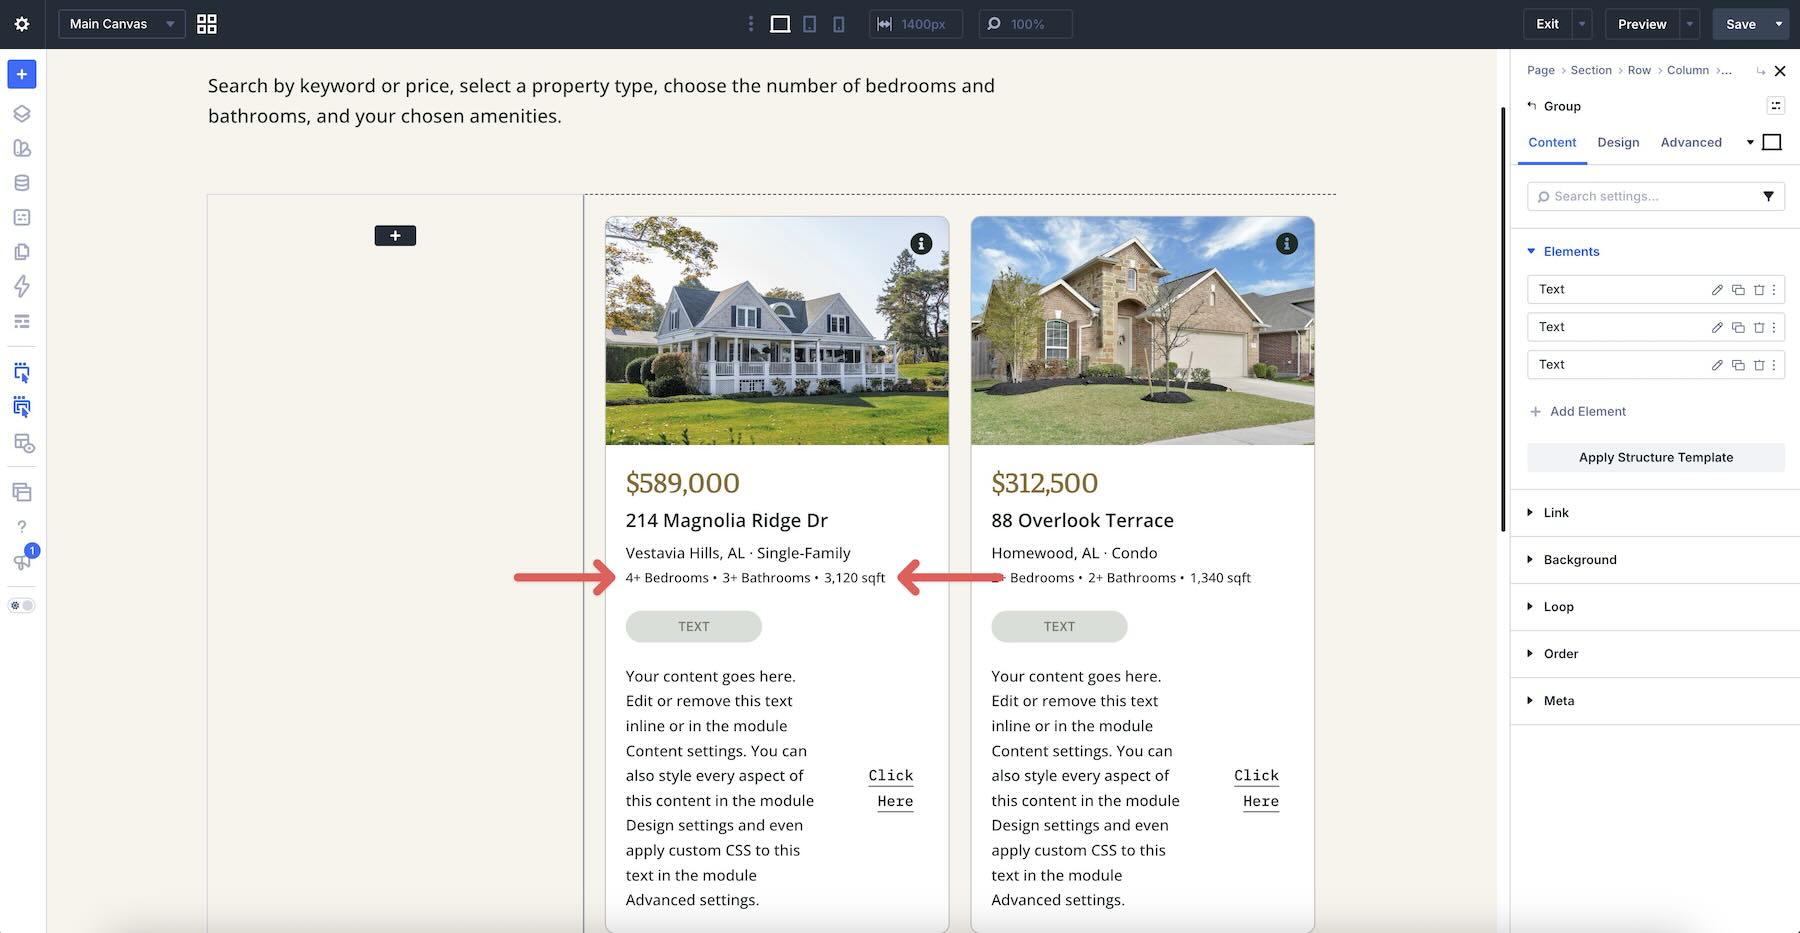
For the standalone Text module, use the Amenities custom field.
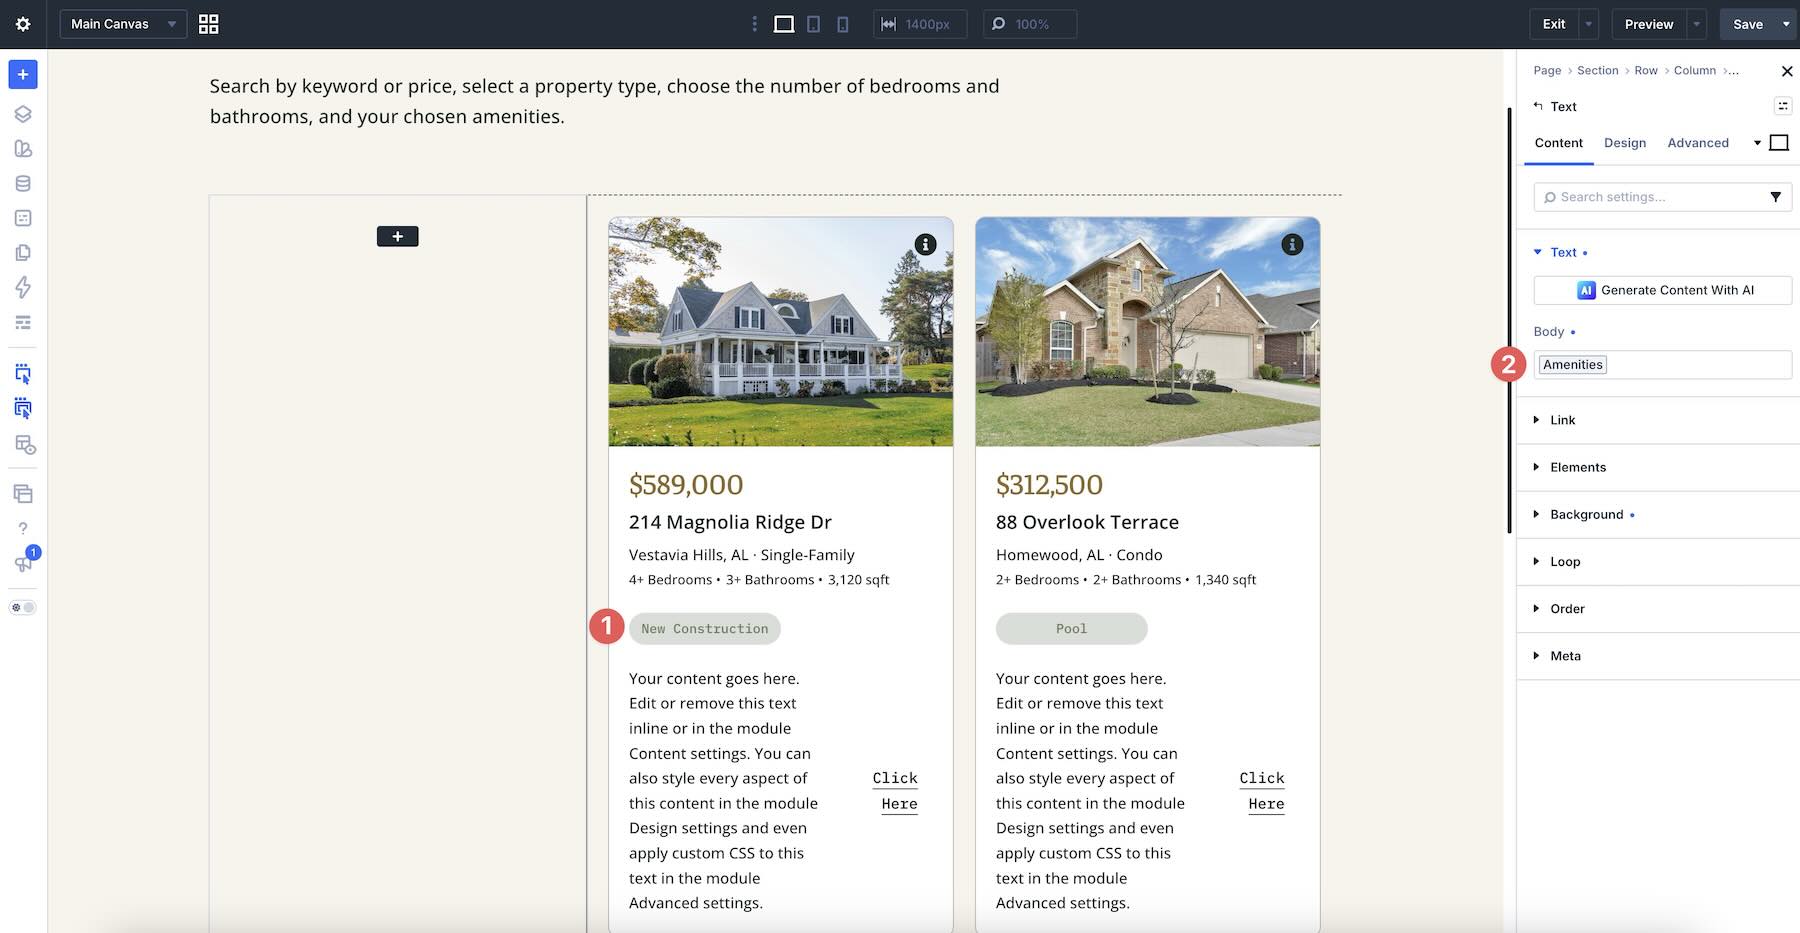
In the final Module Group, assign the Agent custom field to the Text module.
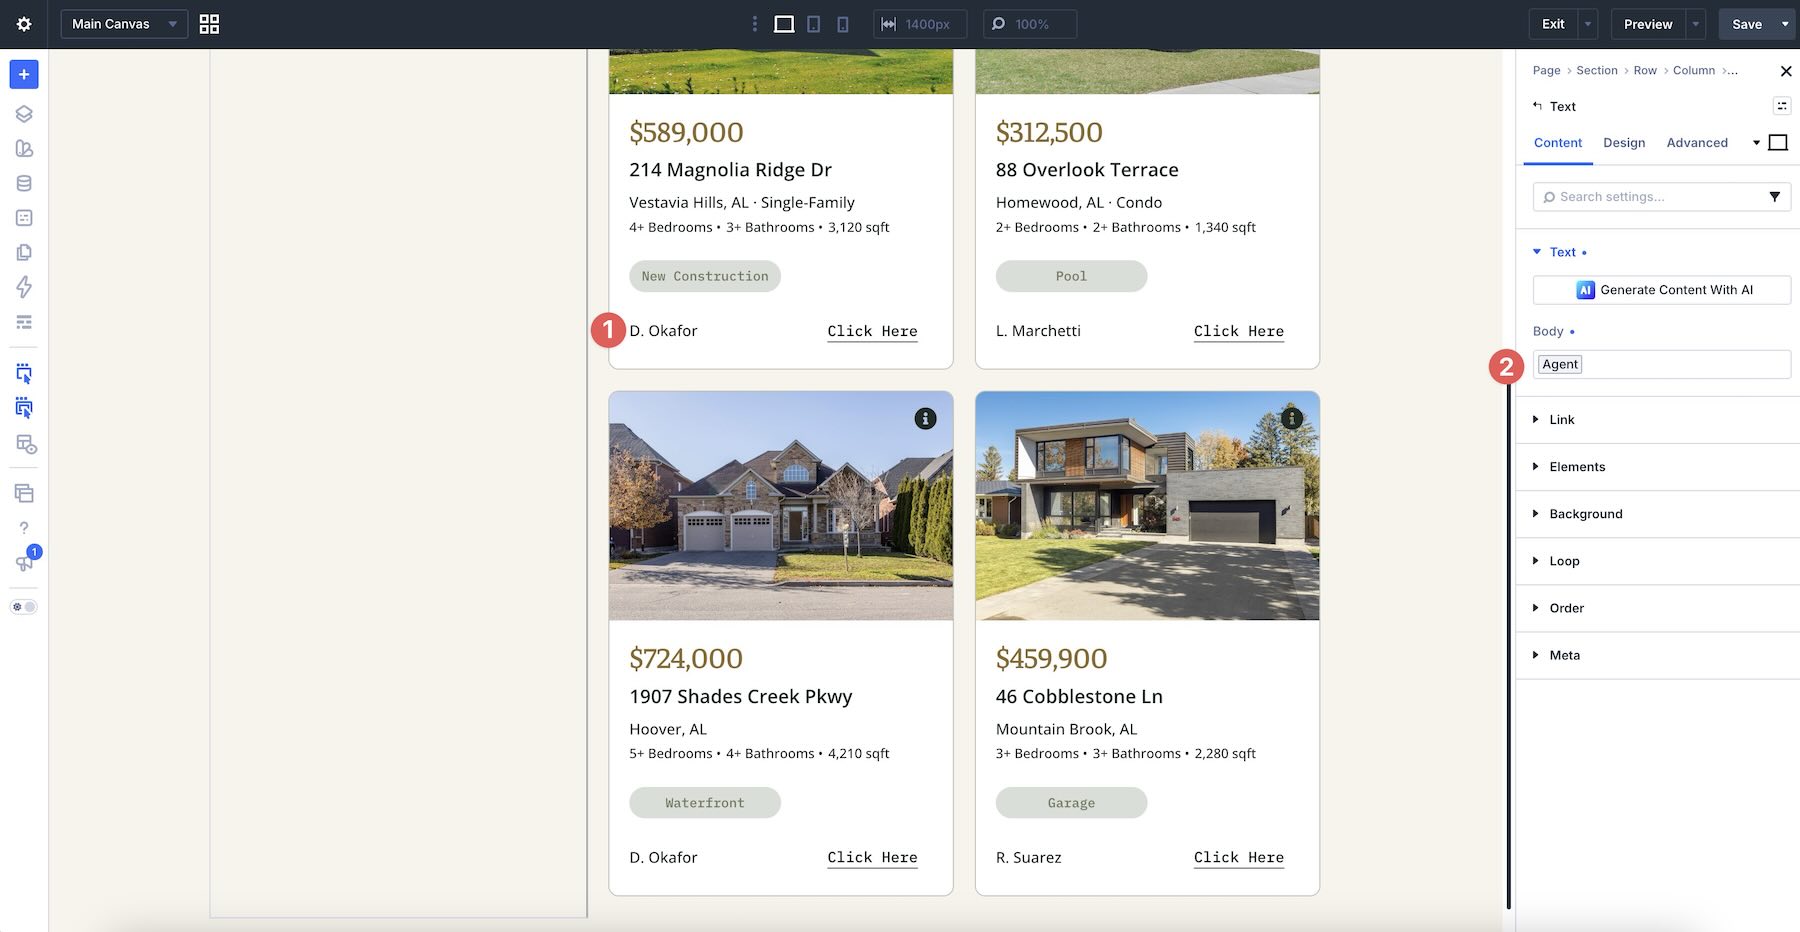
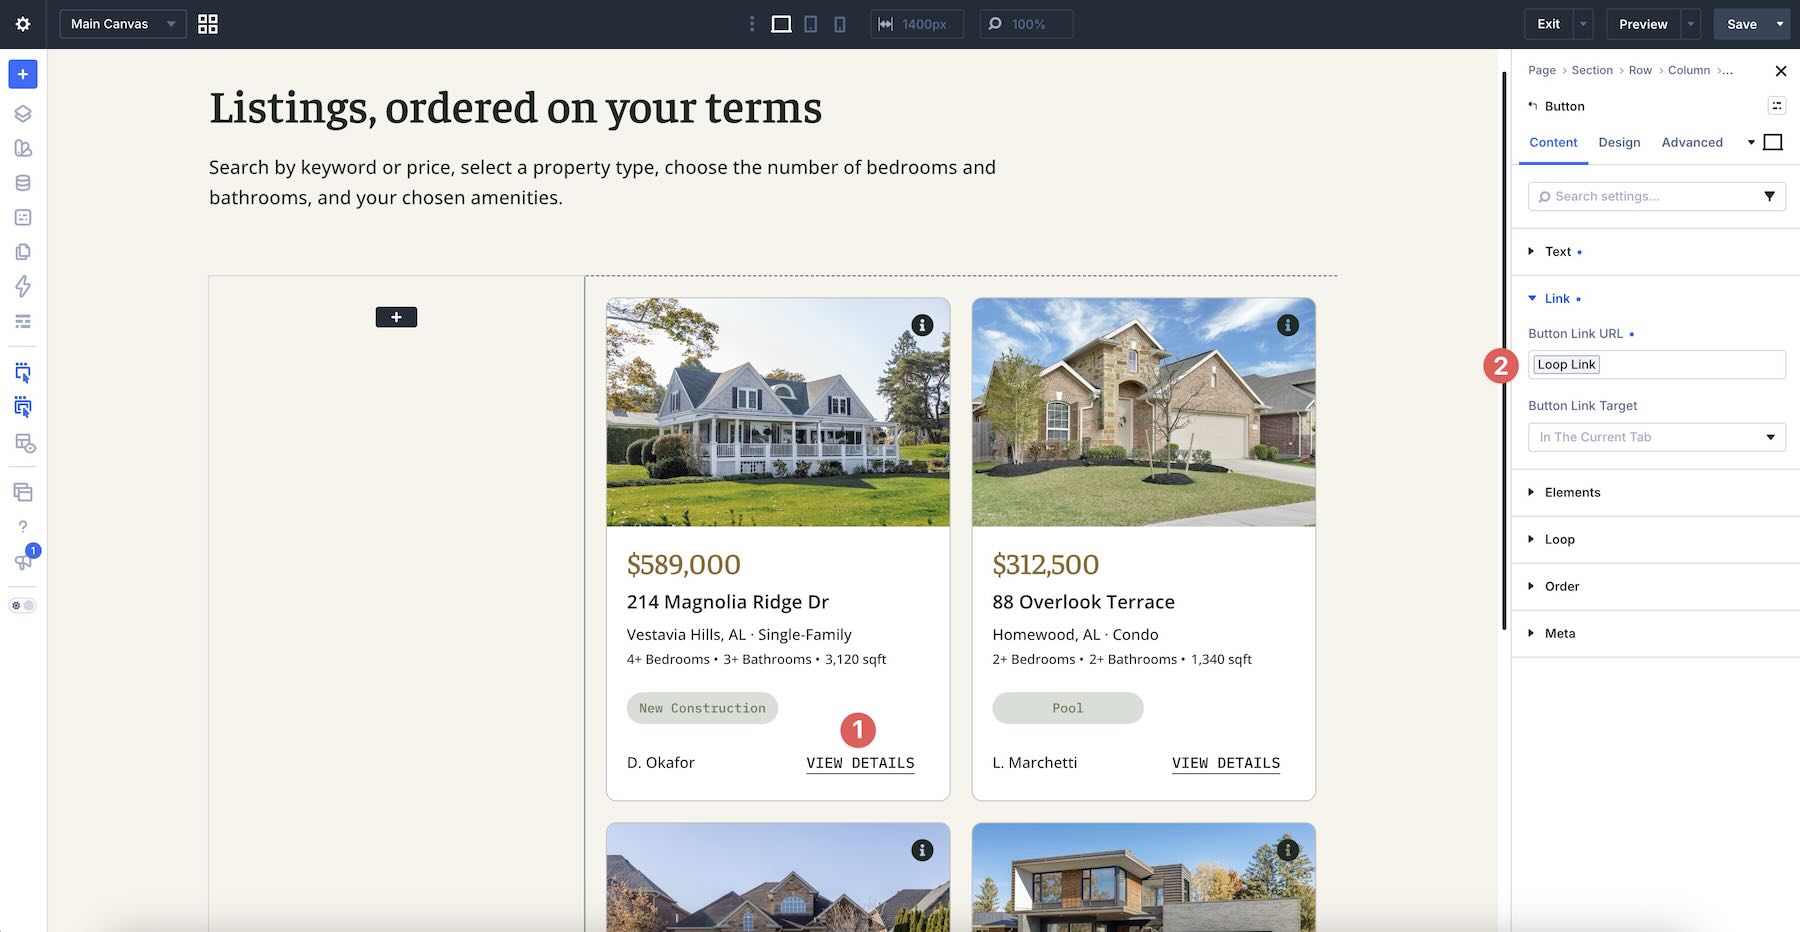
For the Button module, add the button text and assign Loop Link to the Button Link URL in the Link option group.
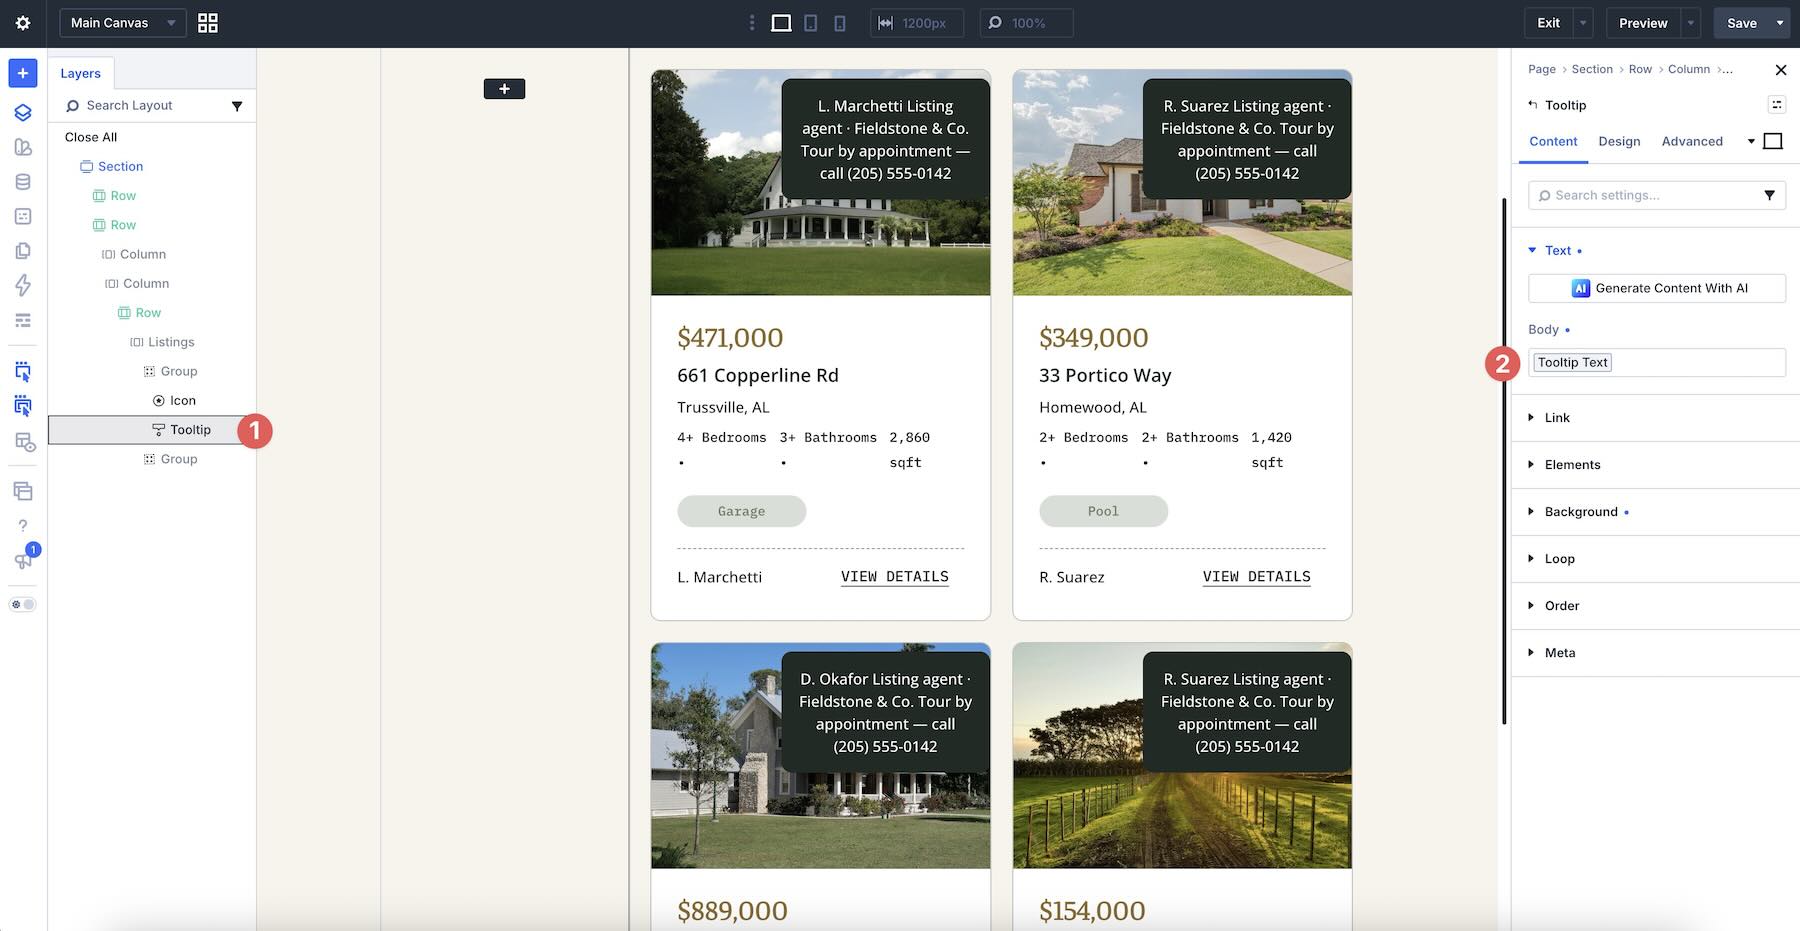
For the final custom field, use the Layers Panel to locate the Tooltip module. In the Content tab, assign the Tooltip Text custom field to the Body.
Create The Filterable Search With The Post Filter Module
With the listings loop ready to go, the final step is to give visitors control over what they see. We’ll add a Post Filter module that lets them search by keyword, choose a property type, filter by bedrooms and bathrooms, select an amenity, and apply or reset their choices.
Add The Post Filter Module
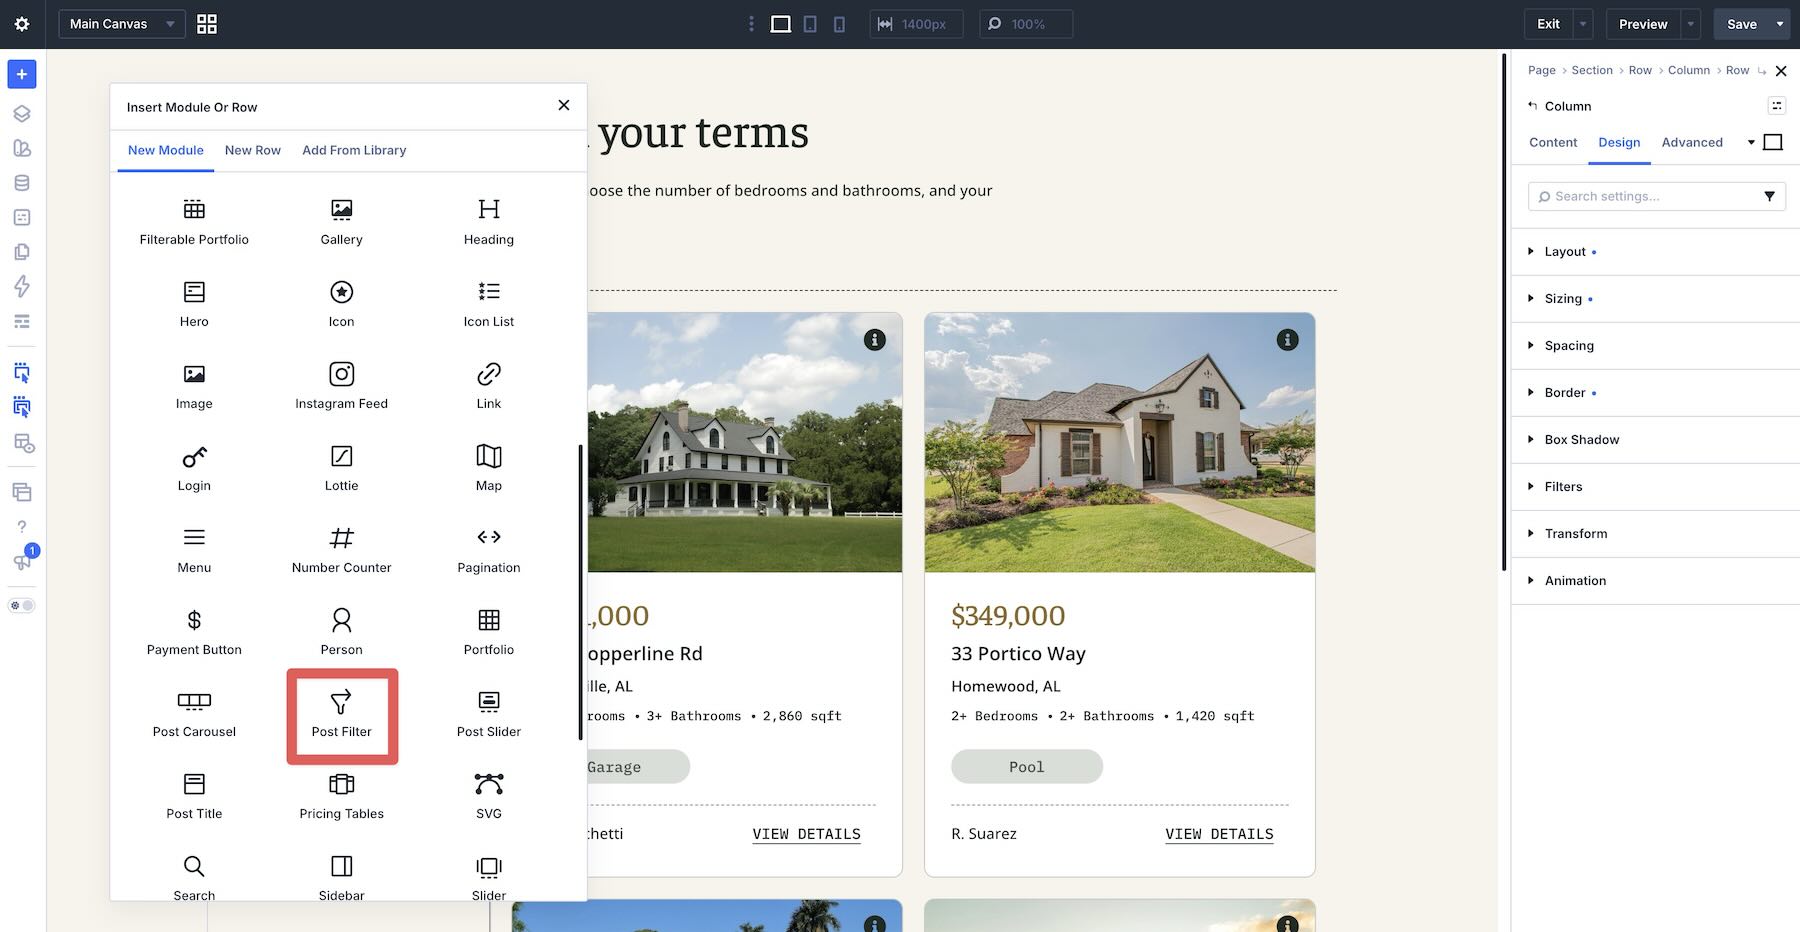
Place a Post Filter module in the left Column of the Row. This module serves as the form wrapper that contains all the individual Post Filter Items.
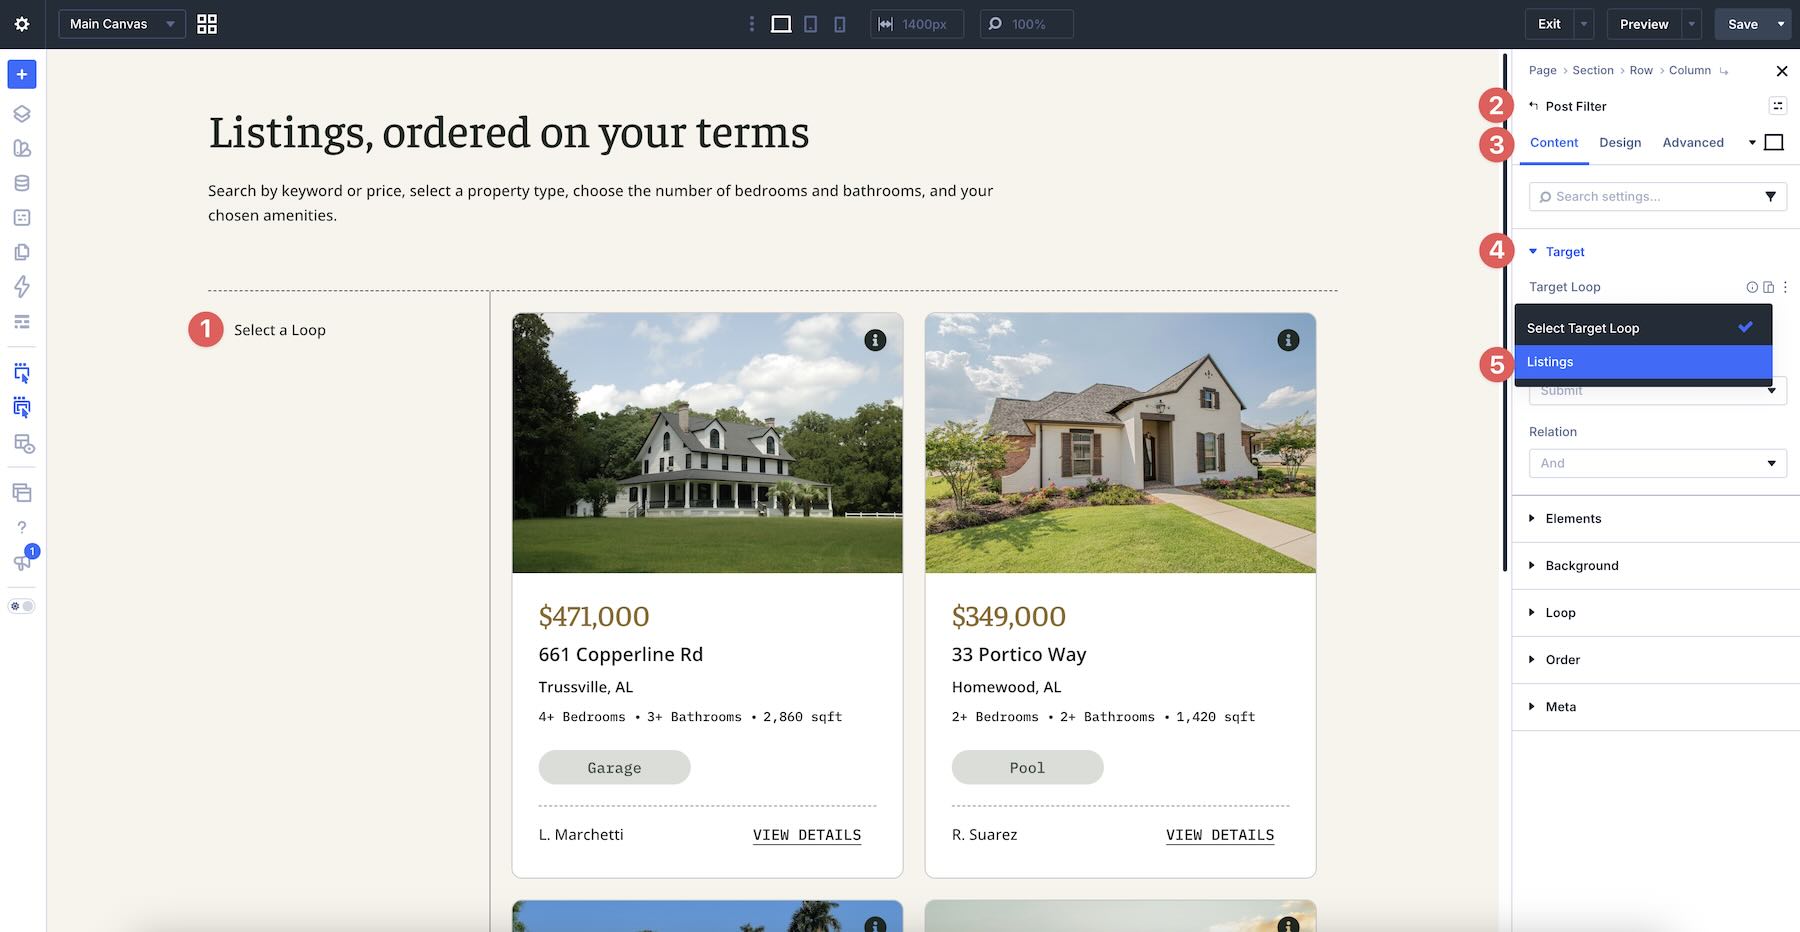
Once added, navigate to the Content tab of the Post Filter module. Expand the Target option group and select the Listings loop we created in the last step.
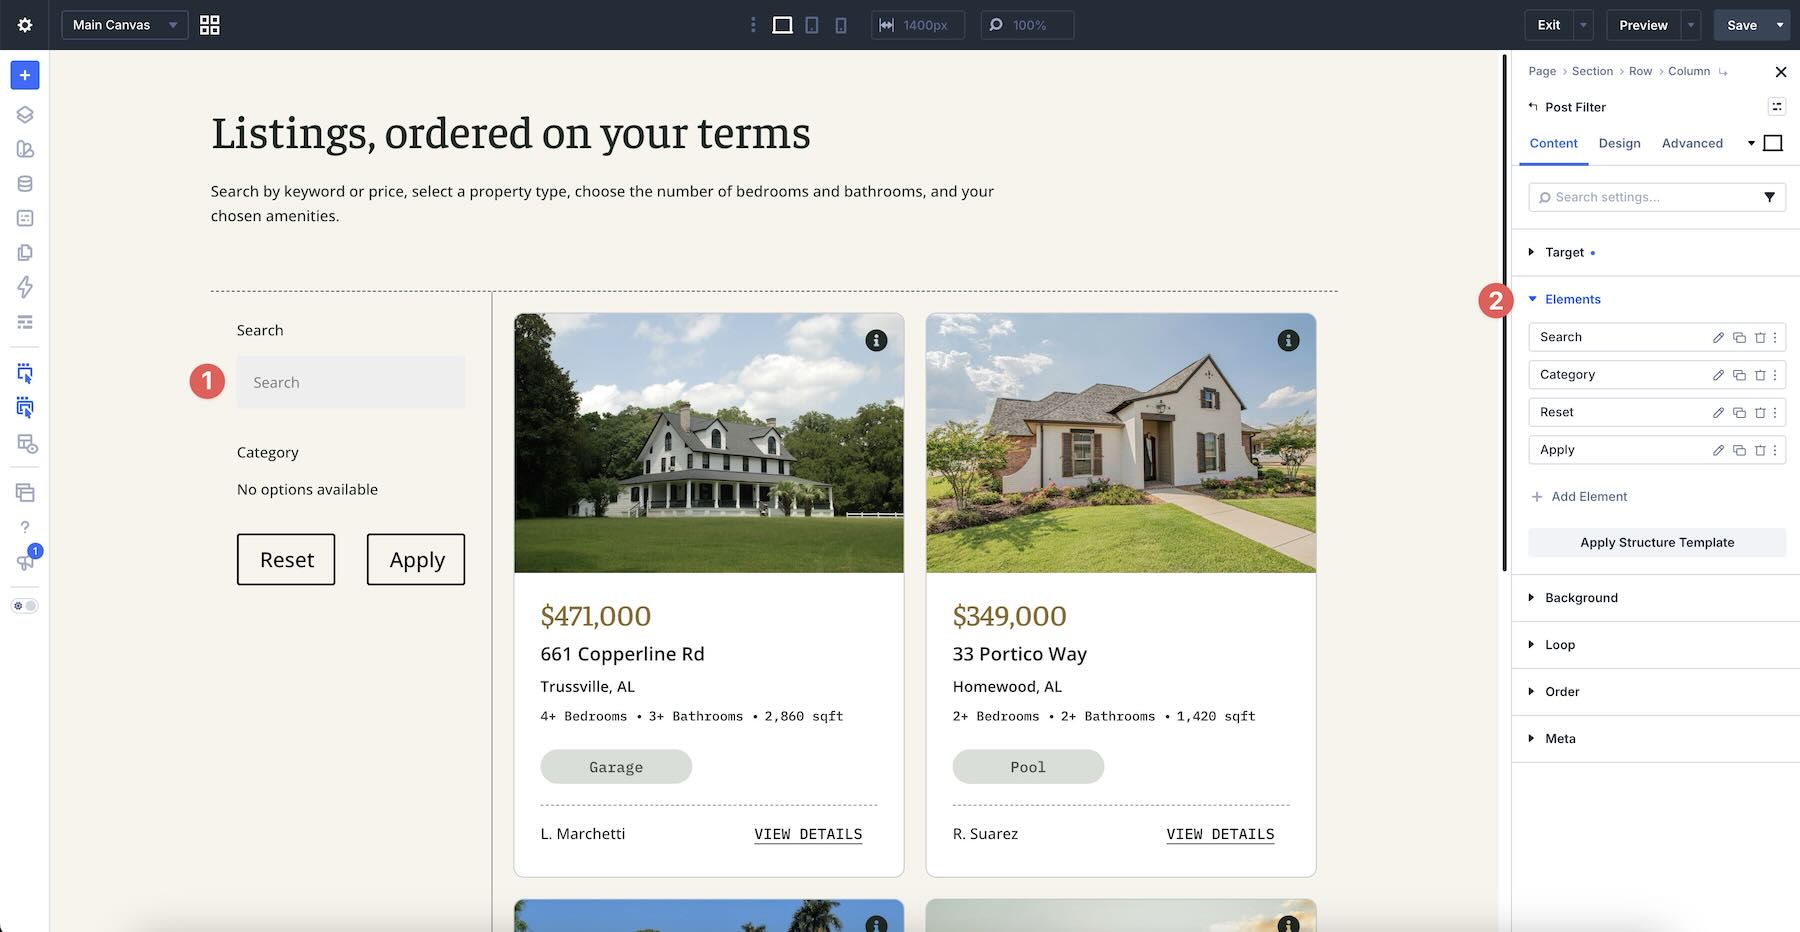
Expand the Elements option group to view and add more fields to the module. By default, the Post Filter module includes a Search field, a Category filter, and Reset and Apply buttons. These are the Post Filter Items.
Assign The Taxonomy And Custom Fields
Start by editing the Search Post Filter Item. Keep Field Type set to Text, then configure the field to query the post title and the City custom field. This will allow visitors to search by the property address or city.
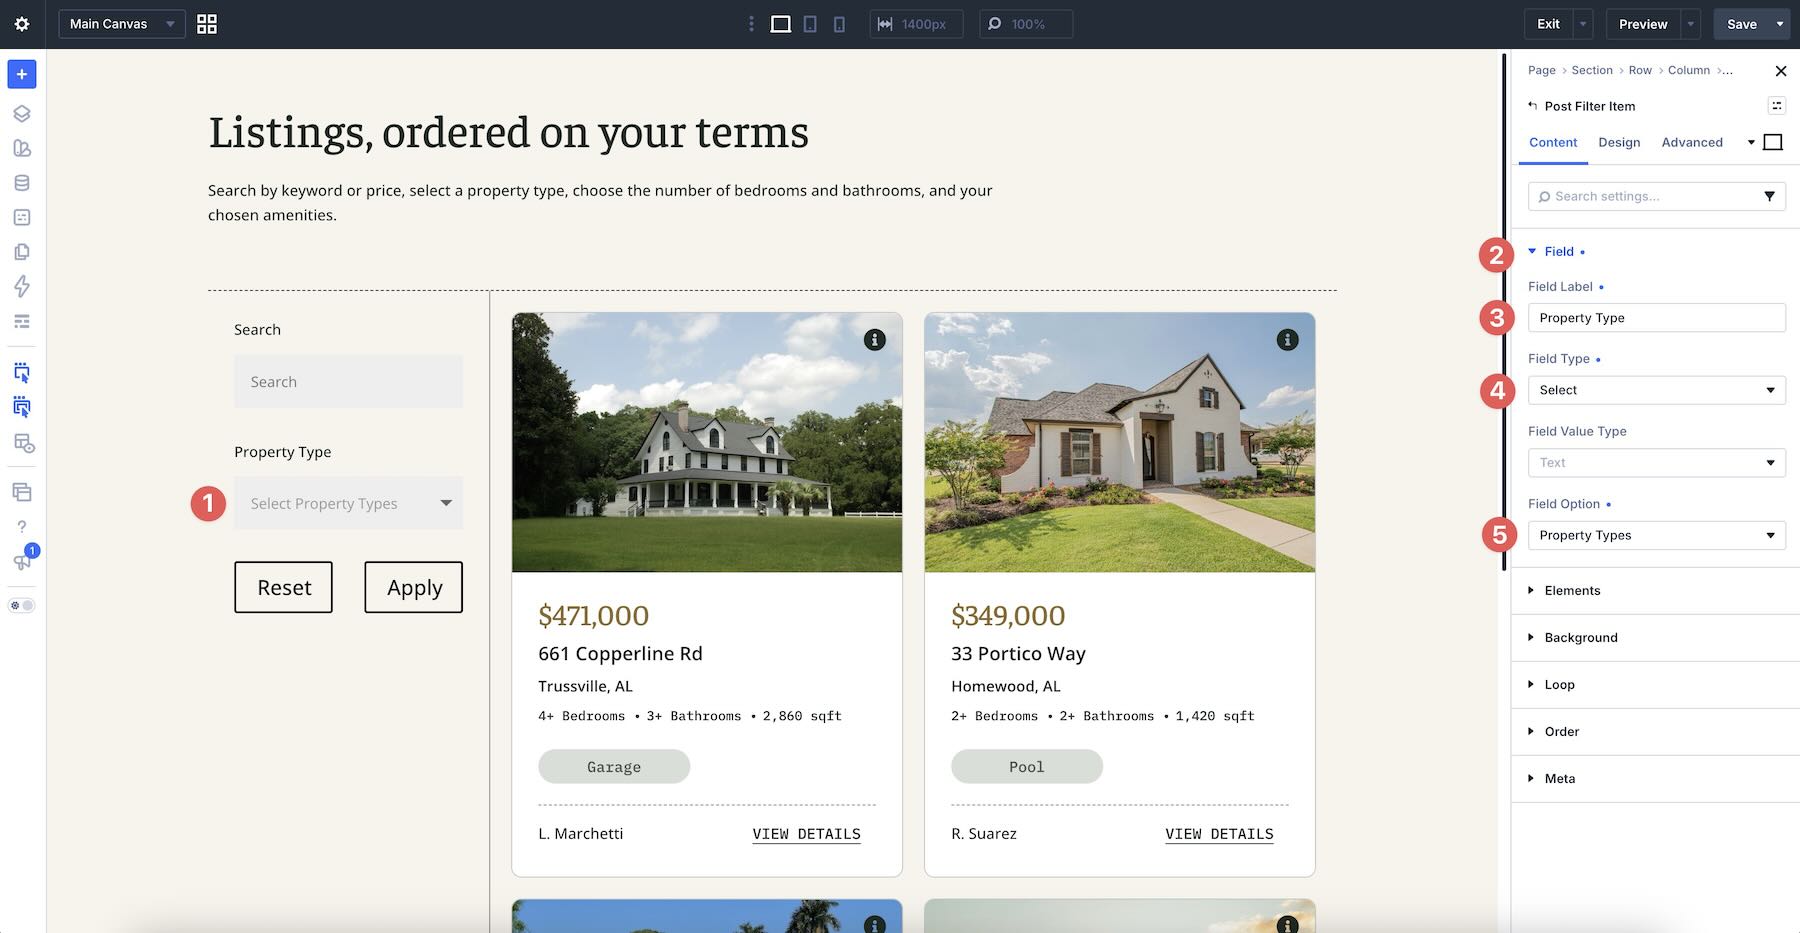
Next, click to edit the Category Post Filter Item. Expand the Field option group and select Radio as the Field Type. In the Field Option dropdown, select the Property Types taxonomy we created in ACF. The Field Label will populate automatically, but you can change it to whatever you like.
We’ll add three new fields to the Post Filter module. In the main Post Filter module’s Content tab, expand the Elements option group and click + Add Element. Choose Post Filter Item from the available options.
Click and drag the new field to place it directly under the Property Type field.
Click to edit the new field. Change Field Type to Radio. For Field Value, select Amenities.
Now, copy the new Post Filter Item twice. Change Field Option to Bedrooms for one field and Bathrooms for the other.
Style The Filter Fields
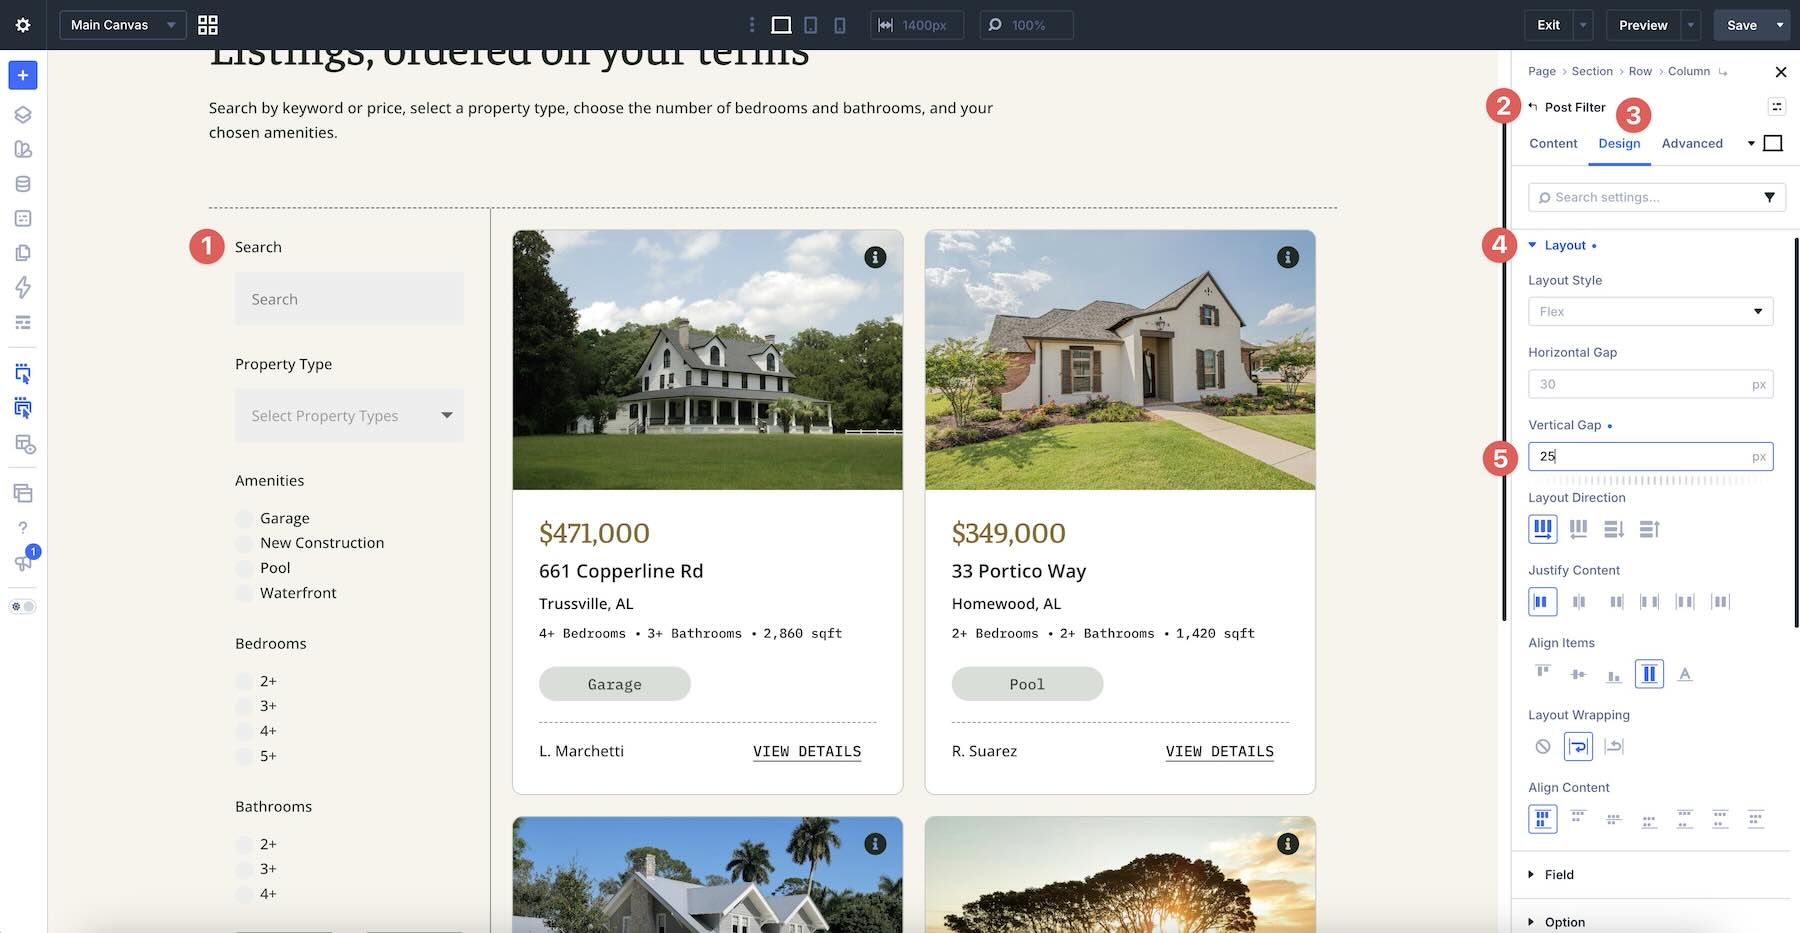
Now that all fields are in place, we need to style them. In the main Post Filter module settings, go to the Design tab. Expand the Layout option group and set the Vertical Gap to 25px.
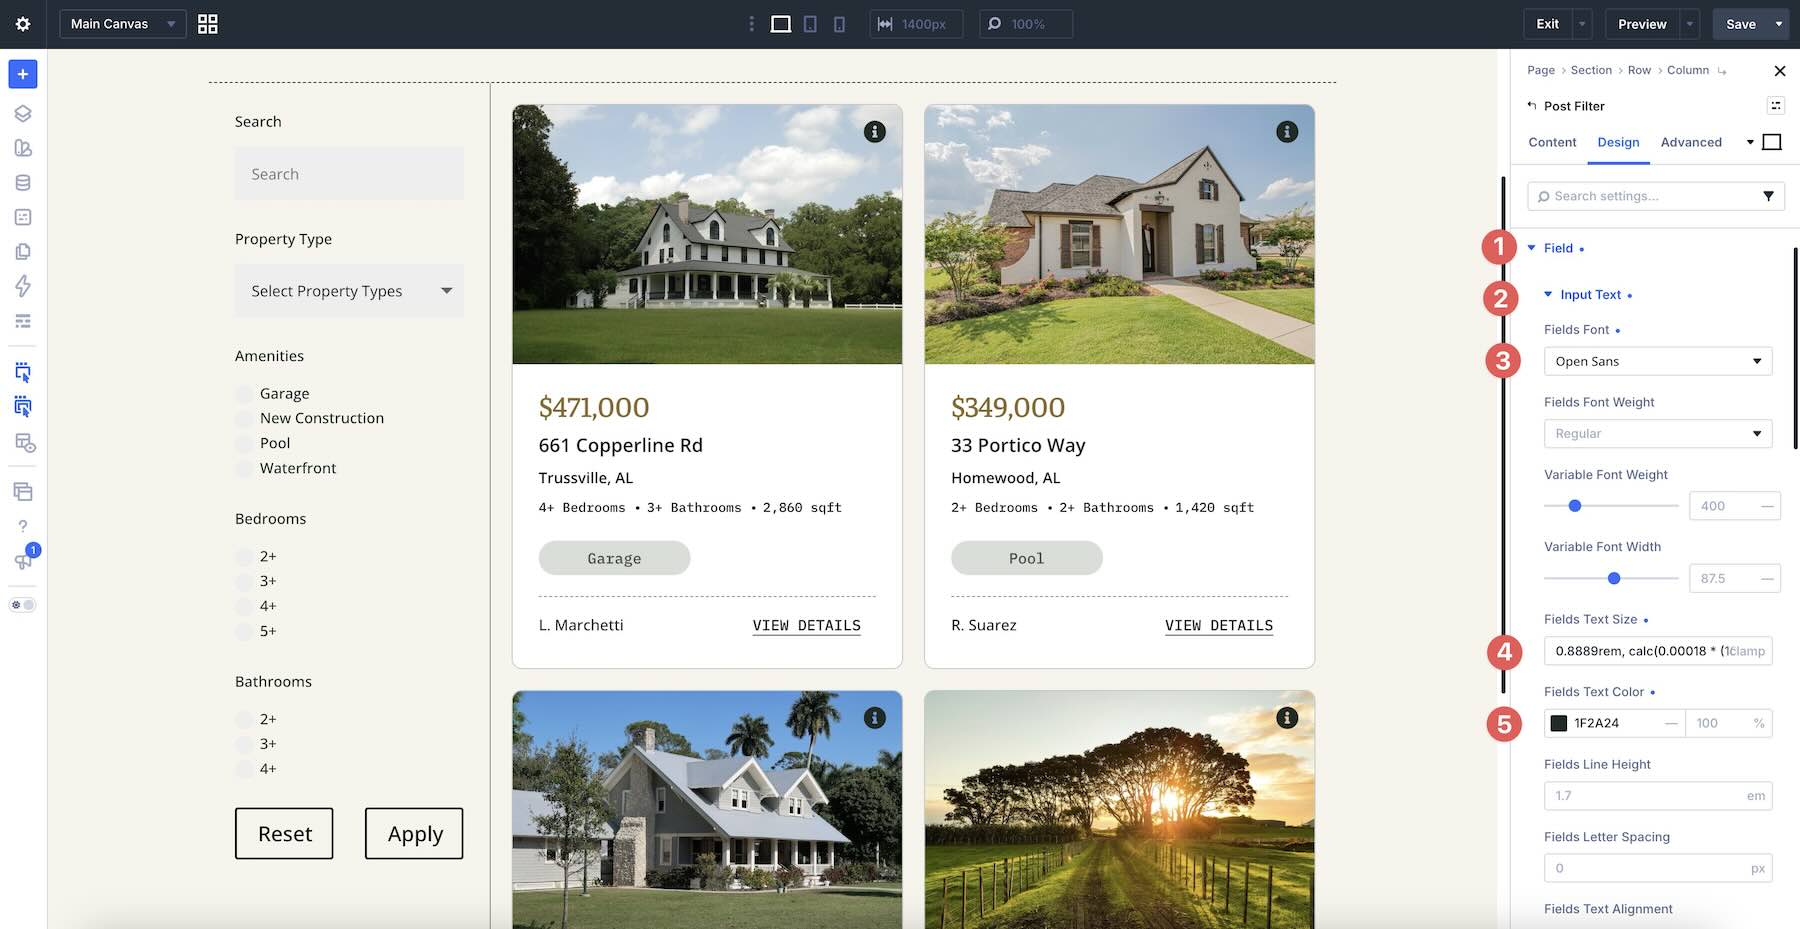
Next, expand the Field option group. Expand the Input Text group, choose a field font, font weight, text size, and text color.
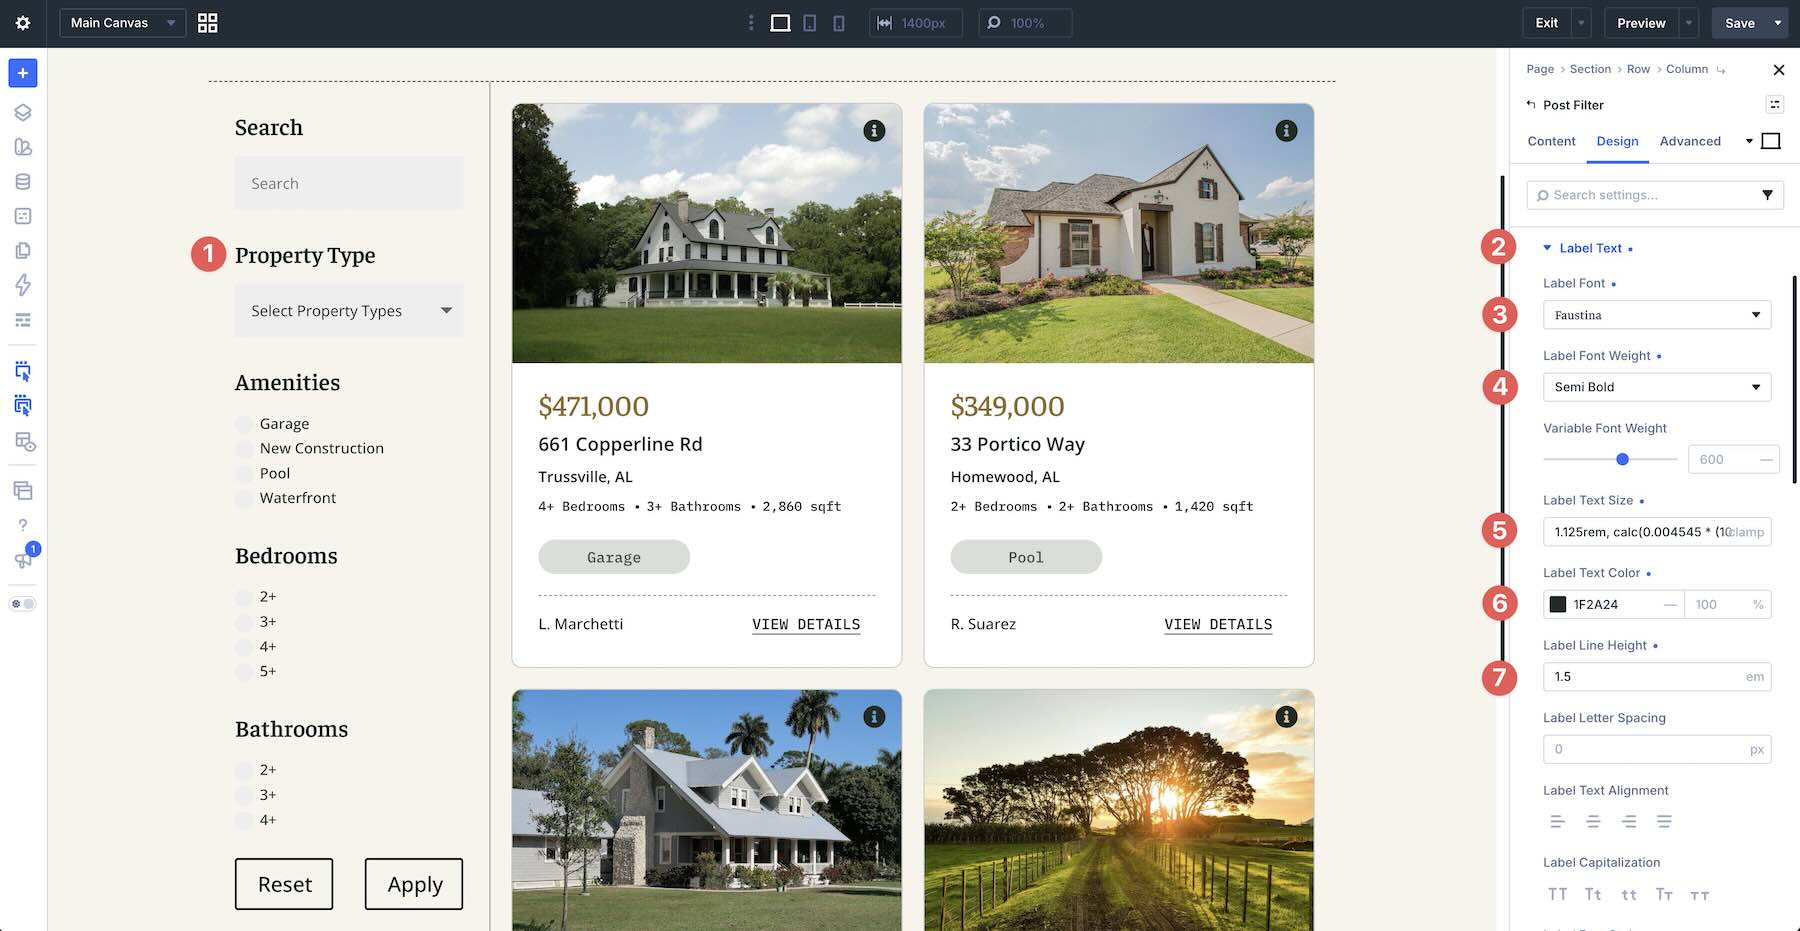
Now, open the Label Text group. Assign a label font, label font weight, label text size, label text color, and label line height.
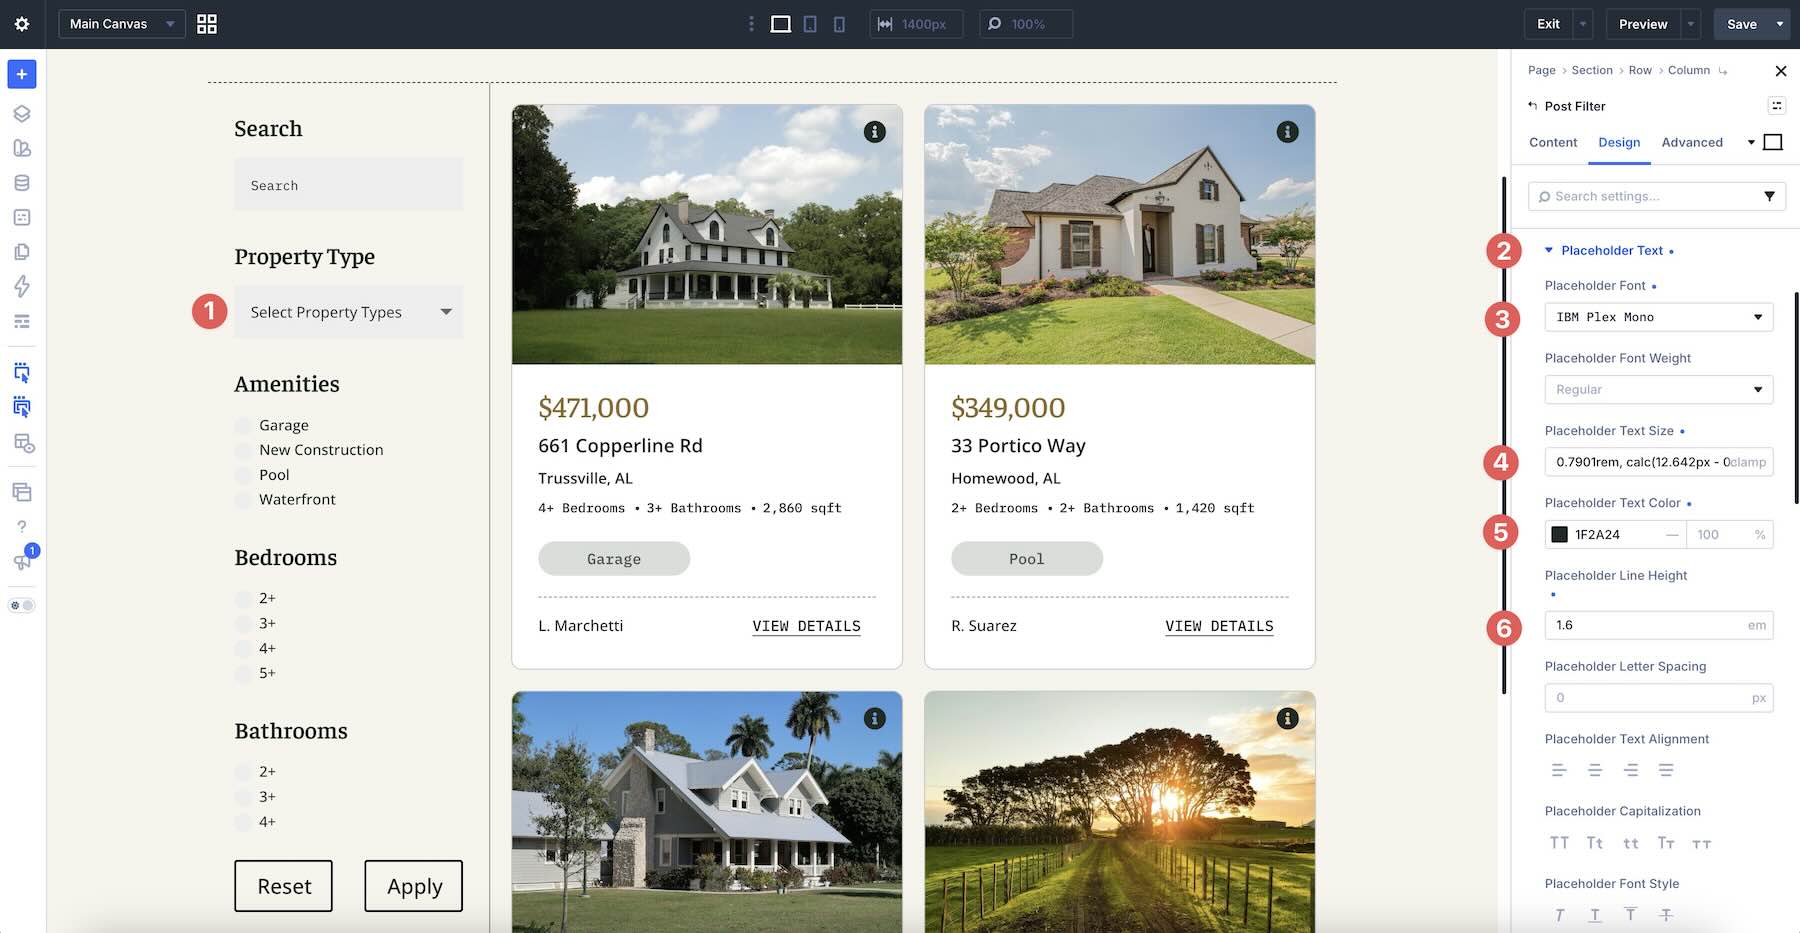
Add styles for the Placeholder Text, including font, font weight, text size, text color, and line height.
Set a Background Color and assign Border Styles as desired.
Style The Radio Options
Expand the Radio Options group in the Design tab. Style the Input Text by assigning its font, text size, text color, and line height.
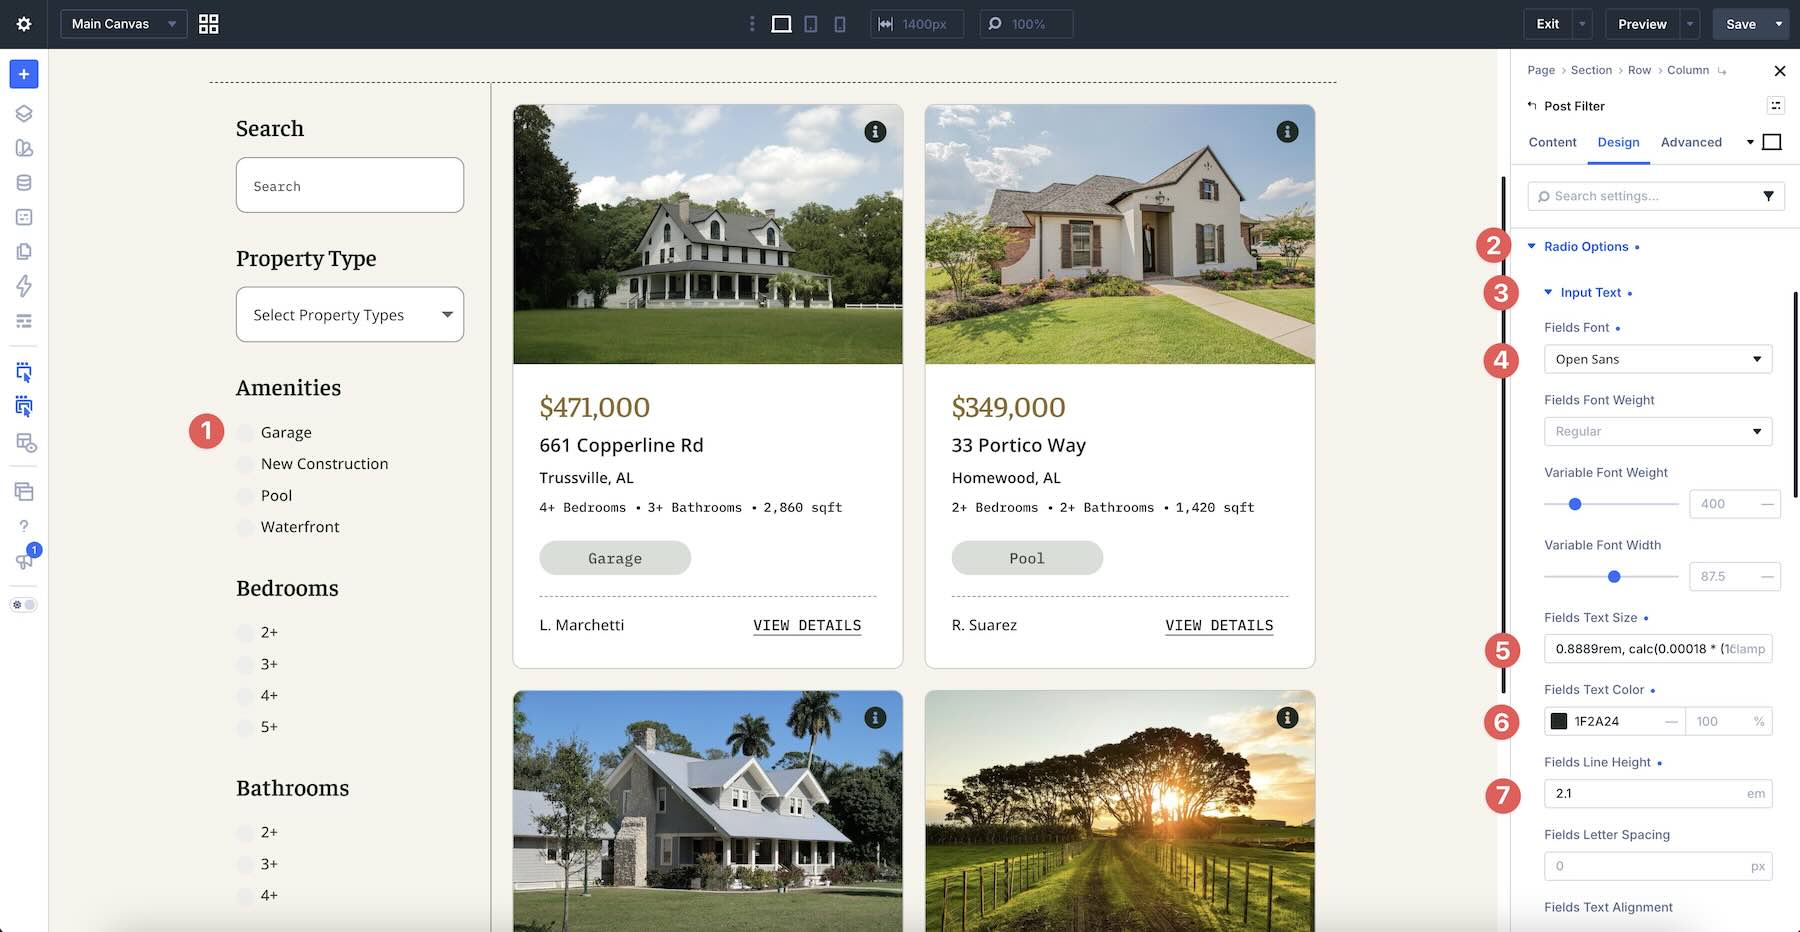
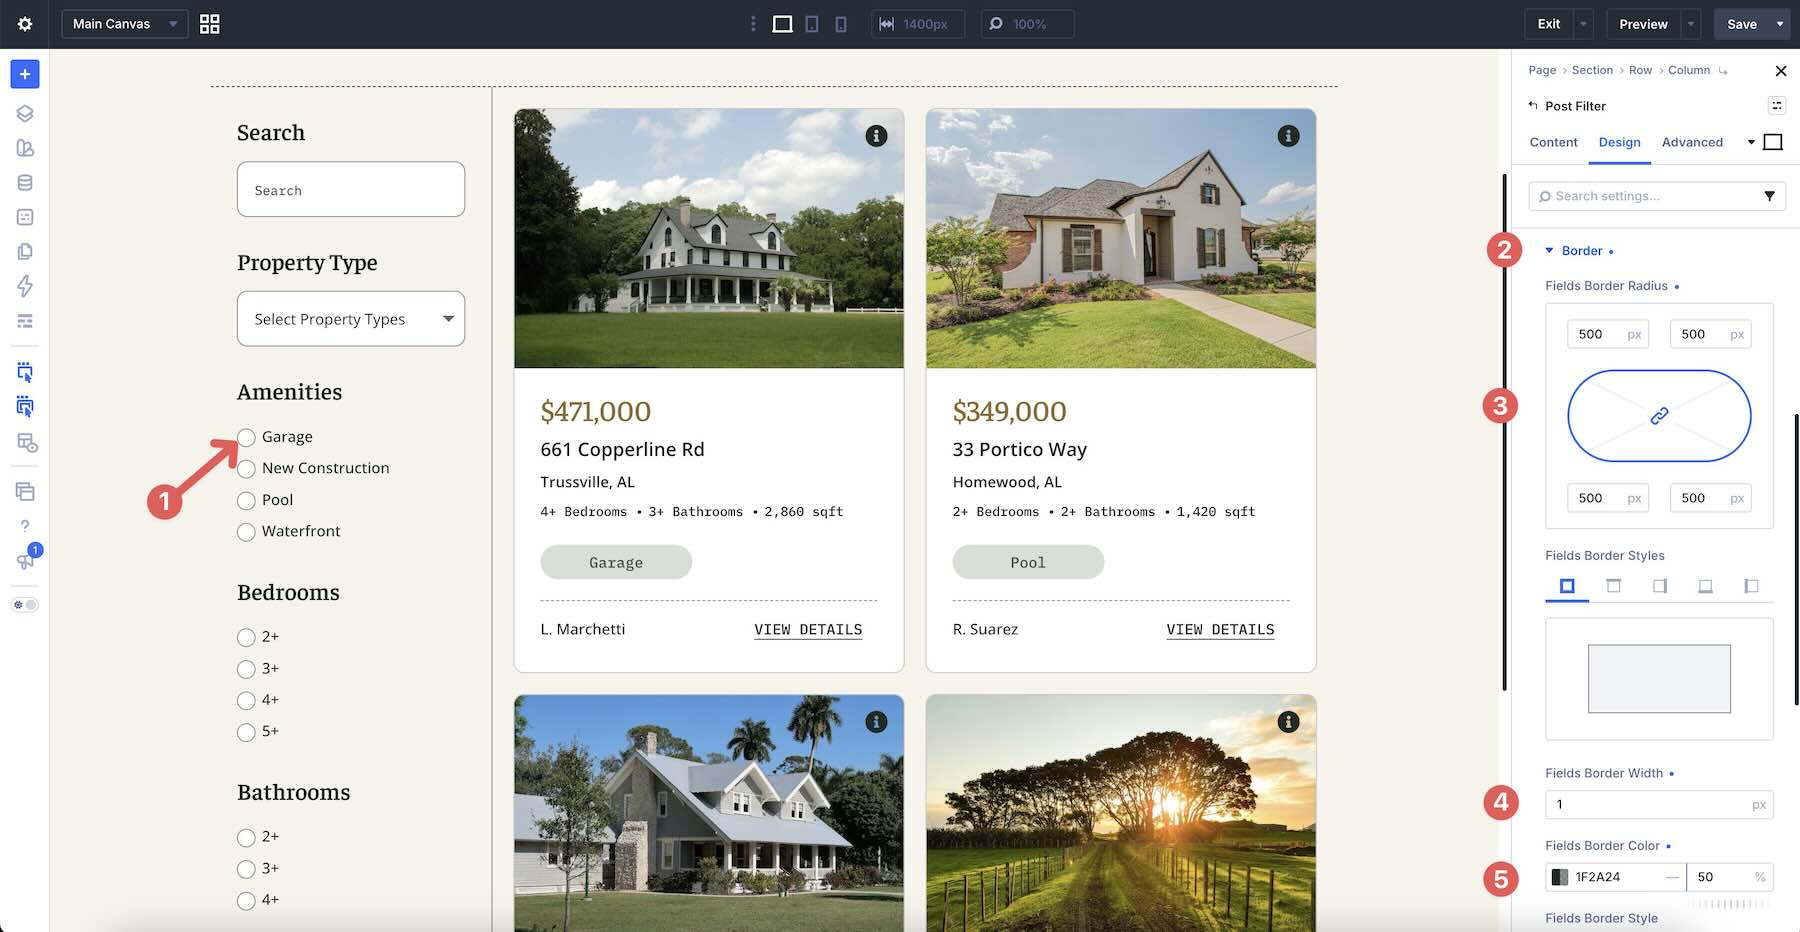
Similar to the Fields group, assign a Background Color for the Radio Options along with Border Styles.
Add Button Styles
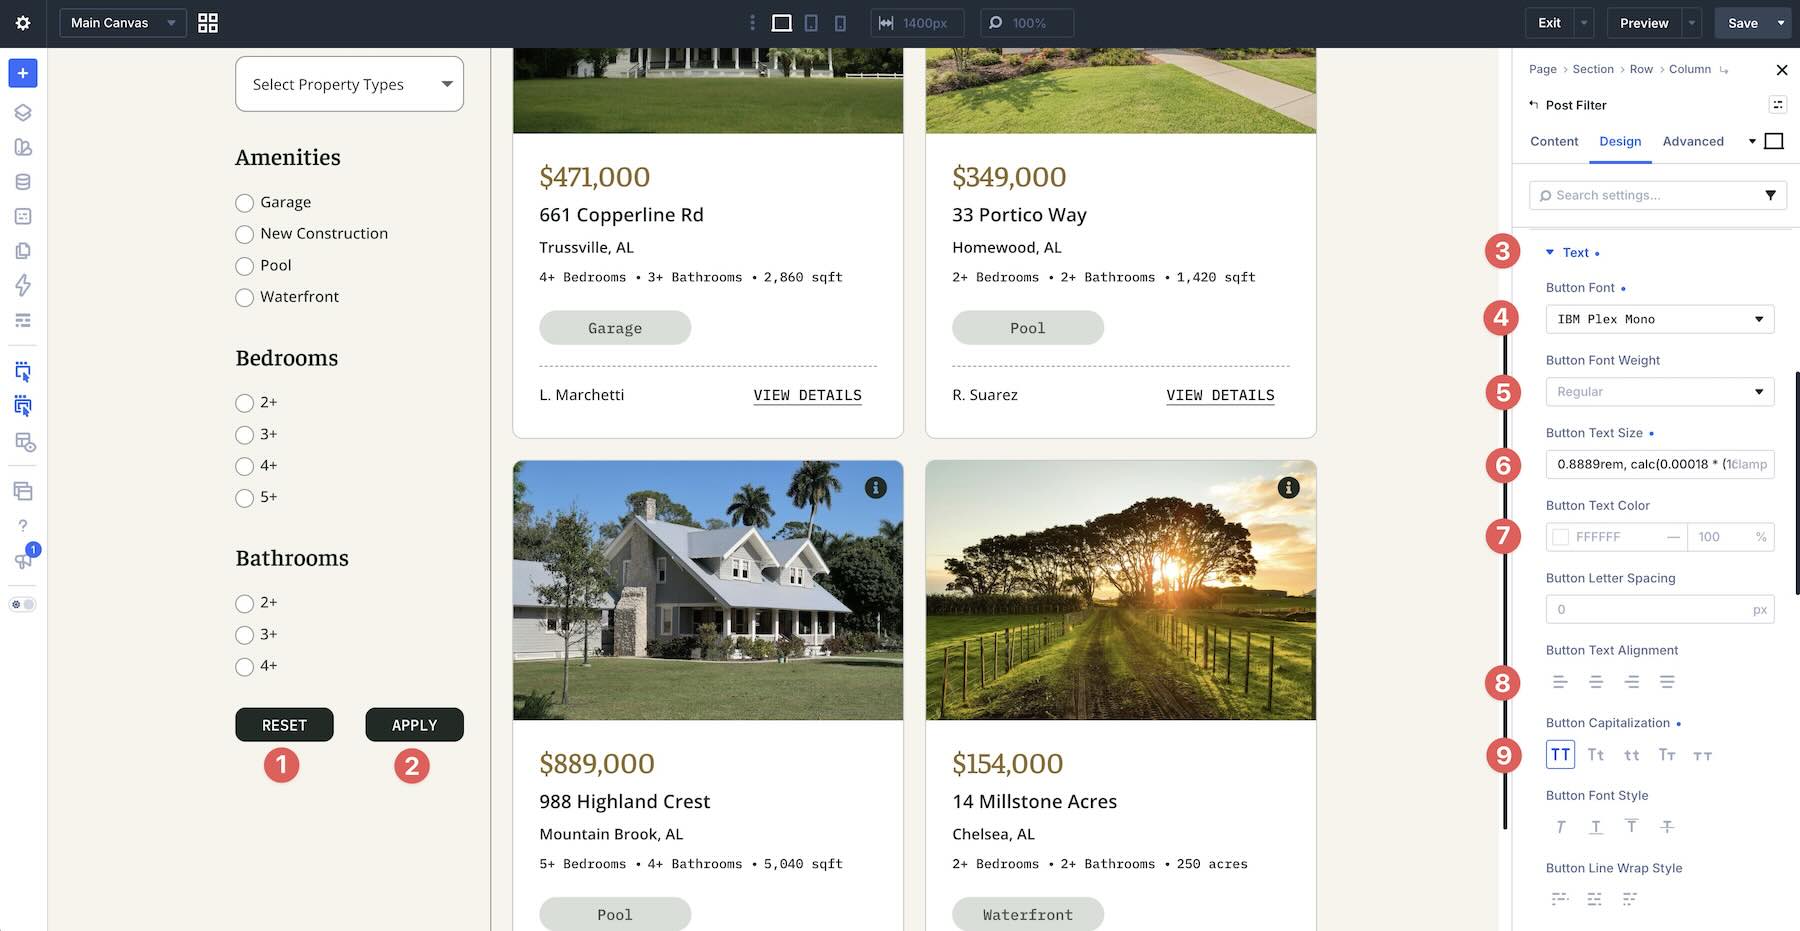
The last step is styling the Apply and Reset buttons in the Post Filter module. In the main Post Filter settings, expand the Button option group in the Design tab. Set a Background Color and Border Styles first.
Next, expand the Text options within the Button styles. Assign a Button Font, Text Size, Text Color, and Capitalization, then make any other necessary styling adjustments.
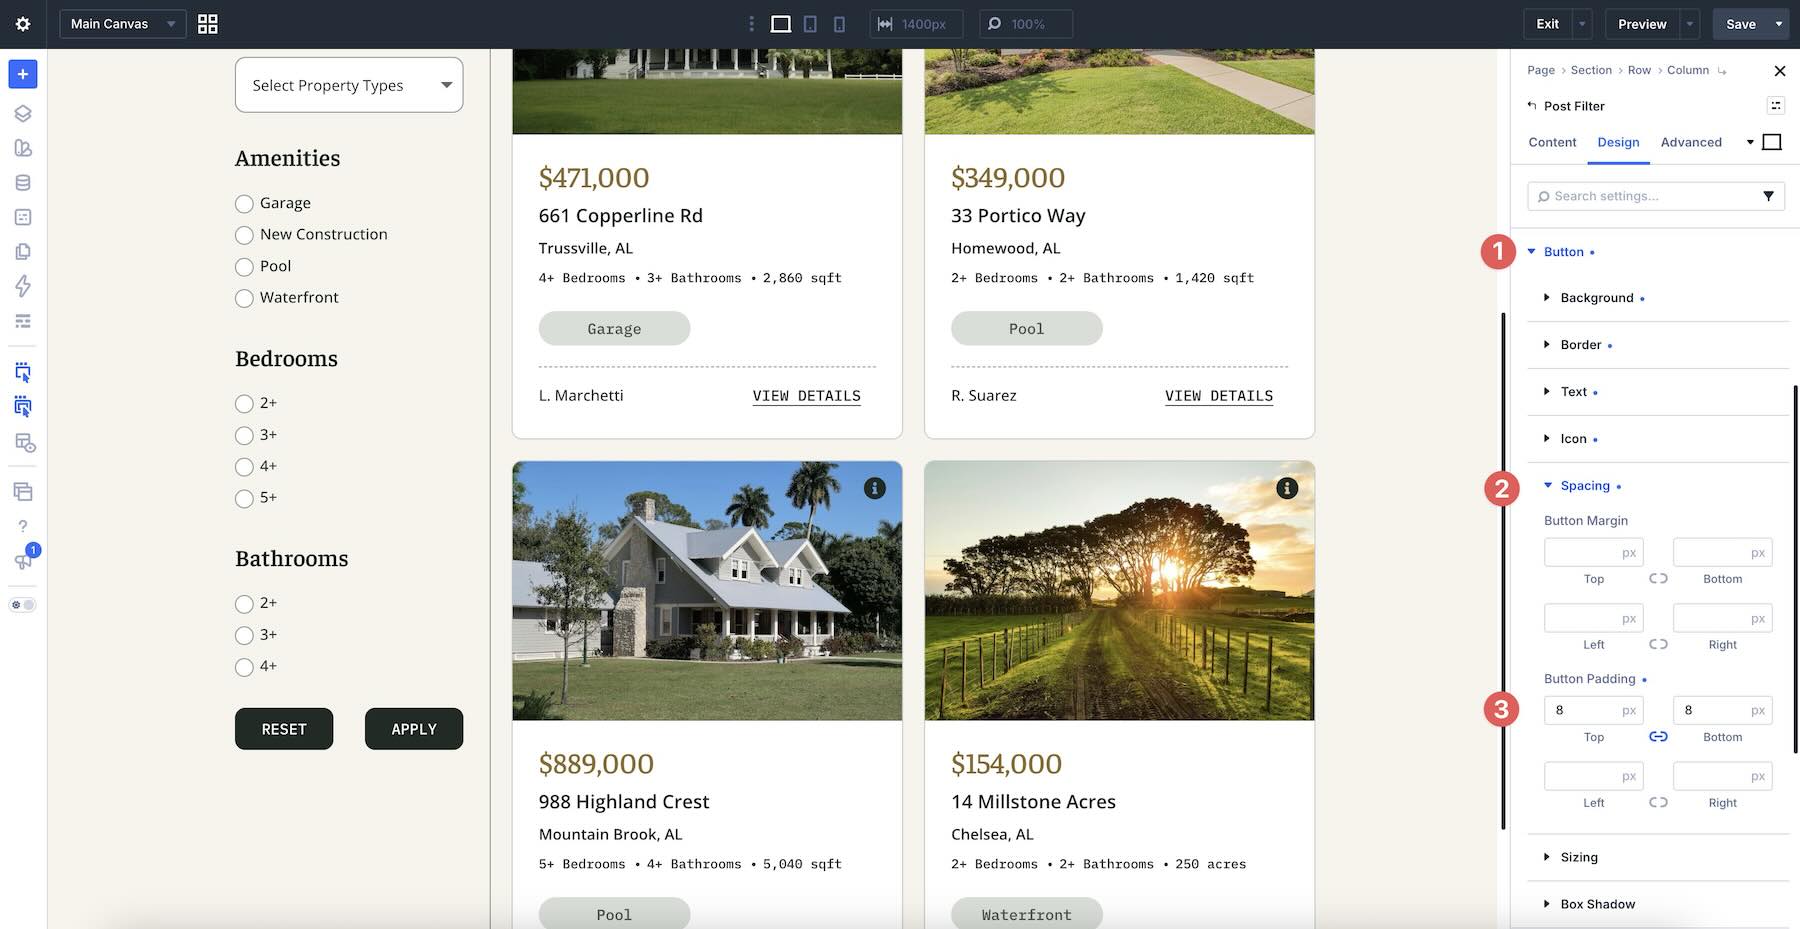
Lastly, expand the Spacing group within the Button styles. Assign top and bottom Padding.
Make Responsive Adjustments
With the Post Filter form styled, we need to ensure the layout looks good at every screen size. Using Divi 5’s Customizable Responsive Breakpoints, switch to the Tablet view. Start by adjusting the Vertical Gap at the Section level to reduce the amount of space between Rows.
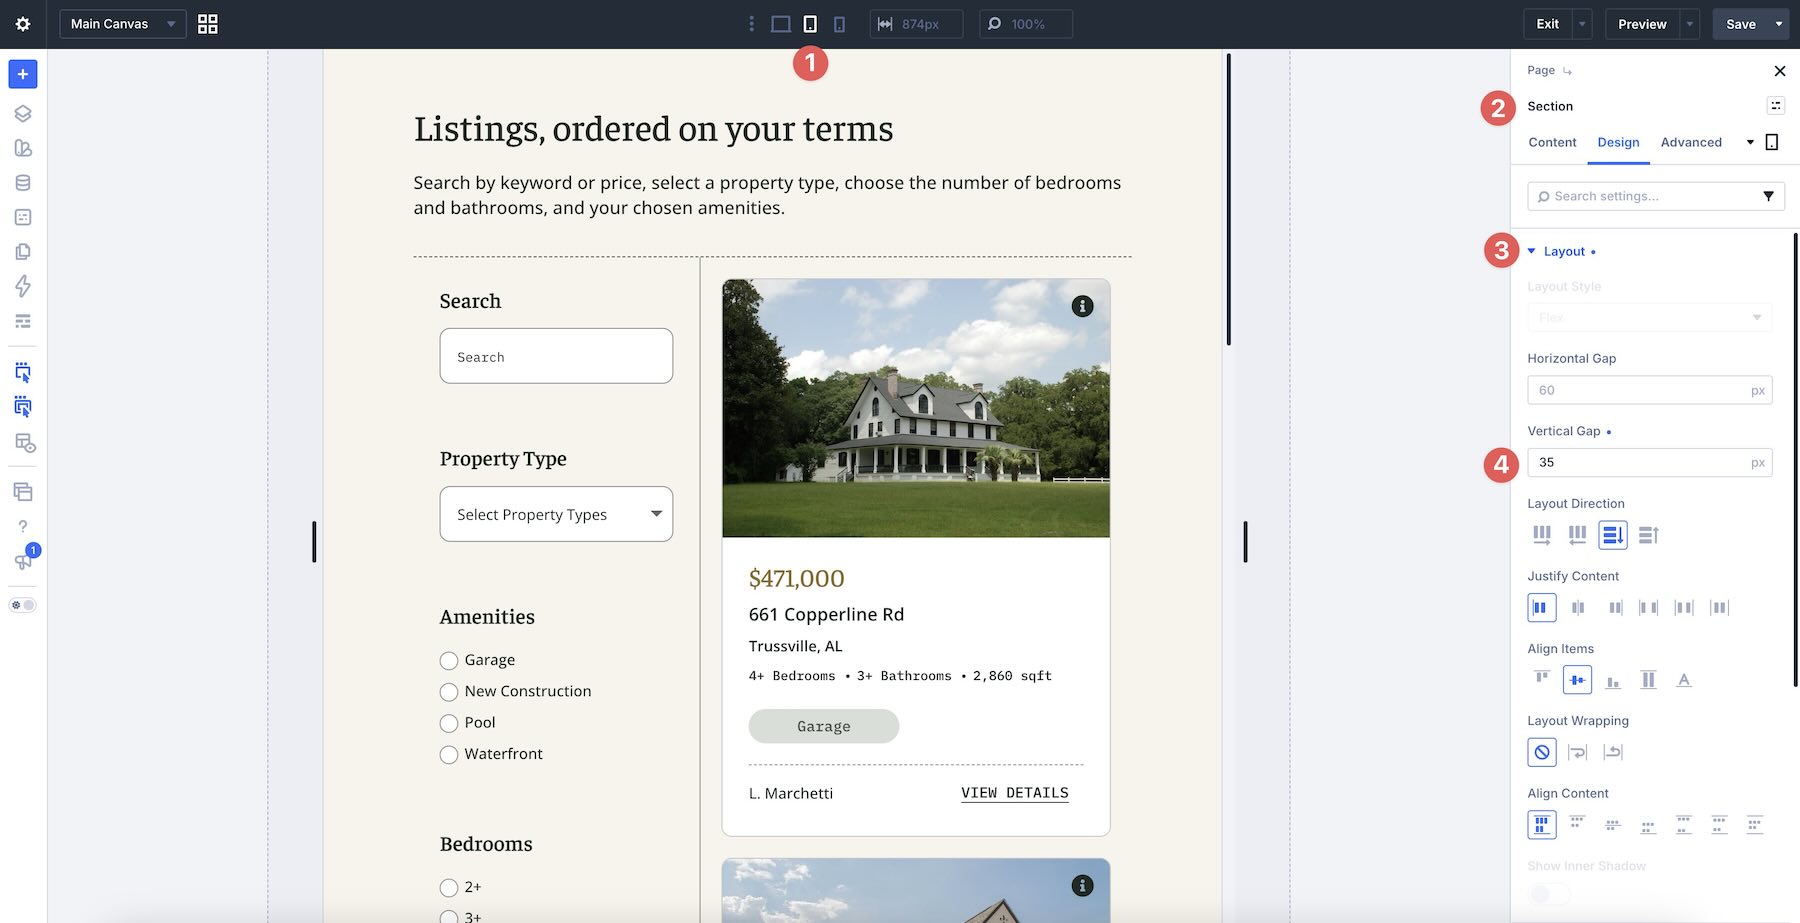
Work your way through Rows and Columns, making spacing adjustments as necessary.
If you need to adjust Column sizes at smaller breakpoints, use Structure Templates to resize them. In the Row settings, open the Content tab, expand the Elements option group, and click Apply Structure Template. From there, select one of the predefined Row templates.
Repeat these steps for the Phone breakpoint, making any necessary tweaks to spacing or row structure.
Preview The Post Filter Form On The Front End
The final step is to preview the completed page on the front end. Test each filter individually by searching for an address or city, selecting a property type, choosing bedroom and bathroom counts, and selecting an amenity. Then, test the fields in combination and use the Apply and Reset buttons to confirm that the loop updates correctly. Once you’ve verified that the filters and loop work together smoothly, your filterable real estate listings page is ready.
Download The Files
To give you a clear picture of how the finished layout works, we’ve created a ready-to-use JSON file of the complete design built in this post.
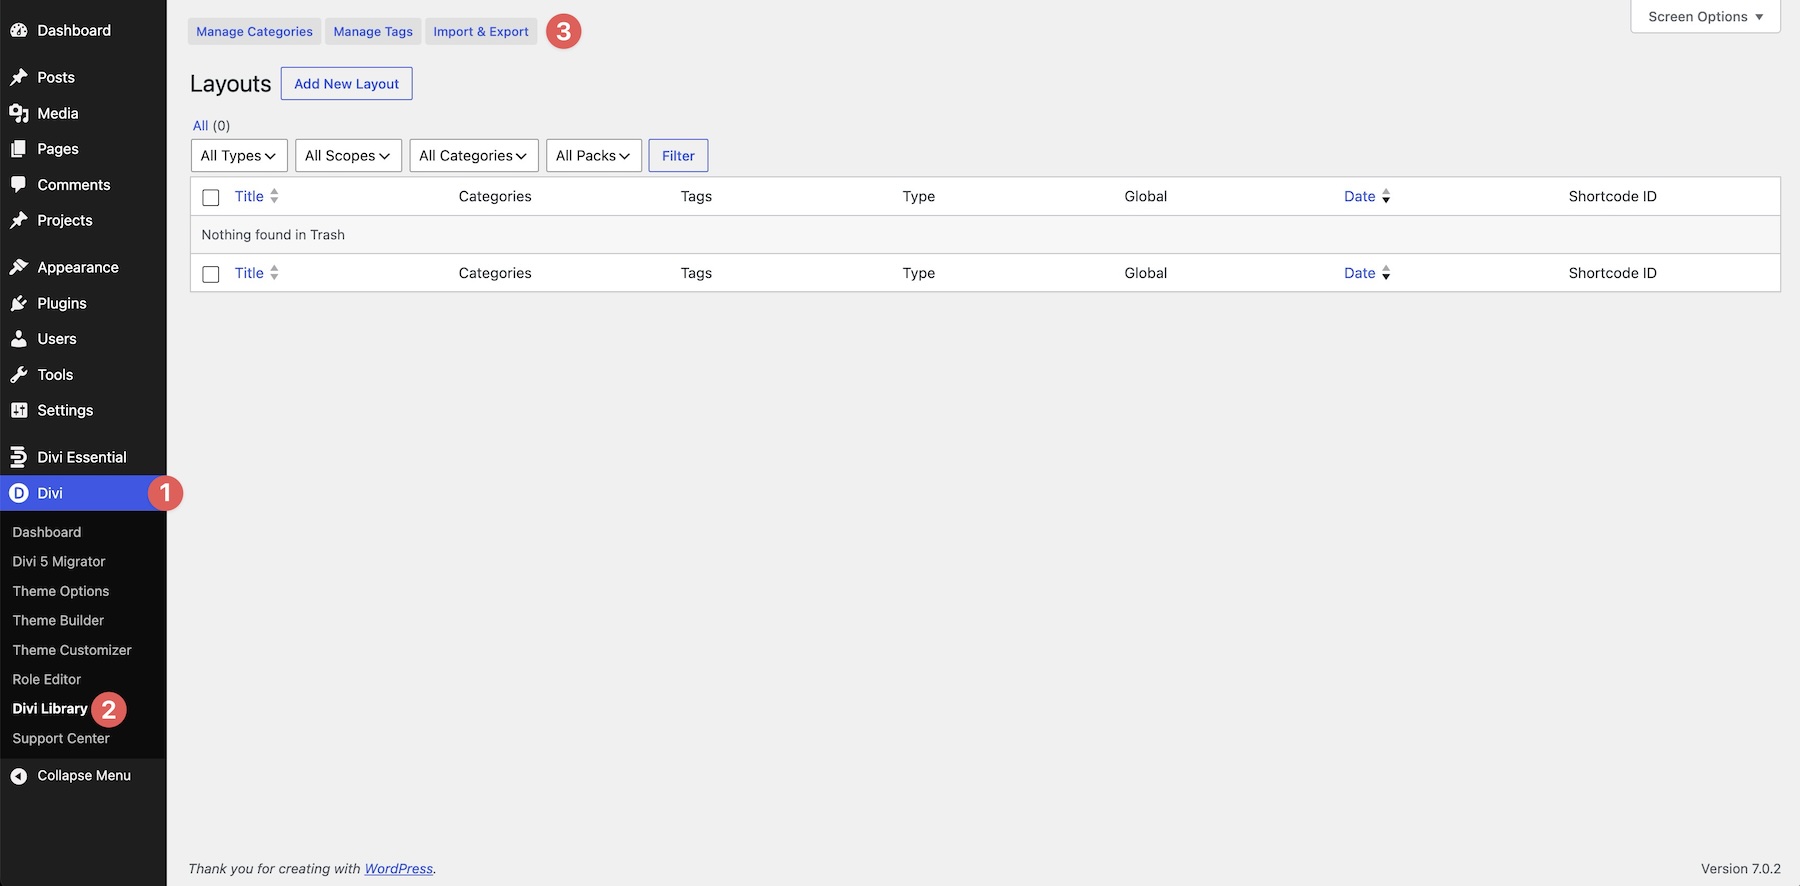
To use it, navigate to Divi > Divi Library and click the Import & Export button.
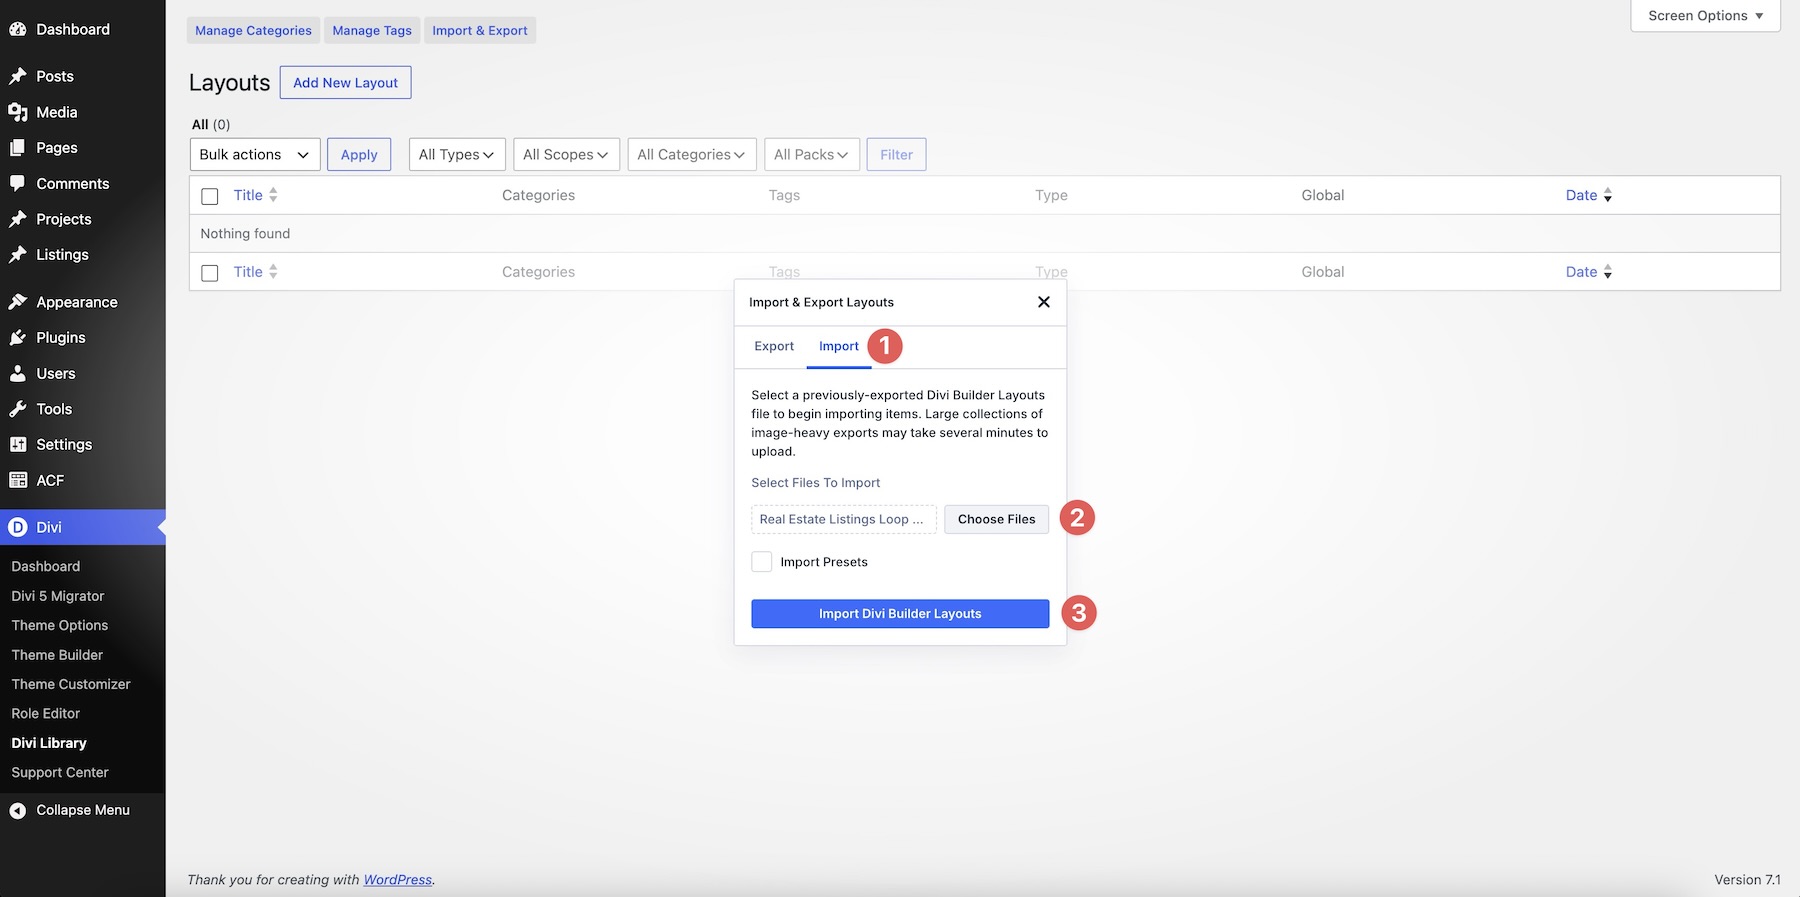
Click the Import tab, attach the Real Estate Listings Loop & Filter.JSON file from your computer, and click Import Divi Builder Layouts.
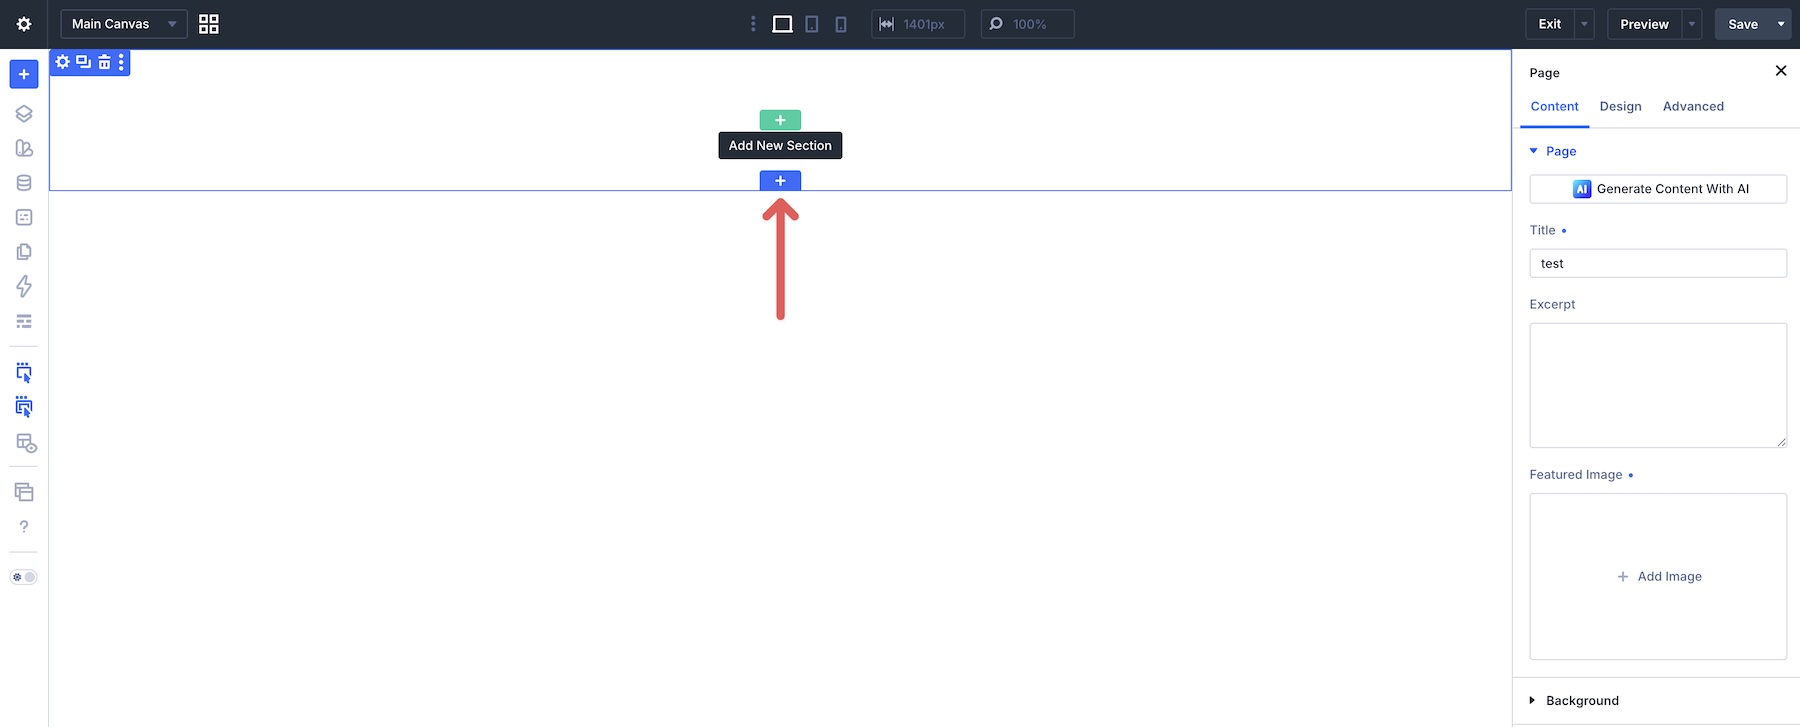
Next, create a new page in the Visual Builder. When the Builder loads, click the blue + icon to add a new Section.
Select the Add From Library tab, choose the layout, and click Use This Section.
For the loop and filters to populate correctly, make sure you have already completed the prerequisite steps, including:
- Creating the Listings custom post type.
- Adding the Property Types taxonomy.
- Setting up the ACF Field Group with all the required custom fields.
- Publishing real estate Listing posts.
Without published listing data, the loop will remain empty. Once those items are in place, the imported layout will display and filter your properties as shown in this post.

Start Building Your Filterable Listings Today
Combining Divi 5‘s Loop Builder with the Post Filter module from the Loop Filter Modules gives you control over the listing design and front-end search experience. You can create fully custom property cards and let visitors search and filter them without relying on a separate third-party filtering plugin.
The same approach works just as well for any directory-style site, including job boards, event calendars, team directories, product catalogs, and more. Experiment with different field types, layouts, and queries to see how flexible the system really is.
Give it a try in Divi 5 and let us know how it works for you. Share your questions or feedback in the comments below or on our social media channels. We’d love to see what you build!
The post How To Build A Filterable Real Estate Listings With Divi 5 appeared first on Elegant Themes Blog.
The Tech Zone


Comments
Post a Comment