How to Add a Contact Form in WordPress (2023 Tutorial)
A contact form is an excellent way to gather information from visitors to your WordPress website. Whether you want to capture orders, survey responses, or job applications, adding a WordPress contact form is an effective way for website visitors to contact and interact with you and your brand online.
Benefits of Using a WordPress Contact Form
There are many platforms and online tools available that allow you to create forms. Many modern platforms provide an easy-to-use interface, reporting, and analytics, among other features. However, using a WordPress contact form, you can have all these features and more within your WordPress interface. Here are some other benefits you can gain using a WordPress contact form:
- Lead Generation – When you use a WordPress contact form, you can take advantage of those entries to grow your audience through your website. A good form plugin will have many many built-in features, so you won’t need separate plugins for lead generation, content funnels, email opt-ins, CRM integration, and more. It’s hard to do this if visitors email you directly from your website or their email platform.
- Better Security and Validation – With a form natively built on your WordPress website, you can ensure the deliverability of your form results and use spam protection services like Recaptcha, Akismet, and more, protecting your email address and your user’s data.
- Manage Entries and Contacts in One Place – A WordPress contact form can allow you to have one central location for your form entries and be able to use them throughout your site. Many form plugins allow you to sort, organize and export content from forms you can store and easily create exhaustive databases. This isn’t possible when people email you directly.
- Create Various Form Types with Advanced Functionality – Surveys, polls, application forms, and more can all be created easily with a WordPress contact form. The limit is your imagination, and with form builders that allow for features like advanced calculations, conditional fields, and more, having a contact form on your website helps make your site an interactive experience for your visitors that’ll have them staying – and returning – to your website.
How to Add a Contact Form to Your WordPress Site (Step-by-Step)
We’ll use the popular and feature-rich WPForms Contact Form plugin to add a contact form to our WordPress website. We begin by installing the plugin onto our website.
Install WPForms
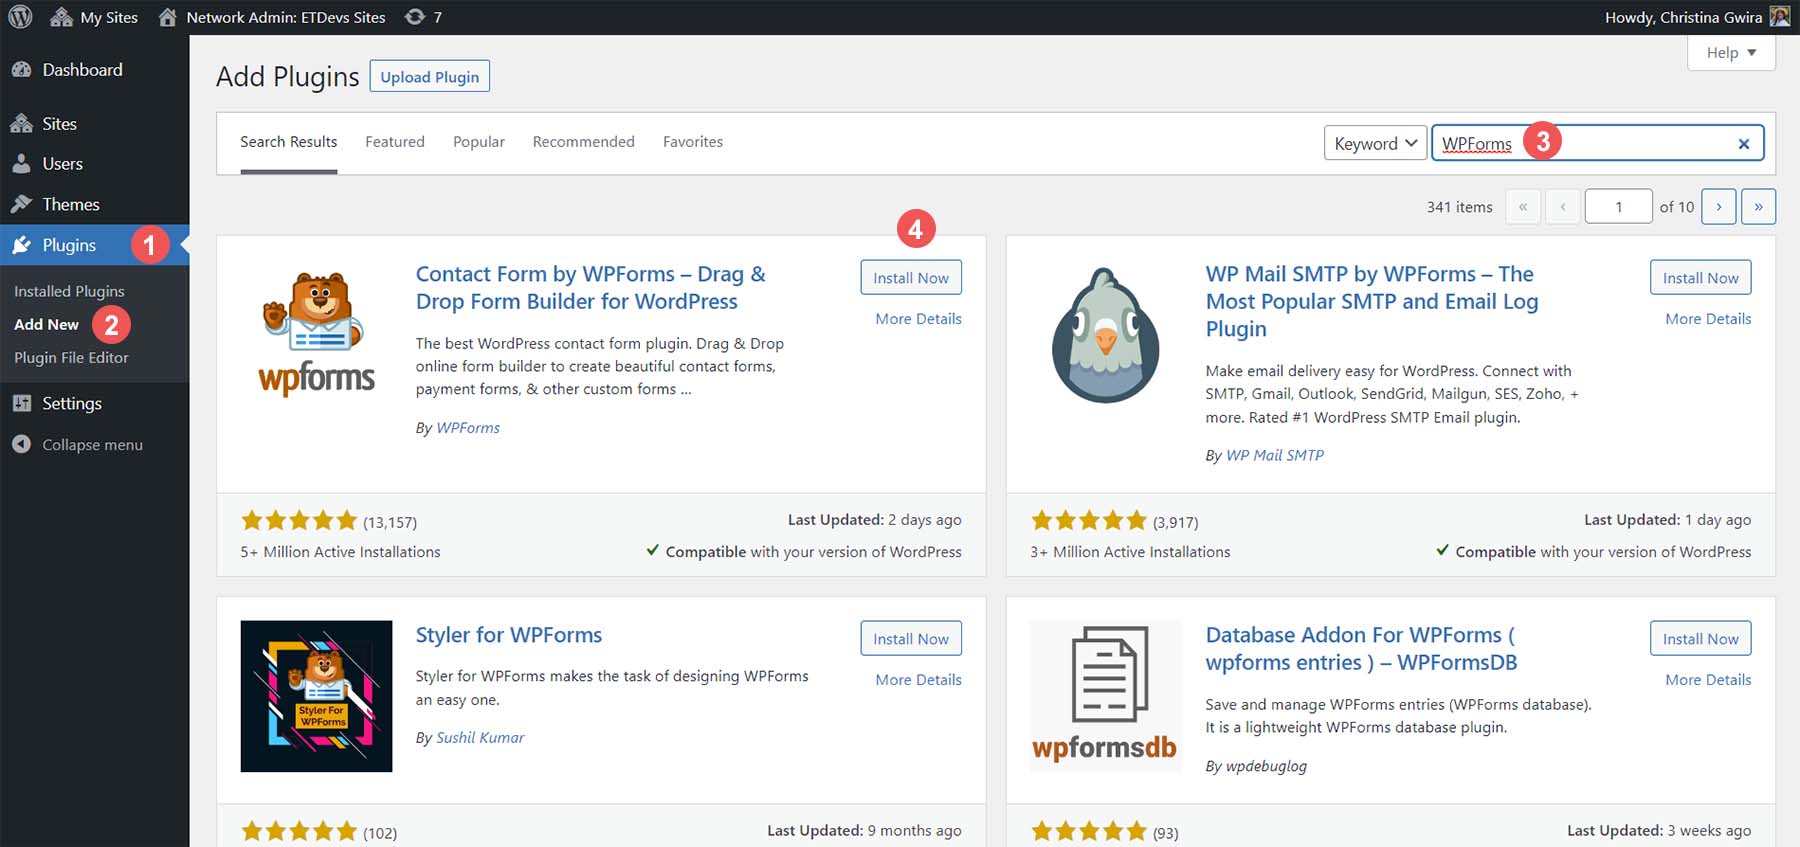
First, log in to your WordPress dashboard, and hover over Plugins. Then, click Add New and in the search box, enter WPForms. Click the Install button to begin the plugin installation process.
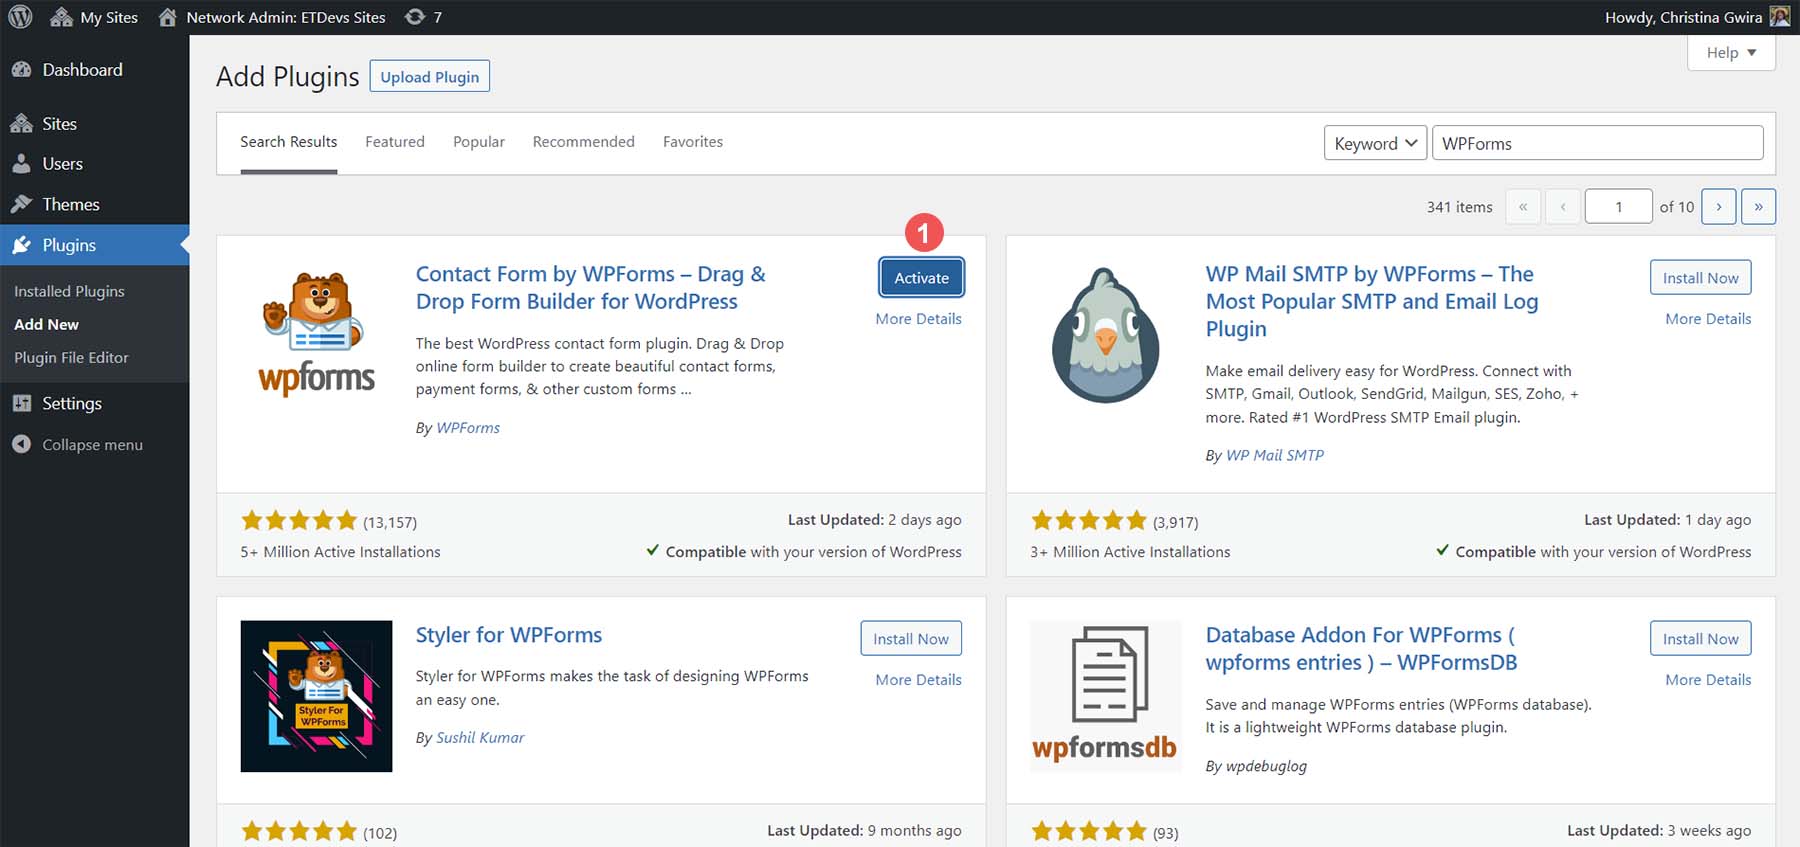
Finally, click the blue Activate button to complete the installation of the WPForms plugin.
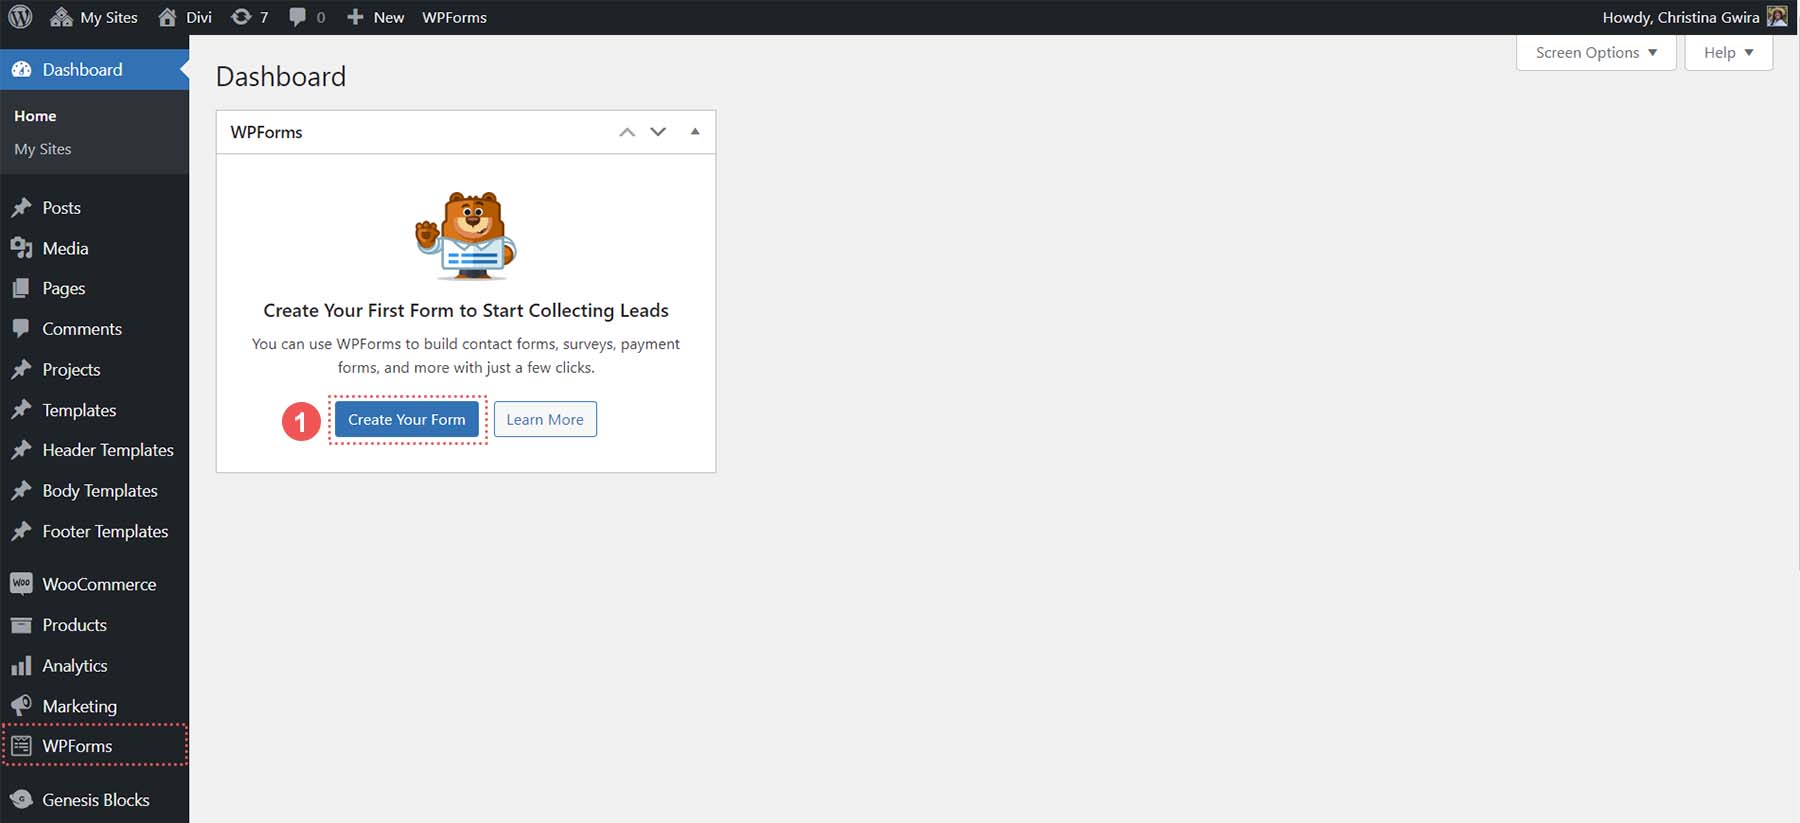
Now that the plugin is installed and activated, you can see that a new menu item has been added to your WordPress menu.
Creating Your First Form
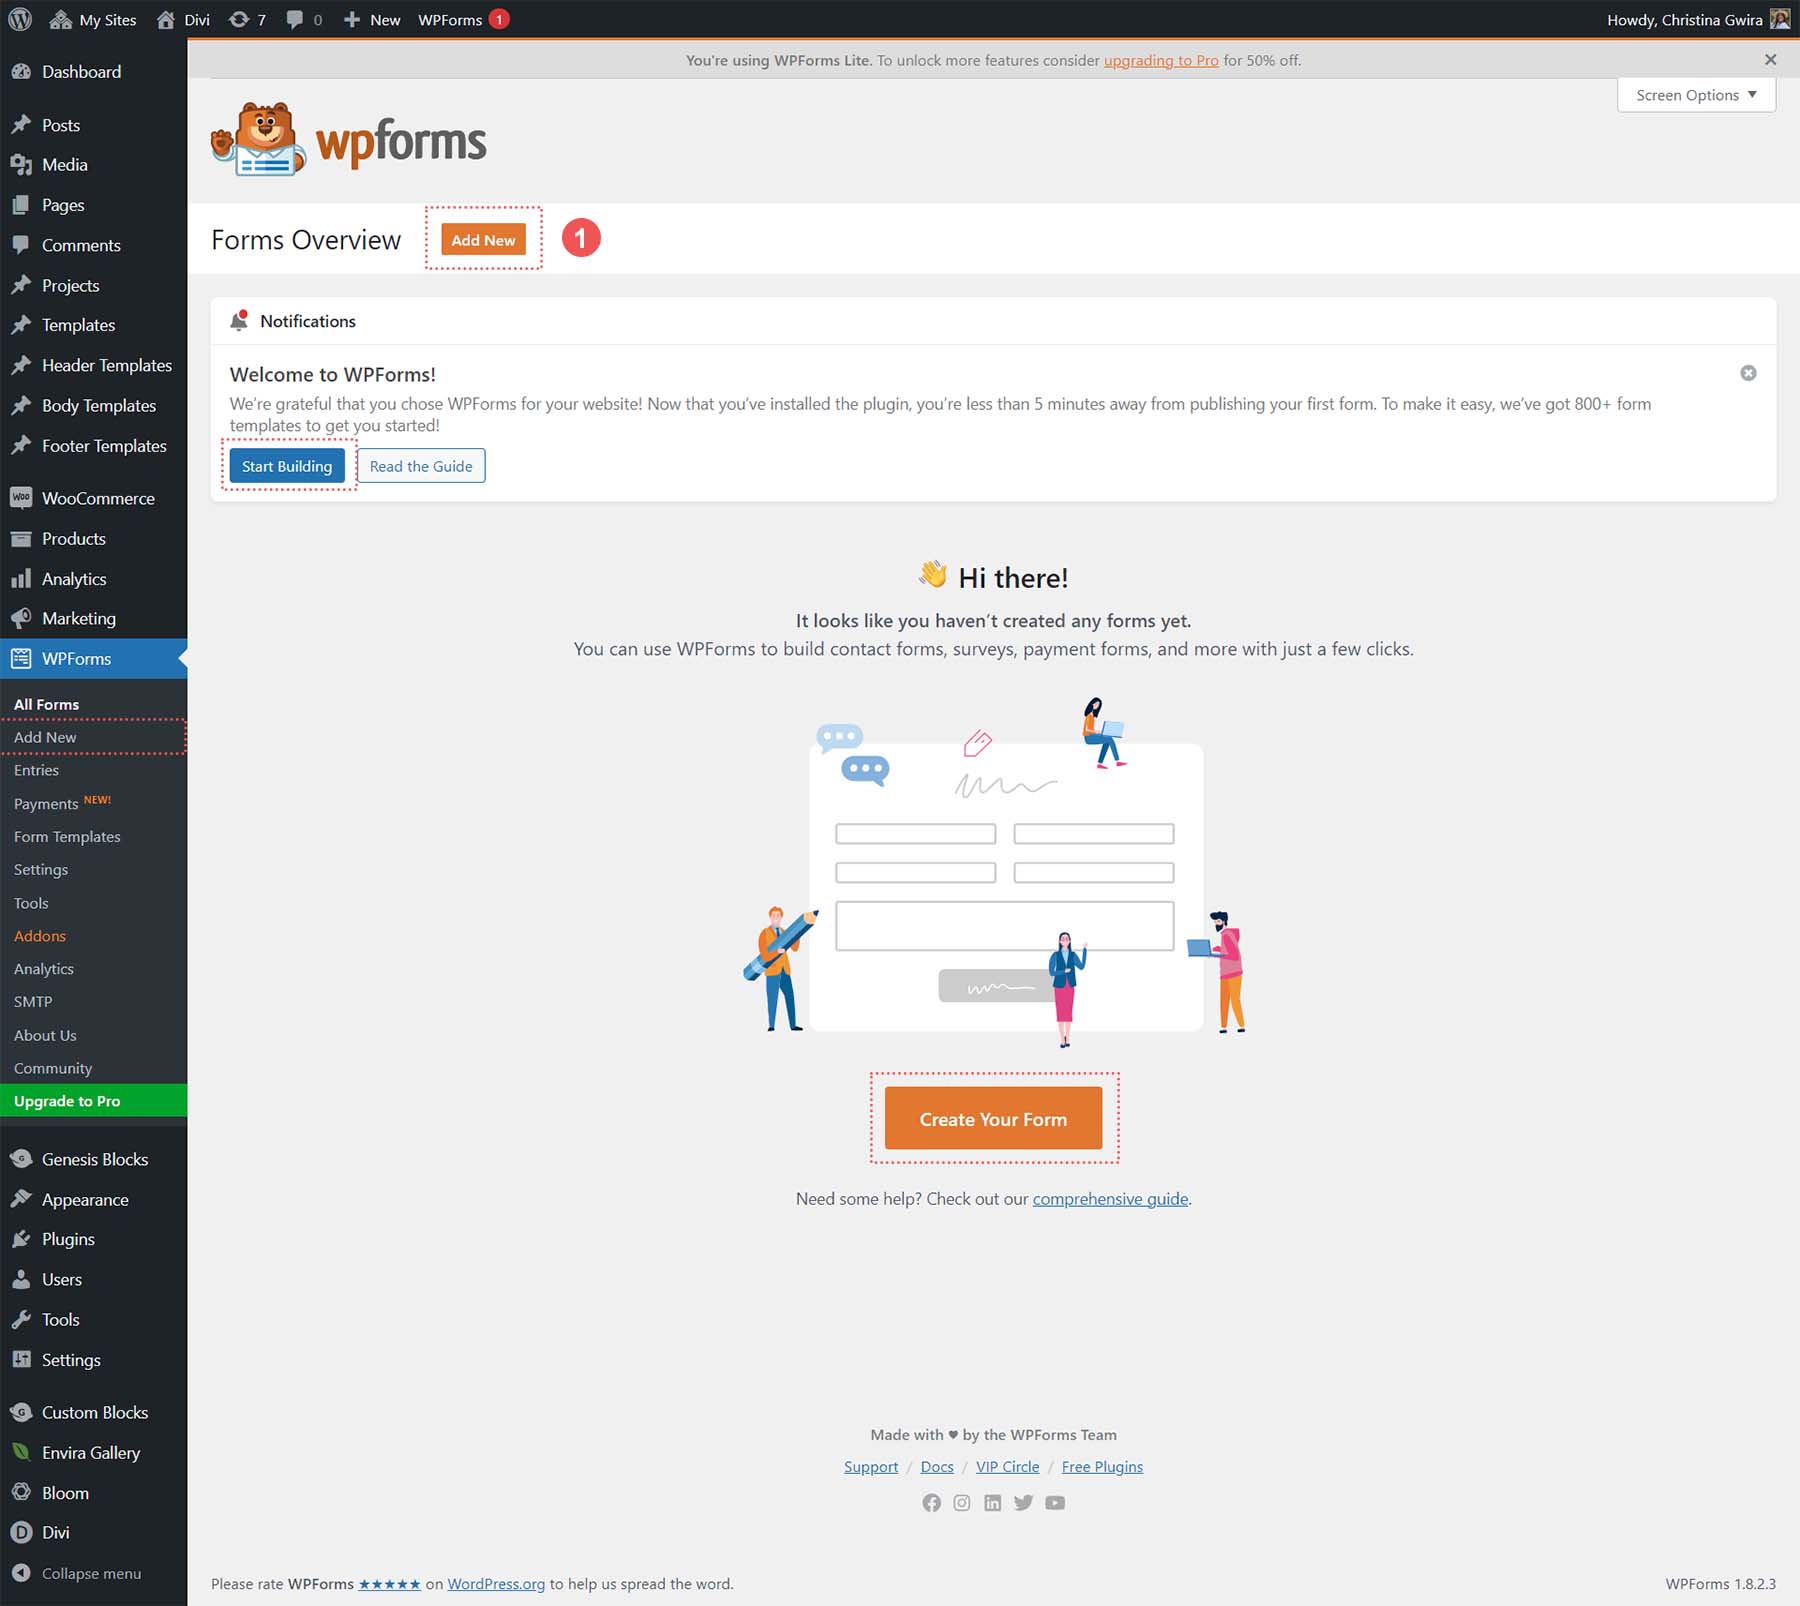
WPForms gives you multiple places to add a new form once you navigate to the dashboard. We’ll start by clicking the orange Add New button at the top of the dashboard.
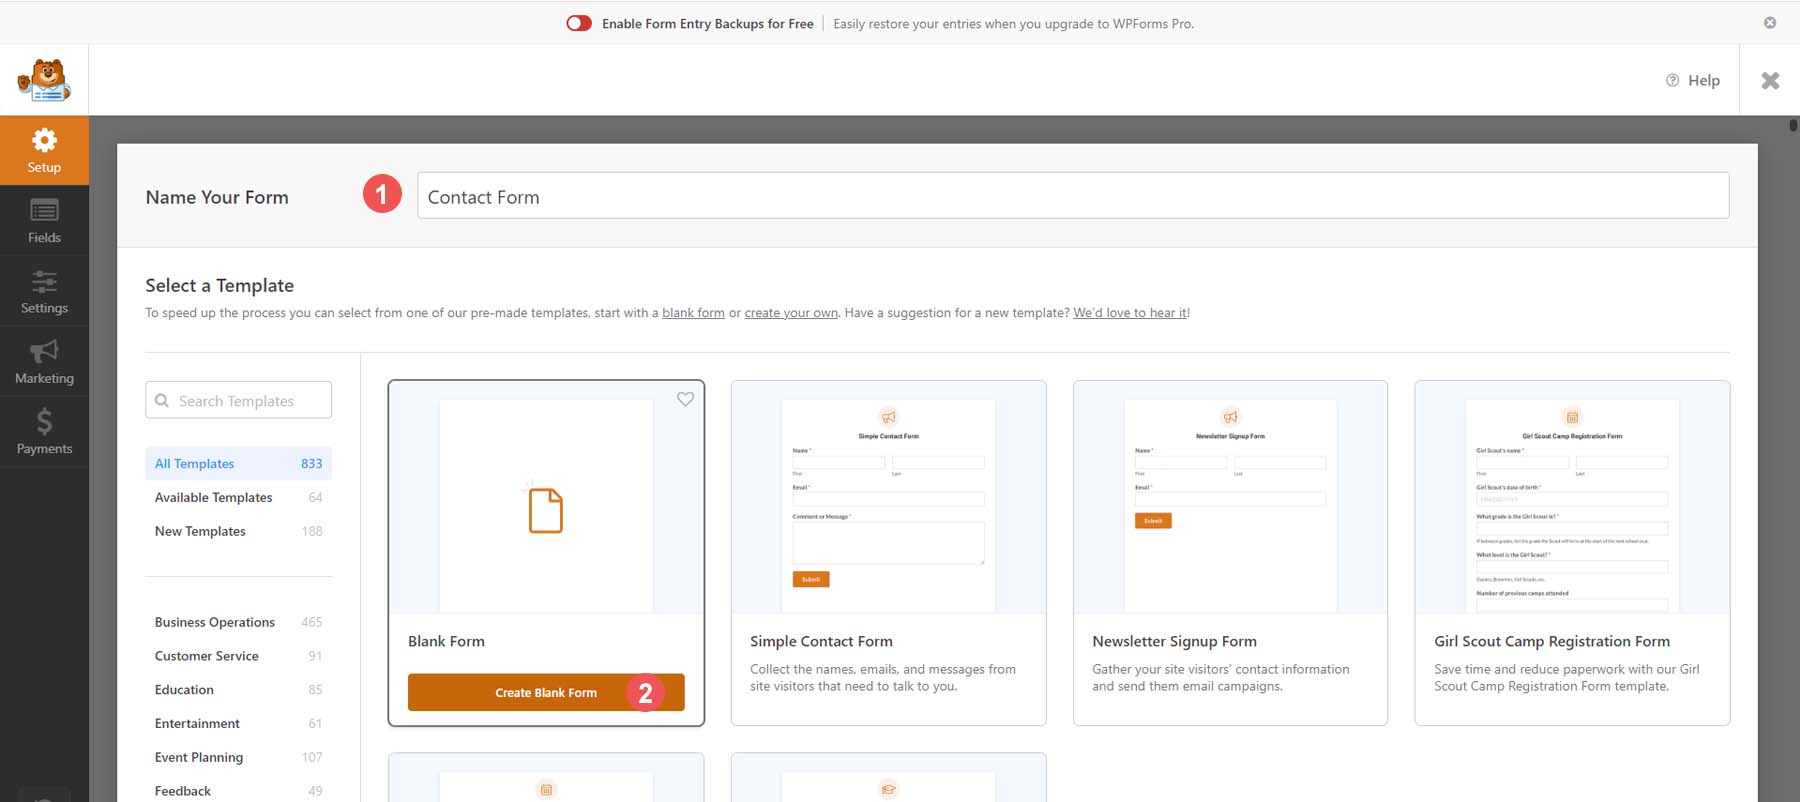
The form-building process in WPForms starts by naming your form and choosing one of the many templates available. To name your form, enter a title within the Title text box. Then select your form template. We’ll build a custom form for our tutorial, so let’s select the Blank Form template.
After choosing the blank form template, you are presented with WPForms’ beautiful drag-and-drop builder. From the left-hand side, you’ll find your field types.
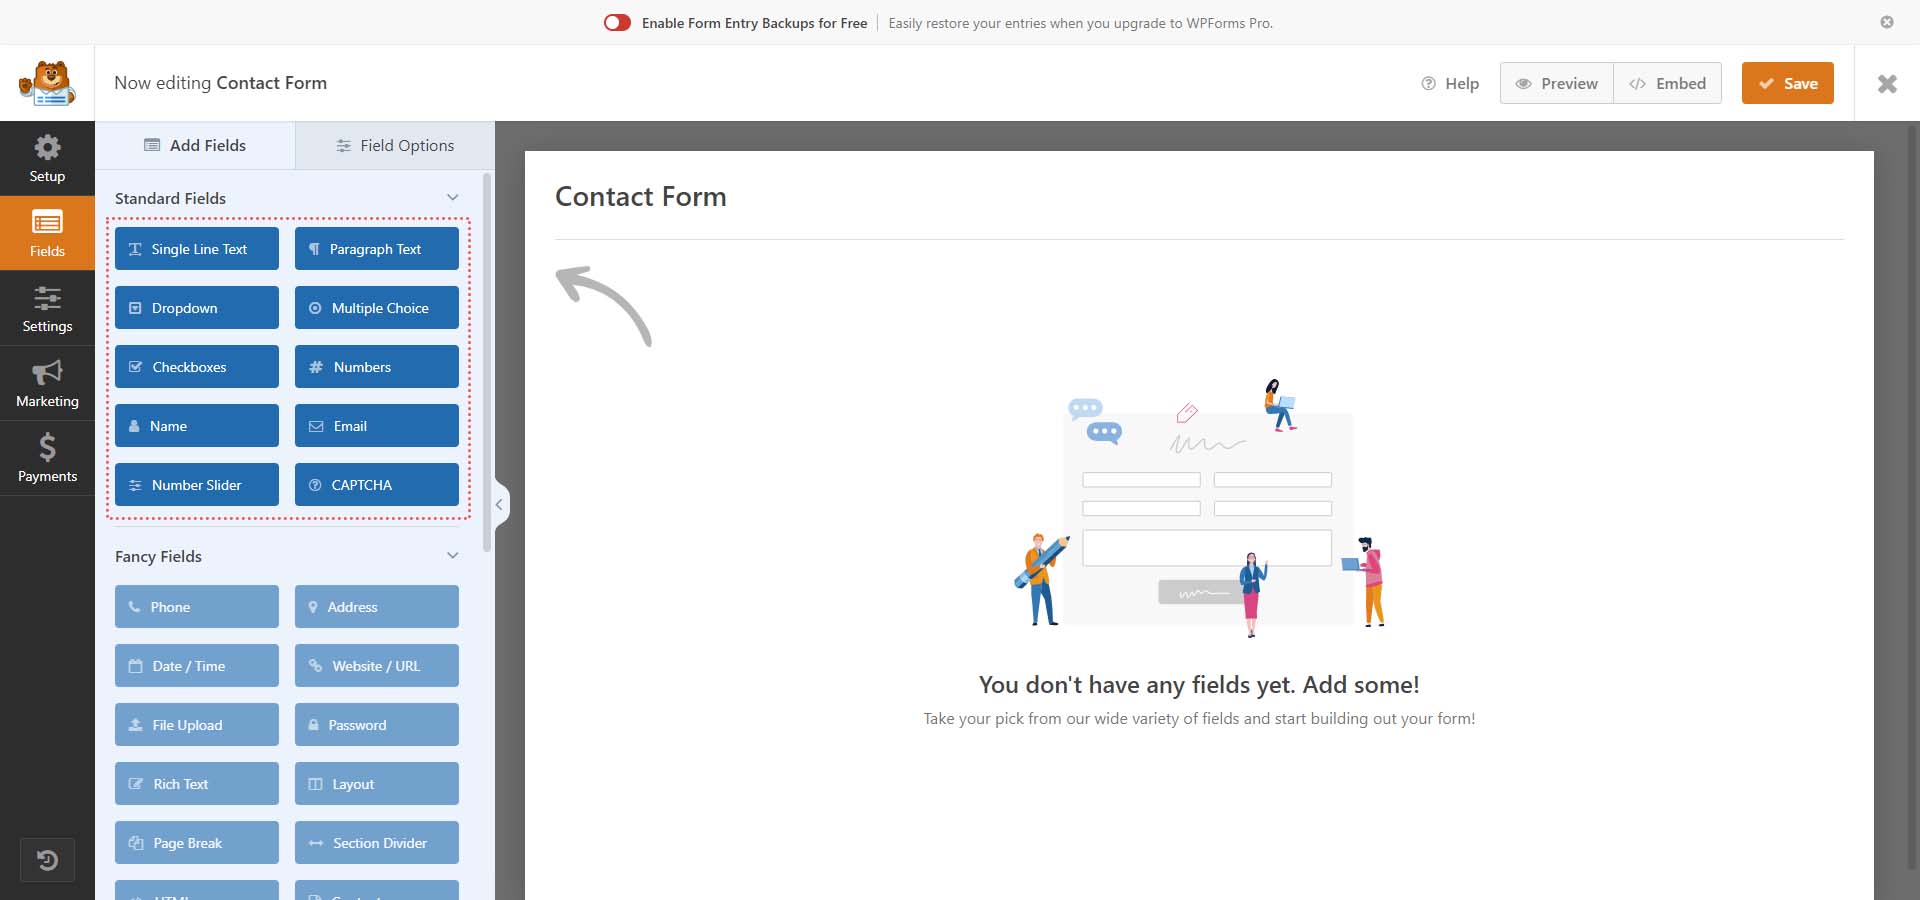
Even with the free version, you are given several form field types that can empower you to create stunning forms. We’ll create a simple contact form and use the name, email, dropdown, and paragraph text fields for our form.
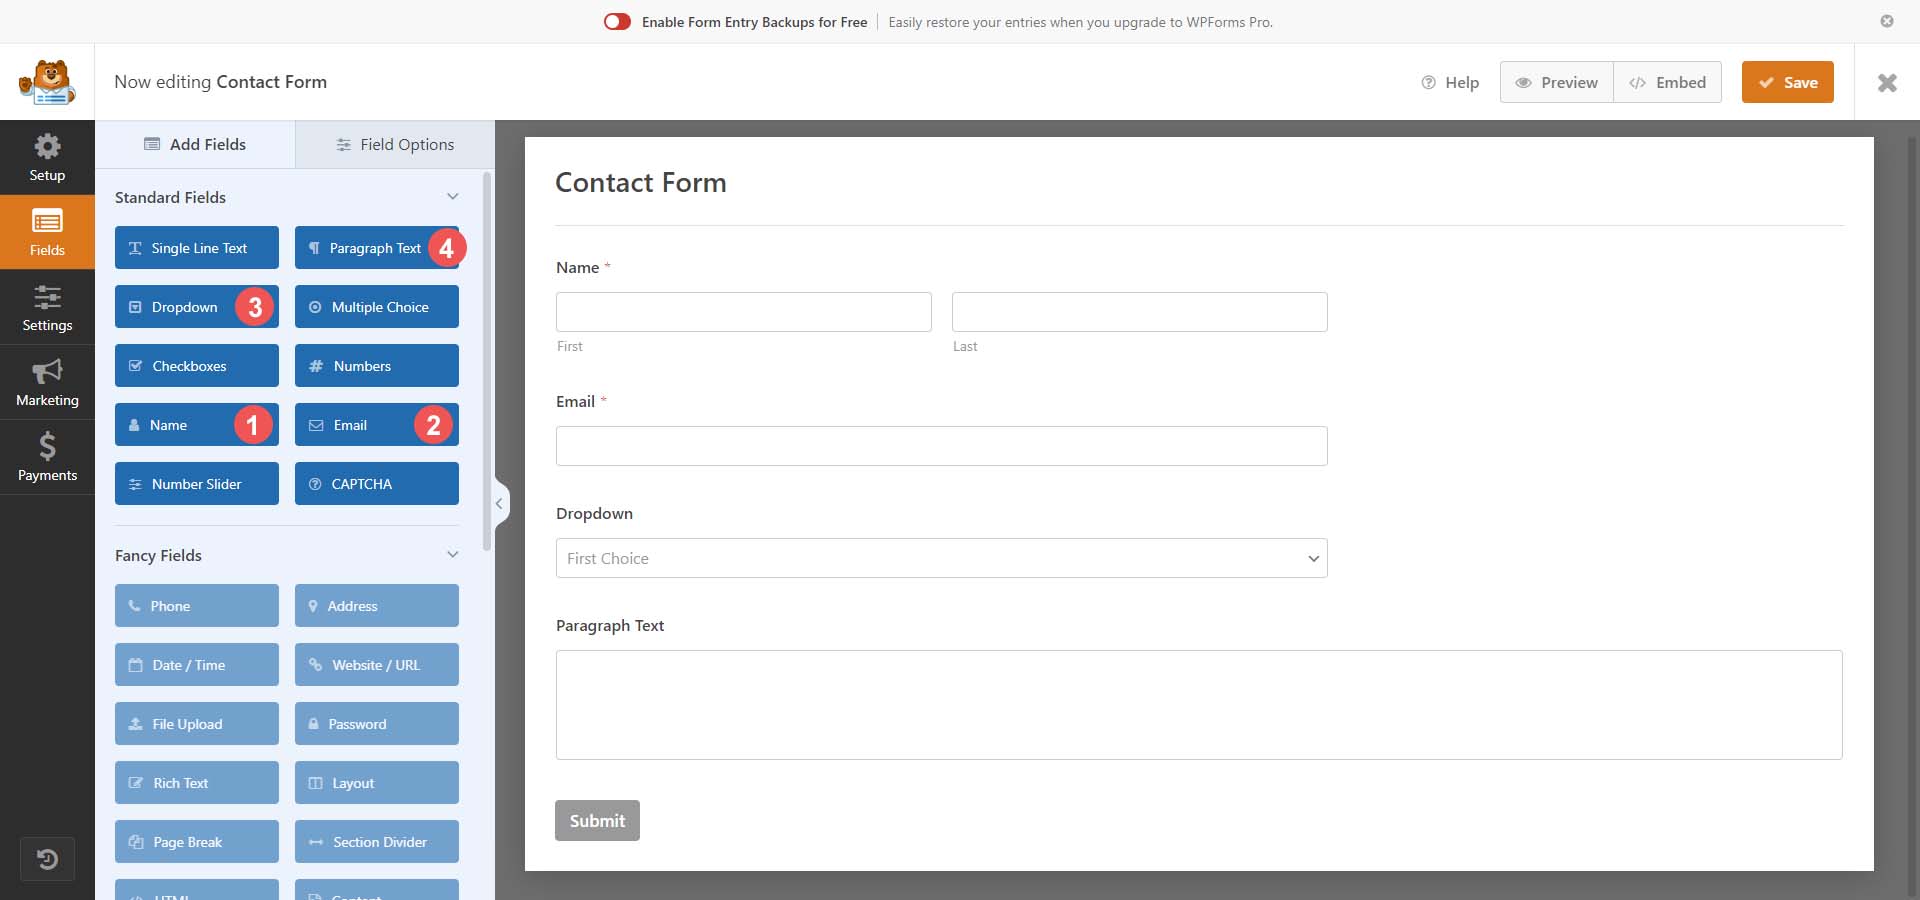
Now that we have our form fields selected, let’s look at some of the customizations we can make with WPForms.
Customizing Your Form and Form Fields
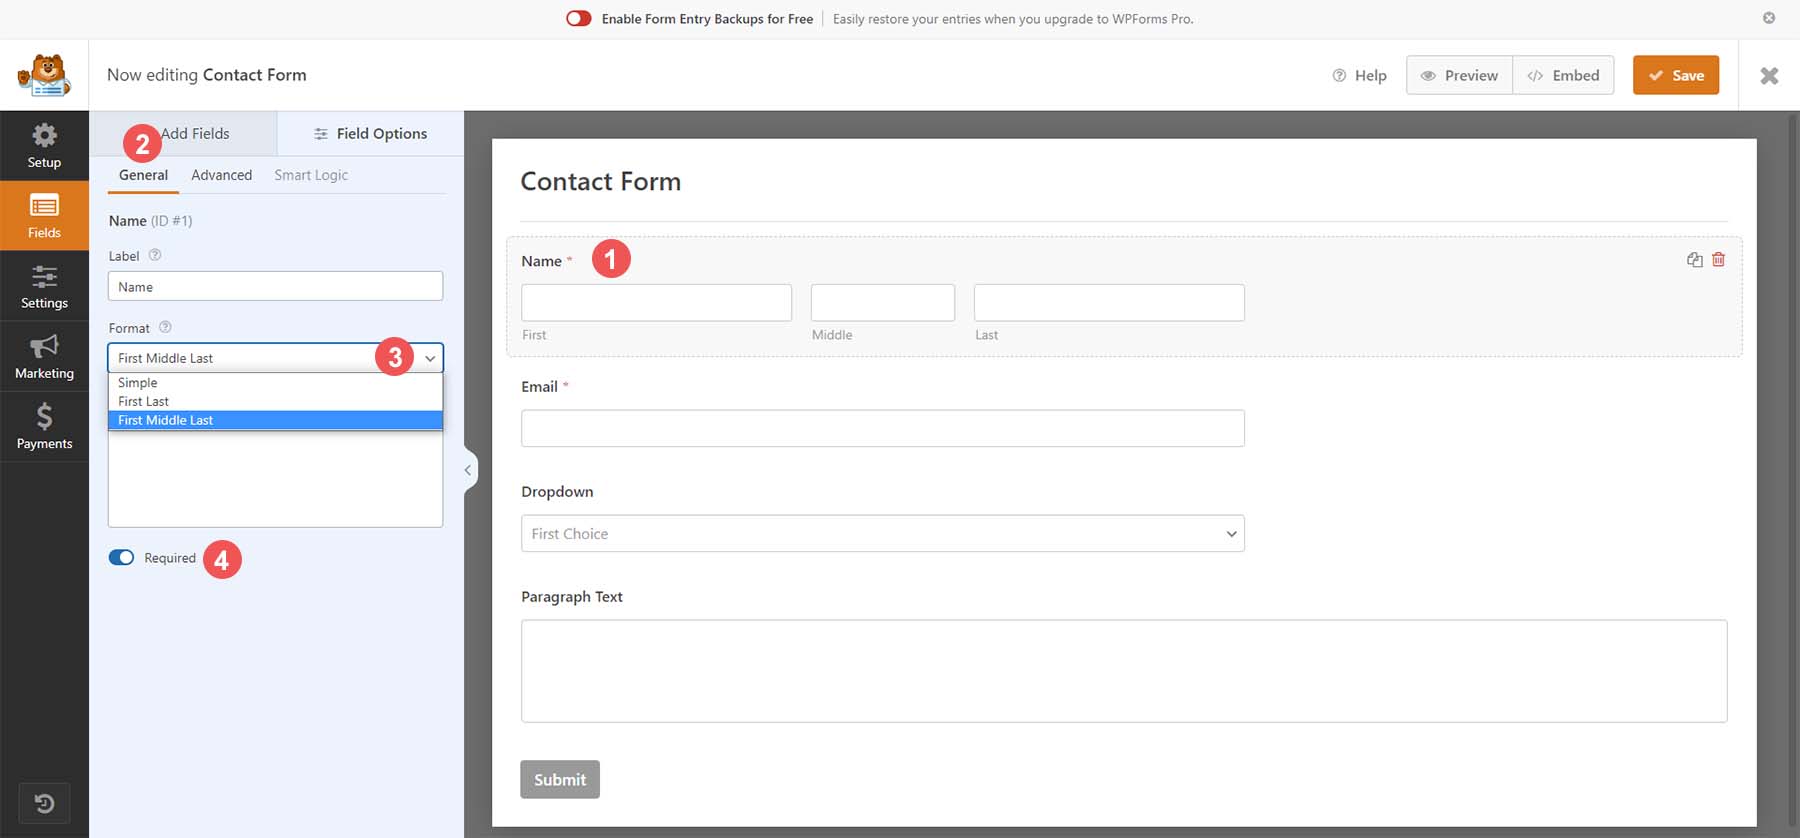
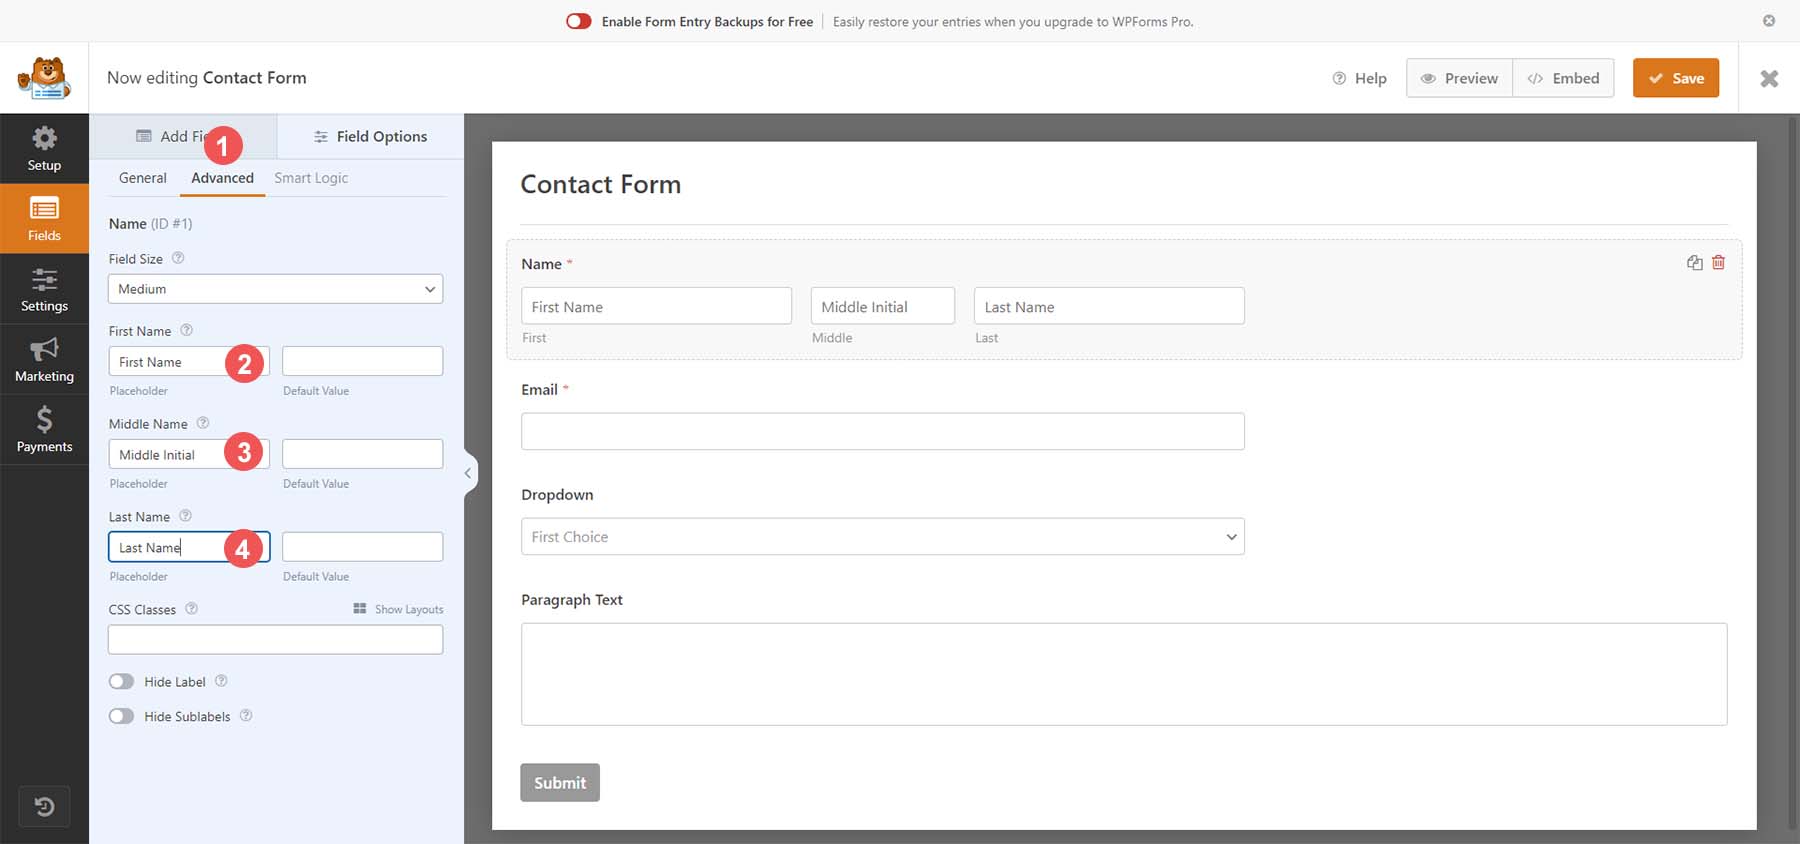
Firstly, let’s click on the Name form field. Next, we’ll select the General tab from the Field Options for this form field. Now, we’ll change the format of this field and select First Middle Last. Finally, we’ll toggle the Required Form field. This means that we’ve made it mandatory to have this form field filled.
Next, let’s click on the Advanced tab. Let’s add placeholders to our name fields by filling in the placeholder field with our chosen text.
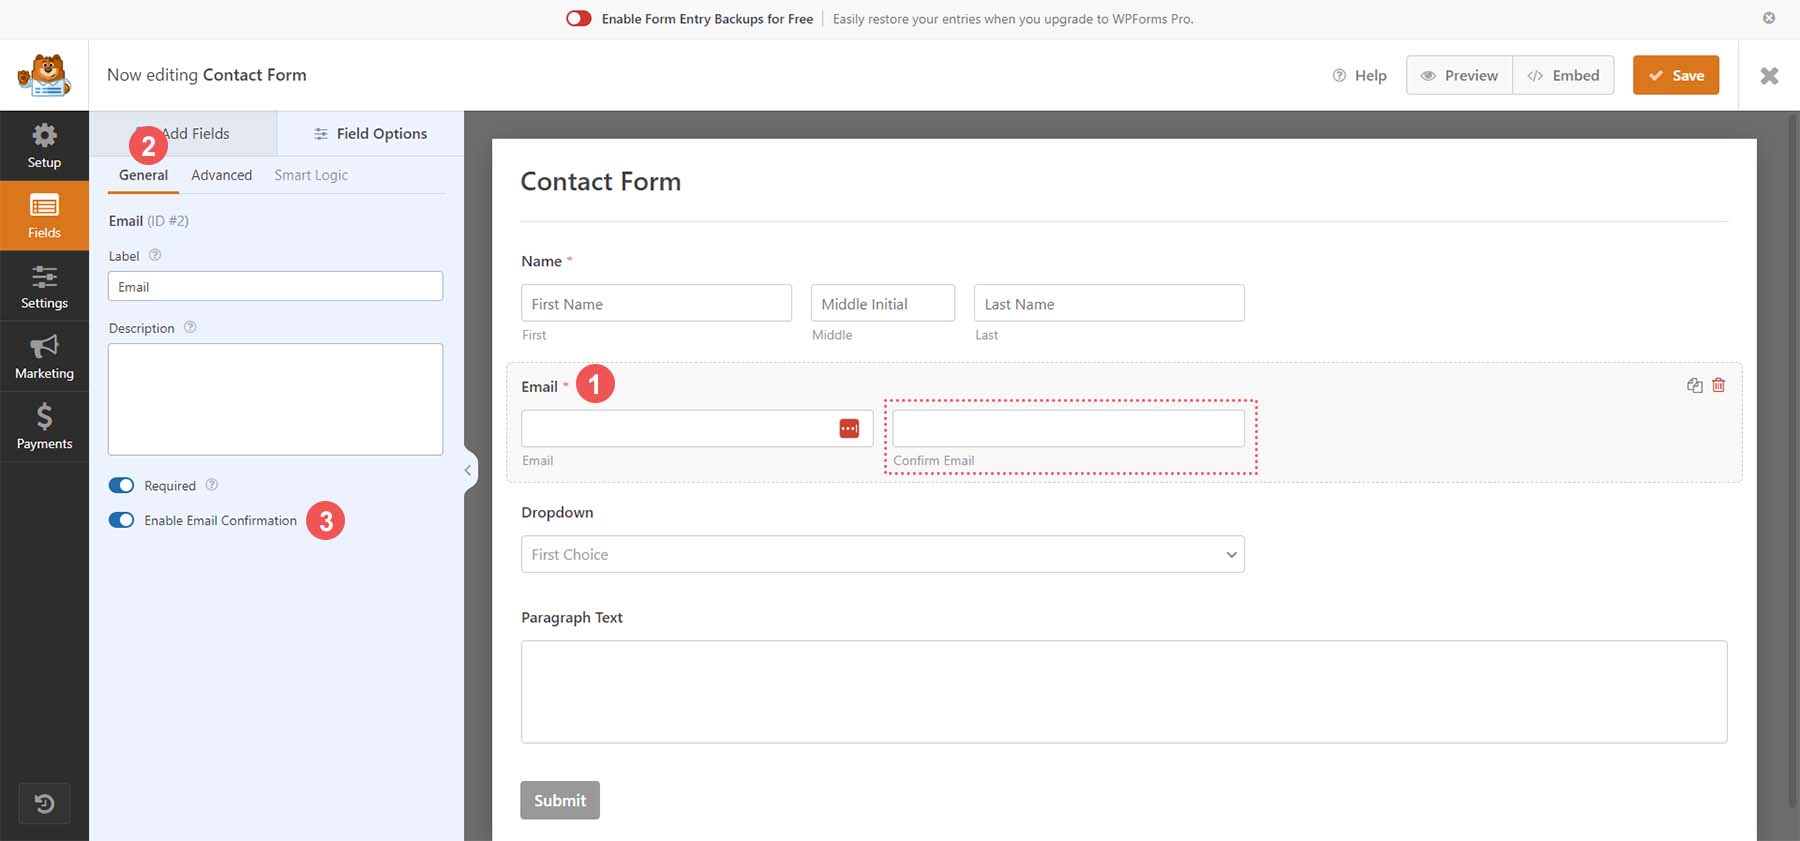
To adjust our email field first, click on the email field. Then, click on the General tab. For this field, let’s add an email confirmation option (meaning users must confirm their email by entering it twice). We do this by toggling the Email Confirmation Field.
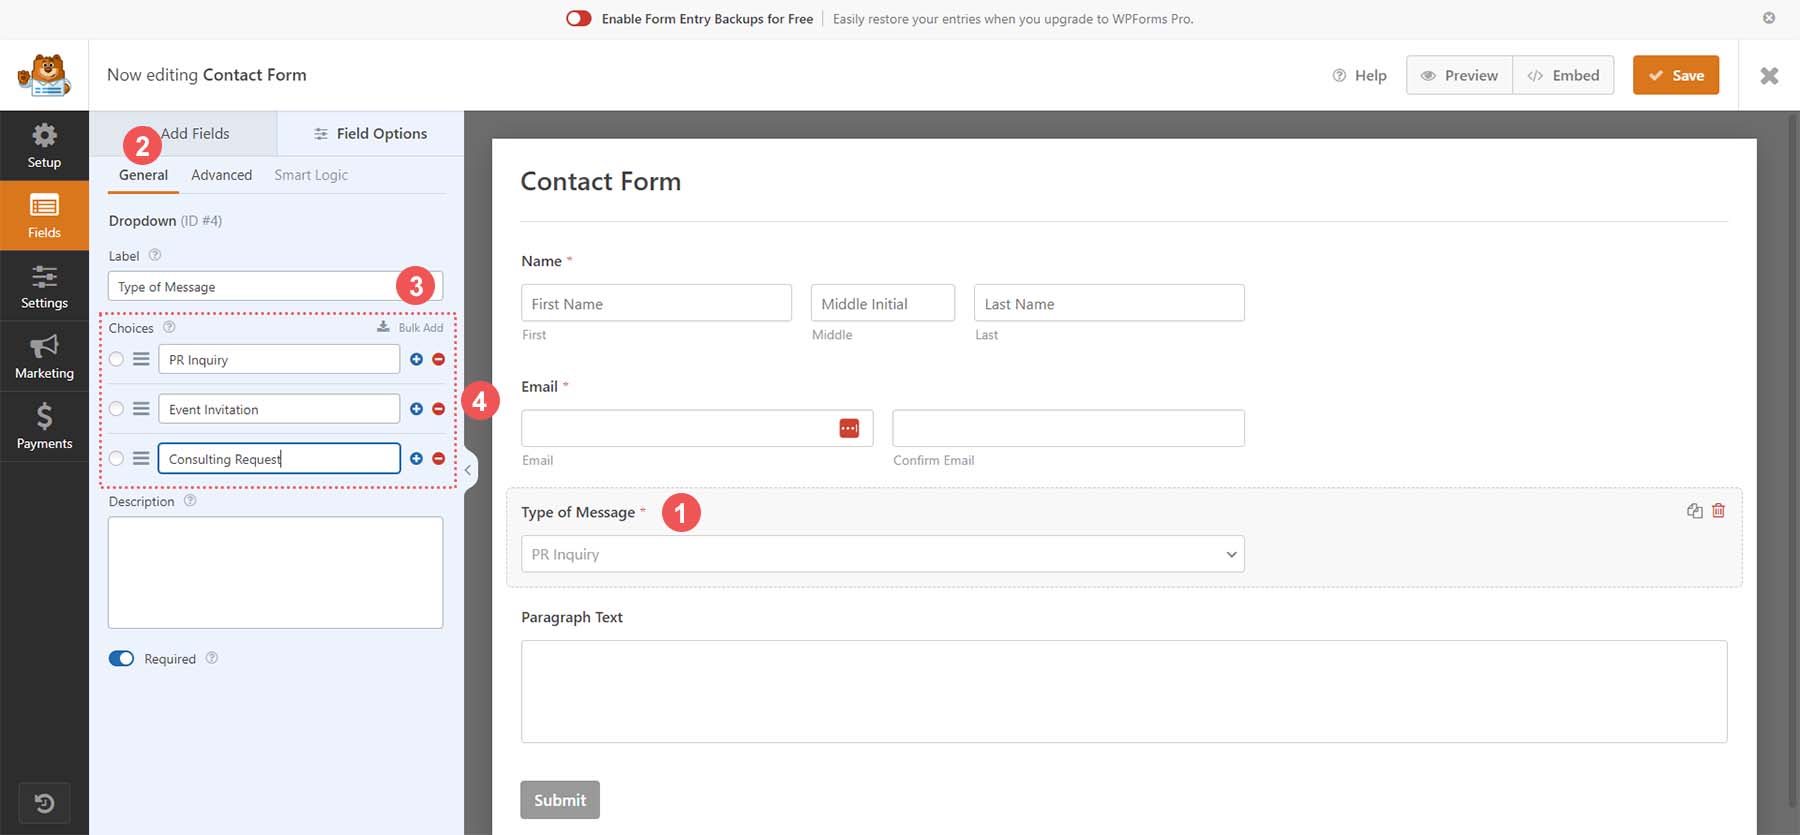
For our dropdown field, let’s click on the field to begin. Then, click on the General tab. Now, we add a label to the form field so that our users know the purpose of this dropdown. Finally, we’ll add our options to this field.
Lastly, we’ll move on to our final form field, the paragraph field. Click on the form field, then click on the General tab. Assign the field a label. Now that we’ve made edits to the form fields within our contact form, let’s adjust the form settings to match our needs.
Customizing Your Form Settings
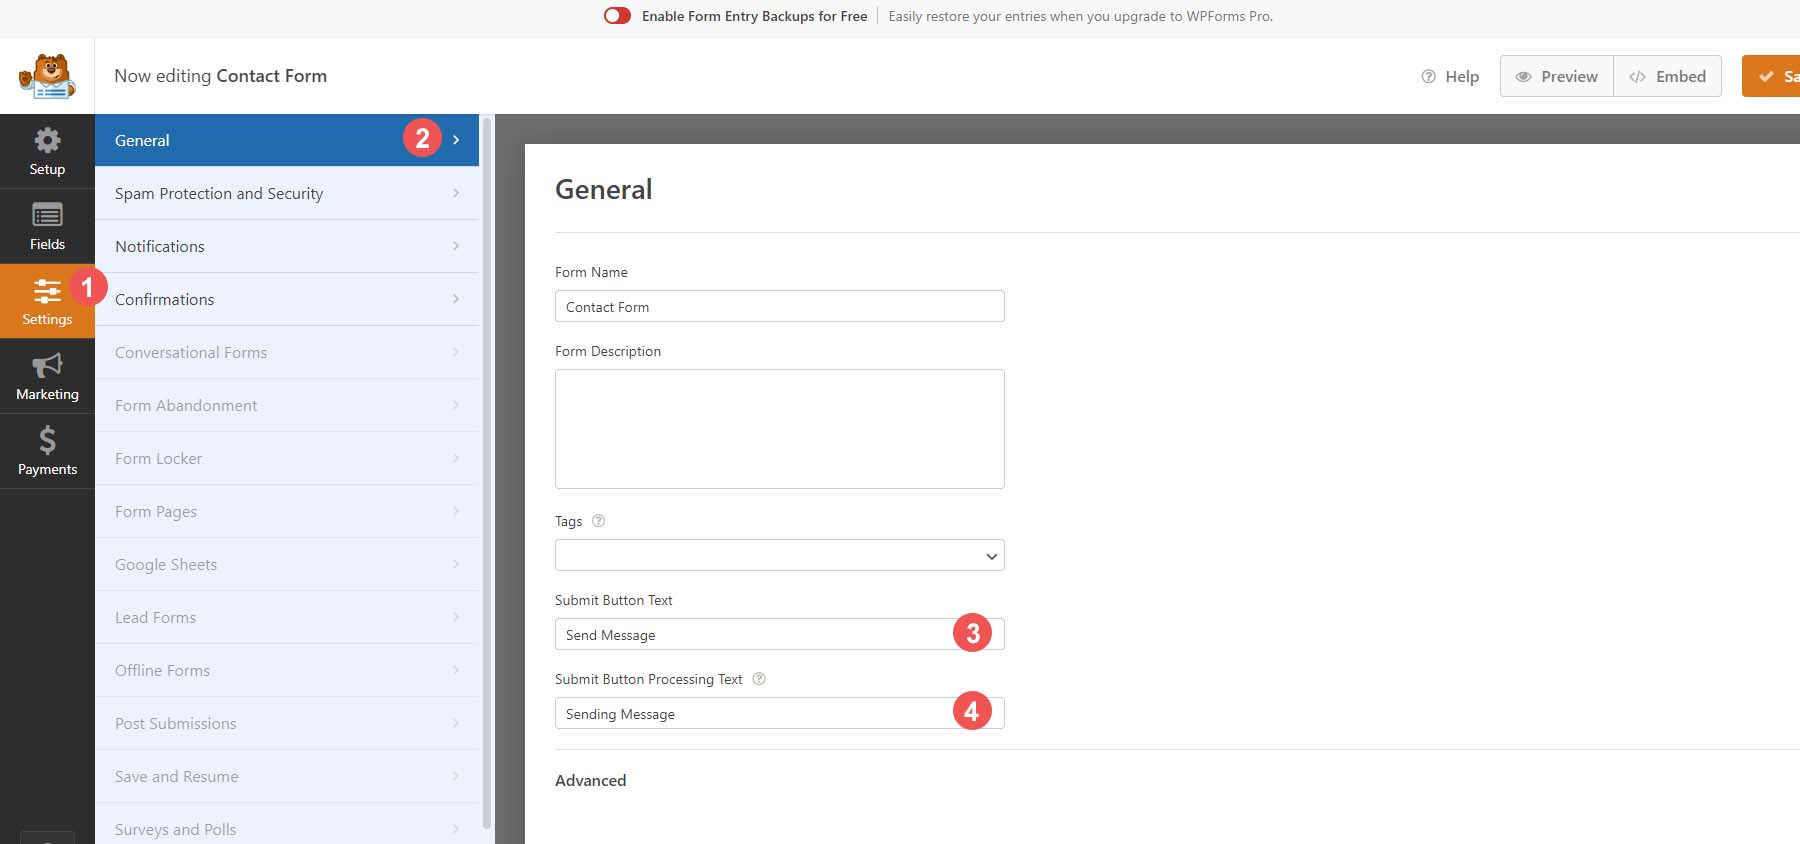
To adjust our form settings, click on the Settings icon from the left side of the form builder. Then, click on the General tab. This tab allows you to edit the form’s general settings, such as its name, description, tags, etc. We will go ahead and change the text on our submit button. Scroll down to the Submit Button Text text box. Then, enter Send Message.
Additionally, we’re going to change the processing text for our form. Add your chosen text to the text box. In our case, we edited it to Sending Message.
WPForms has built-in security; however, if you have another provider you’d like to use, you would use the Spam Protection and Security tab to integrate your chosen spam and security provider with your form. We’ll use the native provisions WPForm has in place for our form now.
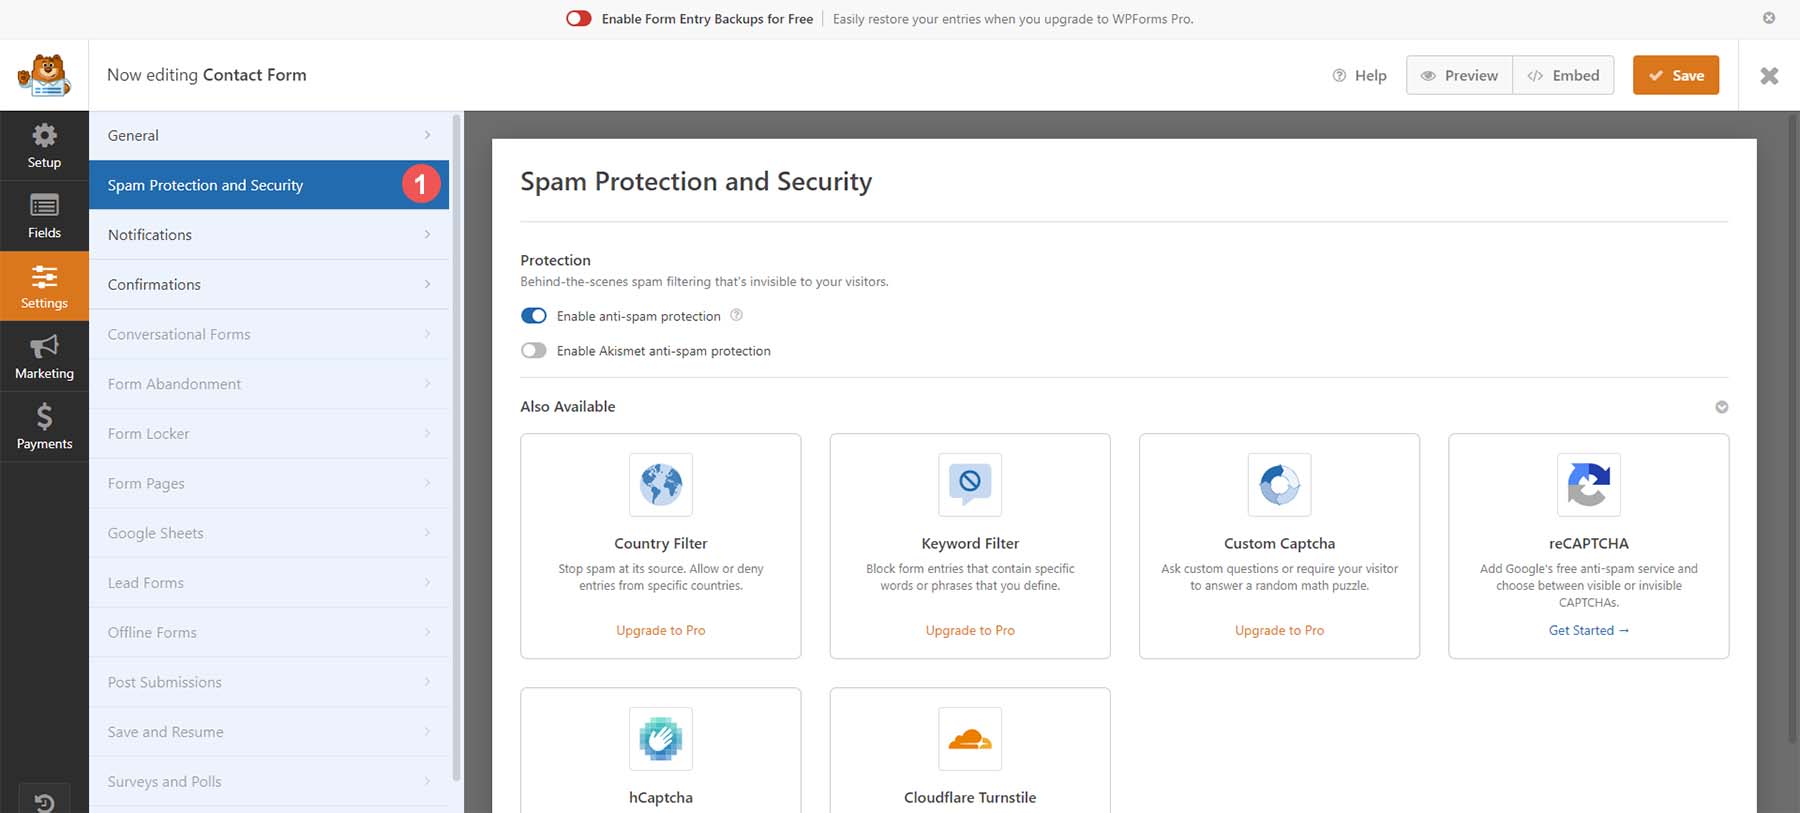
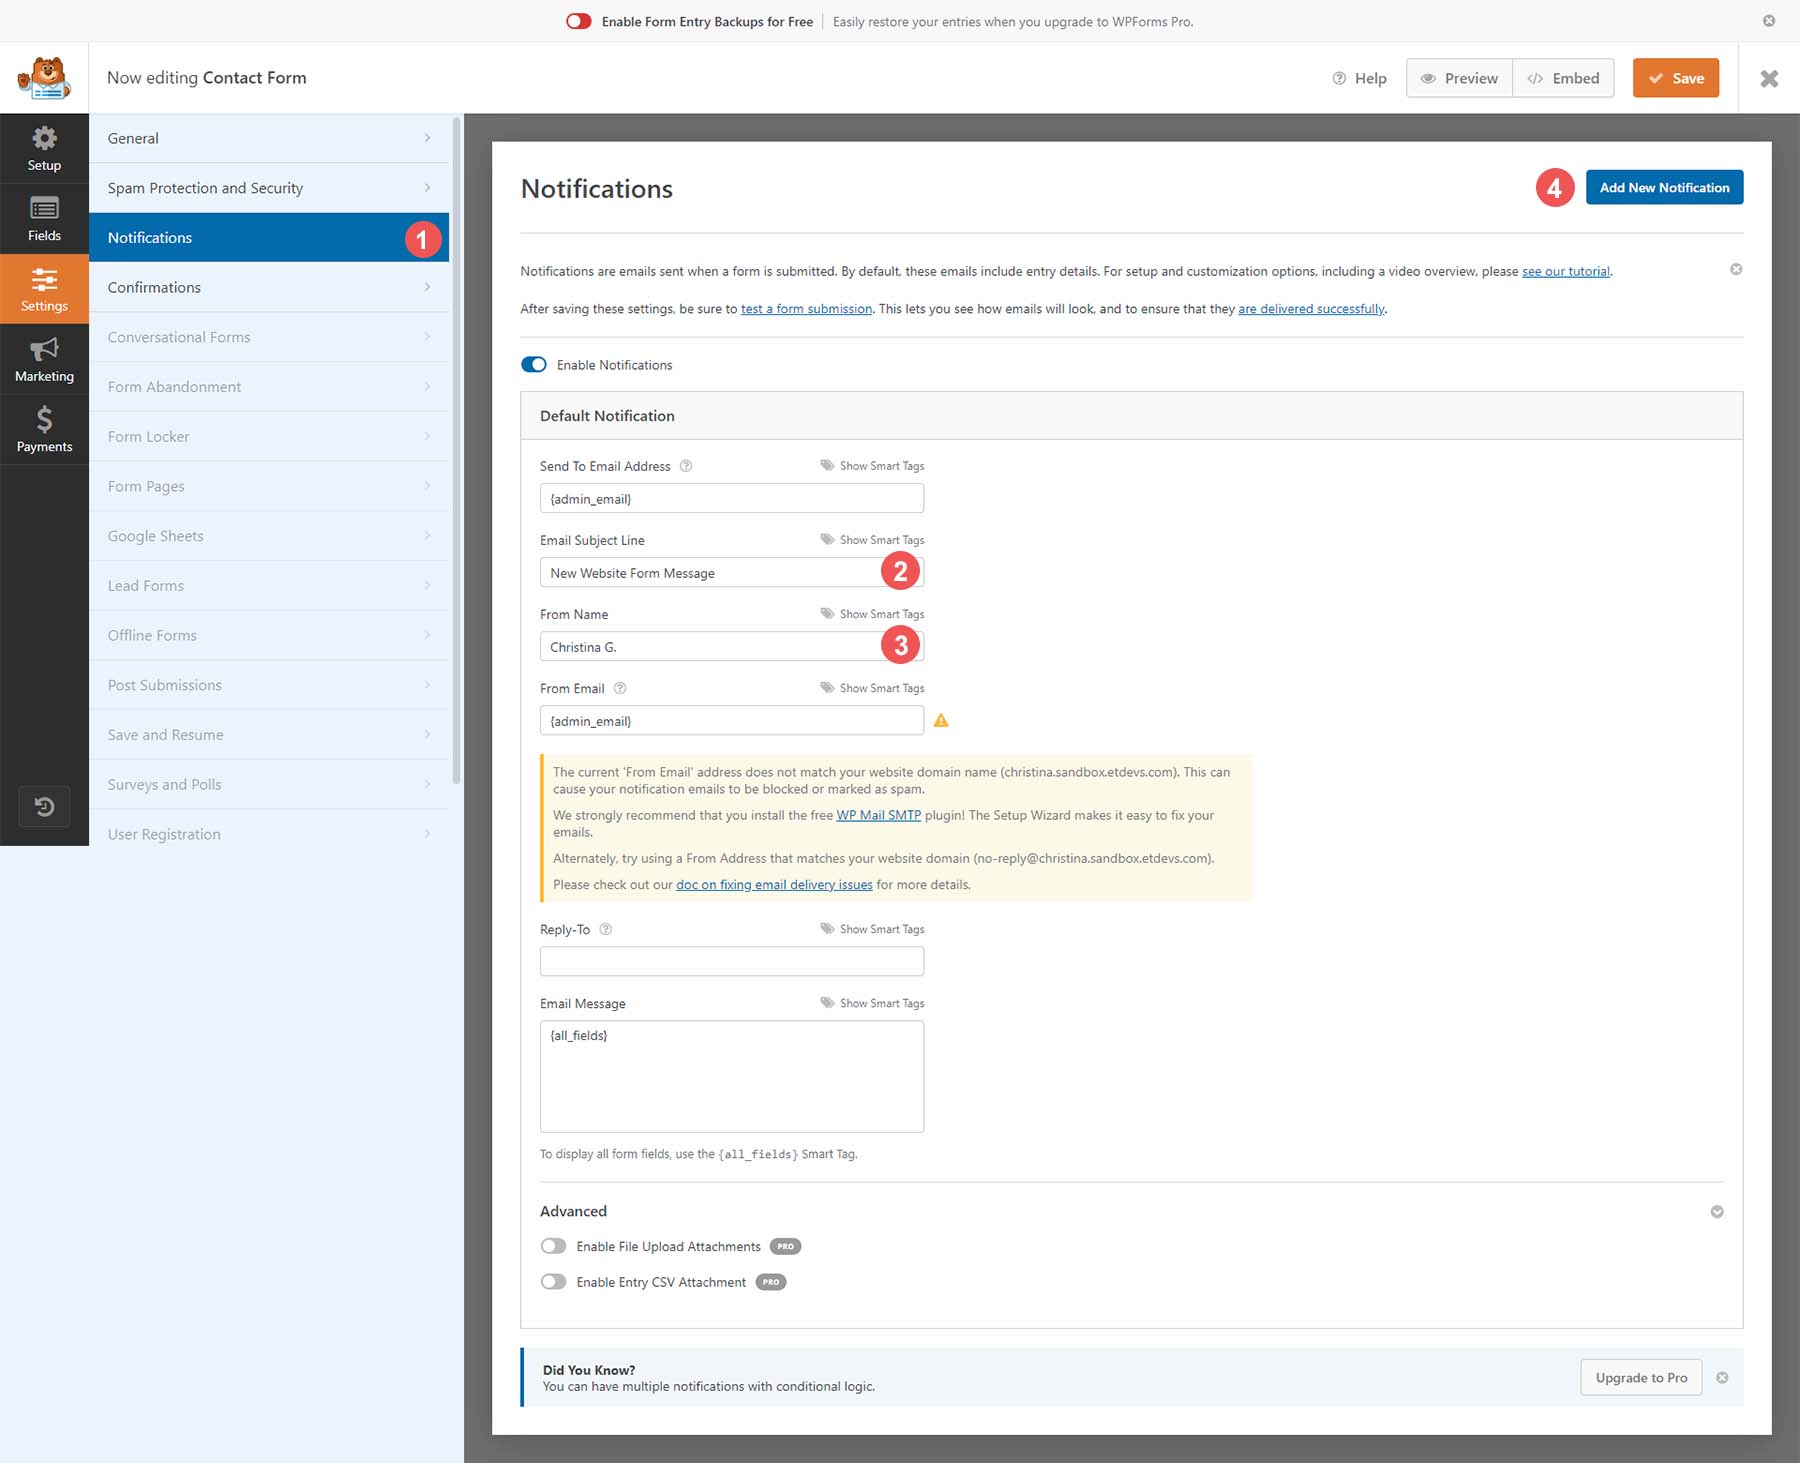
Now, let’s add some notifications to our form. This means we’ll receive an email when a visitor comes onto our website and sends us a message through our form. To enable this, first, click on the Notifications tab. Then, let’s change the Email Subject line to New Website Form Message. Also, let’s adjust the From Name to a name we’ll recognize in our email inbox. With the pro version of WPForms, multiple notifications can be added in the future.
Finally, let’s send our website visitors a confirmation that we’ve successfully received their form entry. To do this, click on the Confirmation menu option. Then, adjust your confirmation message in the textbox. You can also redirect users to another page on your website or show another page in addition to showing an on-screen message.
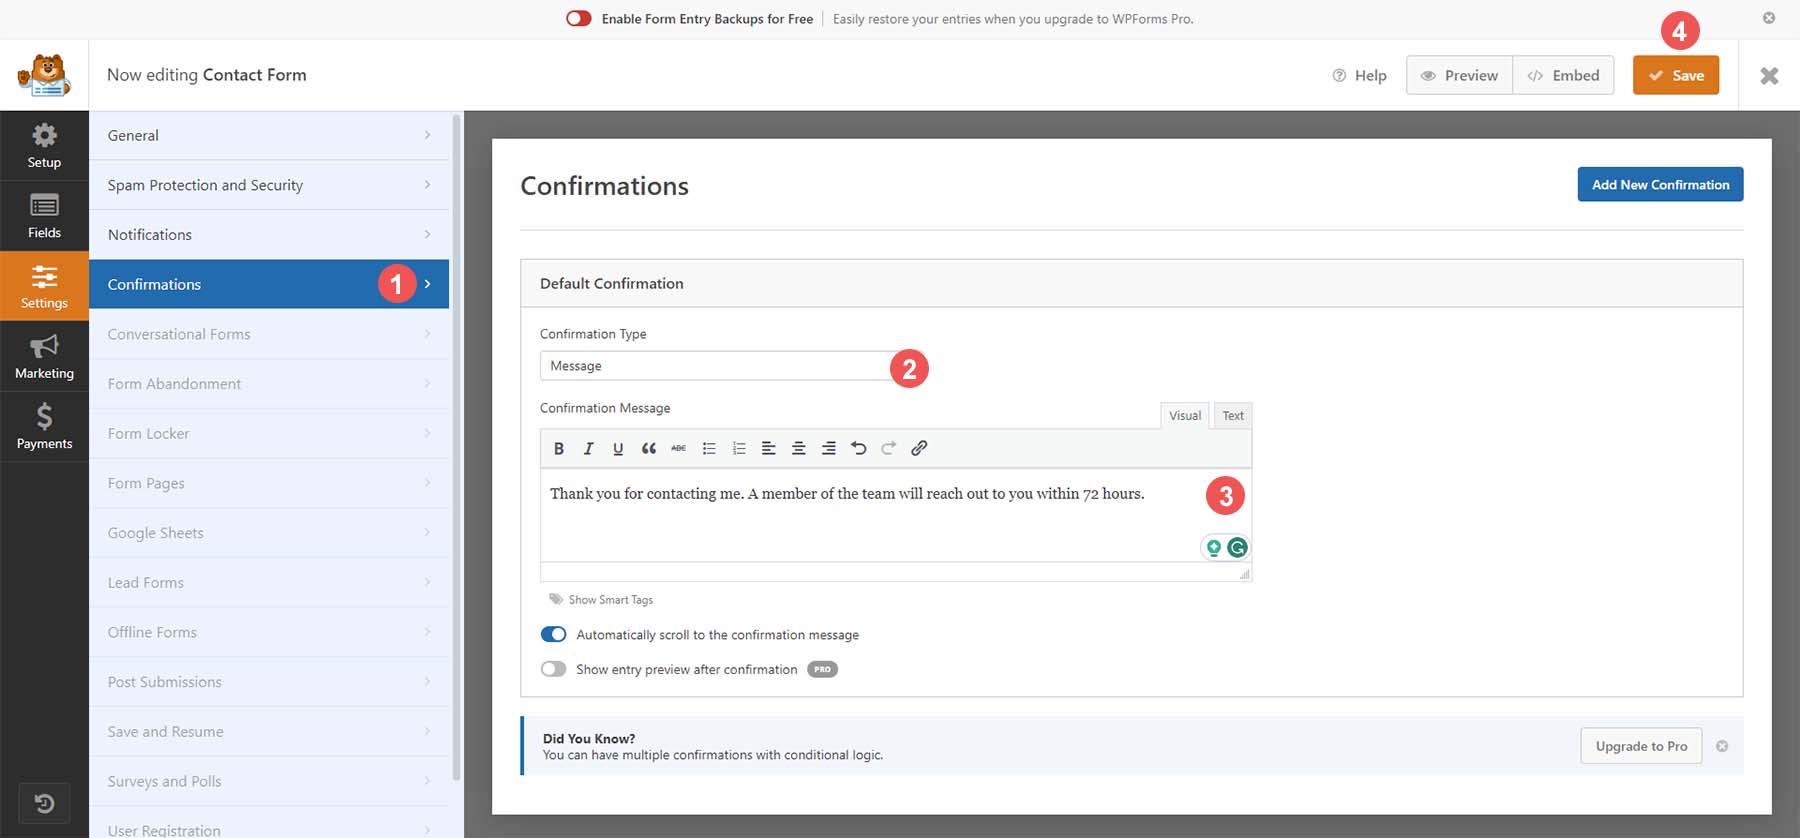
After making all these changes to your form, click the orange Save button at the top right-hand corner of the screen. With our form created, let’s add it to our page!
Adding Your Contact Form to a WordPress Page
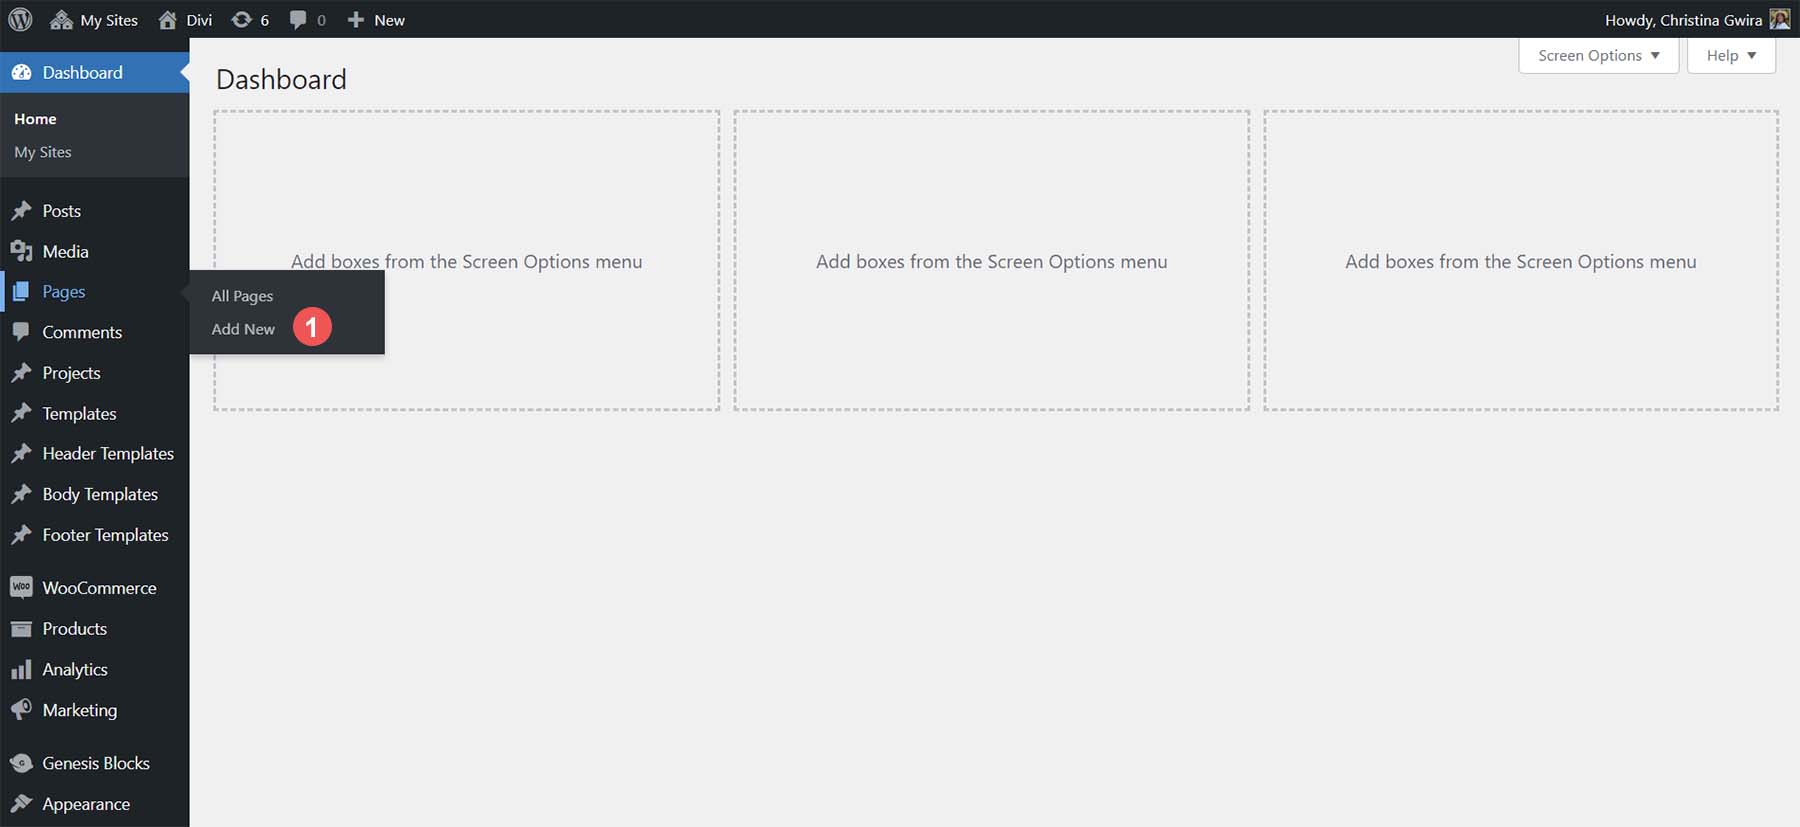
To add your form to your page, create a new page on your website or edit an existing page. Let’s create a new page for our contact form. First, hover over the Pages menu option, then click Add New.
After we are directed to the default WordPress page editor, give your page a title. Then click the black plus icon to open the library of available blocks. Search WPForms and select the WPForms block.
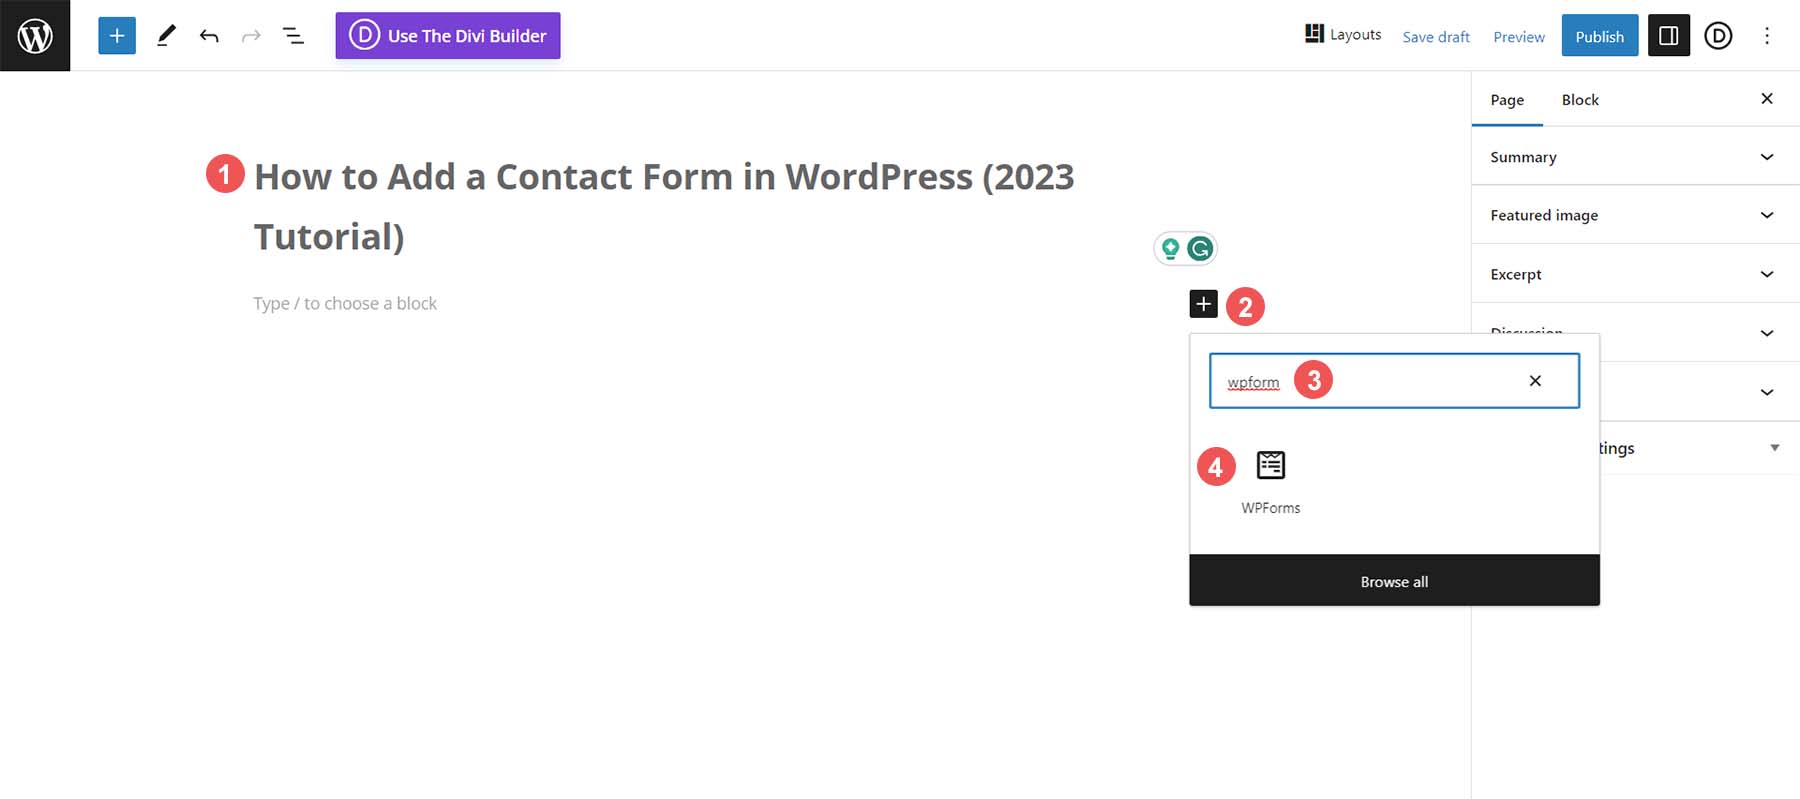
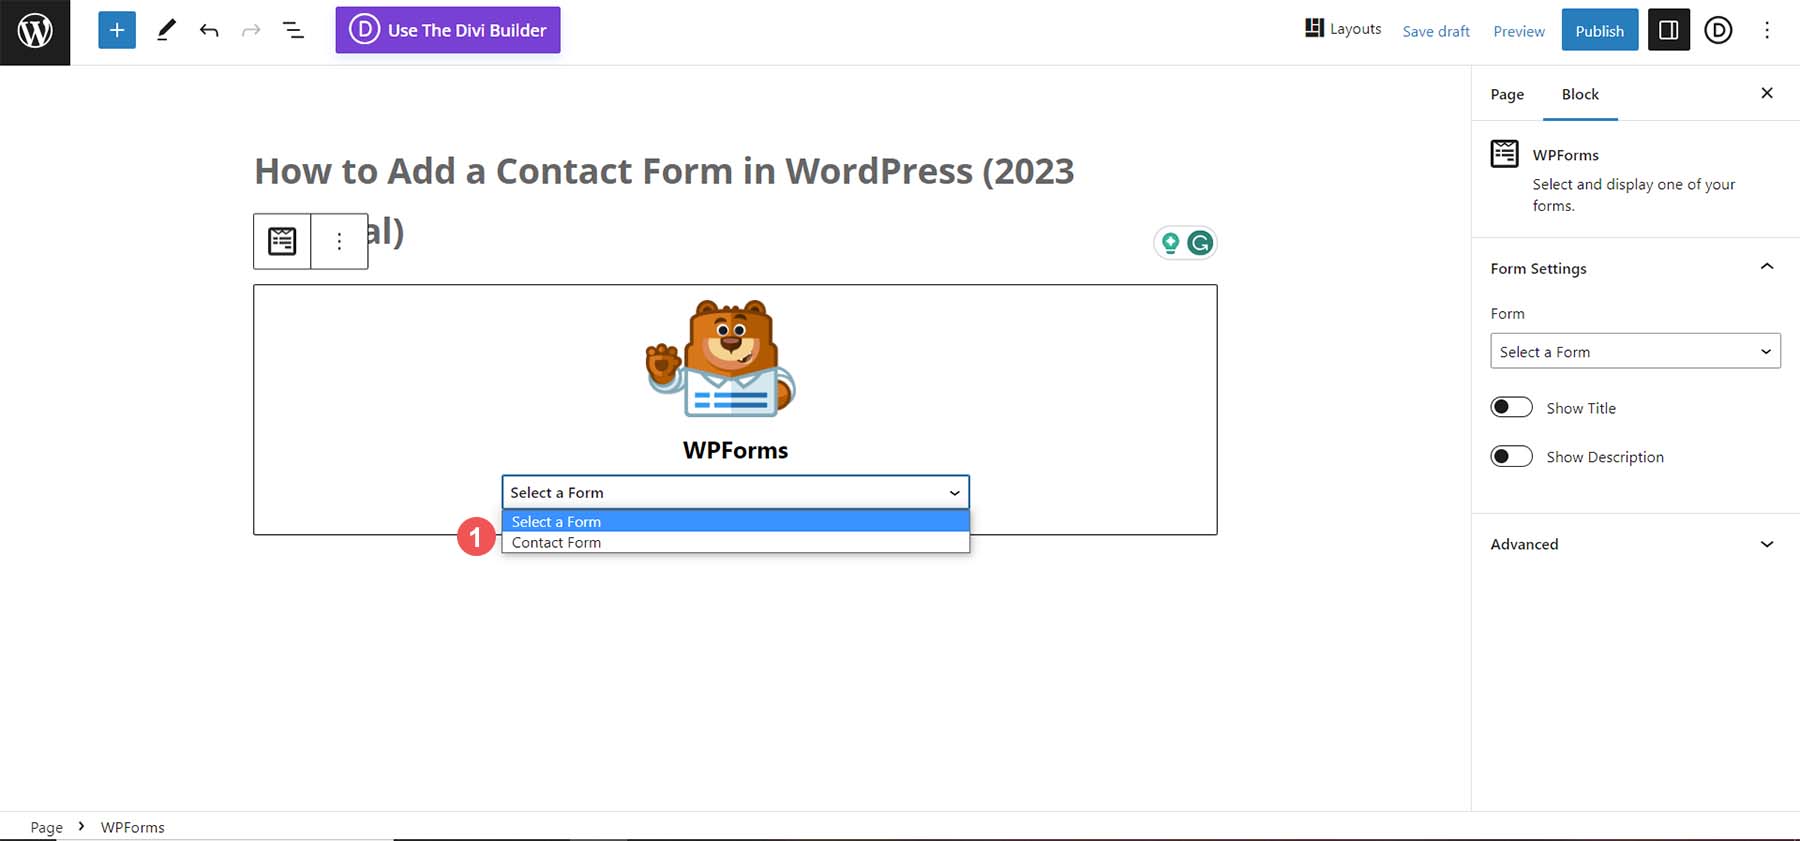
Select your form from the dropdown of forms available.
With your form selected, we can start styling it from within the Block Editor.
Styling Your Form
WPForms makes it very easy to style your contact form. While you can use CSS, you can also use the simple tools within the Block Editor to edit and style your form.
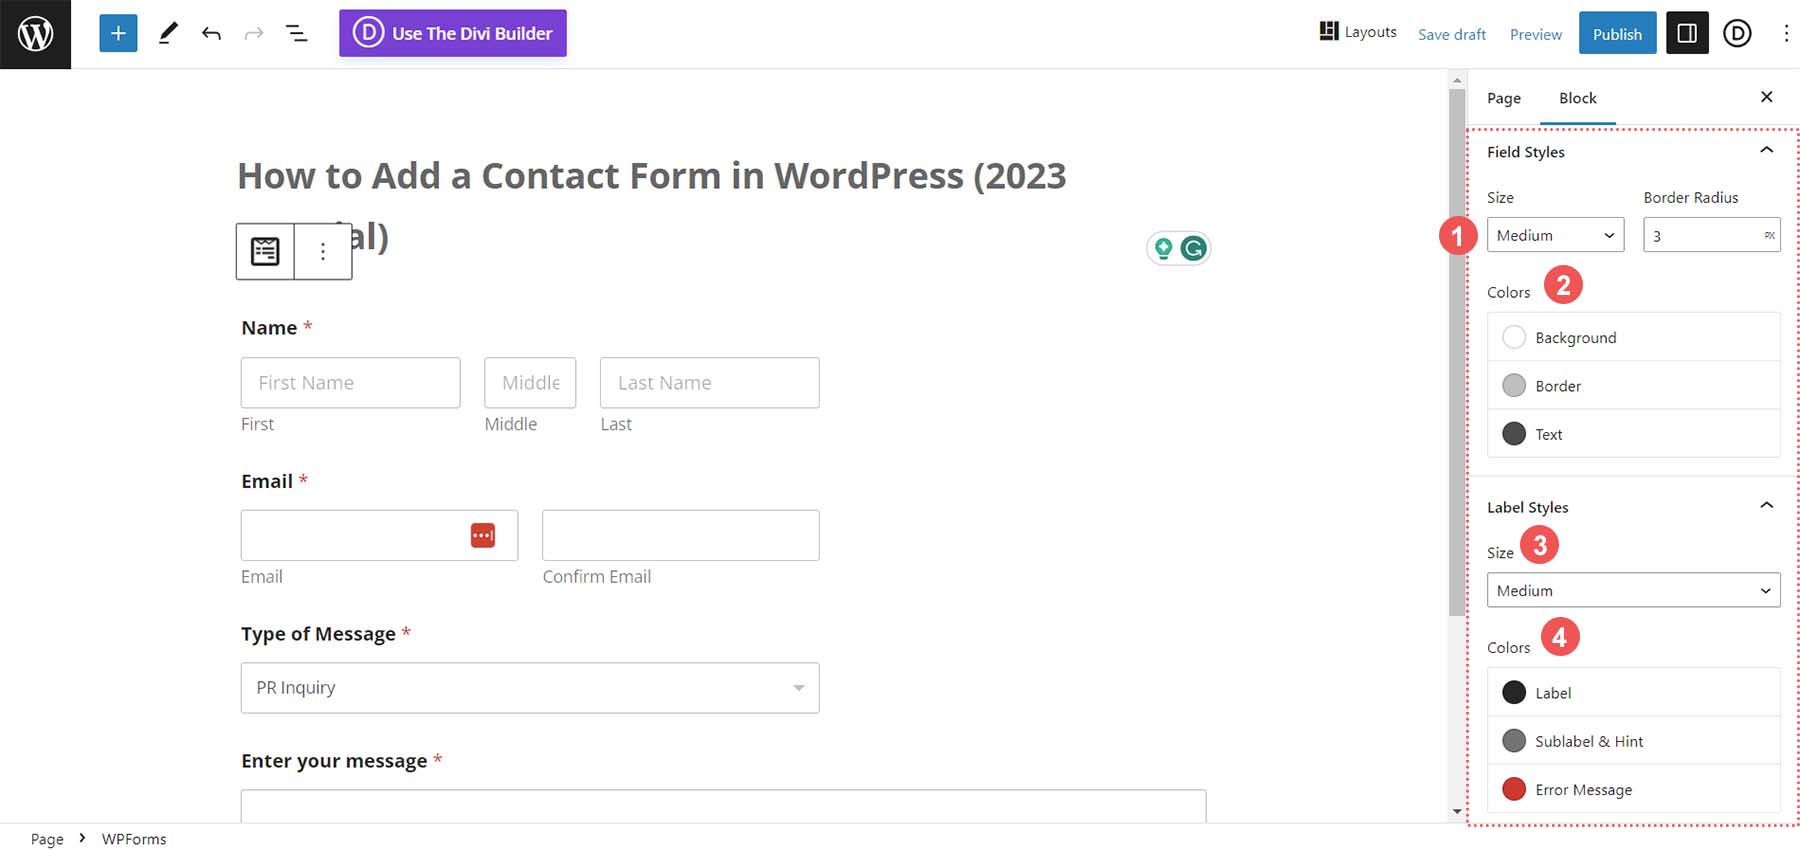
Within the editor, you can change the color of form fields, form field size, and much more with just a few simple clicks. This is what our form looked like before adding our styling edits:
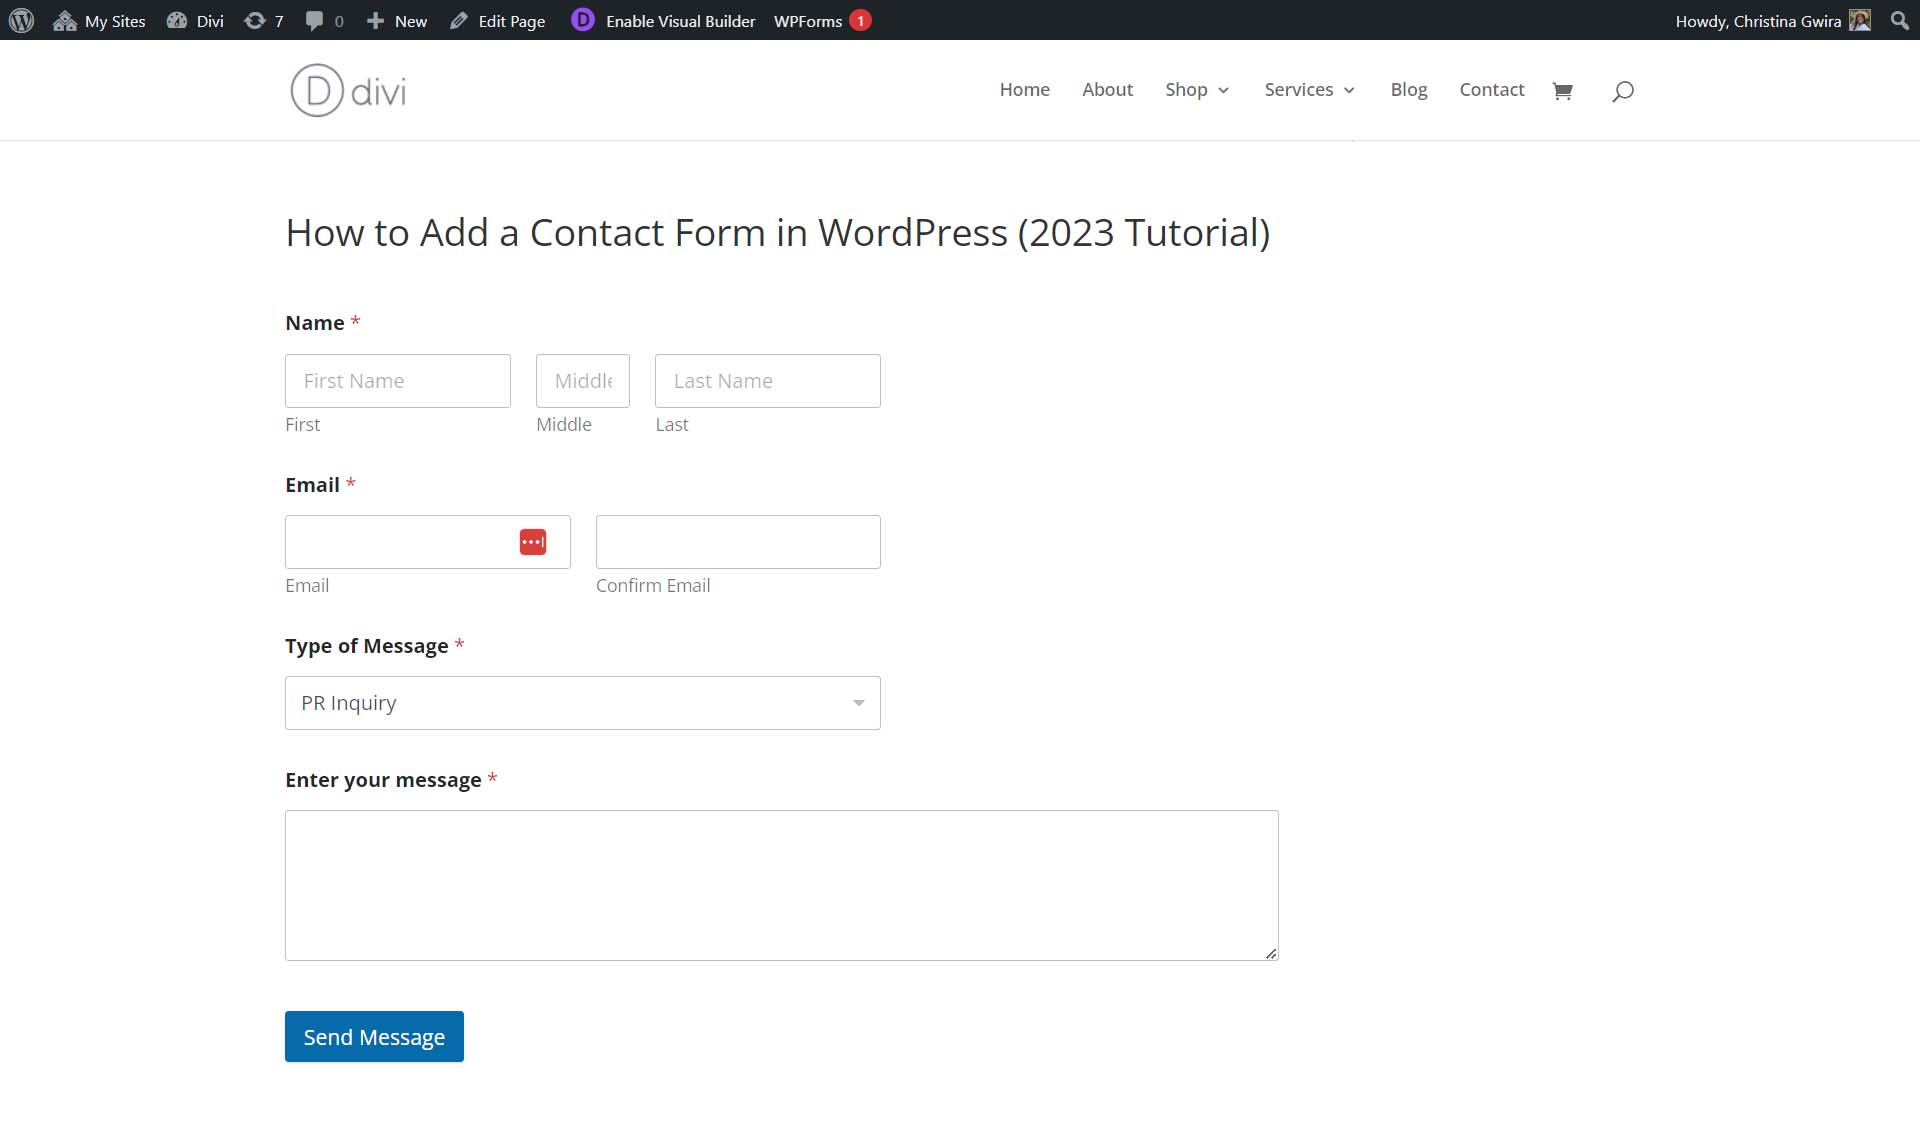
After styling, this is what our form looks like. Notice the submit button has changed color, and edits have been made to the border of the form fields. Don’t forget we can also assign CSS classes to each aspect of our form and use CSS to customize our form further.
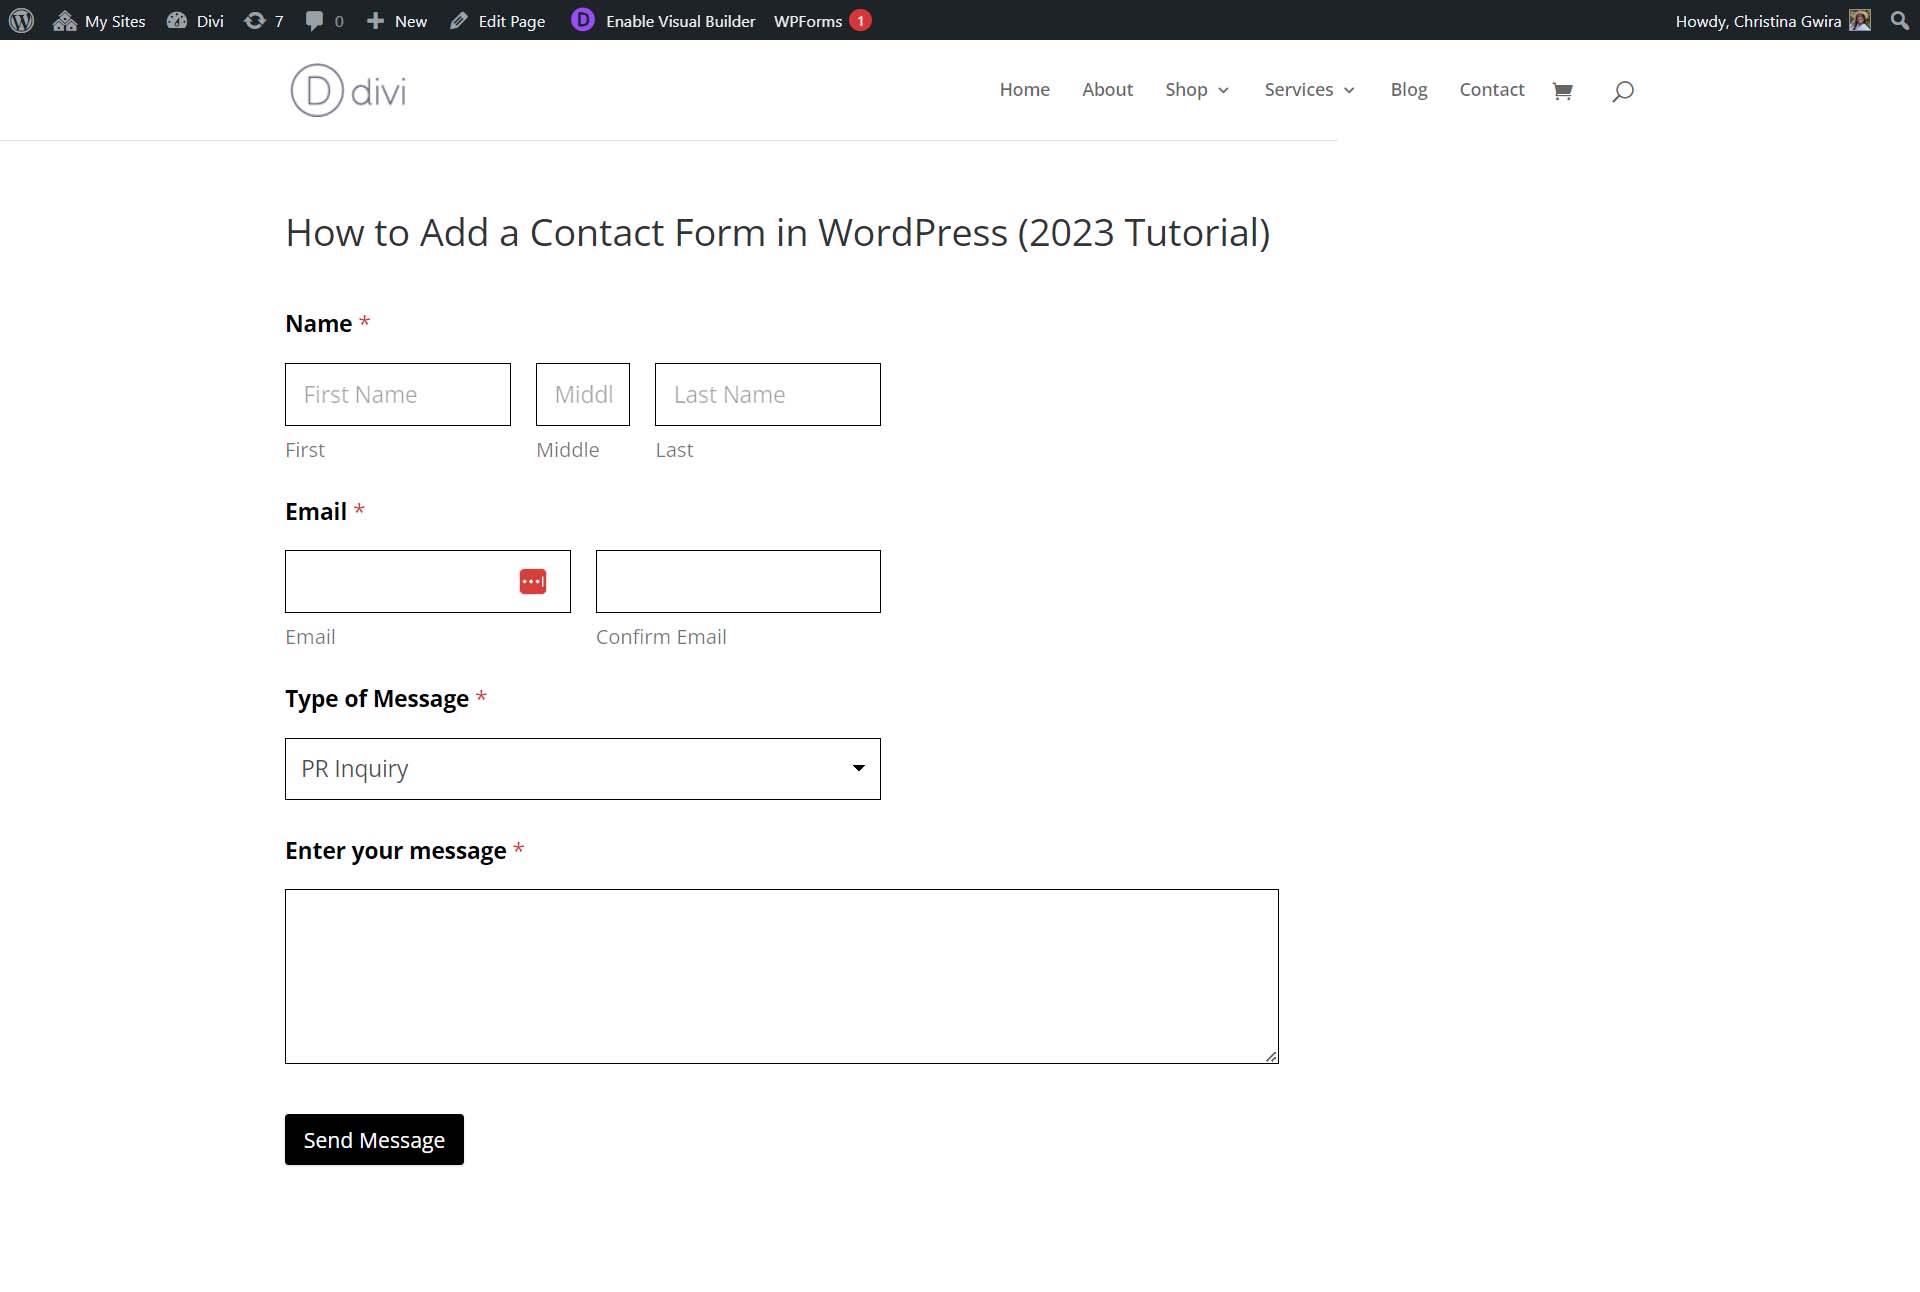
With our form customized and our fields in place, we’ve successfully created our first WordPress form! Here are some tips and tricks you should remember while building your contact form.
How to Get the Most Out of Your Contact Form
Contact forms allow you to add a dynamic connection with visitors to your site. However, there are some tips you should remember as you plan on building your site.
Think Outside the Box
Though we made a simple form in this tutorial, WPForms and other contact form plugins have hundreds of templates you can use to create a wide array of forms. Forms aren’t just used to collect contact information but can be vital to successful your business. You can create surveys, take polls, and generate quotes for clients with many WordPress form builders. Using a contact form to collect product personalization requests is even possible. Also, don’t be afraid to get creative in the way that you use forms on your website.
Keep Your Form Secure
Spammers will use any means to achieve their tasks; one method is online contact forms. However, a security feature like Akismet or Recaptcha can help keep your form content and email address secure. Don’t forget to keep your form security tight as you add forms to your website.
The Power of Integrations
Integrations are where using a native WordPress contact form shine. You can create custom email subscription forms that automatically populate your email marketing solution (like Mailchimp). Your form can be connected to your CRM, allowing you to nurture leads effectively. WordPress contact forms instill trust in your customers as they look and feel like your website. Your form becomes a powerhouse that populates different aspects of your business while keeping your processes seamless and streamlined.
Customize Your Form Notifications and Emails
Remember to customize your notifications and emails if you’re sending notifications to yourself or your visitors. Adding your brand colors, changing boilerplate text, and more makes your website visitor feel trusting of your brand. Additionally, if you’re redirecting people to different pages after form submission, ensure these pages give your customers all the information they need to embark on their next steps with your website.
Think About User Experience
Building a conversion-optimized form ensures that your visitors successfully fill out and submit your form. Creating straightforward and easy-to-understand forms helps guide visitors to a successful form submission. Consider adding tooltips, descriptions, directions, and placeholders that inform your customers about your form’s different fields and sections, providing them with a seamless and frictionless process to completing your form.
Consider Accessibility
While not often discussed, accessibility is approaching the forefront of web design. Consider how other users may interact with your forms through alternative means. Ensuring that labels, ARIA, tab sequences, and more are in place helps those who may use the internet differently also to use your website and ultimately experience the interactive element of your website in a way that works best for their needs.
More Contact Form Plugins and Platforms
Here are some alternative contact form plugins and platforms to test out.
- Formidable Forms: A popular form builder that has a clean drag-and-drop interface, more than 15 premium add-ons, creates advanced calculators, and more
- Gravity Forms: Another WordPress form plugin that has a library of more than 30 form field types, payment processor integrations, and complex form templates such as quizzes, surveys, and more
- Ninja Forms: Integrated with platforms like AWeber and CampaignMonitor, this form plugin boasts over 40 premium add-ons, making it a great form builder for those who value integration.
- Contact Form 7: A powerful, free WordPress form plugin with a plethora of integrations from Mailchimp to Stripe
- Divi: The most powerful WordPress theme has a great Contact Form module that makes creating branded, mobile-responsive forms on your website a smooth process
- Google Forms: Another free form builder, Google Forms comes with every Google account and is a powerful builder with excellent analytics, allows for multi-page forms, and more.
- Typeform: This form builder has become popular over the years due to its beautiful UI design, form animations, and integrations. It offers a unique way for users to engage with the form in a conversational way.
- Jotform: One of the first online form builders, Jotform has had many changes and remains one of the most popular free online form builder platforms.
Conclusion
A contact form is a powerful tool that every website should have. Not only is it a way for your clients to contact you, but it’s a way to add an interactive element to your website. With a plugin like WPForms, which comes with a drag-and-drop builder, crafting highly-functional and beautiful forms is simple. Integrations, notifications, and security are features that make building a native WordPress contact form a mainstay in the website-building process. To further your research, check out our list of the best contact form plugins you can add to your following website. How do you add contact forms to your website? Is there a plugin that you like that you’d want us to learn more about? Let us know in the comments section down below!
Featured Image via Viktoria Kurpas / shutterstock.com
The post How to Add a Contact Form in WordPress (2023 Tutorial) appeared first on Elegant Themes Blog.
The Tech Zone
Comments
Post a Comment